
How to Record a PowerPoint Presentation with Narration
Can be helpful in creating a dramatic narrative
Microsoft PowerPoint has a built-in recording tool that allows you to narrate your presentations using recorded audio. You can export and share recorded presentations as video files.
This tutorial covers everything about recording PowerPoint presentations on Windows and Mac computers.

Record PowerPoint Presentation with Narration
Open the PowerPoint file/presentation you want to record and follow the steps below.
Record PowerPoint Presentation on Windows
- Select the slide you want to start recording from on the slide thumbnail pane.

- Head to the Record tab on the ribbon and select the Record button to start recording from the current/selected slide.

To record from the first slide, select the down-facing arrow icon below the Record button and select From Beginning .

You can also record a presentation from the Slide Show tab. Select Slide Show on the ribbon and select Record , From Current Slide , or From Beginning .

That’ll open PowerPoint’s presentation recorder in a fullscreen window.
- Select the Record icon and start speaking after the three seconds countdown.

PowerPoint records the presentation window and captures your voice and webcam feed as you navigate the slides. Select the left-facing and right-facing arrows to move to the previous and next slides in the presentation.
Record PowerPoint Presentation in macOS
- Open the Slide Show tab and select Record Slide Show .

- Select the Record button on the toolbar to start recording your narration.

Use your keyboard arrow keys to move back and forth between slides. Press N or Space Bar to move to the next slide or animation in the presentation. Press P or Backspace to return to the previous slide or animation.
Select Tips in the top-left corner for more keyboard shortcuts and other presentation tips.

Note: The narration tool doesn’t record slide transitions. When moving between slides, wait for the destination slide to appear on the screen before speaking.
PowerPoint Recorder Control/Settings
You’ll find a handful of controls and options on the recording tool. We’ll show you how to use these controls to include voiceovers or audio recordings in your presentation.

Using Presentation Pointer Tools
PowerPoint provides several tools to mark up your slides when narrating your presentation. There’s a pen tool, eraser, laser pointer, and highlighter.
With the Pen tool, you can draw on slides during narration/recording. Press Ctrl + P (Windows) or Command + P (Mac) to use the pen tool. You can also select the Pen icon to convert the pointer to a pen.

The Laser pointer tool converts your cursor to an onscreen laser. Use the laser pointer to draw attention to something on a slide/presentation.
Press Ctrl + L (Windows) or Command + L (Mac) to use the laser pointer. There’s also a Laser pointer icon on the toolbar.

Pressing Ctrl + I (or selecting the Highlighter tool ) converts your cursor to a highlighter.

Use the Eraser tool to remove inks and highlight from slides. Select the Eraser icon or press Ctrl + E and select the ink to erase.

On macOS, select the Erase Pen icon (or press E ) to erase all drawings and highlights on the slide.

You can change the pointer tools ink from the color selection boxes. However, one major limitation is that you can’t change the size of these pointer tools.
Pause and Resume Your Recording
In Windows, press I on your keyboard or select the Pause button in the top-left corner to pause your recording.

Press I again or select the Record icon to resume the recording.

If you use a Mac, select the Pause icon in the top toolbar to pause the recording.

Unmute or Mute Microphone
Check that your microphone is unmuted before recording. Select the microphone icon in the bottom-right corner to mute or unmute your mic.

PowerPoint for Windows allows you to mute and unmute your microphone in real time while recording video/audio narrations. The macOS version of PowerPoint only lets you configure your camera and microphone settings before recording.
Switch Microphone or Camera
Want to record your presentation with an external microphone or camera? Press Ctrl + M or select the audio/camera settings icon in the top-right corner and choose your preferred microphone/camera.

In macOS, select the microphone icon to mute or unmute your microphone. Select the arrow-down icon next to the microphone or camcorder icons to switch input devices.

Enable and Disable Camera
The recorder displays your camera or webcam feed in the bottom-right corner of the presentation slides.
Select the camcorder icon to remove your webcam feed from the recording. Select the icon again to display your webcam feed in the presentation.

You can also use the Ctrl + K keyboard shortcut on Windows computers to enable or disable your camera.
On Mac computers, you’ll find the video control icon on the top toolbar.

Note: The recording tool greys out the camcorder icon if your microphone is turned off.
Enable or Disable Camera Preview
PowerPoint allows you to disable the camera preview without turning off your camera or webcam.
Press Ctrl + J (Windows) or select the Camera Preview icon in the bottom-right corner to disable or enable the camera preview.

End a Recording
Press S on your Windows keyboard or select the Stop icon to end the recording.

Replay or Preview Your Recording
When you end a narration, press V on your keyboard or select Replay to preview or watch the recording.

The recorded narration will include all pen inks, highlights, and laser pointer gestures made during the presentation.
You can also preview/replay the narration outside the recording tool. Open the Slide Show tab and choose to watch the playback From Beginning or From Current Slide .

PowerPoint allows you to preview the playback on individual slides. A speaker/audio icon appears in the bottom-right of PowerPoint slides with narrations.
Choose the slide you want to preview, hover your cursor on the speaker icon in the bottom-right corner, and select Play .

Delete Current Narration/Recording
Did you spot an error when previewing your presentation? Want to delete the current narration and start from scratch?
Select the Clear existing recordings icon and choose whether to Clear Recordings on Current Slide or Clear Recordings on All Slides .

On Mac, select the Bin icon to delete the entire narration/recording.

Close the Narration Tool
Select the X icon on the title bar to close the presentation narration tool and return to Powerpoint.

Select End Show in the top-left corner to close the recording tool on a Mac computer.

Delete Narrations from Slides
Want to delete the narration or timing on an individual slide or the entire presentation? Select the slide with the narration you want to delete and follow the steps below.
- Open the Record tab and select the down-facing arrow below the Record icon.
- Select Clear and choose to clear timing or narration on current or all slides.

Export Recorded or Narrated Presentation
You can export a narrated PowerPoint presentation as a video file. The video output includes ink strokes, recorded audio/video, laser pointer gestures, and webcam/camera recording.
- Open the Record tab and select Export to Video .

Alternatively, open the File menu, select Export on the sidebar, and select Create a Video .

- Choose the quality of the video export in the first drop-down box—Ultra HD (4K), Full HD (1080p), HD (720p), Standard (480p).

- Choose Use Recorded Timings and Narrations in the next drop-down box and select Create Video .

- Give the recorded presentation a file name and select Save .

Narrate Your PowerPoint Presentations
The Microsoft PowerPoint web app doesn’t have a recording tool. As a result, you can only record presentations with narrations using PowerPoint for Windows or Mac.
You might meet issues recording a slide show if you use an outdated version of PowerPoint. Also, the recording tool on older versions of PowerPoint has a different interface and lacks some controls. Update PowerPoint and restart your computer if you cannot record a slide show.

Sodiq has written thousands of tutorials, guides, and explainers over the past 4 years to help people solve problems with Android, iOS, Mac, and Windows devices. He also enjoys reviewing consumer tech products (smartphones, smart home devices, accessories, etc.) and binge-watching comedy series in his spare time. Read Sodiq's Full Bio
Read More Posts:

Leave a Reply
Your email address will not be published. Required fields are marked *
How-To Geek
How to make a microsoft powerpoint presentation into a video.
Share your presentations with anyone, even if they don't have PowerPoint!
Quick Links
Why convert a powerpoint to video, convert a powerpoint presentation to a video.
Microsoft PowerPoint presentations are great, but they are not as easily accessible as videos. Luckily, you can convert your presentations to videos with a built-in option. We'll show you how.
There are many reasons to turn a presentation into a video. Maybe you want to send someone a presentation but they don't have PowerPoint installed. Or, maybe you want to upload your presentation to a site that only accepts videos.
PowerPoint has a built-in option to convert presentations to videos. When you perform this conversion, all your original animations, transitions, and media items are preserved. Your resulting video also includes all recorded timings , narrations , ink strokes, and laser pointer gestures (though you can choose not to include these if you want).
Related: How to Burn Your PowerPoint to DVD
To turn a PowerPoint presentation into a video, first, open your presentation with the PowerPoint app on your Windows or Mac computer.
In the top-left corner of PowerPoint, click the "File" option.
From the sidebar that opens after clicking the "File" option, select "Export."
In the "Export" menu, click "Create a Video."
To the right of the "Export" menu, you will now see a "Create a Video" section. In this section, you will define the options for your video file.
First, choose the quality for your video by clicking the "Full HD" option.
You will see multiple video quality options. Select the one that you think works the best for you. Know that the higher the quality you select, the larger the file size of your video will be.
To include the recorded timings and narrations in your video, then beneath the video quality menu, click the "Don't Use Recorded Timings and Narrations" option.
Select the "Use Recorded Timings and Narrations" option. If this option is grayed out, that's because you don't have any recorded timings or narrations in your presentation.
You will now specify how long each slide appears in the video. Click the "Seconds Spent on Each Slide" box and enter the duration in seconds. By default, this duration is set to 5 seconds.
Finally, at the bottom of the "Create a Video" section, click "Create Video" to start making your video.
Your computer's standard "save" window will open. Here, select the folder to save your video in, type a name for your video, and click "Save."
PowerPoint will take you back to the main interface. At the bottom of this interface, you will see the progress of the conversion.
When your video is made, you will find it in the specified folder on your computer.
And that's how you make your presentations available to a wider audience by converting them to a video format!
Need your video in another format? Use VLC to convert your video to other formats.
Related: How to Convert a Video or Audio File Using VLC
- Slidesgo School
- PowerPoint Tutorials
How to Add, Record or Edit Audio or Music in PowerPoint

Do you want to set the right mood and keep your audience engaged and entertained during your next presentation? In this new Slidesgo School tutorial, you’ll learn how to add audio or music to your presentations . You’ll also find out how to edit them to your liking .
Adding Audio from your Computer
Recording audio from powerpoint, editing audio, adding online audio, adding music from youtube, playing several clips in succession during your presentation.
- Before we begin, please note the following: in PowerPoint 2010 or older, you should use .wav or .wma files in Windows, and .wav files in Mac. If you’re using a newer version, we recommend that you work with AAC .m4a files.
- Open your PowerPoint presentation and select the slide where you want to add audio.
- On the Insert tab, in the Media group, click the Audio drop-down arrow. You’ll see two options: the first one allows you to add audio from your PC, whereas the second one allows you to record audio (you’ll need to have a microphone set up in your computer).
- Select Audio from My PC. A new window will open, where you have to locate the audio file you want to add to your presentation.
- Once located, click the drop-down arrow next to Insert. You’ll see two options:
- If you choose Insert , the audio will be directly inserted into your presentation, increasing the size of the document.
- If you choose Link to File , a link to the file will be created, reducing the size of the document. However, there could be issues if you use the presentation in a different computer, forcing you to link the audio file to the presentation again.
- Select the option that best suits your needs.
- If you want to export any audio included in your PowerPoint presentation, right-click its icon → Save Media As (you can only do this with audio inserted from your PC).
- Please note that if you want to play a different audio in each slide, you’ll need to add the audio files one by one. You’ll also need to uncheck “Play Across Slides”. You can refer to the “ Editing Audio ” section in this tutorial if you want more information.
- On the Insert tab, in the Media group, click the Audio drop-down arrow. Select Record Audio. A new window will open.
- Enter the name of the audio file you’re about to record.
- Press Record to start recording. To stop, press the Stop button. To play what you’ve recorded, press Play.
- If you’re happy with what you’ve recorded, click OK. If that’s not the case, click Cancel.
- Select the audio whose format you want to adjust. A new set of tabs, called Audio Tools, will appear on the toolbar.
- In the Bookmarks group, you’ll find an option to add bookmarks, which will be visible in the timeline. These can be helpful if you want to quickly find the main points in your audio during the presentation.
- In the Editing group, there are options to add a fade in and a fade out. You’ll also find the Trim Audio option. If you click it, a new window will open, where you can set the start point and the end point of the audio clip.
- In the Audio Options group, you’ll find the following options to adjust the behavior of the audio clip:
- Volume: It allows you to set the volume of the clip.
- Start: Click the drop-down arrow to choose how you want the audio to start. If you’re using Office 2010, you’ll also find an option here to play the audio clip during the entire presentation.
- Loop until Stopped: Once the audio clip finishes, it starts again indefinitely until you stop it.
- Play Across Slides: If you enable this, the audio clip will be played during the entire presentation. If “Loop until Stopped” is enabled too, it won’t stop playing until you reach the end of the presentation.
- Hide During Show: Check this option if you want to hide the icon.
- Rewind after Playing: Check this option if you want the timer of the audio clip to go back to the beginning when it reaches the end.
- If you’re using newer versions of PowerPoint, you’ll find a group called Audio Styles. Choose “No Style” if you don’t want additional effects. Choose “Play in Background” if you want the audio clip to be played in the background during your presentation.
- You can change the icon of the audio clip. To do so, on the Format tab, in the Adjust group, click Change Picture.
- Insert an icon or a picture. We’ll use it to link the online audio. Please refer to the How to Add and Modify Icons tutorial to learn how to insert icons.
- Add the link to the online audio resource. If you don’t know how to do it, please refer to the How to Insert a Hyperlink in PowerPoint tutorial.
- Once added, click the icon of this audio. A new window will open, where you must click the Play button. Some audio platforms, such as Soundcloud, allow you to generate an autoplay sharing link. With that, you just need to click the icon to play the audio automatically.
- If you want to pause the playback, you’ll need to exit the presentation mode and do it manually.
- Insert the video containing the audio or music you want. If you don’t know how, please refer to the How to Add a Video in PowerPoint tutorial.
- Decrease the size of the video and place it outside the visible part of the slide.
- We need to set it to automatically play in presentation mode. To do this, on the Playback tab, in the Video Options group, click the Start drop-down arrow and select “Automatically”. If you need more information, please refer to the How to Add a Video in PowerPoint tutorial.
- Please note that the audio will stop when changing slides.
To create a playlist that plays across all slides during your presentation, you need to use an audio editing software, such as Audacity or Adobe Audition, and edit the clips so that they come one after another. When you’re done, export it as a single audio file, which you can now use in your presentation.
Do you find this article useful?
Related tutorials.

How to print PowerPoint notes
Crafting an impactful PowerPoint slideshow and delivering a captivating presentation are distinct skills. The first focuses on designing appealing visuals to convey a clear message, while the second involves employing effective presentation techniques to ensure the audience grasps the idea. The content of this article will help you with the latter part of this process, guiding future presenters on how to print PowerPoint with speaker notes to enhance your presentations success and effectiveness.

Discover Our Online Presentation Software for Free
We have great news for you today! If you’ve been a Slidesgo fan for years (or months, or weeks, or days, or mere hours, we welcome everyone!), you’ll probably know for now that our templates are available mostly in two formats: for use in Google Slides and PowerPoint.Google Slides is a free tool, since you only need a Google account in order to use it. PowerPoint, on the other hand, is part of the Microsoft Office suite, so it’s not a free program, but that didn’t stop it from being one of the most popular options in the world!What if we...

Webinar: Presentation Audit
With more than 15,000 templates released on Slidesgo and a user base composed of millions of people, we estimate that the total number of presentations created adds up to… um, a lot! Our team of professional designers work very hard to provide you with editable slides so that the only thing you need to do is, well, customize the elements to your liking. Starting from any given template, the results may vary a lot depending on the person who edited the contents.Have you ever wondered “Is my presentation good enough?” and wished that an expert on presentations looked at your template...

How to Change Slides Orientation in Google Slides
A change of perspective is always good! Do you want your public to look at your slides in a new way? Changing slides orientation will do the work. In this tutorial you’re going to learn how to go from horizontal slides, to vertical ones (and vice versa!).

How to Record in a PowerPoint presentation Audio & Video.
Recording audio and video in a PowerPoint presentation can improve the overall effectiveness and impact of your presentation because it can make it more interesting and keep your audience engaged.
Microsoft PowerPoint 2013 and later versions allow you to record your presentation with audio and video, so you can enhance your slides with voice narration or by recording yourself during the narration via the camera.
In this guide we show, how you can record your voice or yourself while presenting a Microsoft PowerPoint Presentation and how to insert an audio or video file to a Presentation. You will also learn how to save the presentation as a video file or as a PowerPoint Show after you have finished recording audio/video.
How to Record or Insert Audio or Video in a PowerPoint Presentation.
There are two ways to include audio and video in your PowerPoint presentation: record a slide show with audio from your microphone and video from your camera, or add external audio and video to your presentation from a file.
* Note: As mentioned above, to add sound and video to a PowerPoint presentation you should have Microsoft PowerPoint 2013, 2016, 2019 or PowerPoint for Office 365.
1. Record your Audio & Video to PowerPoint.
2. Insert External Audio or Video files to PowerPoint.
Method 1. Record your Sound and Video to a PowerPoint Presentation.
To record your voice narration and/or yourself while presenting the slides in a presentation:
Step 1. Configure Microphone & Camera Settings.
Before recording your audio/video to a PowerPoint presentation, make sure that your microphone and camera settings are properly configured.
To adjust your microphone and camera settings for optimal quality:
1. Press Windows + I keys to open Windows Settings.
2 . Go to System > Sound and under Input Settings select your microphone device and make sure the input volume is set to at least 80%

3. When done, go to Bluetooth & devices > Cameras > Connected Cameras and ensure that your camera is recognized by the system.

Step 2. Record Audio and Video to PowerPoint Slideshow.
Before you start recording audio/video in a presentation, it's important to know that audio cannot be recorded during animations and slide transitions. So, to avoid interruptions of your speech during the presentation, remember to leave a brief pause of 1-2 seconds in your narration at the beginning and end of each slide.
1. Open the PowerPoint presentation in which you want to record audio and video.
2. From the Slide Show tab (or the Recording tab), click the Record Slide Show button and choose either Record from Current slide or Record from Beginning, depending on which point you want to add audio/video.

3. The presentation will open in a recording window in full-screen mode.

4. Click the SETTINGS button at the top-right corner and ensure the correct microphone and camera devices are selected.

5. Use the Microsoft and Camera icons in the bottom right corner of the screen to turn off the input of the Microphone or Camera device if it is not needed during the presentation.

6. When you are ready, click the RECORD button to start recording your voice and/or camera input and present your slides.

7. Use the arrow keys to navigate through slides (forward only). Remember that you cannot go back or forward to a slide that already has a recording. This is to prevent accidentally recording over an existing recording.

8. If there are videos in your slides, click on them to start or stop the playback.

9. Use the Pen , Highlighter , or Laser icons from the bottom right corner to annotate your slides.
![clip_image026[3]](https://www.wintips.org/wp-content/uploads/2023/06/clip_image0263_thumb.png "clip_image026[3]")
10. Look at the bottom left corner to find out the time counts for the current slide and the entire presentation.
![clip_image028[3]](https://www.wintips.org/wp-content/uploads/2023/06/clip_image0283_thumb.png "clip_image028[3]")
11. If a slide already contains a recording, you will see a video preview or a speaker icon displayed at the bottom right corner.
- To re-record audio/video to a slide, click CLEAR and select Clear Recording on Current Slides .
- To delete all recordings, click CLEAR and select Clear Recordings on All Slides .
![clip_image030[3]](https://www.wintips.org/wp-content/uploads/2023/06/clip_image0303_thumb.png "clip_image030[3]")
12. To pause or stop recording using the Pause and Stop buttons.
![clip_image032[3]](https://www.wintips.org/wp-content/uploads/2023/06/clip_image0323_thumb.png "clip_image032[3]")
13. When finished Close the recording window (or right-click and select End Show ).
![clip_image034[3]](https://www.wintips.org/wp-content/uploads/2023/06/clip_image0343_thumb.png "clip_image034[3]")
Step 3. Preview your Recordings on the Presentation.
After completing the recording, it is crucial to review the recordings of each slide before exporting the file as a PowerPoint show or video. To preview your recordings in your PowerPoint presentation:
1. Go to the Slide Show tab and click either From Beginning or From Current Slide to start playback.

2. Make sure each slide has a record and timing by changing the View to Slide Sorter .
![clip_image038[3]](https://www.wintips.org/wp-content/uploads/2023/06/clip_image0383_thumb.png "clip_image038[3]")
3. On each slide where audio has been recorded you will see an audio icon along with the time/duration of the recording.

4. When you are satisfied with your recordings, you can move on to the next steps and export the entire presentation, including your audio and videos, either as a PowerPoint Show as a video file.
Step 4. Save the Presentation as a PowerPoint Show.
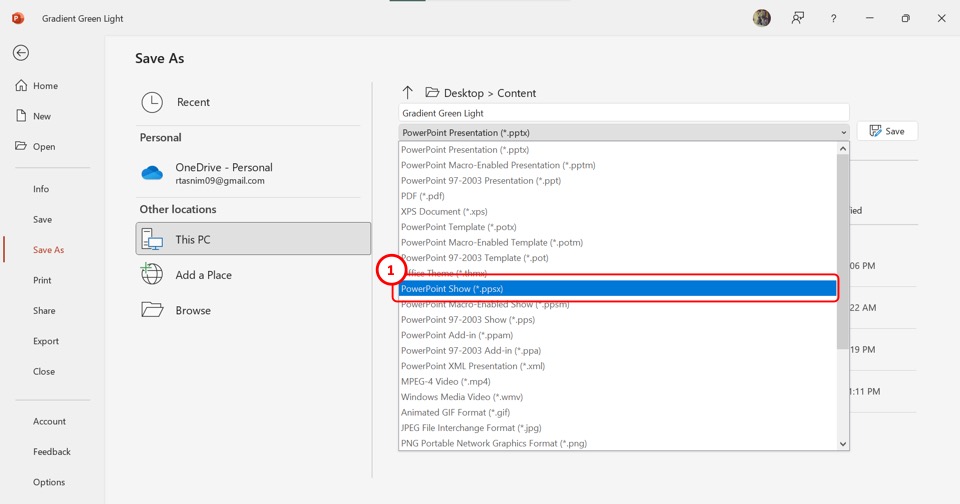
If you want to export your Presentation as a PowerPoint Show (.ppsx), which is useful if you want your presentation to be viewed even on computers that don't have the Microsoft PowerPoint app installed, do the following:
1. Click on File and select Save As .

2. Choose the location where you want to save the file and select PowerPoint Show (*.ppsx) format from the Save as type drop-down menu.
![clip_image044[3]](https://www.wintips.org/wp-content/uploads/2023/06/clip_image0443_thumb.png "clip_image044[3]")
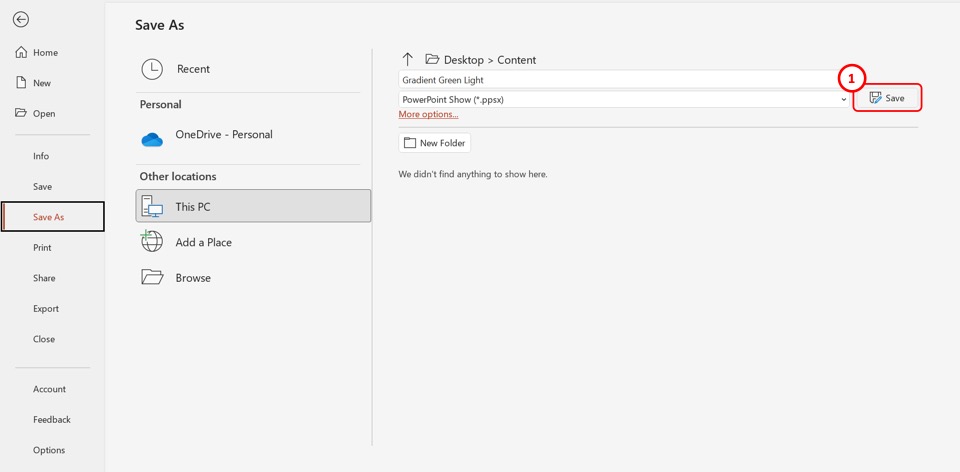
3. Then, click Save to save the file as a PowerPoint Show.
![clip_image046[3]](https://www.wintips.org/wp-content/uploads/2023/06/clip_image0463_thumb.png "clip_image046[3]")
Step 5. Save Presentation to Video.
If you prefer to export your PowerPoint SlideShow as a video file, follow these steps:
1. Click on File and select Export .

2. Then Click the Create a Video option and select the preferred video quality from the first drop-down menu (e.g., Full HD 1080p ).

3. Then select the Use Recorded Timings and Narrations option in the next drop-down menu.

4. Then adjust the Seconds spent on each slide for the slides without recordings.
![clip_image054[3]](https://www.wintips.org/wp-content/uploads/2023/06/clip_image0543_thumb.png "clip_image054[3]")
5. Finally, click the Create Video button and select the location to save the video.

6. Now wait for the PowerPoint to finish creating the video, as it may take some time depending on the performance of your computer.
7. Once the video is created, you can play it using any video player of your choice.
Method 2. Add External Audio and/or Video to a PowerPoint Presentation.
Instead of directly capturing audio and video within PowerPoint, you can insert an external audio or video file in your presentation.
Step 1. Adding an audio archive to a PowerPoint presentation.
To insert an audio file from your computer (such as pre-recorded narration, background music), to a slide:
1. Open your PowerPoint presentation and navigate to the specific slide where you want to add the audio.
2. Then, go to the Recording tab, click on the Audio button, and select the Audio on My PC option.

3. Then, choose the desired audio file from your device and click Insert .

4. The added audio file will appear as a small speaker icon in your presentation.
![clip_image062[3]](https://www.wintips.org/wp-content/uploads/2023/06/clip_image0623_thumb.png "clip_image062[3]")
5. When you click on the speaker icon, the Playback tab will appear in the Ribbon. Move to the Playback tab and click the Play in Background option if you want the audio to play across all slides.
![clip_image064[3]](https://www.wintips.org/wp-content/uploads/2023/06/clip_image0643_thumb.png "clip_image064[3]")
Step 2. Adding a Video file to a PowerPoint Presentation.
If you want to insert a video file from your PC, inside a Presentation.
1. Open the presentation and navigate to the specific slide where you want to add the audio.
2. Switch to the Recording tab and click on the Video button.
![clip_image066[3]](https://www.wintips.org/wp-content/uploads/2023/06/clip_image0663_thumb.png "clip_image066[3]")
3. Then, select the video file that you want to add in the slide and click Insert .
![clip_image068[3]](https://www.wintips.org/wp-content/uploads/2023/06/clip_image0683_thumb.png "clip_image068[3]")
4. Resize the video window as needed, and then customize the Playback settings from the Playback tab.
![clip_image070[3]](https://www.wintips.org/wp-content/uploads/2023/06/clip_image0703_thumb.png "clip_image070[3]")
Step 3. Exporting or Saving the Presentation.
Once the audio and video files are inserted, you can export the presentation to a video file or save it as a PowerPoint show. To do that:
1. Select the Recording tab:
- Select Save as Show to save the file as a PowerPoint show, or…
- Export to Video to export the file as a video.
![clip_image072[3]](https://www.wintips.org/wp-content/uploads/2023/06/clip_image0723_thumb.png "clip_image072[3]")
That's it! Let me know if this guide has helped you by leaving your comment about your experience. Please like and share this guide to help others.
We're hiring
We're looking for part-time or full-time technical writers to join our team! It's about a remote position that qualified tech writers from anywhere in the world can apply. Click here for more details.
- Recent Posts

- How to Disable or Remove BitLocker from Windows RE. - April 24, 2024
- FIX: Error 0x8007025d in Windows 10 Update. - April 22, 2024
- How to Disable Device Encryption in Windows 11/10. - April 17, 2024

Konstantinos Tsoukalas
Related posts.

How to , Tutotial , Windows , Windows 10 , Windows 11
How to Disable or Remove BitLocker from Windows RE.

How to , Tutotial , Windows , Windows 10
FIX: Error 0x8007025d in Windows 10 Update.

How to , Windows , Windows 10 , Windows 11
How to Disable Device Encryption in Windows 11/10.
Leave a reply cancel reply.
Your email address will not be published. Required fields are marked *
Where Does PowerPoint Save Recordings? [Here’s Where!]
By: Author Shrot Katewa
![Where Does PowerPoint Save Recordings? [Here’s Where!]](https://artofpresentations.com/wp-content/uploads/2023/01/ezgif.com-gif-maker-6.webp "how to save powerpoint presentation with audio")
It is really annoying when you finish recording a PowerPoint presentation and you don’t get to see the complete presentation that you just finished recording! The truth is that the presentation is embedded on the slides itself. But, how do you access the recordings and how do you share the recorded presentation?
PowerPoint saves the recording specific to each slide on the slide itself. However, to access the complete recording of your presentation, you need to export your presentation as a video file. Click on the “File” tab, then click “Save As” and change the file format to an “.MP4” file.
In this article, I will share with you all the details of not just how to record a presentation correctly, but also how to locate the recorded file and share it with your colleagues or clients.
So, without further ado, let’s get started!
1. How to Record a Presentation in PowerPoint?
To know how the video or audio recordings work in PowerPoint, let us first understand how to record a presentation in PowerPoint. We shall take two examples to understand this further i.e. recording yourself giving the presentation with your video camera, and recording just the audio narration.
1.1 How to Record Yourself Giving a PowerPoint Presentation With Video?
Microsoft PowerPoint allows you to record yourself presenting the slides. You can also use features like laser pointer, pen, highlighter, etc. during the recording. To record yourself presenting a PowerPoint presentation, follow the steps mentioned below:
Step-1: Click on the “Record” tab

In the menu ribbon located at the top of the screen, click on the “Record” tab to open the “Record” menu.
Step-2: Click on the “From Beginning” option
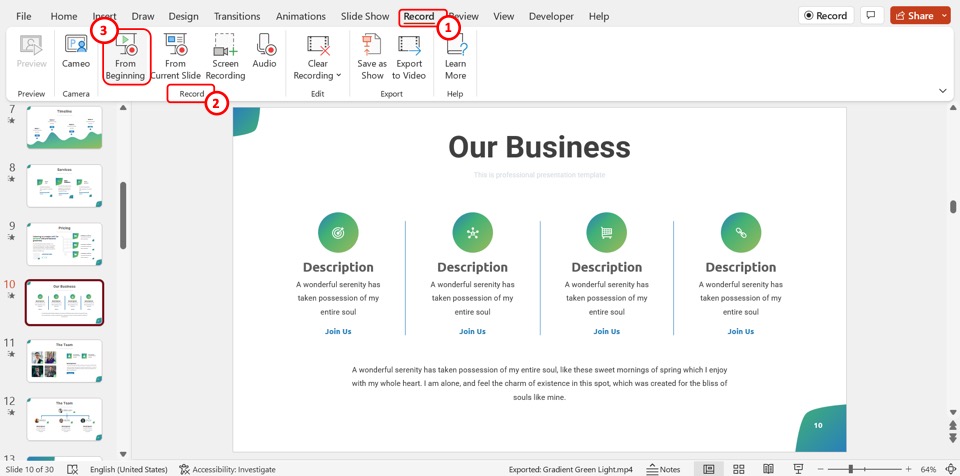
Click on the “From Beginning” option in the “Record” group of the “Record” menu. This will open the recording screen.
Step-3: Click on the “Camera” icon
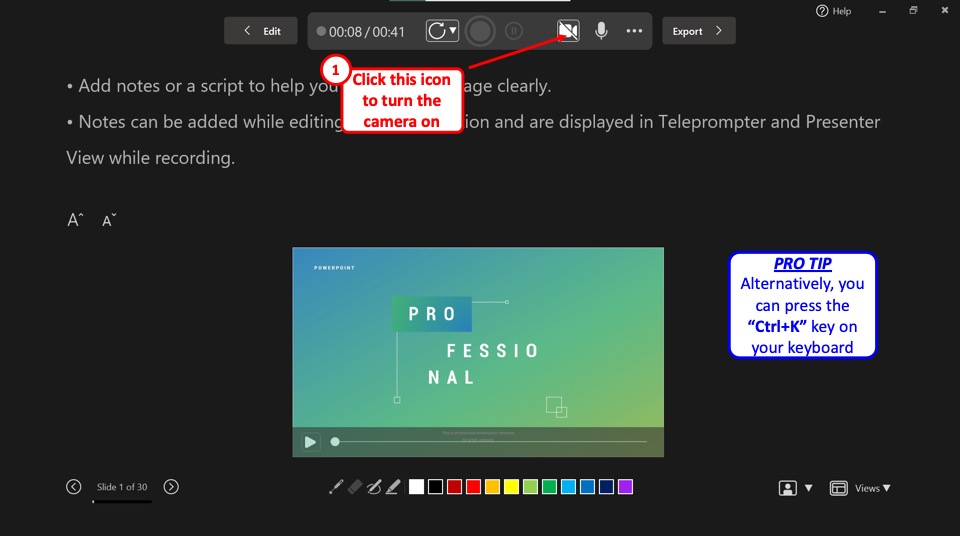
In the toolbar at the top of the screen, click on the “Turn camera on” option which is the camera icon. Alternatively, you can press the “Ctrl+K” keys on your keyboard to turn on the device camera to record yourself.
Step-4: Click on the “Start recording” option
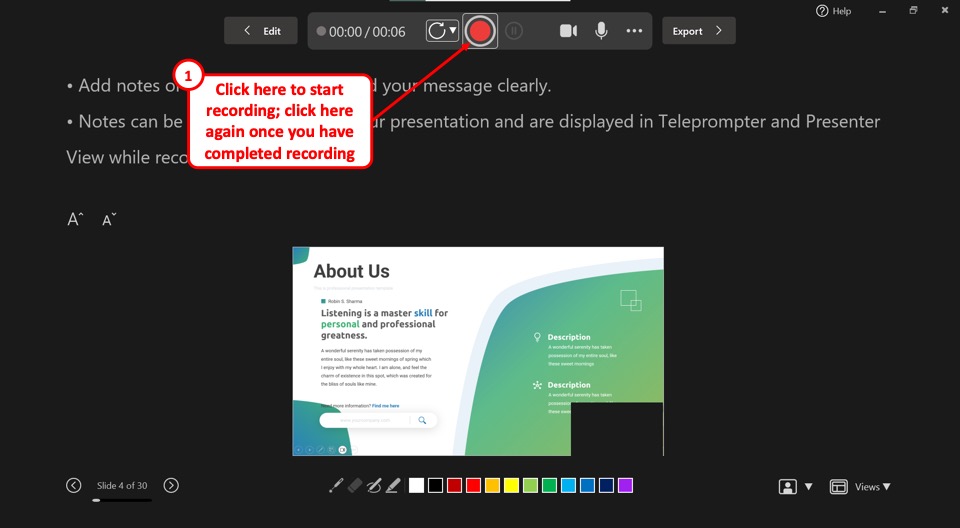
Now you can start recording yourself presenting. Click on the “Start Recording” option which is the circle icon with a large red dot in the middle. When you are done presenting, click on the same icon to stop recording.
Step-5: Click on the “Close” option
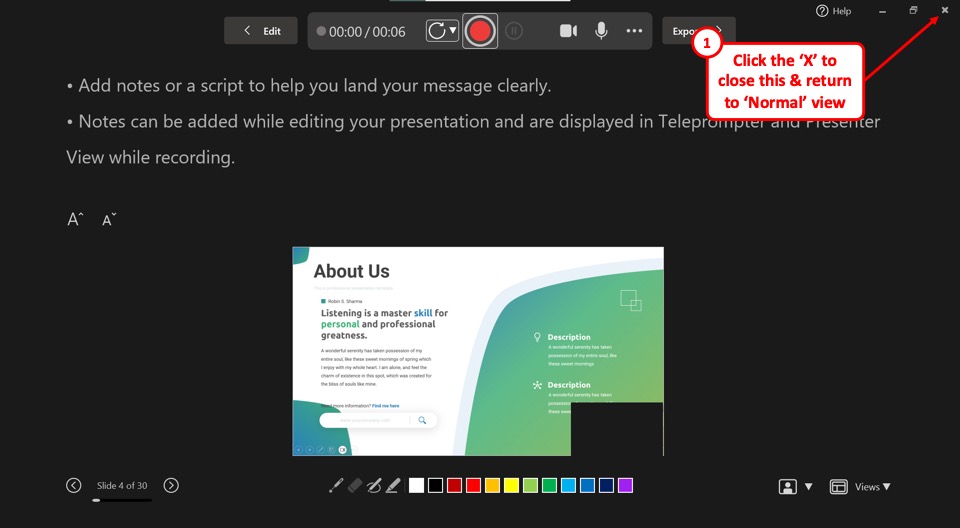
Click on the “Close” option which is the “X” icon at the top right corner of the recording screen to return to the “Normal” view.
Once you have finished the recording, you will notice that the part of the video that talks about slide 1 gets automatically added to the first slide, and part of the video where you talk about slide 2 is added to the 2nd slide .
Likewise, your entire recording gets automatically divided across every single slide wherever you had any comments to add!
You may not notice this at first, however, just look for the camera video that gets embedded to the bottom right corner of your slide.
Now, how do you extract your recordings? I will explain that in the subsequent sections.
1.2 How to Record a PowerPoint Presentation with Audio?
If you wish to record just the audio narration for your presentation without showing your face or using your camera, you can do so by choosing the following methods.
To be honest, there are a couple of different ways to record audio narration for your presentation.
Method 1 – Using the “Record” Feature
The first method is quite similar to the one described above. The only difference is that you need to turn off the camera before you begin recording the presentation.
This will record the presentation with just your voice for each slide. Since we’ve already covered the steps, I won’t show you the steps for this method and I shall focus on the second method for recording audio narration for your presentation.
Once the recording is complete, follow the steps mentioned in section 1.3 below to convert it into a cohesive recorded presentation.
Method 2 – Using the “Audio” Recording Feature
The second method involves recording the audio for a presentation on each slide. This method allows you to record audio for a slide individually and not the whole presentation at once.
Here’s what you need to do to record just the audio for the presentation.

The first step is to click on the “Record” tab in the menu ribbon at the top of the screen. This will open the “Record” menu.
Step-2: Click on the “Audio” option
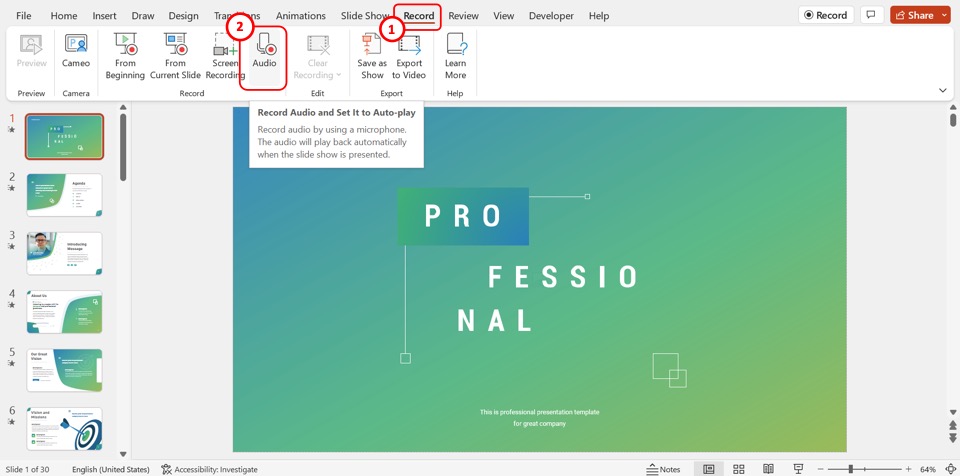
In the “Record” group of the “Record” menu, click on the “Audio” option. This will open the “Record Sound” dialog box.
Step-3: Click on the “Name” box
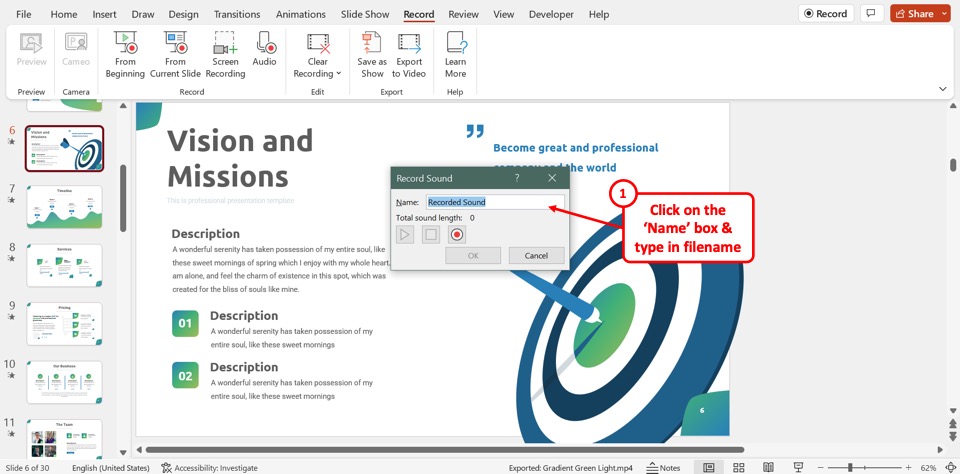
In the “Record Sound” dialog box, click on the “Name” box. Then you can type in a file name for the audio recording.
Step-4: Click on the “Record” icon
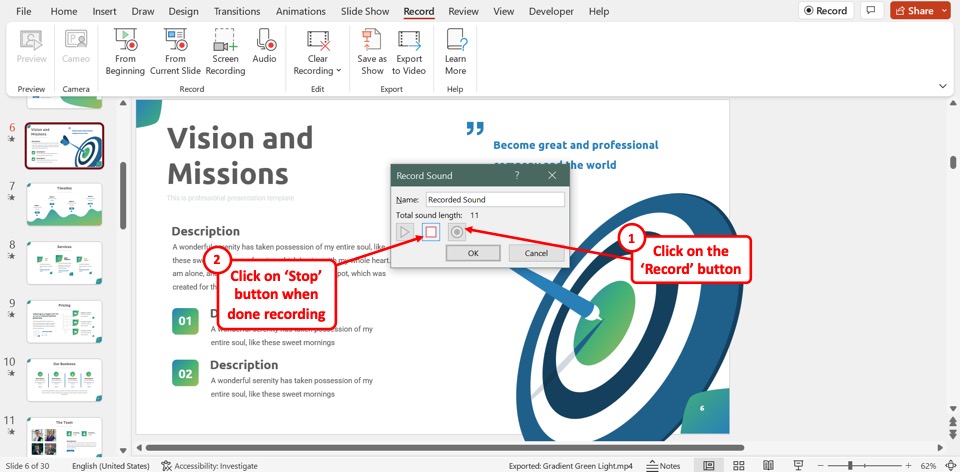
The next step is to click on the “Record” icon in the “Record Sound” dialog box. It is the black circle with a large red dot inside. When you are done recording audio, click on the “Stop” option which is the square icon.
Step-5: Click on the “Ok” button
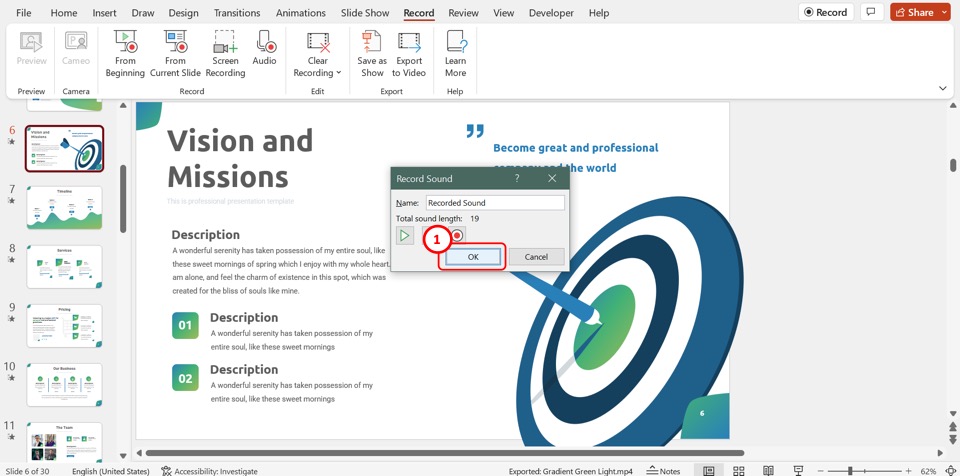
Now all you have to do is click on the “OK” button at the bottom of the “Record Sound” dialog box to save the audio recording.
Repeat the process for each slide where you want to add an audio recording. Once you’re done recording the audio narration for your presentation, save the file and proceed for section 1.3 below to make it into a cohesive presentation.
1.3 How to Save Your PowerPoint Presentation Recording?
Once you have recorded your complete presentation using the aforementioned methods, it is now time to save your presentation recording.
One mistake that people often make is to try and save the camera video embedded on the file. However, this will only save the camera video and not your entire presentation.
The correct way to save your PowerPoint presentation recording is to save the file as a video. However, do this only once you have finished recording your presentation.
Here’s what you need to do to save your recorded presentation into a video:
Step-1: Click on the “Save” option
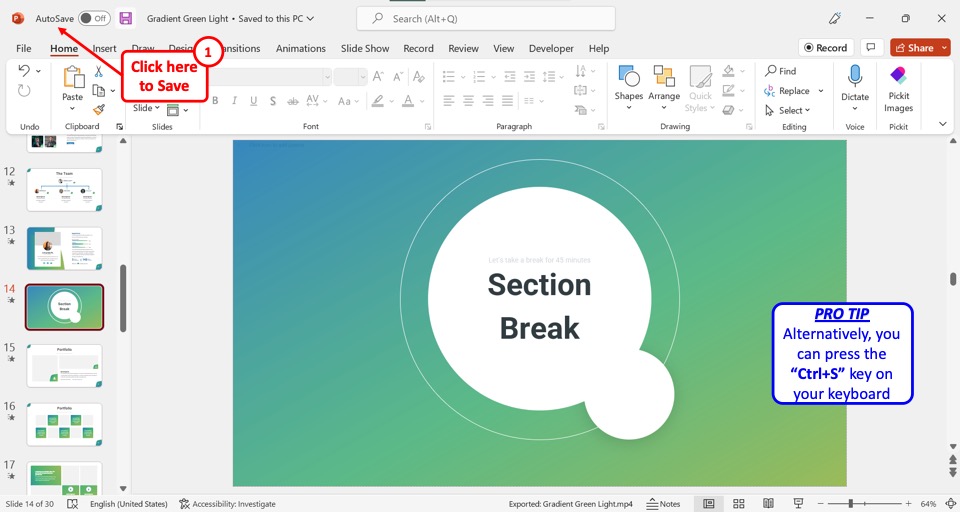
On the left corner at the top of the screen, click on the “Save” option. Alternatively, you can press the “Ctrl+S” keys on your keyboard to save all the changes made to the presentation file.
Step-2: Click on the “Export to Video” option
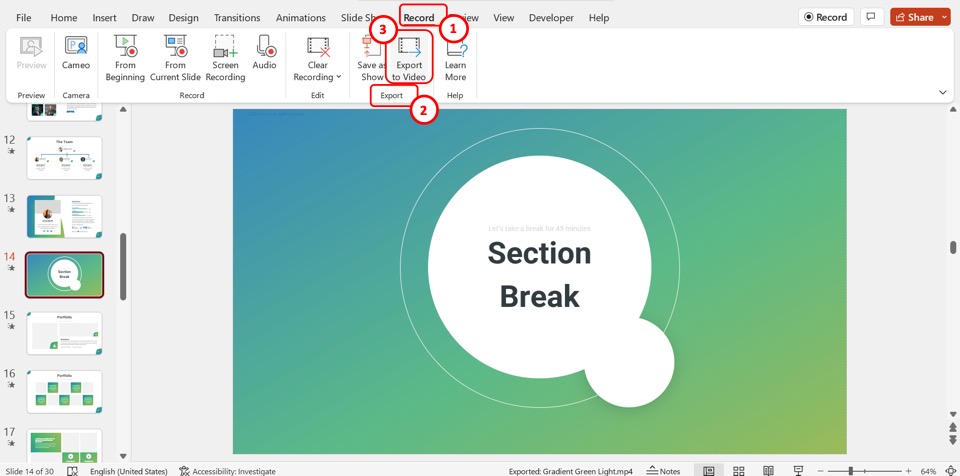
Click on the “Record” tab in the menu ribbon to open the “Record” menu. Then click on the “Export to Video” option in the “Record” menu. This will open the recording screen.
Step-3: Click on the “Export Video” option

In the recording screen, click on the “Export Video” button at the bottom to save the presentation recording as a video file.
1.4 Recording a Presentation into a PowerPoint Show File
You can also convert your presentation into a PowerPoint Show file (.ppsx file). This allows you to directly open the file into a presentation.
This option works great when you don’t have any audio components to your presentation and when you don’t want to record yourself to give a presentation. Instead, all you want to show is the presentation itself in the “Slideshow” mode.
I’ve written a detailed article about how you can loop your presentation using a PowerPoint Show file . Make sure to check out that article to understand a use case for this type of a presentation recording.
Nevertheless, here’s what you need to do to record your presentation as a .ppsx file.
Step-1: Click on the “File” tab
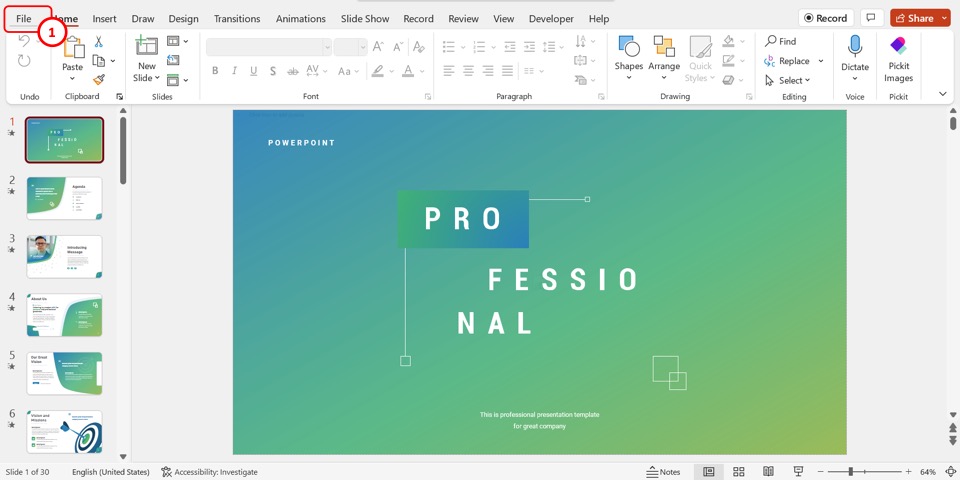
In the menu ribbon located at the top of the screen, click on the “File” tab. This will open the “File” screen.
Step-2: Click on the “Save As” option
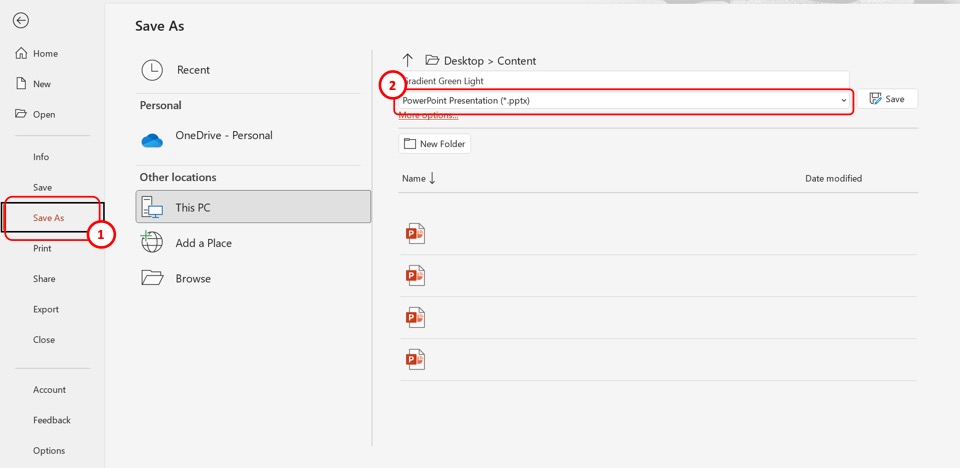
In the menu sidebar on the left side of the “File” screen, click on the “Save As” option. Then click on the second box in the “Desktop” section of the “Save As” screen.
Step-3: Click on the “PowerPoint Show (.ppsx)” option
Now all you have to do is click on the “PowerPoint Show (.ppsx)” option from the dropdown list to save the PowerPoint presentation as a recording.
Step-4: Click on the “Save” button
Finally, click on the “Save” button next to the “Save As” box to save the PowerPoint recording. This will save all the transitions, animations, and audio as a slideshow.
2. Where Does PowerPoint Save Recordings?
As I previously mentioned, typically PowerPoint saves the presentation recording as a video embedded into the presentation slide. You can access the complete recording only when you save your entire presentation and convert it into a video file.
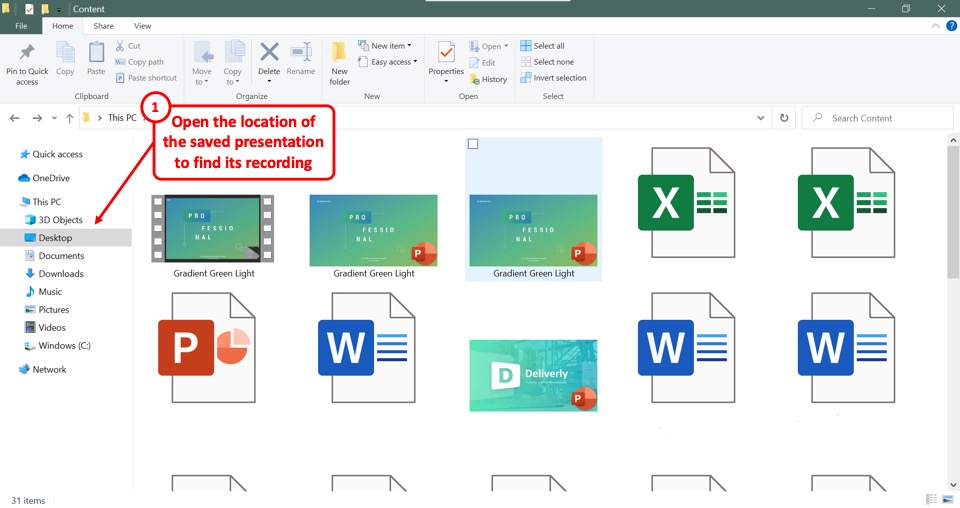
This video file is saved in the same folder as the location of your original PowerPoint file. To find the recording or the slideshow, all you have to do is open the location of the PowerPoint presentation file.
2.1 Where does PowerPoint Save Recordings on Mac?
In Microsoft PowerPoint for Mac, you can save a presentation recording as an “MP4” or a “MOV” file. Just like Windows, you get an option to choose the location of the folder to save the video recording of your PowerPoint presentation.
That said, if you want to access just the video from the camera, it is usually saved in the “Movies” folder available on your Mac device.
3. How to Find Saved PowerPoint Recordings?
In Microsoft PowerPoint, you cannot select the destination for saving the default presentation recording as the files are saved within the presentation itself.
The difficult bit is often recognizing that the presentation has been recorded as it is often difficult to notice any change to the presentation at the end of the recording.
However, there are ways you can know that the presentation has been recorded and access the recordings!
Method-1: Click on the video inserted in the slide

When you record yourself presenting a Microsoft PowerPoint file, the recording is embedded in each slide as a video. To find the recording, all you have to do is open the slide and find the video embedded in there.
Method-2: Click on the “Video Exported Successfully” notification
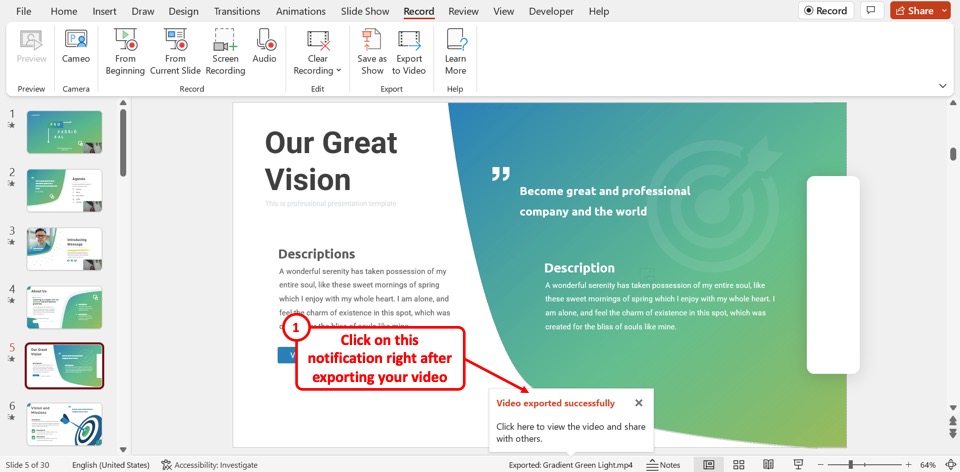
When you save a presentation recording using the “Export to Video” option, the “Video exported successfully” notification will appear at the bottom of the screen. All you have to do is click on the notification to open the recorded video without having to look for it in your desktop files.
Method-3: Open the PowerPoint location
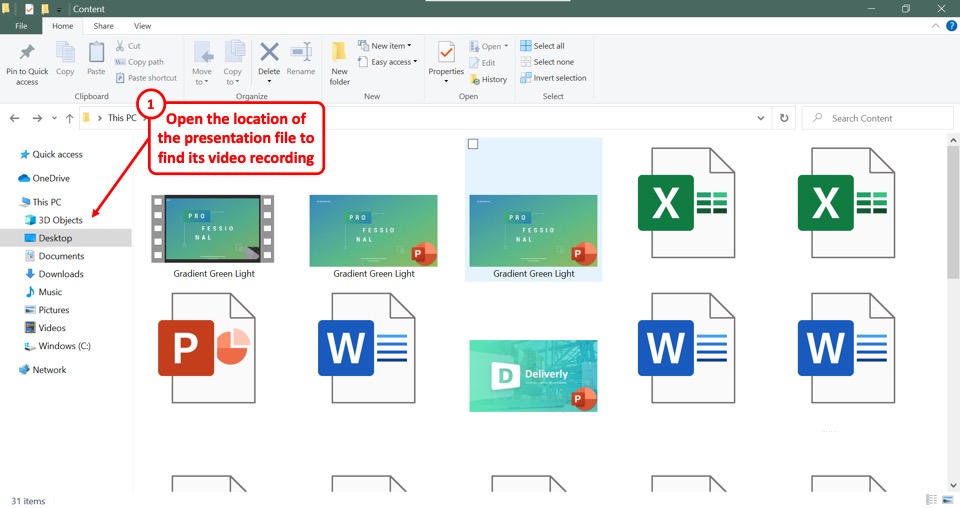
Since recordings are saved in the location of the original PowerPoint presentation file, you can simply open the file location to find the recorded presentation file.
4. Where does PowerPoint Save Audio?
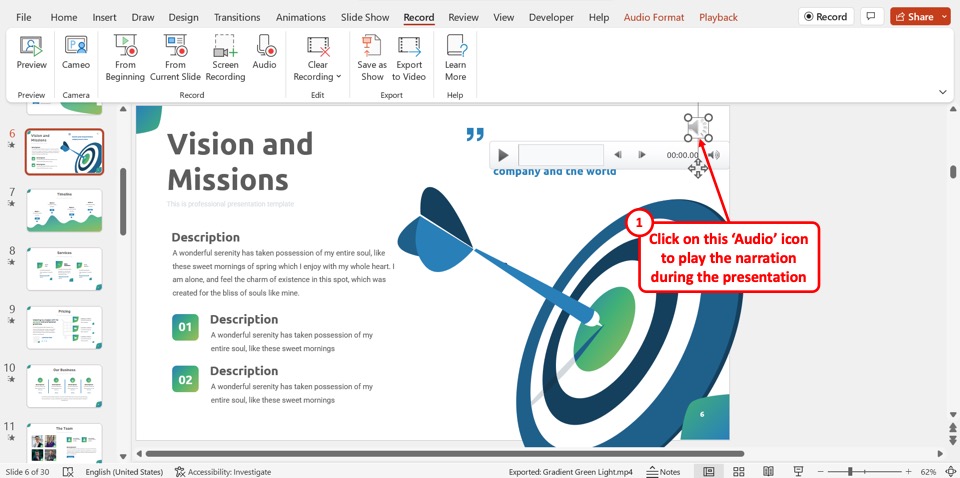
In Microsoft PowerPoint, the recorded audio is embedded into each slide rather than saved as a separate file. You can find the recorded audio as the “Audio” icon which is a megaphone icon in the middle of the slide. To play the narration, all you have to do is click on the “Audio” icon on the slide during the presentation.
Credit to cookie_studio (on Freepik) for the featured image of this article (further edited).
- Get One: Tornado Alert Apps
- The Best Tech Gifts Under $100
How to Save Sounds From PowerPoint Slideshows
Copy any embedded audio file for use in a different presentation
- Brock University
Music and other sound objects that are embedded in a PowerPoint slideshow can be extracted and used in another presentation or for any other purpose. How you go about extracting the audio file depends on your version of Microsoft 365 or Office. Follow this tutorial to learn how to extract audio from PowerPoint slideshows.
Information in this article applies to PowerPoint 2019, 2016, 2013, 2010, 2007, 2003; and PowerPoint for Microsoft 365.
Extract Embedded Sounds in PowerPoint 2019, 2016, 2013, and 2010
Beginning with PowerPoint 2010 , sound files are embedded in presentation files by default. This method of extracting a sound file works on .pptx files in PowerPoint 2019, 2016, 2013, and 2010 for Windows PC.
You need to set Windows File Explorer so it shows file names with extensions in order to follow this process.
Open Windows File Explorer .
Select the presentation file (in .pptx format), right-click, and choose Copy .
Right-click a blank area in the folder where you want to place a copy of the file and choose Paste .
Rename the copy of the presentation to differentiate it from the original.
Change the file extension of the copied file from .pptx to .zip .
Press Enter and select Yes to continue. The file icon changes to a folder icon.
Double-click the ZIP folder to reveal a list of folders inside.
Double-click the ppt folder in the list of folders.
Double-click the Media folder and copy the sound files to another folder.
Extract Embedded Sounds (PowerPoint 2007)
To extract an embedded sound file in a PowerPoint 2007 presentation:
Open the PowerPoint 2007 presentation file.
To edit the file, first open PowerPoint and then open the presentation file.
Select the Office button and choose Save As .
In the Save As dialog box, select the Save as Type down arrow and choose Web Page (*.htm; *.html) .
In the File name text box, enter a file name.
Select Save .
PowerPoint creates a file with the new filename and an HTM extension. It also creates a new folder, called yourfilename_files , containing all the embedded objects in the presentation. At this point, close PowerPoint.
Open the newly created folder to see all the sound files listed, along with any other objects that were inserted into the presentation. The file extensions are the same type as the original sound file type. The sound objects will have generic names, such as sound001.wav or file003.mp3 .
How to Sort Files by Type
If the new folder contains many files, sort the files by type to quickly locate these sound files.
To sort files by type:
Right-click a blank area of the folder window.
Choose Arrange Icons by > Type .
Look for the files with file extensions of WAV , WMA , or MP3 . These are the sound files that were embedded in the original PowerPoint show file.
Extract Embedded Sounds (PowerPoint 2003)
To extract an embedded sound file in a PowerPoint 2003 presentation:
Open PowerPoint 2003.
Do not double-click directly on the file icon to open PowerPoint, which would open the PowerPoint 2003 presentation. You want to be able to edit the file, so you must first open PowerPoint and then open this file.
Go to File , select Open , and choose the presentation file.
From the menu, choose File > Save as Web Page .
PowerPoint 2003 creates a file with the new file name and an HTM extension. It also creates a new folder, called yourfilename_files , containing all the embedded objects in your presentation. At this point, close PowerPoint.
Open the newly created folder to see all the sound files listed, along with any other objects that were inserted into the presentation. The file extension is the same type as the original sound file type. The sound objects will have generic names, such as sound001.wav or file003.mp3 .
Get the Latest Tech News Delivered Every Day
- How to Use Copilot in Powerpoint
- Create Pictures From PowerPoint Slides
- Why Doesn't the Music or Sound Play in My PowerPoint Presentation?
- What Is a PPTX File?
- Change a PowerPoint Show File to a Work File
- Print Slides From a PowerPoint Show File for PC
- How to Insert PDF Files Into PowerPoint Presentations
- What Is a PPT File?
- How to Save PowerPoint Presentations as PDF Files
- Create a Default Presentation Template in PowerPoint
- Copy Slides to Another PowerPoint Presentation
- What Is a PPTM File?
- Keep Your PowerPoint Presentation Fonts From Changing
- How to Use Portrait and Landscape Slides in the Same Presentation
- How to Use Microsoft's Free PowerPoint Viewers
- How to Convert PowerPoint to Video
Convert PPT to MP3
You have the option to convert your ppt file to mp3, as well as a variety of other formats, using our free online converter.
How to convert ppt to mp3?
Upload ppt-file, select «to mp3», download your mp3 file, best tool to convert ppt to mp3, ppt to mp3 fast and easy, secure ppt to mp3 conversion, no software installation required, microsoft powerpoint, mp3 audio file, faqs on ppt to mp3 conversion, ppt converter, convert to mp3.
How To Download Google Slides With Audio To Powerpoint

- How-To Guides
- Software Tutorials

Introduction
Welcome to this guide on how to download Google Slides with audio to PowerPoint! Google Slides is a popular tool for creating stunning presentations, but sometimes you may want to convert them to PowerPoint format for various reasons. One common challenge you might face is preserving the audio in your Google Slides presentation when downloading it as a PowerPoint file. However, with a few simple steps, you can successfully download your Google Slides presentation with audio and enjoy seamless playback on PowerPoint.
Whether you’re a student, teacher, or working professional, knowing how to convert a presentation from one format to another can be extremely useful. By converting your Google Slides to PowerPoint, you can ensure compatibility with different devices, operating systems, and presentation software, making it easier to share your work with others. This guide will walk you through the step-by-step process, enabling you to download your Google Slides presentation with audio to PowerPoint effortlessly.
Before we dive into the steps, it’s important to note that downloading Google Slides with audio to PowerPoint requires an internet connection and access to both Google Slides and PowerPoint applications. Additionally, the process outlined in this guide is applicable for desktop versions of Google Slides and PowerPoint.
Now that we have a brief overview, let’s delve into the specific steps you need to follow to successfully download Google Slides with audio to PowerPoint. Whether you’re a beginner or an experienced user, this guide will provide you with the necessary instructions to make the conversion process a smooth one. Let’s get started!
Step 1: Open the Google Slides presentation
The first step in downloading Google Slides with audio to PowerPoint is to open the Google Slides presentation that you want to convert. To do this, follow the steps below:
- Go to the Google Slides website (slides.google.com) and sign in to your Google account if you haven’t already.
- In the Google Slides dashboard, you will see a list of your presentations. Locate the presentation you want to download and click on it to open it.
- The presentation will open in a new tab, displaying the slides and any audio or media files that may be present.
Opening the Google Slides presentation is the first crucial step in the conversion process. It allows you to access the content and audio within the presentation, which can then be downloaded and preserved in the PowerPoint format.
It’s worth mentioning that before proceeding to the next steps, you should ensure that your Google Slides presentation is properly organized, contains the desired audio recordings, and is ready for download. Take the time to review each slide and audio element to ensure they are in the correct order and functioning as intended. This will help avoid any issues during the conversion process.
Once you have successfully opened your Google Slides presentation, you are ready to move on to the next step and start the process of downloading the presentation with audio to PowerPoint.
Step 2: Go to “File” and select “Download”
After opening your Google Slides presentation, the next step is to navigate to the “File” menu and select the “Download” option. This will allow you to choose the desired file format for download. Follow the steps below to complete this step:
- In the top menu bar of the Google Slides interface, locate the “File” tab and click on it.
- A dropdown menu will appear with several options. Scroll down and find the “Download” option.
- When you hover over the “Download” option, another submenu will appear with various file format options.
- Select the file format that you want to download your Google Slides presentation as. In this case, choose the “PowerPoint” format.
By choosing the “PowerPoint” format, you ensure that the downloaded file will be compatible with Microsoft PowerPoint software. This is important if you plan to present or share your presentation with others who primarily use PowerPoint.
It’s important to note that depending on your browser settings, the downloaded file may automatically save to a default location or prompt you to choose a save location on your computer. Pay attention to these prompts and ensure that your presentation is saved in a location where you can easily access it later.
Now that you have successfully selected the “Download” option and chosen the “PowerPoint” format, you are ready to move on to the next step – actually downloading the Google Slides presentation with audio to your computer.
Step 3: Choose the PowerPoint (.pptx) format
Once you have selected the “Download” option from the “File” menu, the next step is to choose the PowerPoint (.pptx) format for your Google Slides presentation. Following these simple steps will guide you through the process:
- After selecting the “Download” option, a submenu will appear with various file format options.
- Locate and click on the “PowerPoint” format in the submenu.
- The Google Slides presentation will start to convert into the PowerPoint format, generating a downloadable file.
- Depending on the size and complexity of your presentation, this conversion process may take a few moments.
Choosing the PowerPoint (.pptx) format is crucial as it ensures compatibility with Microsoft PowerPoint software. PowerPoint (.pptx) files are widely used and support various multimedia elements, including audio, making it ideal for preserving the audio in your Google Slides presentation.
It’s worth noting that by selecting the PowerPoint format, any transitions, animations, and formatting styles used in your Google Slides presentation will also be preserved in the downloaded PowerPoint file. This allows for a seamless transition from Google Slides to PowerPoint without losing any visual or audio elements.
Once the conversion process is complete, the PowerPoint file will be ready for download and saved to your computer. At this point, you’re just a few steps away from being able to play the audio in PowerPoint and fully enjoy your converted presentation.
With the PowerPoint (.pptx) format successfully selected, let’s move on to the next step – downloading the converted Google Slides presentation and opening it in PowerPoint.
Step 4: Click “Download” to save the file to your computer
After choosing the PowerPoint format for your Google Slides presentation, the next step is to click the “Download” button to save the file to your computer. Follow these steps to complete this process:
- Locate and click the “Download” button, which will be displayed after you have chosen the PowerPoint format.
- Depending on your browser settings, you may see a notification or prompt asking you to confirm the download. Click “Save” or “OK” to proceed.
- Choose a location on your computer where you want to save the downloaded PowerPoint file.
- Click “Save,” and the file will start downloading to the chosen location on your computer.
- The download time will vary depending on the size of your presentation and the speed of your internet connection. Be patient and wait for the download to complete.
- Once the download is finished, you will have successfully saved the Google Slides presentation with audio as a PowerPoint file on your computer.
It’s important to remember the location where you saved the file, as you will need to access it in the next steps to open it in PowerPoint and play the audio. You may want to save the file in a location that is easily accessible and organized to avoid any confusion later on.
By clicking “Download,” you have completed an essential step in the process of downloading your Google Slides presentation with audio to PowerPoint. Now, let’s move on to the next step and learn how to open the downloaded PowerPoint file.
Step 5: Open the downloaded PowerPoint (.pptx) file
Now that you have successfully downloaded the PowerPoint file of your Google Slides presentation with audio, the next step is to open the downloaded file using Microsoft PowerPoint. Follow these steps to accomplish this:
- Locate the downloaded PowerPoint (.pptx) file on your computer. It is usually saved in the default Downloads folder or the location you specified during the download.
- Double-click on the PowerPoint file to open it. This will launch the Microsoft PowerPoint software.
- The PowerPoint file will open, displaying your Google Slides presentation with all the slide content, formatting, and audio intact.
Opening the downloaded PowerPoint file allows you to access the converted Google Slides presentation and all its associated audio files. You can now manipulate and present the content using the features provided by Microsoft PowerPoint.
It’s important to note that you will need to have Microsoft PowerPoint installed on your computer to open and edit the downloaded file. If you don’t have PowerPoint installed, you can use alternative presentation software that supports the PowerPoint (.pptx) format.
By successfully opening the downloaded PowerPoint file, you’re one step closer to being able to play and control the audio in your Google Slides presentation. In the next step, we will explore how to enable editing and play audio in PowerPoint.
Step 6: Enable editing and play audio in PowerPoint
After opening the downloaded PowerPoint file, the next step is to enable editing and play the audio in your Google Slides presentation. Follow these steps to accomplish this:
- When the PowerPoint file is open, you will see a ribbon at the top of the screen with various tabs. Click on the “File” tab in the ribbon to access the options menu.
- In the options menu, look for the “Enable Editing” button. Click on it to enable editing mode for the presentation.
- Once editing mode is enabled, you can navigate through the slides using the arrow keys, mouse scroll wheel, or by clicking on the slide thumbnails on the left side of the screen.
- To play the audio, click on the slide that contains the audio file.
- If the audio file is embedded in the slide, it will play automatically when you reach that slide. If it is linked to an external audio file, you may need to click on a play button or an audio icon on the slide to initiate playback.
- Adjust the volume and control the playback of the audio using the options provided in the PowerPoint interface.
Enabling editing allows you to interact with the presentation, play the audio, and make any necessary changes or adjustments. By following these steps, you can fully enjoy the audio elements in your Google Slides presentation within the PowerPoint environment.
It’s important to note that the process of enabling editing and playing audio may vary slightly depending on the version of PowerPoint you are using. However, the general concept and functionality remain the same across different versions.
Now that you have successfully enabled editing and played the audio in PowerPoint, you’re ready to move on to the next step – adjusting audio settings if needed.
Step 7: Adjust audio settings if needed
After enabling editing and playing the audio in your downloaded Google Slides presentation in PowerPoint, it is important to ensure that the audio settings are properly adjusted. By correctly configuring the audio settings, you can optimize the playback experience and make any necessary adjustments. Follow these steps to adjust the audio settings:
- Select the slide that contains the audio file you want to modify.
- Click on the audio object on the slide to select it. You will see a contextual “Audio Tools” tab appear on the ribbon.
- Within the “Audio Tools” tab, locate the “Playback” section. This section will provide options for adjusting the audio settings.
- You can choose whether the audio should play automatically when the slide is displayed or upon clicking on the audio object.
- Adjust the volume slider to increase or decrease the volume of the audio. You can also choose to mute the audio if desired.
- Explore additional options such as starting the audio from a specific point, looping the audio playback, or fading in/out the audio.
- Repeat these steps for each slide that contains audio, making any necessary adjustments to the settings.
By adjusting the audio settings, you can customize the behavior and quality of the audio playback in your presentation. This allows you to create a seamless and engaging experience for your audience.
It’s worth mentioning that the specific audio settings available in PowerPoint may vary depending on the version you are using. However, the general process of accessing and modifying the audio settings remains consistent across different versions.
With the audio settings properly adjusted, you have successfully completed the final step in downloading your Google Slides presentation with audio to PowerPoint. Now you can confidently present and share your converted presentation, complete with seamless audio playback.
Converting your Google Slides presentation with audio to PowerPoint doesn’t have to be a complex task. By following the step-by-step process outlined in this guide, you can successfully download your presentation in PowerPoint format while preserving the audio elements. Let’s recap what we’ve covered:
First, we discussed the importance of being able to convert a presentation from one format to another, particularly when it comes to compatibility and sharing with others. We then explored the initial steps of opening your Google Slides presentation, ensuring it’s well-organized and ready for download.
Next, we delved into the process of selecting the “Download” option from the “File” menu in Google Slides and choosing the PowerPoint (.pptx) format for download. This ensures that your presentation can be opened and viewed in Microsoft PowerPoint or other compatible software.
Once the download is complete, we learned how to open the downloaded PowerPoint file, enabling editing and accessing all the slide content and audio files. We then discussed how to play the audio within PowerPoint, making use of the playback options provided by the software.
Lastly, we explored the importance of adjusting the audio settings to optimize the playback experience. By adjusting the volume, playback options, and other settings, you can enhance the audio quality and ensure a seamless presentation.
With all these steps completed, you’re now equipped with the knowledge and tools to successfully download Google Slides with audio to PowerPoint. You can confidently convert your presentations, preserving the audio elements and delivering impactful presentations that captivate your audience.
Remember to regularly check for updates in Google Slides and PowerPoint as new features and functionalities may be introduced over time. Explore the various options and tools available to enhance your presentation and make the most of your audio assets.
So go ahead, start converting your Google Slides presentations with audio to PowerPoint and unlock a whole new level of presentation versatility and compatibility!
Leave a Reply Cancel reply
Your email address will not be published. Required fields are marked *
Save my name, email, and website in this browser for the next time I comment.
- Crowdfunding
- Cryptocurrency
- Digital Banking
- Digital Payments
- Investments
- Console Gaming
- Mobile Gaming
- VR/AR Gaming
- Gadget Usage
- Gaming Tips
- Online Safety
- Tech Setup & Troubleshooting
- Buyer’s Guides
- Comparative Analysis
- Gadget Reviews
- Service Reviews
- Software Reviews
- Mobile Devices
- PCs & Laptops
- Smart Home Gadgets
- Content Creation Tools
- Digital Photography
- Video & Music Streaming
- Online Security
- Online Services
- Web Hosting
- WiFi & Ethernet
- Browsers & Extensions
- Communication Platforms
- Operating Systems
- Productivity Tools
- AI & Machine Learning
- Cybersecurity
- Emerging Tech
- IoT & Smart Devices
- Virtual & Augmented Reality
- Latest News
- AI Developments
- Fintech Updates
- Gaming News
- New Product Launches
- Fintechs and Traditional Banks Navigating the Future of Financial Services
- AI Writing How Its Changing the Way We Create Content
Related Post
How to find the best midjourney alternative in 2024: a guide to ai anime generators, unleashing young geniuses: how lingokids makes learning a blast, 10 best ai math solvers for instant homework solutions, 10 best ai homework helper tools to get instant homework help, 10 best ai humanizers to humanize ai text with ease, sla network: benefits, advantages, satisfaction of both parties to the contract, related posts.

How To Download Google Slides As PPT

How To Download Canva Slides To Google Slides

How To Download Google Slides With Speaker Notes

How To Download Slides From Google Slides

How To Download Music To Powerpoint

How To Download Music For A Powerpoint

How To Download Fonts Into Powerpoint

How To Record Audio on Google Slides
Recent stories.

Fintechs and Traditional Banks: Navigating the Future of Financial Services

AI Writing: How It’s Changing the Way We Create Content

How to Know When it’s the Right Time to Buy Bitcoin

How to Sell Counter-Strike 2 Skins Instantly? A Comprehensive Guide

10 Proven Ways For Online Gamers To Avoid Cyber Attacks And Scams

- Privacy Overview
- Strictly Necessary Cookies
This website uses cookies so that we can provide you with the best user experience possible. Cookie information is stored in your browser and performs functions such as recognising you when you return to our website and helping our team to understand which sections of the website you find most interesting and useful.
Strictly Necessary Cookie should be enabled at all times so that we can save your preferences for cookie settings.
If you disable this cookie, we will not be able to save your preferences. This means that every time you visit this website you will need to enable or disable cookies again.

Contribute to the Microsoft 365 and Office forum! Click here to learn more 💡
April 9, 2024
Contribute to the Microsoft 365 and Office forum!
Click here to learn more 💡
PowerPoint Top Forum Contributors: Steve Rindsberg - John Korchok 👍✅
April 17, 2024
PowerPoint Top Forum Contributors:
Steve Rindsberg - John Korchok 👍✅
- Search the community and support articles
- Microsoft 365 and Office
- Search Community member
Ask a new question
How to convert video within Powerpoint (PPTX) to audio only?
I have PPTX file with a video on each slide. As a result of this the file size is very large. I would like to keep audio only and delete the video. Is there a easy way to do this (besides manually converting each media to audio and then reimportng it)?
Report abuse
Replies (5) .
- Volunteer Moderator
There's nothing in PowerPoint to convert video to audio. You'll have to do that with a third party application, then reimport.
Was this reply helpful? Yes No
Sorry this didn't help.
Great! Thanks for your feedback.
How satisfied are you with this reply?
Thanks for your feedback, it helps us improve the site.
Thanks for your feedback.
- Microsoft Agent |
May I know whether there are any updates to your question? If you have any questions, please feel free to contact us.
Hi, May I know whether there are any updates to your question? If you have any questions, please feel free to contact us. Tin
No updates. It seems that as John replied its not possible to do this automatically. So I fixed this issue by manually exporting and reimporting again individually the files
Thanks for the reply.
Thats unfortunate, I ended up doing it manually. Hopefully Microsoft can add this feature in the future
1 person found this reply helpful
Hi,JohnKimble:
Thank you for your reply and we understand your feelings.
We understand that this problem has caused you great inconvenience. In this case, we recommend that you report this problem directly to the support team in Powerpoint. You can kindly give your valuable suggestion in Powerpoint application; your feedback will be sent to the related team directly. For your reference: How do I give feedback on Microsoft Office?
Thanks for your understanding.
Question Info
- For business
- Norsk Bokmål
- Ελληνικά
- Русский
- עברית
- العربية
- ไทย
- 한국어
- 中文(简体)
- 中文(繁體)
- 日本語
- Add, change, or remove transitions between slides Article
- Animate text or objects Article
- Use the Morph transition in PowerPoint Article
- Insert a video from YouTube or another site Article
- Add or delete audio in your PowerPoint presentation Article
- Record your screen in PowerPoint Article
Add or delete audio in your PowerPoint presentation
You can add audio, such as music, narration, or sound bites, to your PowerPoint presentation. To record and hear any audio, your computer must be equipped with a sound card, microphone, and speakers.

Add audio from your PC
Select Insert > Audio .
Select Audio on My PC .
In the Insert Audio dialog box, select the audio file you want to add.
Select Insert .
Record audio
Select Insert > Audio .
Select Record Audio .
Type in a name for your audio file, select Record , and then speak.
Note: Your device must have a microphone enabled in order to record audio.
To review your recording, select Stop and then select Play .
Select Record to re-record your clip, or select OK if you're satisfied.
To move your clip, select and drag the audio icon to where you want it on the slide.
If you’re using more than one audio file per slide, we recommend putting the audio icon in the same spot on a slide to find it easily.
Select Play .
Hide the Audio icon
Select the audio clip icon on the slide.
On the ribbon, on the Playback tab, select the Hide During Show check box.
Use this option only if you set the audio clip to play automatically. Note that, in Normal view, the audio icon is always visible unless you drag it off the slide.
Change playback options
Select the audio icon and then select the Playback tab. Then select which options you'd like to use:
To trim the audio, select Trim and then use the red and green sliders to trim the audio file accordingly.
To fade in or fade out audio, change the number in the Fade Duration boxes.
To adjust volume, select Volume and select the setting you prefer.
To choose how the audio file starts, select the dropdown arrow next to Start, then select an option:
In Click Sequence : Plays the audio file automatically with a click.
Automatically : Plays automatically once you advance to the slide that the audio file is on.
When Clicked On : Plays audio only when the icon is clicked on.
To choose how the audio plays in your presentation, select an option:
Play Across Slides : Plays one audio file across all slides.
Loop until Stopped : Plays an audio file on loop until it’s stopped manually by clicking the Play/Pause button.
To have the audio play continuously across all slides in the background, select Play in Background .
Delete audio
To delete an audio clip, select the audio icon on the slide and press Delete.
To add music or other audio clip to your slide show, select the slide you want and click Insert > Audio . You can add audio to a single slide, play audio automatically when a slide appears, or add a song that plays as background music during your entire presentation.
You can add your own narration or commentary to an entire presentation by recording it on the Slide Show tab. See Record your slide show for more information.
Add audio to a single slide
In Normal view, select the slide you want and click Insert > Audio .

Click Audio Browser to insert audio from iTunes, or Audio from File to insert an audio clip from your computer.
Select the audio clip. On the Audio Format tab, select the audio options you want.

(Optional) If you want to change or modify the standard audio file icon, use the picture format buttons on the Audio Format tab to add a frame, border, or other formatting effect to the audio icon.

Preview the audio
On the slide, select the audio icon, and then click Play/Pause beneath the audio icon.

Play audio automatically when a slide appears
By default, during a slide show, audio plays when it is clicked. You can change it so that the audio plays automatically as soon as its slide appears.
In Normal view, select the slide you want and add an audio clip if you haven't already done so.
On the Audio Format tab, on the right, click Start > Automatically .

Add audio that plays during your entire presentation
In Normal view, select the first slide in your presentation and add an audio clip if you haven't already done so.
On the Audio Format tab, on the right, click Play across Slides .

Add audio that plays repeatedly
On the Audio Format tab, on the right, click Loop Until Stopped .
(Used alone, this option means the looping sound lasts while the slide it resides on is being shown. When Loop Until Stopped is used in tandem with Play Across Slides , the looping sound continues throughout the presentation.)

On the PowerPoint ribbon, on the Playback tab, select the Hide During Show check box.
Record your slide show
Supported audio formats in PowerPoint for the web: MP3, WAV, M4A, AAC, and OGA
Maximum size of the audio file: 16 MB
Add audio from your computer
On the Insert tab, near the right end, select Audio .
In the file explorer, browse to the audio file you want to use, then select Open .
Select the audio icon and then select the Audio tab or Playback tab. Then select which options you'd like to use:
To choose how the audio file starts, select the Start dropdown arrow and select an option:
Automatically : During a slide show, the audio plays automatically once you advance to the slide that the audio file is on.
When Clicked On : During a slide show, the audio plays only when the icon is clicked.
To choose how the audio plays in your presentation, select one or more options under Audio Options :
Hide During Show : If you've set the audio clip to play automatically, you can hide the audio icon during the show, because you won't need to click it at any time.
Rewind after Playing : Use this option if you need to play an audio clip more than once while you are still presenting the same slide that contains that audio clip.
Play music or other sounds automatically when a slide appears
Play music across multiple slides in your slide show
Record a slide show with narration and slide timings

Need more help?
Want more options.
Explore subscription benefits, browse training courses, learn how to secure your device, and more.

Microsoft 365 subscription benefits

Microsoft 365 training

Microsoft security

Accessibility center
Communities help you ask and answer questions, give feedback, and hear from experts with rich knowledge.

Ask the Microsoft Community

Microsoft Tech Community

Windows Insiders
Microsoft 365 Insiders
Was this information helpful?
Thank you for your feedback.

How to Record Customized Camera Feeds With Cameo in PowerPoint
T he widespread adoption of remote work and virtual meetings has led many people and organizations to realize they don't have to be physically present in the same conference room to make presentations. In fact, you don't even need to conduct them live.
However, recording your PowerPoint slides with your face on them requires technical know-how and third-party apps like OBS. This makes recording presentations a bit difficult and discourages people from doing it.
Thankfully, Microsoft has addressed this issue in PowerPoint 365 with the Cameo feature. Here's what it is and how to use it.
What Is Cameo in PowerPoint?
Cameo is a PowerPoint feature that lets you add your webcam or any other camera feed into your presentation. This makes it easier to present virtually, as your audience can see you from within your slides.
Previously, you needed a third-party app like OBS to overlay yourself on your presentation. You can also use a green screen overlay in Capcut or other similar apps to achieve the same effect. However, this takes a lot of effort and know-how.
But with this feature, you can do it from inside PowerPoint with just a few clicks. Here's how to insert a cameo into your slides.
- Go to Insert > Cameo .
- After clicking on Cameo, PowerPoint will insert a placeholder object on your current slide and open the Camera Format tab.
- You can edit the object as you wish, much like any other shape on PowerPoint. You can also click on the options in the Designer pane on the right side of the screen to help you work faster.
- Once you're happy with its placement on your slide, click on the Preview button to see your live video.
With that, you can start presenting your PowerPoint slides via screen sharing while still keeping yourself on the screen.
How to Record Your PowerPoint Presentation With Cameo
You can also insert a cameo from Record > Cameo . Clicking on this will bring you to the same menu tab and insert a placeholder object for your video. However, even if you didn't set up Cameo beforehand, you can insert it directly while recording your presentation. Here's how:
- Go to Record > From Beginning or Record > From Current Slide .
- In the recording screen, click on the Camera icon at the top. This will insert a round object containing your video in your slides' lower-right-hand section.
- Click on the Red icon to start recording your presentation.
- Go through your presentation as usual. For more information, check out our guide on turning your presentations into videos .
- Once you've finished, click the Red icon again to stop recording.
- Click Export to go to the Export to video screen .
- Change the File Name as needed, then click Browse to select the location where you will save your recorded video.
- Once done, click Export Video .
With that, you don't have to spend much effort to add your video feed to your PowerPoint presentation recording. However, the app only places your video at one location across every slide; it might cover some of your content. That's why it's better to use the Cameo feature when you're building or editing your PowerPoint presentation.
If you're unhappy with your recording, press the Retake Video on the left of the record icon. You can pick between On Current Slide or On All Slides .
What You Need to Record Customized Camera Feeds
You need a webcam and a Microsoft 365 account to record your customized camera feed. Furthermore, you cannot use Cameo or record presentations in the PowerPoint web app. You need to download and install it on your computer to use these features.
The Cameo feature is already available on Microsoft PowerPoint 365 in Windows and Mac. However, recording your presentation with Cameo is only available on Windows. As of the time of writing, this feature isn't available for the main PowerPoint 365 for Mac version.
If you're running macOS, you must be a Microsoft 365 Insider to get this feature. However, since the Cameo recording feature is already announced in the Microsoft 365 Insider blog , we hope it will be available in the mainstream PowerPoint for Mac version in a few months.
Recording Your Presentations Is Now Much Easier
The Cameo feature has made presenting PowerPoint slides in video calls easier. And with the recording function, you no longer need a third-party app to put your video over your presentation.
You can integrate it into each slide, allowing you to control where you are on your screen. And you also save a lot of time and effort, as you can record and save your presentation as a video from within Microsoft PowerPoint.

IMAGES
VIDEO
COMMENTS
Learn how to record a PowerPoint Presentation with audio and video simply by using the build-in PowerPoint functionalities and tools. ... Learn how to record a PowerPoint Presentation with audio ...
On the File menu, select Save to ensure all your recent work has been saved in PowerPoint presentation format (.pptx). Select File > Export > Create a Video. (Or, on the Recording tab of the ribbon, select Export to Video .) In the first drop-down box under the Create a Video heading, select the video quality you want, which pertains to the ...
Open the slide you want to start recording from. Near the upper right corner of the PowerPoint window, select Record. When you're ready, select the round, red Record button, wait for the countdown, then start speaking. To record from a specific slide, go to it, and then select Record. Note: Narration isn't recorded while the transition between ...
Watch this video to learn how to convert your PowerPoint presentation into a video. When you make a recording of a presentation, all its elements (narration,...
Right-click (or Control-click on macOS) the audio icon or video, and click Save Media as. Tip: Ensure your disk has enough space to save the media file, otherwise you'll have to free up space and try again. In the Save Media as dialog box, choose a folder and also enter a name for the media file. If the Save Media as option doesn't appear on ...
Open the Slide Show tab and select Record Slide Show . Select the Record button on the toolbar to start recording your narration. Use your keyboard arrow keys to move back and forth between slides. Press N or Space Bar to move to the next slide or animation in the presentation.
Audio and video can be an important addition to any PowerPoint presentation. Watch this series of videos to learn how to use both most effectively for your a...
In the top-left corner of PowerPoint, click the "File" option. From the sidebar that opens after clicking the "File" option, select "Export." In the "Export" menu, click "Create a Video." To the right of the "Export" menu, you will now see a "Create a Video" section. In this section, you will define the options for your video file.
How to add audio files from your PC into PowerPoint presentations. The first thing you have to do is open your PowerPoint presentation and select the slide where you want to embed an audio file. PowerPoint, audio, insert. Next, click or tap to select the Insert tab from the ribbon menu on top of the PowerPoint window. PowerPoint, audio, insert.
Open your PowerPoint presentation and select the slide where you want to add audio. On the Insert tab, in the Media group, click the Audio drop-down arrow. Select Record Audio. A new window will open. Record Audio option. Enter the name of the audio file you're about to record. Entering the file name. Press Record to start recording.
1. Open the PowerPoint presentation in which you want to record audio and video. 2. From the Slide Show tab (or the Recording tab), click the Record Slide Show button and choose either Record from Current slide or Record from Beginning, depending on which point you want to add audio/video. 3.
Nevertheless, here's what you need to do to record your presentation as a .ppsx file. Step-1: Click on the "File" tab. In the menu ribbon located at the top of the screen, click on the "File" tab. This will open the "File" screen. Step-2: Click on the "Save As" option. In the menu sidebar on the left side of the "File ...
Add and record audio, such as music, narration, or sound bites, to your PowerPoint presentation and select the playback options. Add audio from your PC. ... To choose how the audio plays in your presentation, select an option: Play Across Slides - Plays one audio file across all slides.
In this you will learn how to record a voice over a PowerPoint presentation, how to edit that audio snippet in PowerPoint and how to save the presentation ...
It seems to me that the process of adding audio files to a pdf is quite time-consuming (I'd have to create separate audio files for every page and then add them manually). It seems to me that the quickest way to create audio-recordings linked to separate pages is to use the "Record slide show" function in power point.
Once I inserted the media file, right click on the icon, go to the Playback section - click "hide during show", "automatically", and "loop until stopped". The sound will continue until the next media file in a slide is played. Hope this works for you and good luck ! PW. PWBeantown.
Open the PowerPoint 2007 presentation file. To edit the file, first open PowerPoint and then open the presentation file. Select the Office button and choose Save As . In the Save As dialog box, select the Save as Type down arrow and choose Web Page (*.htm; *.html) . In the File name text box, enter a file name. Select Save .
Go to the PowerPoint Preferences > Output and Sharing > Save > Font Embedding. Tick the box that says, "Embed fonts in the file." On Windows: Go to File > Options > Save. In the section "Preserve fidelity when sharing this presentation," tick the box which says, "Embed fonts in the file.
Save in a video format. Select File > Export. (Don't use Save As, because it doesn't offer video options.) Open the File Format list and select the video format that you want ( MP4 or MOV ). If the MP4 and MOV options aren't in your version of PowerPoint, see Requirements below for more information. Select the video Quality you want ...
🔵 The .ppt file format, used in Microsoft PowerPoint presentations, includes slides with text, images, animations, videos, and audio, often featuring embedded objects from other Office applications. Key points include: - File Type: ".ppt" stands for PowerPoint Presentation, used for creating slideshows.
Step 2: Go to "File" and select "Download". After opening your Google Slides presentation, the next step is to navigate to the "File" menu and select the "Download" option. This will allow you to choose the desired file format for download. Follow the steps below to complete this step:
Report abuse. There's nothing in PowerPoint to convert video to audio. You'll have to do that with a third party application, then reimport. Author of "OOXML Hacking - Unlocking Microsoft Office's Secrets", ebook now out. John Korchok, Production Manager.
Select the audio icon and then select the Playback tab. Then select which options you'd like to use: To trim the audio, select Trim and then use the red and green sliders to trim the audio file accordingly. To fade in or fade out audio, change the number in the Fade Duration boxes. To adjust volume, select Volume and select the setting you ...
Go to Record > From Beginning or Record > From Current Slide.; In the recording screen, click on the Camera icon at the top. This will insert a round object containing your video in your slides ...