- Link to facebook
- Link to linkedin
- Link to twitter
- Link to youtube
- Writing Tips

How to Download a PowerPoint Presentation

4-minute read
- 24th January 2024
PowerPoint is Microsoft’s presentation software . It’s frequently used by families, students, and businesses to create slideshows that use text, images, art, and videos.
Whether you want to access lecture slides or presentations showing essential business insights, in this post, we’ll walk you through you how to download PowerPoint presentations so you can work with them offline.
1. Get the Software
If you don’t already have PowerPoint, you will need to download it. Microsoft PowerPoint is part of Microsoft 365 . This is a subscription service, so it does come with a cost.
A free alternative for working with PowerPoint files may be Google slides .
If you choose to download PowerPoint, first make sure your computer will be able to run it:
- Windows Users: Check that your computer is running Windows 10 or higher that your system has the required hardware specifications to run PowerPoint smoothly.
- Mac Users: Confirm that your Mac is running a version of macOS that supports Microsoft’s software .
2. Connect to the Internet
This may seem obvious, but it’s good to make sure you have a reliable internet connection before you try to download anything.
3. Download Your PowerPoint Presentation
Once you’ve got PowerPoint or Google slides set up, you’re ready to download PowerPoint presentations.
First, find the PowerPoint you want to download. This could be in an email, on a website, or on a platform like Google Drive or OneDrive .
Next, make sure you have access to the file and permission to download it. For some websites, you may need to create an account and login.
Downloading a PowerPoint from Email
While each email provider is a little different, the basic steps for downloading a PowerPoint are the same:
1. Open the email that contains the PowerPoint presentation.
2. Click on the Attachment icon to download the file.
3. Once the file is downloaded, click on it to open it with PowerPoint.
4. To save a copy of the presentation, click on the File tab.
5. Select Save As and choose where you want to save the file.
6. Give the file a name and hit Save .
Downloading a PowerPoint from a Website
You can download a PowerPoint presentation from a website in just a few steps:
1. Right-click the presentation link or select File if you are viewing the presentation.
2. Select Save As .
Find this useful?
Subscribe to our newsletter and get writing tips from our editors straight to your inbox.
3. Give the file a name and choose the file format you want to save it in.
4. Click Save .
Some websites use PowerPoint for the web, which is one of Microsoft’s online tools. The steps to download these PowerPoint files are slightly different:
1. Click on the File tab of the main ribbon.
2. Select Download As .
3. From the panel of options on the right, select Download a Copy .
4. A dialog box will confirm that the copy is ready to be downloaded to your computer.
5. Select Download to continue.
Downloading a PowerPoint from OneDrive or Google Drive
You can download a PowerPoint presentation from OneDrive or Google Drive for offline use:
1. Open the appropriate website and sign in to your account.
2. Locate the PowerPoint presentation you want to download.
3. Right-click on the file and select Download .
4. When prompted, select Save or Save As .
5. Choose where to save the file and click Save .
If you’re using Microsoft 365, your PowerPoint presentations may automatically save to your OneDrive. Follow the steps above if you want to save a copy to your computer.
Have the Best PowerPoint Presentation
Now you know how to download a PowerPoint presentation from almost any source!
If you want to make sure you have the best PowerPoint presentations around, have one of our expert proofreaders check them for you. You can even try it free !
Share this article:
Post A New Comment
Got content that needs a quick turnaround? Let us polish your work. Explore our editorial business services.
3-minute read
How to Insert a Text Box in a Google Doc
Google Docs is a powerful collaborative tool, and mastering its features can significantly enhance your...
2-minute read
How to Cite the CDC in APA
If you’re writing about health issues, you might need to reference the Centers for Disease...
5-minute read
Six Product Description Generator Tools for Your Product Copy
Introduction If you’re involved with ecommerce, you’re likely familiar with the often painstaking process of...
What Is a Content Editor?
Are you interested in learning more about the role of a content editor and the...
The Benefits of Using an Online Proofreading Service
Proofreading is important to ensure your writing is clear and concise for your readers. Whether...
6 Online AI Presentation Maker Tools
Creating presentations can be time-consuming and frustrating. Trying to construct a visually appealing and informative...
Make sure your writing is the best it can be with our expert English proofreading and editing.
How to convert Google Slides to a PowerPoint presentation in 4 easy steps
- It's easy to convert Google Slides to a PowerPoint presentation on your computer.
- To save a Google Slides presentation as a PowerPoint deck, use the File menu to download the Google Slides file as a PowerPoint (.pptx) file.
- Your browser will then give you the option to open or save the PowerPoint file on your computer.
- Visit Business Insider's homepage for more stories .
Whether you regularly use Google Slides or Microsoft PowerPoint , it's just a matter of time before you need to convert one of those files into the other.
If you have a PowerPoint presentation that you need to convert into a Google Slides deck, read our article, " How to convert a PowerPoint presentation to Google Slides in 2 different ways ."
If you need to go the other way and save a Google Slides presentation as a PowerPoint deck, it's even simpler. Here's how to do it.
How to convert Google Slides to PowerPoint
1. Open Google Drive in a web browser.
2. Locate and open the Slides deck that you want to convert to PowerPoint. You can zero in on your slides by clicking the three horizontal lines at the top left of the page and choosing "Slides" from the menu.
3. In the open presentation, click "File."
4. Click "Download" and then click "Microsoft PowerPoint (.pptx)."
A PowerPoint version of the document will be saved to your computer. Find the file depending upon what browser you're using:
- In Firefox, you'll see a dialog box that lets you open the file in PowerPoint or save it to your hard drive.
- In Google Chrome, the file will be automatically downloaded. You can find it in the download bar at the very bottom of the browser window.
- In Microsoft Edge, you should see a dialog box at the bottom of the browser asking if you want to open or save the file.
Related coverage from How To Do Everything: Tech :
How to add music or other audio to a google slides presentation, how to embed a youtube video into a powerpoint presentation, depending on the version of your powerpoint, how to edit google docs files offline, for when you're without internet or trying to eliminate online distractions, how to embed a youtube video in google slides in 4 simple steps to make your slideshow presentations more engaging.
On February 28, Axel Springer, Business Insider's parent company, joined 31 other media groups and filed a $2.3 billion suit against Google in Dutch court, alleging losses suffered due to the company's advertising practices.
Watch: I cut Google out of my life for 2 weeks, but the alternatives prove why Google is so much better
- Main content

Reinvent productivity with Copilot for Microsoft 365.
Microsoft PowerPoint

Copilot in PowerPoint
Turn your inspiration into stunning presentations. Get it now when you add Copilot Pro or Copilot for Microsoft 365 to your Microsoft 365 subscription.
Turn your inspiration into stunning presentations
Turn a spark of inspiration into personalized presentations with Copilot in PowerPoint. Copilot will turn existing Word documents into presentations, create new presentations from simple prompts or outlines, or find the best places for impactful imagery—and will help you leave audiences dazzled with skillful storytelling.

Designing slides has never been easier
Create well-designed, impactful slides with the help of Designer and Ideas in PowerPoint.
3D isn't just for the movies
Now you can easily insert 3D objects and embedded animations directly into PowerPoint decks from your own files or a library of content.

Interact naturally using voice, touch, and ink
Easily ink onto a slide, then convert handwritten notes into text and make hand-drawn shapes perfect in seconds.
Nail your next presentation
With Presenter Coach, practice your speech and get recommendations on pacing, word choice, and more through the power of AI.

Be on the same page
Always know where you are in the editing process. With the while you were away feature, track recent changes made by others in your decks.
Task management with PowerPoint and Microsoft 365
Tell your story with captivating presentations.
Originally starting from Free now starting from Free
Sharing and real-time collaboration
PowerPoint for the web
Basic templates, fonts, icons, and stickers
Dictation and voice commands
Works on web, iOS, and Android™
5 GB of cloud storage
Microsoft 365 Personal
Originally starting from $6.99 now starting from $6.99
$6.99 $6.99
(Annual subscription–auto renews) 1
PowerPoint for the web and PowerPoint desktop app for offline use
Premium templates, fonts, icons, and stickers with thousands of options to choose from
Dictation, voice commands, and transcription
Advanced spelling and grammar, in-app learning tips, use in 20+ languages, and more
1 TB (1000 GB) of cloud storage
Premium desktop, web, and mobile apps
Advanced security
Ad-free experience
Works on Windows, macOS, iOS, and Android™
Copilot Pro available as an add-on. *
Microsoft 365 Family
Originally starting from $9.99 now starting from $9.99
$9.99 $9.99
One to six people
Up to 6 TB of cloud storage, 1 TB (1000 GB) per person
Premium desktop, web, and mobile apps
Advanced security
Microsoft Powerpoint
One person
Microsoft 365 Apps for business
Originally starting from $8.25 now starting from $8.25
$8.25 $8.25
Available for up to 300 employes
Desktop versions of Word, Excel, PowerPoint, and Outlook
1 TB of cloud storage per user
Anytime phone and web support
Microsoft 365 Business Standard
Originally starting from $12.50 now starting from $12.50
$12.50 $12.50
Everything in Microsoft 365 Apps for business, plus:
Web, and mobile versions of Word, Excel, PowerPoint, and Outlook
Custom business email ([email protected])
Chat, call, and video conference with Microsoft Teams
10+ additional apps for your business needs (Bookings, Planner, Microsoft Forms, and others)
Automatic spam and malware filtering
Webinars with attendee registration and reporting
New: Collaborative workspaces to co-create using Microsoft Loop
New: Video editing and design tools with Clipchamp
Copilot for Microsoft 365 available as an add-on. **
Add Copilot to your Microsoft plan
Achieve more than ever using AI integrated with Word, Excel, PowerPoint, Outlook, and other Microsoft 365 apps.

Get the PowerPoint mobile app
Ready to create great presentations with Microsoft 365?
See more from microsoft powerpoint.
Collaborate on shared projects
Get commonly used Office features and real-time co-authoring capabilities through your browser.
Jumpstart your design
Show your style and professionalism with templates, plus save time. Browse PowerPoint templates in over 40 categories.
Connect with experts
See what’s new and get classic tips and editors' tricks to help you create, edit, and polish presentations like a pro.
Read about slide presentations
6 slide presentation software tips to impress, host large-scale virtual presentations, how to make a slide show, what’s new in powerpoint.
- [1] Once your paid subscription begins, cancelation policies vary based on your status as a new customer, product, and domain selections on Microsoft. Learn more. Cancel your Microsoft 365 subscription any time by going to the Microsoft 365 admin center. When a subscription is canceled, all associated data will be deleted. Learn more about data retention, deletion, and destruction in Microsoft 365 . Microsoft PowerPoint with a Microsoft 365 subscription is the latest version of PowerPoint. Previous versions include PowerPoint 2016, PowerPoint 2013 , PowerPoint 2010 , PowerPoint 2007 , and PowerPoint 2003. iTunes, iPhone, and iPad are registered trademarks of Apple Inc., registered in the U.S. and other countries. Android is a trademark of Google Inc.
- [*] Copilot Pro benefits are currently available on web, Windows, and macOS and iPadOS. A Microsoft 365 Personal or Family subscription is required to access Copilot in select apps, including Word, Excel, PowerPoint, OneNote, and Outlook. Excel features are currently in preview in English only. Microsoft 365 Personal or Family and Copilot Pro are not available in the same transaction and must be purchased in two separate transactions.
- [**] Copilot for Microsoft 365 may not be available for all markets and languages. To purchase, enterprise customers must have a license for Microsoft 365 E3 or E5 or Office 365 E3 or E5, and business customers must have a license for Microsoft 365 Business Standard or Business Premium.
Follow Microsoft 365
How To Import PowerPoint Template? [Step-by-Step Tutorial!]
By: Author Shrot Katewa
![How To Import PowerPoint Template? [Step-by-Step Tutorial!]](https://artofpresentations.com/wp-content/uploads/2023/02/Featured-Image-1.jpg "how do you download presentation to powerpoint")
When you want to change the design of your presentation but don’t have enough time, try using a template. Microsoft PowerPoint has a variety of built-in templates or you want to take it to another level by importing custom templates to your presentation.
To import PowerPoint Template, open your presentation and click on the “File” tab. Then, choose the “Office” option under the “Blank Presentation” option in the “New” screen. Click on your preferred template and hit “Create” to download the template.
Are you constantly using the same theme? Would you like to change the design of each new presentation? This article is a complete guide on how to import a template to a new or existing presentation as well as how can you save a custom PowerPoint template.
Let’s get started!
1. How to Insert PowerPoint Template?
In Microsoft PowerPoint, you can add custom templates to a presentation file using the “File” menu. Using templates in your PowerPoint presentation makes the slides look more connected and coherent. To add a PowerPoint template to a blank presentation, follow the 5 easy steps.
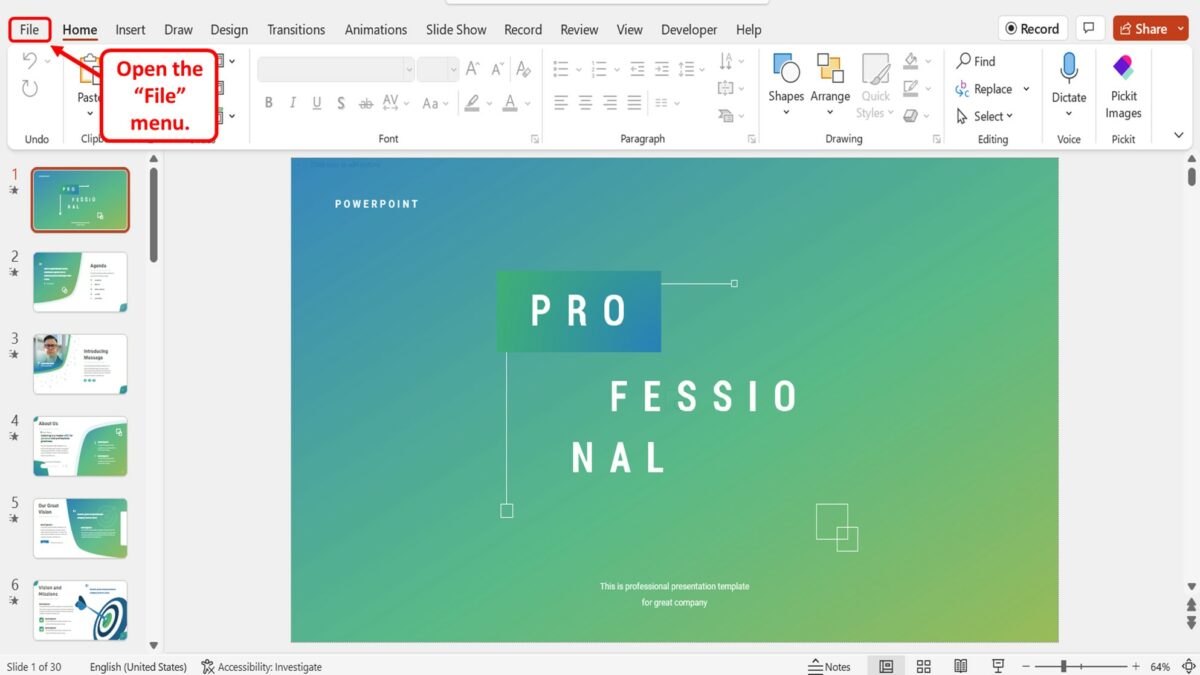
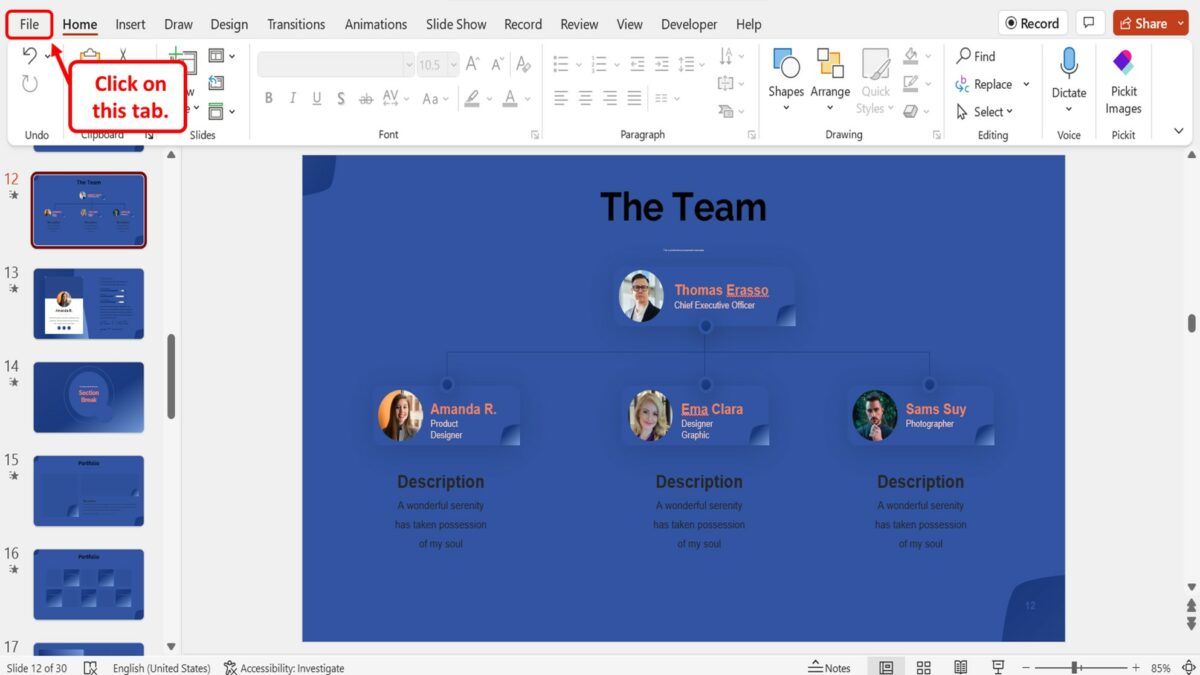
Step-1: Click on the “File” tab
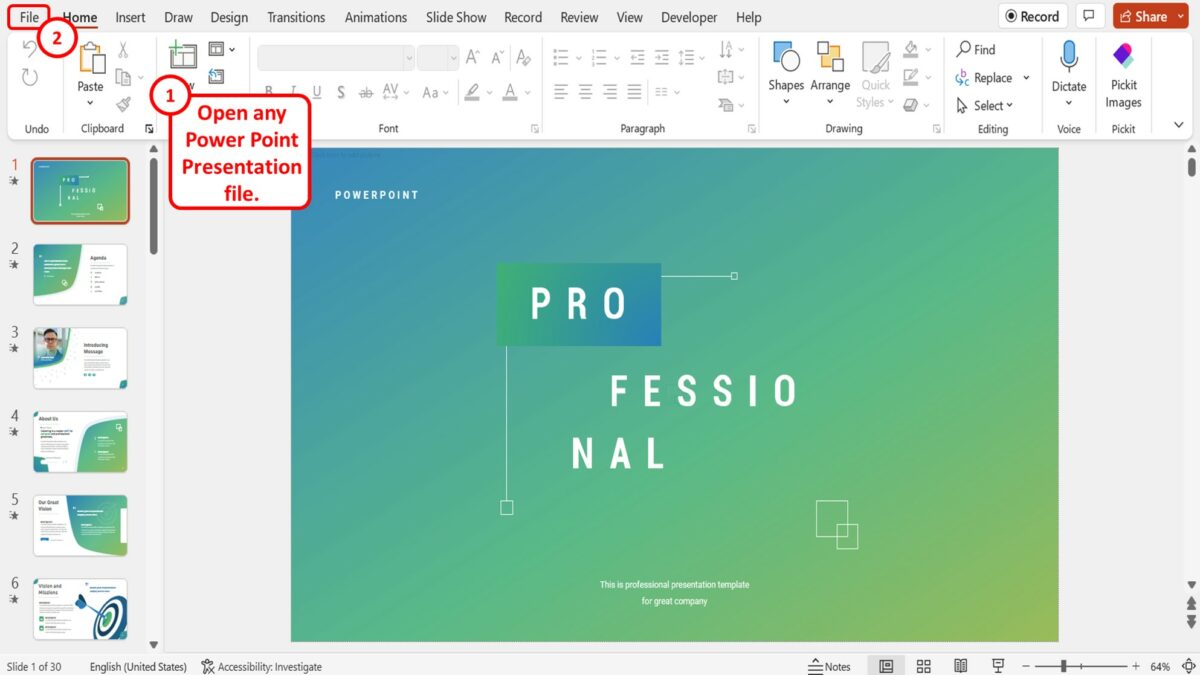
The first step is to open any PowerPoint presentation file. Then click on the “File” tab, the first option in the menu ribbon at the top of the screen.
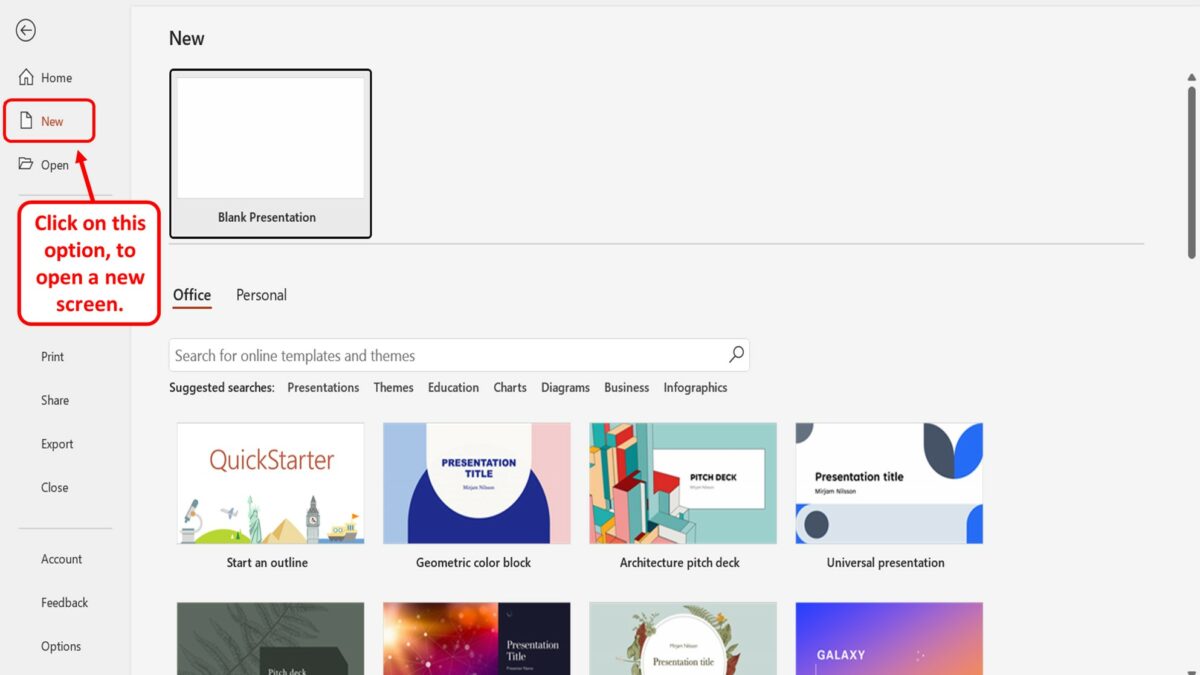
Step-2: Click on the “New” option
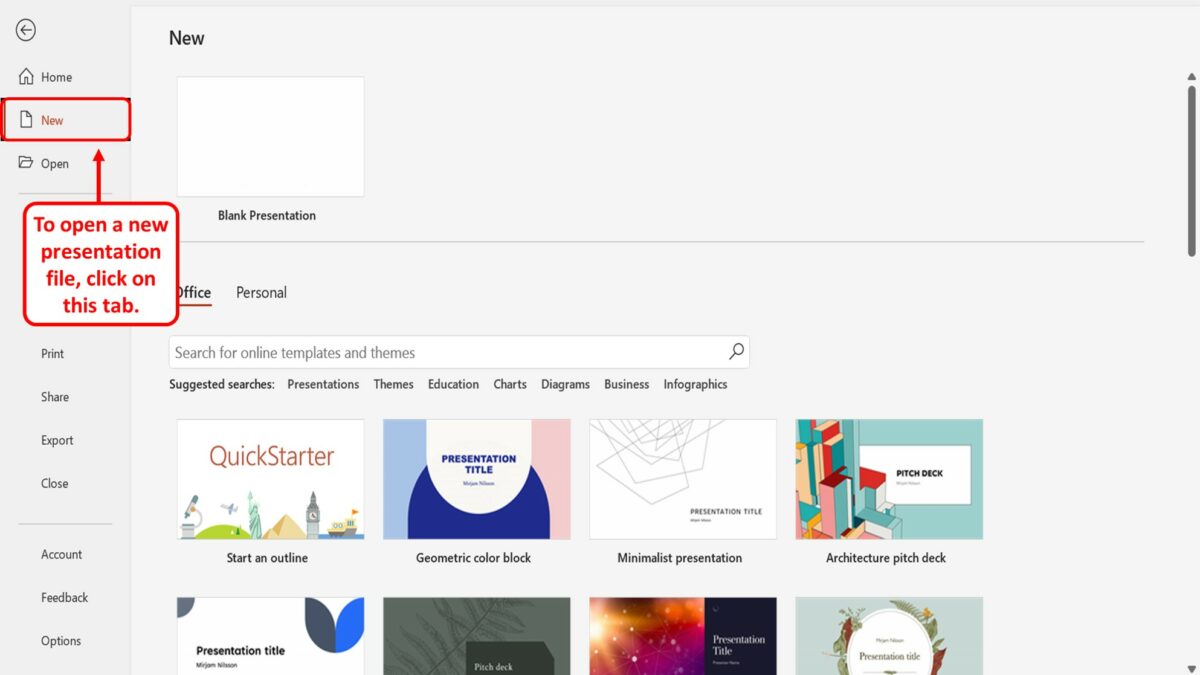
The next step is to open a new presentation file with a template. To do so, click on the “New” option in the sidebar located at the left side of the screen in the “File” menu.
Step-3: Click on the “Office” option
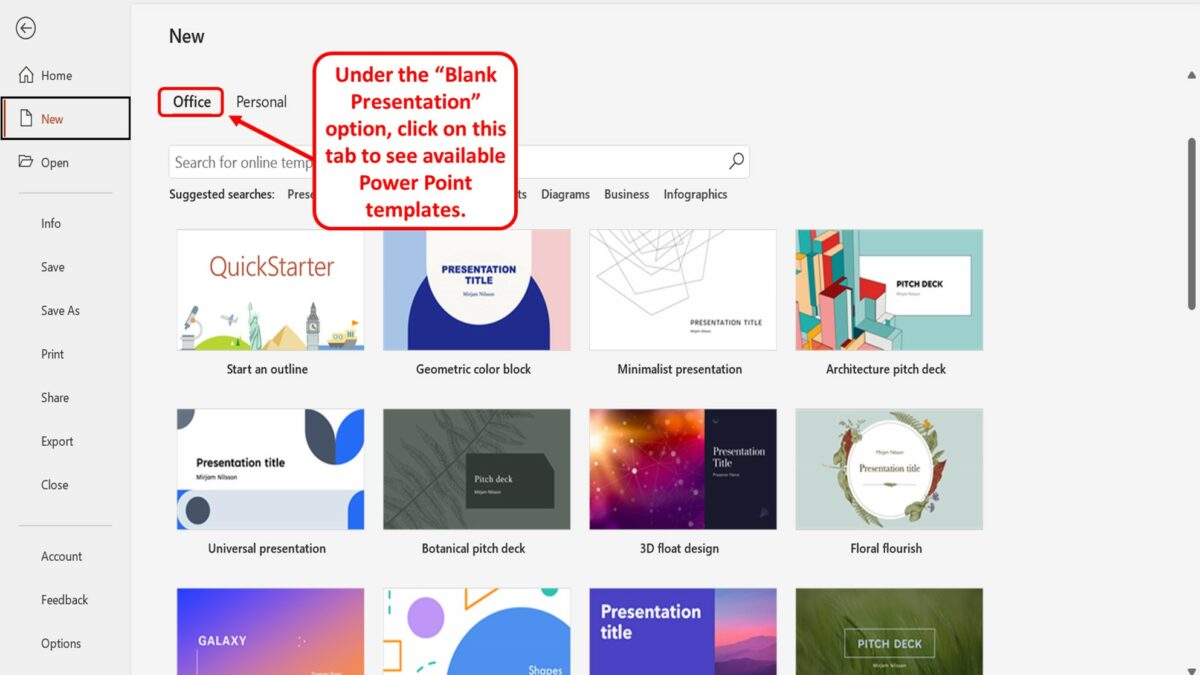
Under the “Blank Presentation” option in the “New” screen, click on the “Office” option. This will show all the PowerPoint templates available in Office 365.
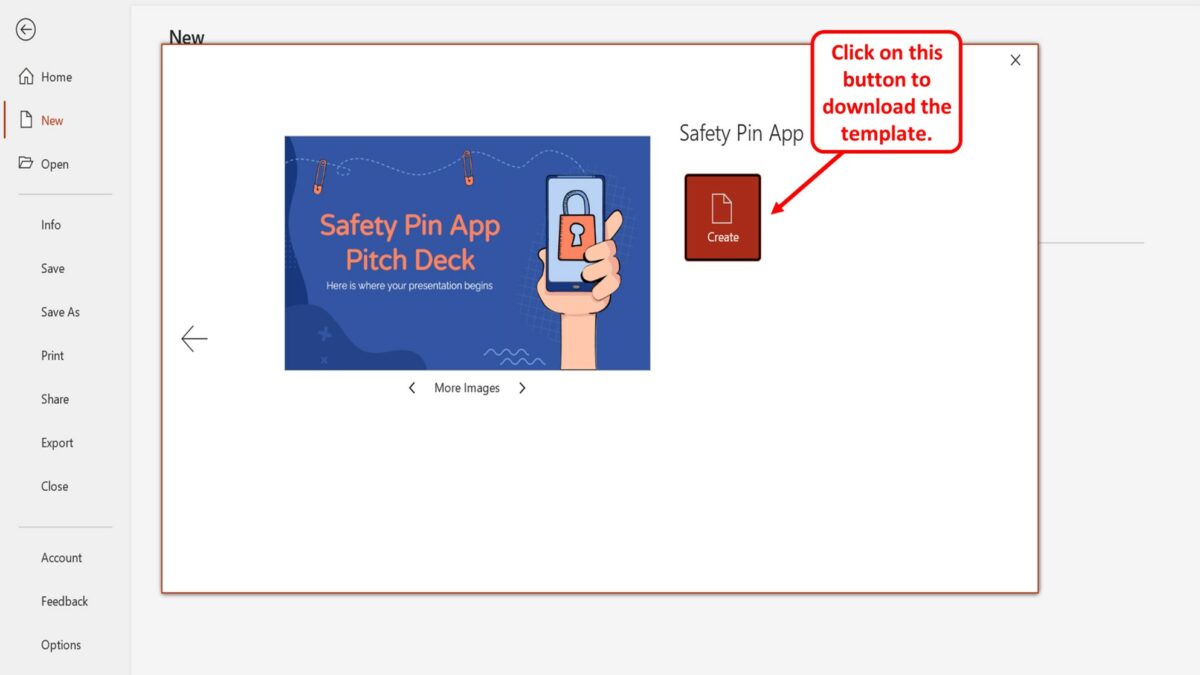
Step-4: Select your preferred template
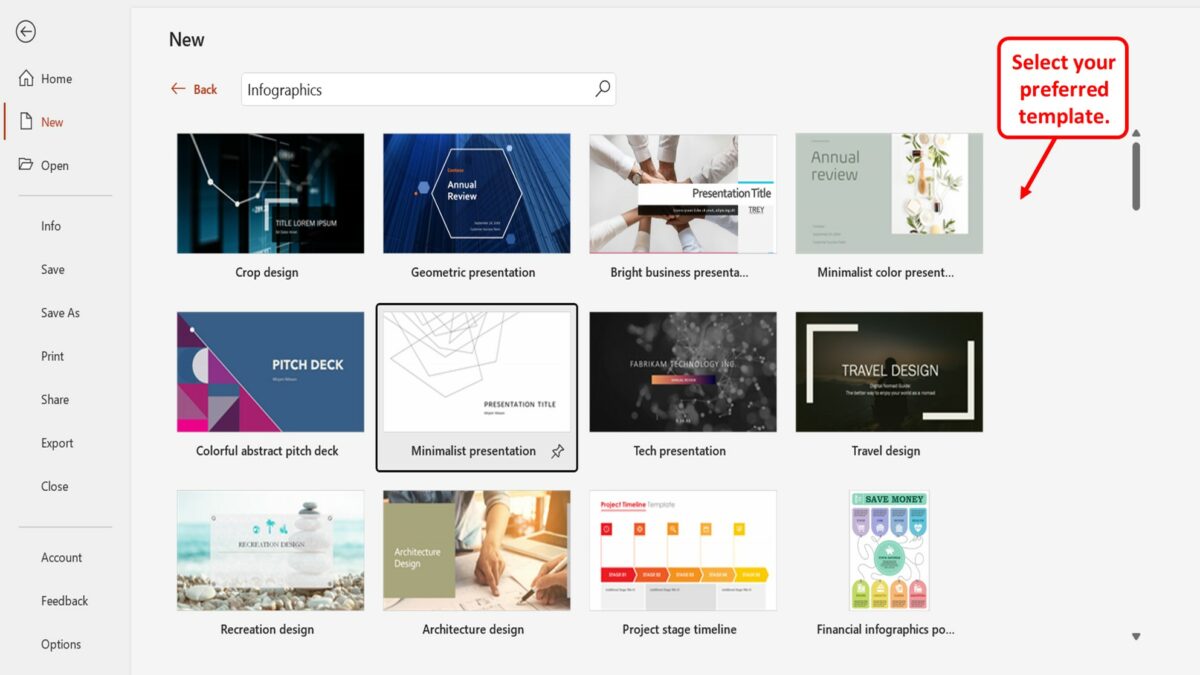
You can scroll down to find your preferred template. You can also click on the search bar under the “Office” option to look for a specific template. Then all you have to do is click on your preferred template. This will open a dialog box.
Step-5: Click on the “Create” button
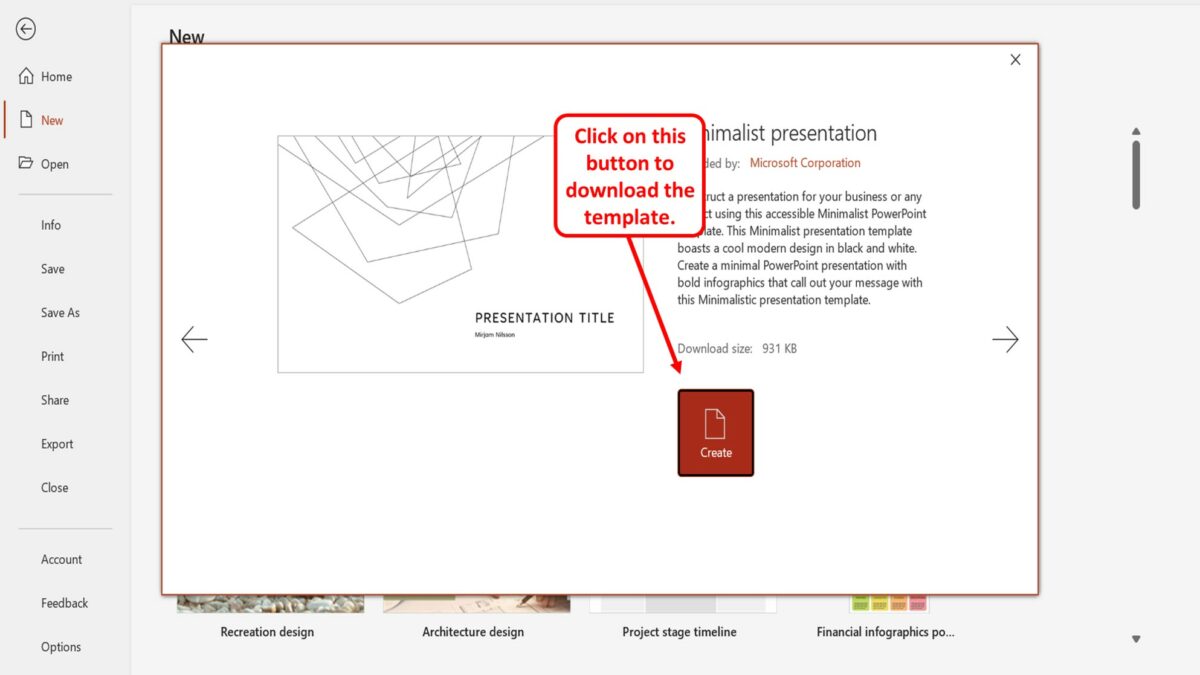
The final step is to download the template. Click the “Create” button in the dialog box to download the template. The new presentation file containing the template slides will open automatically once the download is complete.
2. How to Import Custom PowerPoint Template?
Microsoft PowerPoint allows you to create and add custom presentation templates. Using the “File” menu, you can import a custom template to a new presentation or even an existing presentation.
2.1 How to Apply a Template to a New Presentation?
To apply a custom template to a new presentation in Microsoft PowerPoint, all you have to do is follow the 5 quick steps.
The first step is to open a new presentation. To do so, you can click on the “File” tab in the menu ribbon of any PowerPoint presentation file. This will open the “File” menu.
In the “File” menu, click on the “New” option. It is the second option in the sidebar located on the left side of the screen. This will open the “New” screen.
Step-3: Click on the “Personal” option

Now you can open a custom template. Click on the “Personal” option under the “Blank Presentation” option in the “New” screen. This will show all the custom PowerPoint templates available on your device.
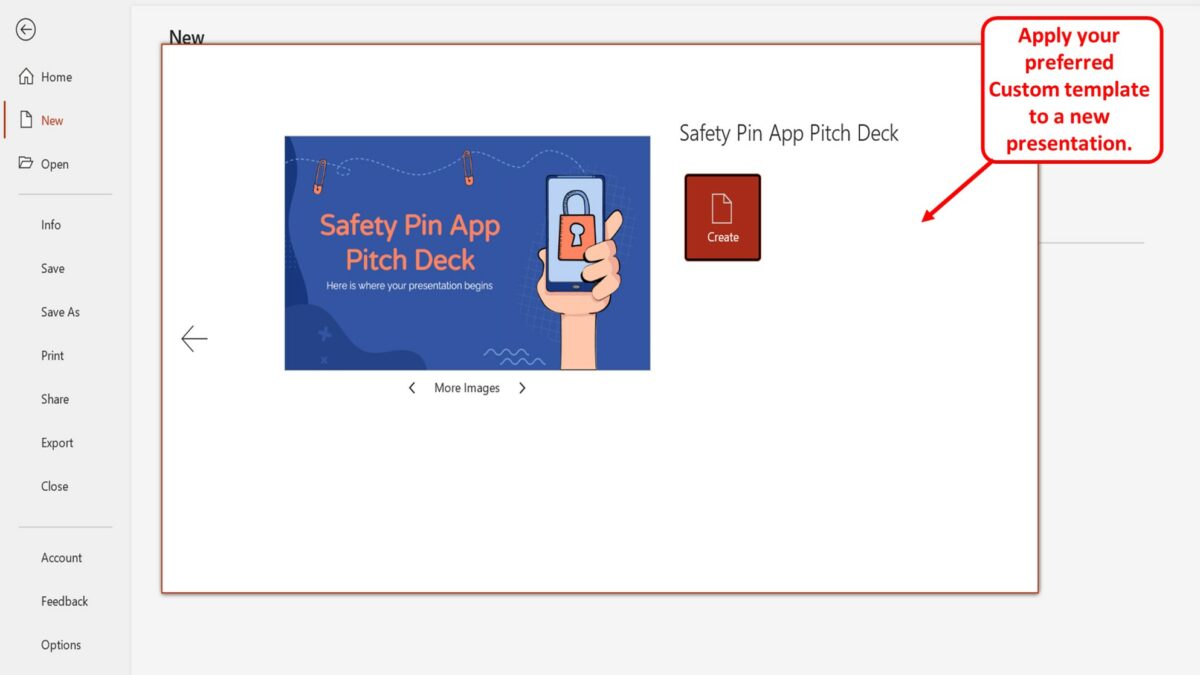
Step-4: Select your preferred custom template
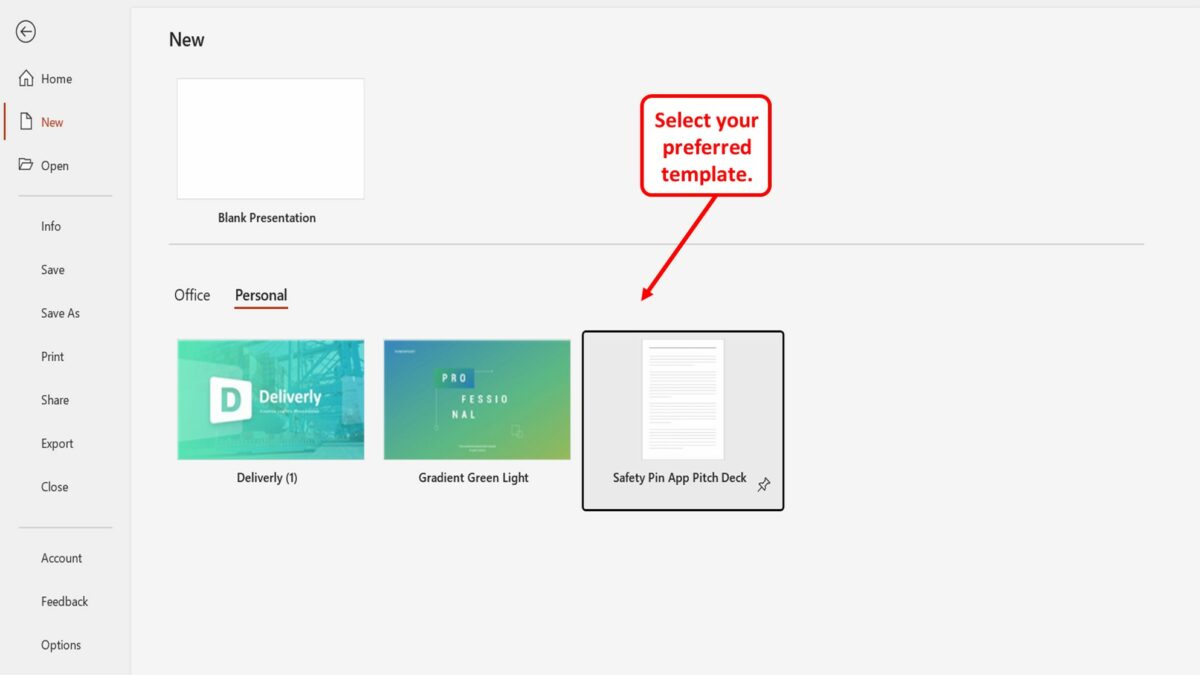
All you have to do now is click on the custom template that you want to use. This will open a dialog box.
In the dialog box, click on the “Create” button to open a new presentation file with the selected template automatically applied to it.
2.2 How to Apply a Template to an Existing Presentation?
In Microsoft PowerPoint, you cannot apply a new custom template to an existing presentation file. However, you can import existing slides into a custom template file. All you have to do is follow the 6 simple steps.
Step-1: Apply a custom template to a new presentation
The first step is to apply your preferred custom template to a new presentation. To do so, follow the steps detailed in section 2.1 .
Step-2: Select the existing presentation slides
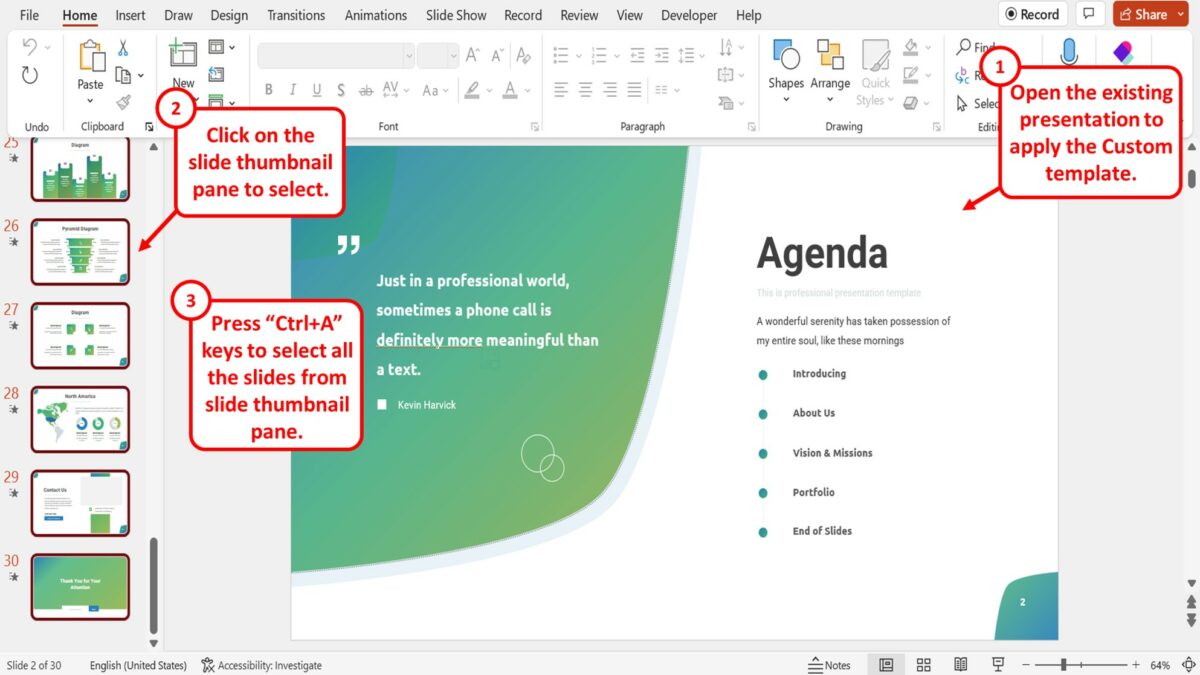
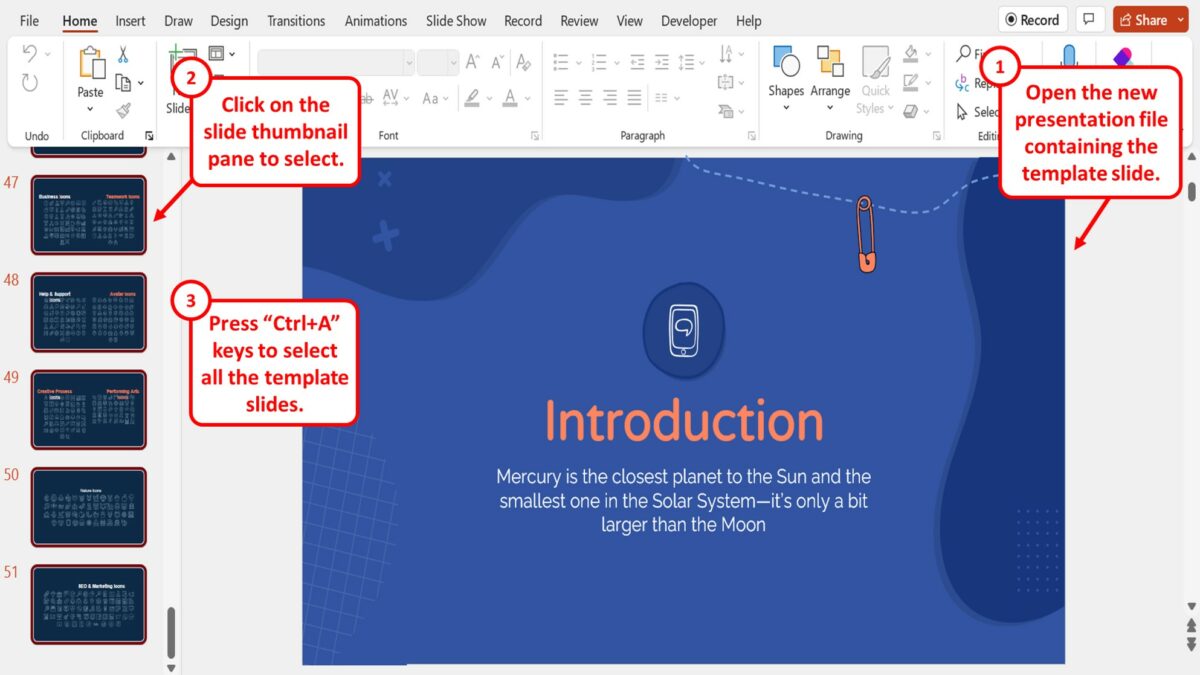
The next step is to open the existing presentation where you want to apply the custom template. Then click on the slide thumbnail pane on the left side of the screen to select the slide thumbnail. Press the “Ctrl+A” keys on your keyboard to select all the slides from the slide thumbnail pane.
Step-3: Click on the “Copy” option
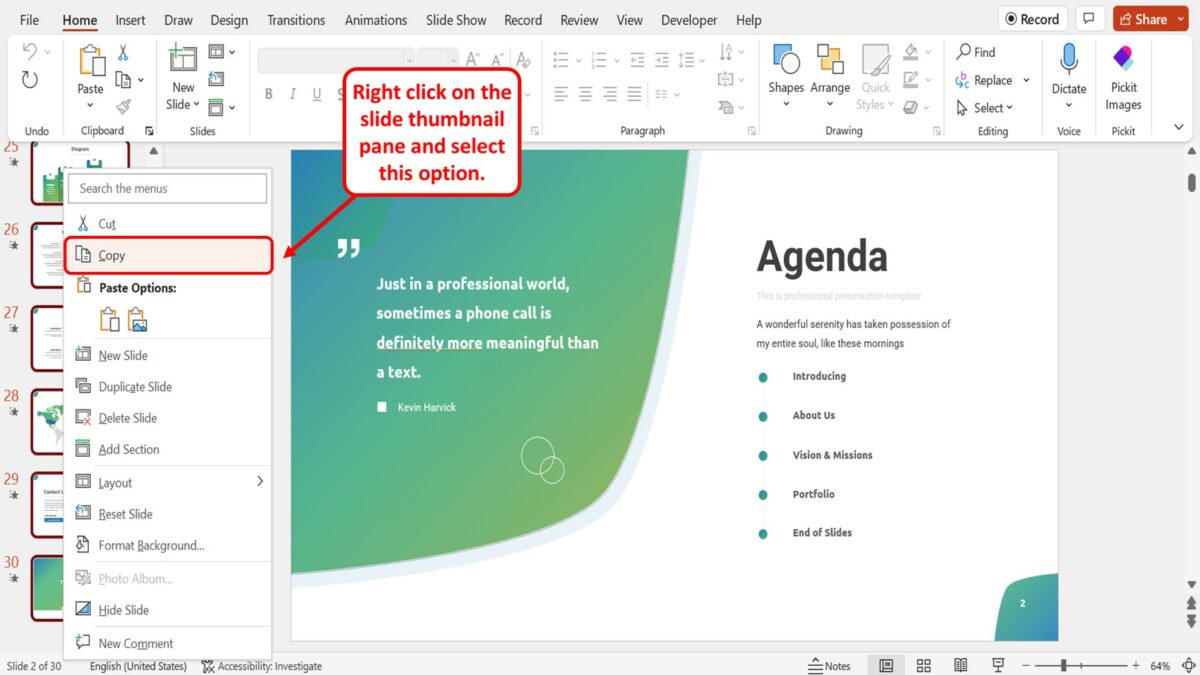
You have to now copy all the existing slides. “Right Click” on the slide thumbnail pane and click on the “Copy” option in the right-click menu. Alternatively, you can press the “Ctrl+C” keys on your keyboard to copy all the slides simultaneously.
Step-4: Select the template slides
The next step is to open the new presentation file containing the template slide. Click on the slide thumbnail pane located on the left side of the screen. Then press the “Ctrl+A” keys on your keyboard to select all the template slides.
Step-5: Click on the “Delete Slide” option
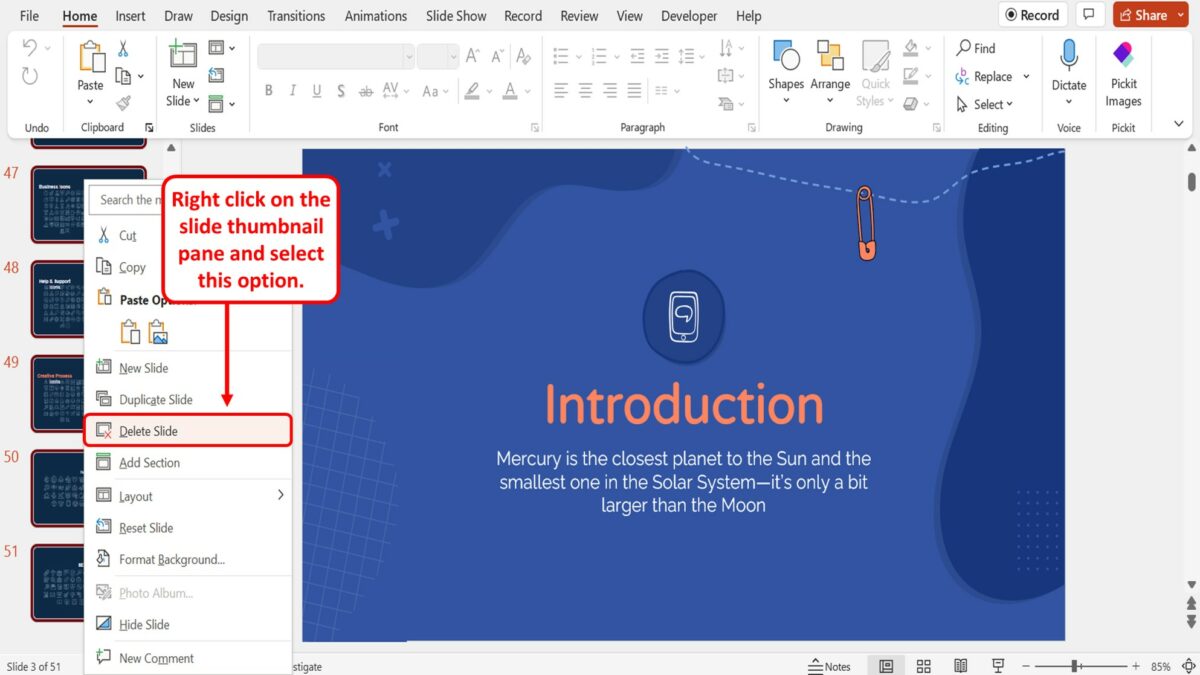
“Right Click” on the slide thumbnails and click on the “Delete Slide” option from the right-click menu. You can alternatively press the “Delete” key on your keyboard to remove all the template slides.
Step-6: Click on the “Use Destination Theme” option
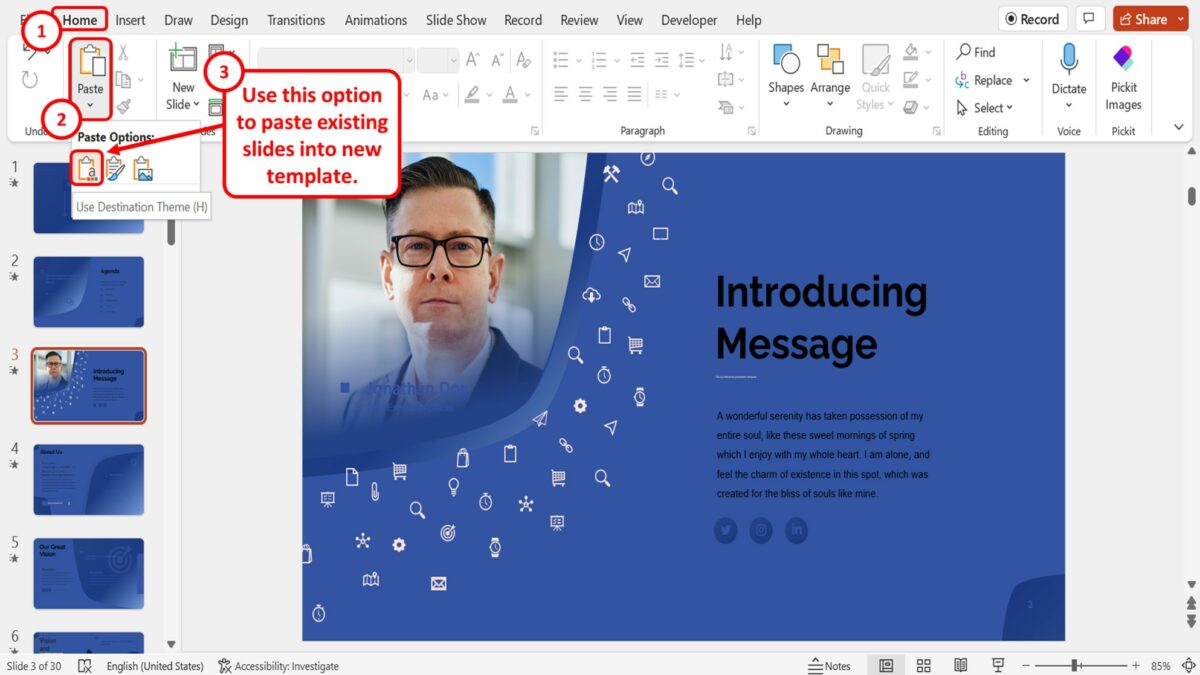
Now all you have to do is click on the down arrow under the “Paste” option in the “Home” menu in the template file. In the dropdown menu under the “Paste” button, click on the “Use Destination Theme” option to paste the existing slides into the new template design.
3. How to Save Custom PowerPoint Template?
To create a custom template in PowerPoint, you can simply save a presentation as a “PowerPoint Template (.potx)” file. To do so, follow the 4 easy steps.
Step-1: Click on the “File” menu
In the menu ribbon located at the top of the screen, click on the “File” tab. This will open the “File” menu.
Step-2: Click on the “Save As” option
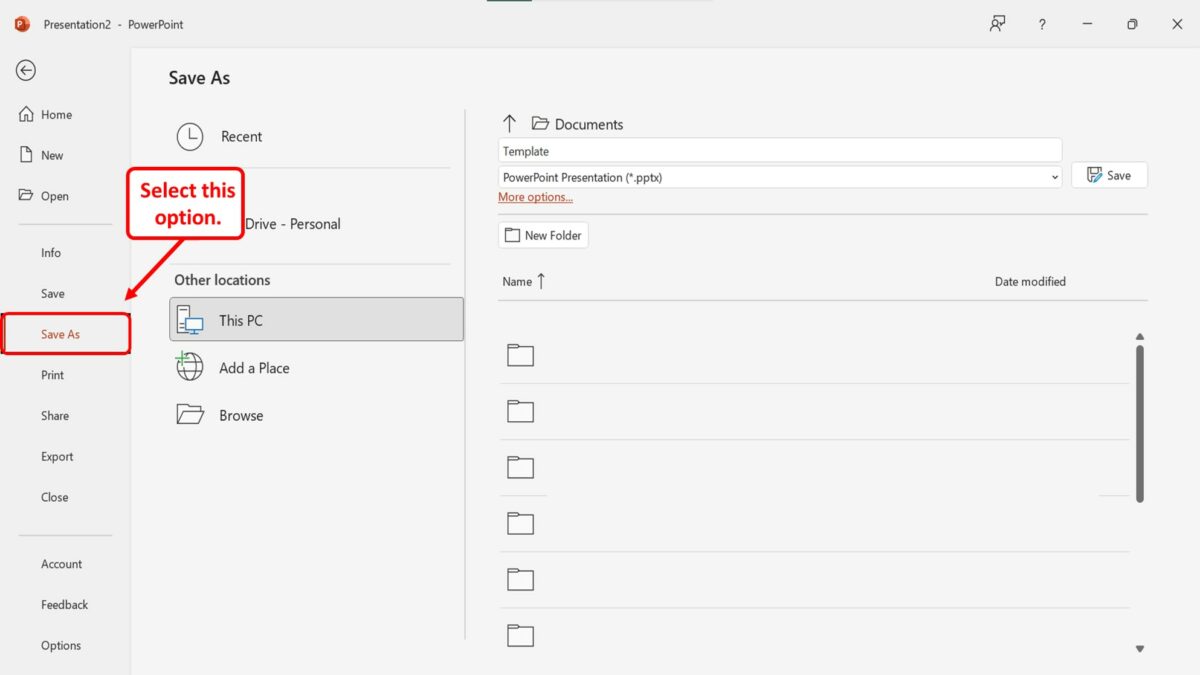
In the “File” menu, click on the “Save As” option from the sidebar located at the left side of the screen.
Step-3: Click on the “File Type” box
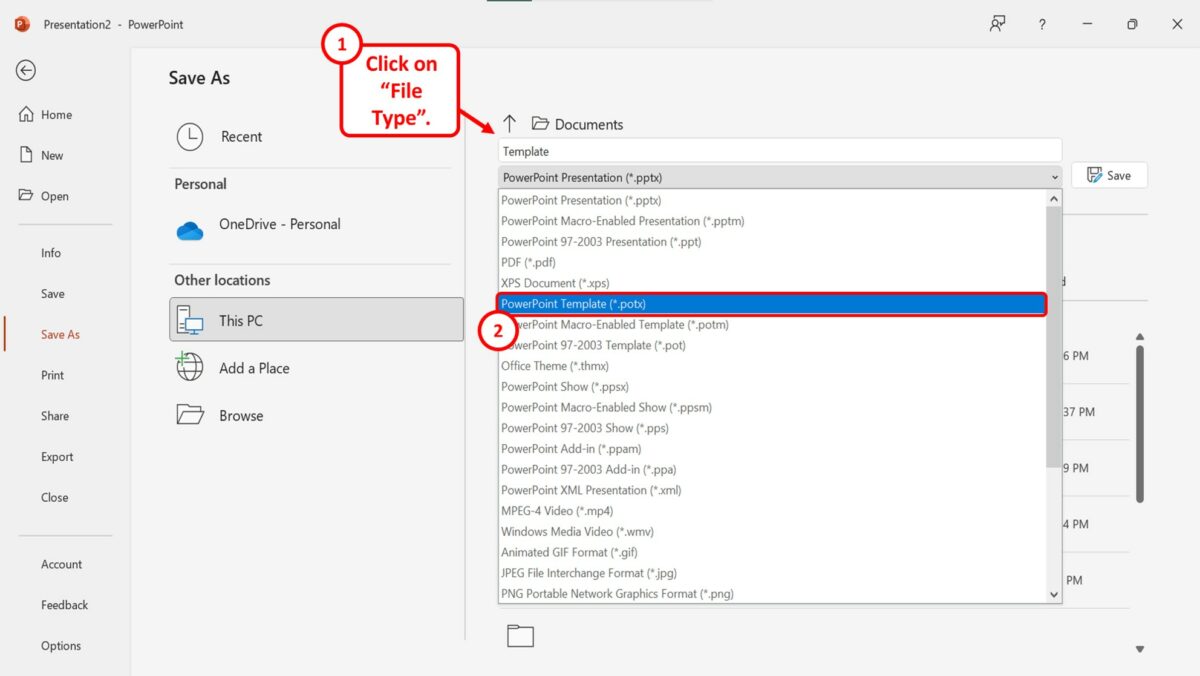
In the “Save As” screen, click on the “File Type” box that shows “PowerPoint Presentation (.pptx)” by default. Then click on the “PowerPoint Template (.potx)” option in the dropdown menu under the “File Type” box.
Step-4: Click on the “Save” button
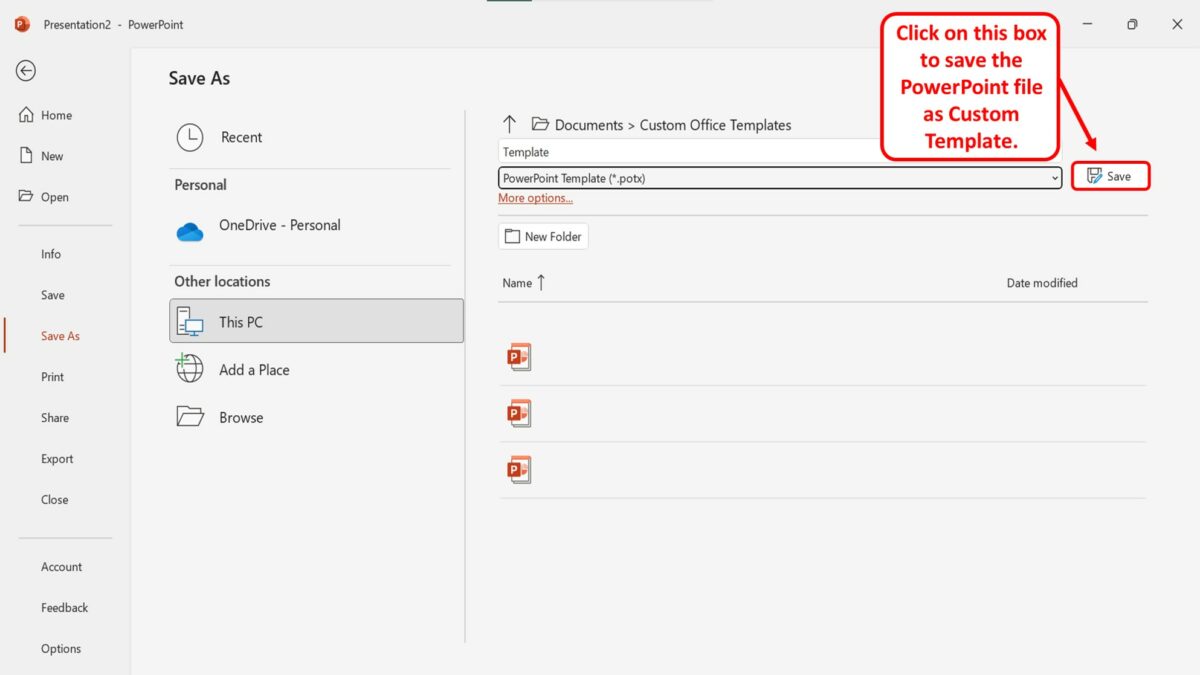
Now all you have to do is click on the “Save” button next to the “File Type” box to save the PowerPoint file as a custom template.
- Slidesgo School
- PowerPoint Tutorials
How to Download Templates for PowerPoint

PowerPoint is a well-known name when it comes to the world of presentations and slideshows. It is part of the Microsoft Office suite and has been employed both for personal and professional use for many years.
But when it's time to start making a presentation, you may worry about the amount of time you'll need to design all the content. Isn't there an easier solution? Yes, there is: templates . We're sure that you've browsed the internet for some of them that can be downloaded for free and can be edited to your liking.
How to Get More PowerPoint Templates
There is an even better way to get templates that are much more elaborate . It consists of visiting websites that are dedicated to offering templates, such as, for example, Slidesgo!
The catalog we have at your disposal is immense, with thousands of free and premium templates at your disposal. It won't take you long to find the template you need, no matter what the theme of your presentation is.
Searching for templates is very easy. If you go to our homepage , you will see a series of categories at the top. These will display the most recent templates, the most popular ones or only those that fit one of the main categories: education, business, marketing, medical and multi-purpose. In addition, we have templates that contain only infographics.

You can also filter easily by color or style . Just click the corresponding filter and select the option you want.

When you have located the template you want, click on it. You will be able to preview all the slides it contains, see a brief description of its contents and, most importantly, download it.
To download the template, simply click on the button corresponding to the software you are going to use, which in this case is PowerPoint. Depending on the browser you are using, you might be asked for confirmation.
Take a look around our website and find the template you like the most to start customizing it in just a few minutes!
Do you find this article useful?
Related tutorials.

How to Download Google Slides Templates
When preparing a presentation, many people start panicking because they realize how much time it will take to edit each and every slide. Creating them from scratch, filling them in, looking for pictures, moving the elements...How stressful! But there is a solution that saves you a lot of time. We're sure that you've browsed the internet for templates, or basically, pre-established designs and elements, that can be downloaded for free and can be edited to your liking. Are we right? Then, we have some good news for you!

Discover our collection of printable templates
With the advance of technology, printing has become something that is no longer a necessity. Smartphones have made the paper format less and less frequent, but there are still certain cases in which having physical resources is much more convenient. Whether it's for taking notes, handing out assignments, making worksheets or handing out business cards or invitations, it's necessary to print your customized designs.From now on, in every Slidesgo printable presentation that you download, you will find the instructions for printing on the third slide. Depending on the style, colors or format of each presentation, we will tell you if you can...

How to Add Superscript and Subscript in Google Slides
Let’s take the most famous formula: E=mc^2, Einstein’s relativity equation. It wouldn’t be the same if it was E=mc2, right? Okay, yes, some people write it like that because it’s very famous and it won’t be misunderstood. But technically… It can! This is where the sophistication of superscript or subscript enters the room! Do you know how to write them in equations, copyright brands or even footnotes in your presentations? Let’s figure out how.

How to Add Superscript and Subscript in PPT
It can be a registered brand, a footnote or a math formula that you need to properly write. “2^2+2” is not the same as “22+2”, is it? Using superscript or subscript in a proper way makes a whole difference in texts. If it’s for your mathematical or physics complex formulas or just an anecdotic footnote, let’s figure out how to write them in a powerpoint presentation!
How-To Geek
How to add a video to a microsoft powerpoint presentation.
If a picture speaks a thousand words, a video speaks a million words!
Quick Links
Embedding videos versus linking to videos, supported video formats in powerpoint, how to insert a video into a powerpoint presentation, manage an embedded video's playback in powerpoint.
Videos can make presentations even more interesting or exciting. If you're looking to add a video to your Microsoft PowerPoint presentation, it's easy to do so. We'll show you how.
In PowerPoint, you can either embed a video or link to a video from your presentation. If you embed a video, your video becomes part of the presentation, which increases the overall size of the presentation file.
Related: How to Send PowerPoint Presentations With an Embedded Video
If you link to a video, PowerPoint only adds a reference to that video in your presentation. The downside of this method is that you need to send the video file separately if you share your presentation with someone. We have written a guide on how to send PowerPoint presentations with videos , so check that out.
In this guide, we'll focus on embedding a video in your presentation so you don't have to worry about sending separate files. And, if you're looking to add a YouTube video to your presentation , there's a way to do that, too.
Related: How to Embed a YouTube Video in PowerPoint
PowerPoint supports multiple video formats, including ASF, AVI, MP4, M4V, MOV, MPG, MPEG, and WMV. If your video is already in one of these formats, you can quickly add that to your presentation.
If your video is in another format, you can convert it to a supported format and then add it to your presentation.
Related: How to Use Handbrake to Convert Any Video File to Any Format
First, make sure the video you want to add to your presentation is saved on your Windows or Mac computer. Then, open your presentation with PowerPoint on your computer.
On the PowerPoint window, in the left sidebar, click the slide in which you want to add a video.
At the top of the PowerPoint window, click the "Insert" tab.
In the "Insert" tab, under the "Media" section (which is to the extreme right side of the interface), click "Video."
You'll now see an "Insert Video From" menu. Here, select "This Device."
Your computer's standard "open" window will open. In this window, access the folder that has your video file. Then double-click your video file to add it to your presentation.
You'll see your selected video in your presentation. To resize this video, click it and use the handles around the video to change its size. Then drag the video to place it at its desired location in your slide.
If you'd like to test the video, at the bottom-left corner of the video, click the play icon.
And you're all set.
Now that you have added a video to your presentation, you might want to change how it plays in your slides. In PowerPoint, you have multiple ways to change your video's playback.
To access these playback options, first, click your video in your presentation. Then, at the top of the PowerPoint window, click "Playback."
In the "Playback" tab, under the "Video Options" section, you will find various options to manage your video's playback.
For example, to change how your video starts to play in your presentation, click the "Start" drop-down menu and select one of these options:
- In Click Sequence : This plays your video in the click sequence. This means if you press the button for the next slide, your video will play.
- Automatically : This option automatically plays your video when the slide with your video opens.
- When Clicked On : Select this option to play your video only when you click it.
The other options are "Play Full Screen," which opens your video in full screen, and "Loop Until Stopped" that plays your video over and over again until you manually stop it.
Before you close PowerPoint, make sure you save your presentation so that your embedded video is saved with it. Do this by clicking File > Save in PowerPoint's menu bar.
And that's how you make your PowerPoint presentations even more engaging by including videos in them. Exciting!
If you don't want to add a video but you do want audio, you can add music to your presentations . This also helps enhance your presentation quality.
Related: How to Add Music to Your PowerPoint Presentation
- PRO Courses Guides New Tech Help Pro Expert Videos About wikiHow Pro Upgrade Sign In
- EDIT Edit this Article
- EXPLORE Tech Help Pro About Us Random Article Quizzes Request a New Article Community Dashboard This Or That Game Popular Categories Arts and Entertainment Artwork Books Movies Computers and Electronics Computers Phone Skills Technology Hacks Health Men's Health Mental Health Women's Health Relationships Dating Love Relationship Issues Hobbies and Crafts Crafts Drawing Games Education & Communication Communication Skills Personal Development Studying Personal Care and Style Fashion Hair Care Personal Hygiene Youth Personal Care School Stuff Dating All Categories Arts and Entertainment Finance and Business Home and Garden Relationship Quizzes Cars & Other Vehicles Food and Entertaining Personal Care and Style Sports and Fitness Computers and Electronics Health Pets and Animals Travel Education & Communication Hobbies and Crafts Philosophy and Religion Work World Family Life Holidays and Traditions Relationships Youth
- Browse Articles
- Learn Something New
- Quizzes Hot
- This Or That Game New
- Train Your Brain
- Explore More
- Support wikiHow
- About wikiHow
- Log in / Sign up
- Computers and Electronics
- Presentation Software
- PowerPoint Presentations
How to Add Images to a PowerPoint Presentation
Last Updated: June 5, 2023
Inserting Saved Images
Inserting copied images, inserting clip art.
wikiHow is a “wiki,” similar to Wikipedia, which means that many of our articles are co-written by multiple authors. To create this article, 13 people, some anonymous, worked to edit and improve it over time. This article has been viewed 135,635 times. Learn more...
Even if you've never used PowerPoint before, adding images to PowerPoint is fairly straightforward with a little explanation. Whether you have your image saved to your computer or you need to search the Internet for the perfect picture for a presentation, have no fear. Soon, you'll be a master when it comes to adding images to your PowerPoint slides.
Things You Should Know
- Insert a saved image into your PowerPoint by clicking "Pictures" within the "Insert" tab atop your screen.
- You can also find an image online to copy and paste it into a PowerPoint presentation.
- Also look for the "Clip Art" or "Online Pictures" section within the "Insert" tab.

- Many times, due to formatting issues, this method can be unreliable. Don't give up; there are other options available.

- You can also double click your image from the "Insert Picture" directory to insert it.

- Mac users can perform the same function by holding ⌘ Command while clicking.
- Content that you've selected with your cursor can also usually be copied by pressing Ctrl + C or, for Apple users, ⌘ Command + C . [1] X Research source [2] X Trustworthy Source Microsoft Support Technical support and product information from Microsoft. Go to source

- You can also paste items from your clipboard by pressing Ctrl + V

Community Q&A
You Might Also Like

- ↑ https://support.apple.com/en-us/HT201236
- ↑ https://support.microsoft.com/en-us/kb/126449
About This Article
To insert an image on a PowerPoint slide, start by clicking the slide in the left panel of PowerPoint. Next, click the ""Insert"" tab at the top of PowerPoint. If the picture you want to insert is on your computer, click ""Pictures"" in the toolbar and then select ""This Device."" Select the image you want to insert and click ""Insert"" to place it on the slide. You can then drag it anywhere on the slide. To resize the image without warping it, click and drag the circles at any of the corners (not the edges) inward or outward. As long as the picture is selected, you can use the tools on the Format tab to add artistic effects, color filters, lighting corrections, borders, and more. If you'd rather insert a picture from the web, return to the ""Insert"" tab—if you see the option for ""Online Pictures,"" click it—if not, click the ""Pictures"" icon first and then select ""Online Pictures"" from the menu. You can then choose a photo from your OneDrive or search for one using Bing Image Search. After inserting an online picture, you can edit it using the tools on the format tab. Did this summary help you? Yes No
- Send fan mail to authors
Reader Success Stories
Viman Haraen
Nov 19, 2016
Is this article up to date?

Dec 2, 2016

Featured Articles

Trending Articles

Watch Articles

- Terms of Use
- Privacy Policy
- Do Not Sell or Share My Info
- Not Selling Info
Keep up with the latest tech with wikiHow's free Tech Help Newsletter
How To Download A Canva Presentation As A Powerpoint

- How-To Guides
- Software Tutorials

Introduction
Have you ever created a stunning presentation using Canva and wanted to download it as a Powerpoint file? Fortunately, Canva offers a simple and convenient way to do just that. Converting your Canva presentation to Powerpoint allows you to easily share it with colleagues, clients, or anyone who may not have access to Canva. Whether you need to present your work in a professional setting or simply want to preserve your design integrity, this guide will walk you through the process of downloading a Canva presentation as a Powerpoint file.
Canva is an intuitive online graphic design tool that offers a wide range of templates, including presentation templates. With its drag-and-drop functionality and an extensive library of design elements, Canva makes it easy for both beginners and professionals to create visually stunning and engaging presentations. And the best part is that you don’t need any design experience to use it!
In the following steps, we’ll demonstrate how to download a Canva presentation as a Powerpoint file in just a few simple clicks. So, let’s get started!
Step 1: Access the Canva Website
The first step in downloading a Canva presentation as a Powerpoint file is to access the Canva website. You can do this by opening your preferred web browser and entering www.canva.com in the address bar. Press Enter or Return to load the website.
If you already have a Canva account, login with your credentials. If you don’t have an account, you can sign up for free by clicking on the “Sign up with email” or “Sign up with Google” button. Fill in the required information, such as your name, email address, and password, and then click on “Sign up” to create your account.
Once you’re logged in, you’ll be taken to your Canva homepage, where you can access all of your saved designs and templates. It’s important to note that you need to have a Canva account and be signed in to download a presentation as a Powerpoint file.
Now that you’ve accessed the Canva website and logged in, you’re ready to proceed to the next step: opening the desired presentation.
Step 2: Open the Desired Presentation
Once you’re on the Canva homepage, you’ll see a list of your saved designs and templates. Look for the presentation you want to download as a Powerpoint file and click on it to open it.
If you don’t see the desired presentation on your homepage, you can use the search bar located at the top of the page to find it. Simply enter the title or keywords related to the presentation and press Enter or Return. Canva will display relevant results based on your search query.
Alternatively, if you have organized your Canva designs into folders, you can navigate to the appropriate folder to find the desired presentation. Click on the folder name to expand it and view the designs within.
Once you have located the presentation you want to download, click on it to open it in the Canva editor. This will allow you to view and make any necessary edits to the presentation before downloading it as a Powerpoint file.
Canva offers a range of customization options to modify your presentation’s layout, design elements, and content. You can change the background, add or remove text, upload images, and much more. Take some time to review and make any desired changes to ensure your presentation looks exactly how you want it.
Now that you have opened the presentation in Canva and made any necessary edits, it’s time to move on to the next step: clicking on the “Download” button.
Step 3: Click on the “Download” Button
After you have opened the desired presentation in the Canva editor and made any necessary edits, it’s time to download it as a Powerpoint file. To do this, locate and click on the “Download” button, which is located in the top-right corner of the Canva editor interface.
When you click on the “Download” button, a dropdown menu will appear, offering various download options. Canva provides multiple file formats to choose from, including PDF, JPG, PNG, and more. However, for the purpose of downloading a Canva presentation as a Powerpoint file, you need to select the appropriate option.
In the dropdown menu, select the “Powerpoint” option or any other format that specifically mentions Powerpoint compatibility. This will ensure that your presentation is downloaded in a format that is easily accessible and editable using Microsoft Powerpoint or other compatible software.
Once you have selected the “Powerpoint” format, Canva may prompt you to upgrade to a premium account if the selected format is only available to premium subscribers. If you’re okay with upgrading, follow the instructions on the screen. Otherwise, you can choose one of the available formats that don’t require an account upgrade.
Now that you have selected the “Powerpoint” option, you’re ready to move on to the next step: choosing the download location for your presentation.
Step 4: Select the “Powerpoint” Option
After clicking on the “Download” button in Canva, a dropdown menu will appear with various file format options. Look for the “Powerpoint” option in the dropdown menu and select it. This will ensure that your Canva presentation is downloaded in a Powerpoint-compatible format.
By selecting the “Powerpoint” option, Canva will generate a Powerpoint file (.pptx) of your presentation, which can be easily opened and edited in Microsoft Powerpoint or any other software that supports Powerpoint files. This format allows you to maintain the integrity of your design while offering the flexibility to make further modifications or additions if needed.
It’s important to note that the availability of the “Powerpoint” option may depend on your Canva subscription plan. Some advanced features and file formats, such as Powerpoint downloads, may require a Canva Pro subscription. If the “Powerpoint” option is not available to you, you may need to upgrade your account to access this feature.
Once you have selected the “Powerpoint” option and confirmed your selection, Canva will begin generating the Powerpoint file of your presentation. The time it takes to generate the file may vary depending on the size and complexity of your presentation. Canva will display a progress indicator to inform you of the status of the download process.
Now that you have selected the “Powerpoint” option, you’re ready to proceed to the next step: choosing the download location for your Canva presentation.
Step 5: Choose the Download Location
Once Canva has finished generating the Powerpoint file of your presentation, it’s time to choose the download location. When the file is ready, Canva will display a notification or message indicating that the download is complete.
Click on the provided download link or button to initiate the download process. This will prompt your web browser to open a window where you can specify the location on your computer where you want to save the downloaded Powerpoint file.
In the file download window, you can choose to save the file to a specific folder on your computer, such as the “Documents” or “Downloads” folder, or you can select a custom location of your choice. Navigate to the desired folder or location and click on the “Save” or “Download” button to start downloading the Powerpoint file.
Keep in mind that the exact steps and options in the download window may vary depending on your web browser and operating system. However, the general process remains the same: selecting the download location and initiating the download.
Ensure that you choose a location that is easily accessible and memorable, as you will need to locate the file later when you want to open or edit it in Powerpoint. It’s a good practice to save the file in a location where you can easily find it, such as your desktop or a dedicated folder for your Canva presentations.
Now that you have chosen the download location for your Canva presentation, it’s time to move on to the final step: saving the presentation as a Powerpoint file.
Step 6: Save the Presentation as a Powerpoint File
After choosing the download location for your Canva presentation, the file will start downloading to your selected location. The time it takes for the download to complete will depend on the size of the presentation and the speed of your internet connection.
Once the download is complete, navigate to the download location on your computer and locate the downloaded Powerpoint file. The file will have a .pptx extension, indicating that it is a Powerpoint file.
If you have Microsoft Office or Powerpoint installed on your computer, you can simply double-click on the downloaded file to open it in Powerpoint. This will allow you to view and edit the presentation as you would with any other Powerpoint file.
If you don’t have Powerpoint installed, you can use alternative software that supports Powerpoint files, such as Google Slides or Apple Keynote, to open and edit the presentation. These software options provide similar functionality and allow you to work with Powerpoint files seamlessly.
Once you have opened the downloaded presentation in your desired software, you can make any further edits, add animations, include additional slides, or customize the content to suit your needs. Remember to save your changes as you work.
By saving the Canva presentation as a Powerpoint file, you have successfully converted it to a format that is compatible with commonly used presentation software. This allows you to easily share it with others or present it without the need for Canva.
Congratulations! You have now completed all the steps to download a Canva presentation as a Powerpoint file. Enjoy sharing and presenting your visually engaging and professional-looking presentation with ease!
Downloading a Canva presentation as a Powerpoint file provides you with the flexibility to share and present your designs using widely accessible presentation software. With just a few simple steps, you can convert your Canva presentation into a Powerpoint file and make any necessary edits or additions using popular software like Microsoft Powerpoint or Google Slides.
Throughout this guide, we covered the process of downloading a Canva presentation as a Powerpoint file. We started by accessing the Canva website and opening the desired presentation. Then, we clicked on the “Download” button and selected the “Powerpoint” format from the dropdown menu. After choosing the download location, we saved the presentation as a Powerpoint file. Finally, we discussed the importance of having compatible software to open and edit the downloaded file.
By following these steps, you can unleash the full potential of your Canva presentations by utilizing the features and functionalities offered by Powerpoint and other Powerpoint-compatible software. Whether you need to collaborate with others, deliver presentations in a professional setting, or simply want to have a backup of your Canva designs, downloading a Canva presentation as a Powerpoint file is a convenient solution.
Now that you have the knowledge and understanding of how to convert Canva presentations to Powerpoint files, you can confidently create, customize, and share your designs with ease. Embrace the versatility and power of Canva and Powerpoint to captivate your audience and make a lasting impression with your visually striking presentations.
Leave a Reply Cancel reply
Your email address will not be published. Required fields are marked *
Save my name, email, and website in this browser for the next time I comment.
- Crowdfunding
- Cryptocurrency
- Digital Banking
- Digital Payments
- Investments
- Console Gaming
- Mobile Gaming
- VR/AR Gaming
- Gadget Usage
- Gaming Tips
- Online Safety
- Tech Setup & Troubleshooting
- Buyer’s Guides
- Comparative Analysis
- Gadget Reviews
- Service Reviews
- Software Reviews
- Mobile Devices
- PCs & Laptops
- Smart Home Gadgets
- Content Creation Tools
- Digital Photography
- Video & Music Streaming
- Online Security
- Online Services
- Web Hosting
- WiFi & Ethernet
- Browsers & Extensions
- Communication Platforms
- Operating Systems
- Productivity Tools
- AI & Machine Learning
- Cybersecurity
- Emerging Tech
- IoT & Smart Devices
- Virtual & Augmented Reality
- Latest News
- AI Developments
- Fintech Updates
- Gaming News
- New Product Launches
- Fintechs and Traditional Banks Navigating the Future of Financial Services
- AI Writing How Its Changing the Way We Create Content
Related Post
How to find the best midjourney alternative in 2024: a guide to ai anime generators, unleashing young geniuses: how lingokids makes learning a blast, 10 best ai math solvers for instant homework solutions, 10 best ai homework helper tools to get instant homework help, 10 best ai humanizers to humanize ai text with ease, sla network: benefits, advantages, satisfaction of both parties to the contract, related posts.

How To Download Canva Presentation As PPT

How To Download Canva Slides To Google Slides

How To Make A Zoom Background

How To Download Presentation From Canva

How To Download Font For Powerpoint

How To Make A Powerpoint On A Tablet

How To Download Prezi Presentation Without Pro

How To Download Google Slides As PPT
Recent stories.

Fintechs and Traditional Banks: Navigating the Future of Financial Services

AI Writing: How It’s Changing the Way We Create Content

How to Know When it’s the Right Time to Buy Bitcoin

How to Sell Counter-Strike 2 Skins Instantly? A Comprehensive Guide

10 Proven Ways For Online Gamers To Avoid Cyber Attacks And Scams

- Privacy Overview
- Strictly Necessary Cookies
This website uses cookies so that we can provide you with the best user experience possible. Cookie information is stored in your browser and performs functions such as recognising you when you return to our website and helping our team to understand which sections of the website you find most interesting and useful.
Strictly Necessary Cookie should be enabled at all times so that we can save your preferences for cookie settings.
If you disable this cookie, we will not be able to save your preferences. This means that every time you visit this website you will need to enable or disable cookies again.
How to Transfer From PowerPoint to Flash Drives: A Step-by-Step Guide
Transferring a PowerPoint presentation to a flash drive is a straightforward process. Simply plug in your flash drive, open the PowerPoint file, click on ‘File’, then ‘Save As’, and choose your flash drive as the location. Save the file, and you’re done! It’s that simple, and now your presentation is portable and ready to go wherever you do.
After you complete the action, your PowerPoint presentation will be stored safely on your flash drive. This allows you to easily transport the file and use it on different computers without the need for internet access or email attachments.
Introduction
Ever been in a situation where you needed to present your ideas, but technology failed you? Maybe the email with your PowerPoint didn’t go through, or the internet was down, and you couldn’t access your cloud storage. In moments like these, having a physical copy of your presentation on a flash drive can be a lifesaver. In today’s fast-paced digital world, the ability to quickly and efficiently move files from one device to another is crucial, especially for professionals who often present in various locations.
Whether you’re a student, an educator, a business professional, or just someone who likes to be prepared, knowing how to transfer your PowerPoint presentation to a flash drive is an essential skill. So let’s dive in and learn how to ensure your presentation is always ready to roll, no matter what technological hurdles you may face.
Step by Step Tutorial: Transferring PowerPoint to Flash Drives
The following steps will help you transfer your PowerPoint presentation to a flash drive, ensuring you have a portable and accessible copy of your important files.
Step 1: Insert Flash Drive
- Insert your flash drive into a USB port on your computer.
Once you have inserted the flash drive, wait for your computer to recognize it. This will typically be indicated by a notification or a new drive appearing in ‘My Computer’ or ‘This PC’.
Step 2: Open PowerPoint File
- Open the PowerPoint presentation you wish to transfer.
Make sure that you have saved all the latest changes to your presentation before proceeding to transfer it to the flash drive.
Step 3: Click ‘File’
In PowerPoint, click on the ‘File’ tab at the top-left corner of the screen.
The ‘File’ tab is where you can find various options for managing your PowerPoint documents, including saving and exporting files.
Step 4: Select ‘Save As’
From the menu, select ‘Save As’ to choose where you want to save your presentation.
‘Save As’ allows you to choose a specific location for your file, which is necessary when transferring files to external storage devices.
Step 5: Choose Flash Drive Location
In the ‘Save As’ dialog box, choose your flash drive from the list of available locations.
Make sure you select the correct drive letter that corresponds to your flash drive to avoid saving the file in the wrong location.
Step 6: Save File
- Click ‘Save’ to transfer the presentation to your flash drive.
After clicking ‘Save’, the transfer will begin, and a progress bar may appear depending on the file size. Once completed, your PowerPoint is now on your flash drive, ready to go.
Additional Information
When transferring your PowerPoint presentation to a flash drive, there are a few more things to keep in mind. Firstly, ensure that your flash drive has enough free space for the file. PowerPoint presentations, especially those with a lot of images or videos, can be quite large. If your flash drive is nearly full, you might need to delete some files or use a drive with a larger capacity.
Also, consider formatting your flash drive to the appropriate file system. Most come pre-formatted with the FAT32 file system, which is widely compatible but has a file size limit of 4GB. For larger files, you may need to format your drive to NTFS or exFAT. Remember, formatting will erase all data on the drive, so back up any important files first. Always safely eject your flash drive after the transfer to avoid data corruption.
- Click on the ‘File’ tab in PowerPoint.
- Select ‘Save As’ from the menu.
- Choose your flash drive from the list of available locations.
Frequently Asked Questions
What if my computer doesn’t recognize my flash drive.
First, try inserting the flash drive into a different USB port. If it’s still not recognized, check if the flash drive appears in ‘Disk Management’. If it does, it may need to be assigned a drive letter or formatted.
Can I transfer multiple PowerPoint presentations to the same flash drive?
Yes, as long as your flash drive has enough storage space, you can transfer multiple presentations. Just ensure that they are clearly labeled to avoid confusion when accessing them.
Will my PowerPoint animations and transitions work on another computer?
Animations and transitions should work on another computer, provided that it has a compatible version of PowerPoint installed. However, custom fonts or media files might not transfer, so it’s a good idea to embed them in the presentation.
Can I edit the PowerPoint presentation directly from the flash drive?
Yes, you can open and edit the presentation directly from the flash drive. However, to avoid potential data loss, it’s recommended to copy the file to the local computer before editing.
How can I ensure my presentation is compatible with older versions of PowerPoint?
When saving your presentation, you can choose to save it in a compatibility mode for older versions of PowerPoint, such as .ppt instead of .pptx. This helps to ensure it can be opened on computers with earlier versions.
Transferring your PowerPoint presentation to a flash drive is a smart move that can save you from many potential headaches. It’s a simple process that anyone can master with just a few clicks. Whether you’re a professional preparing for a big pitch or a student gearing up for a class presentation, having a backup on a flash drive ensures you’re ready to impress, no matter where you are.
So go ahead, take the plunge, and make your presentations as portable and safe as possible. Who knows, this skill might just be your ticket to a flawless performance next time you’re up to present!

Matthew Burleigh has been writing tech tutorials since 2008. His writing has appeared on dozens of different websites and been read over 50 million times.
After receiving his Bachelor’s and Master’s degrees in Computer Science he spent several years working in IT management for small businesses. However, he now works full time writing content online and creating websites.
His main writing topics include iPhones, Microsoft Office, Google Apps, Android, and Photoshop, but he has also written about many other tech topics as well.
Read his full bio here.
Share this:
Join our free newsletter.
Featured guides and deals
You may opt out at any time. Read our Privacy Policy
Related posts:
- How to Save Powerpoint as PDF with Notes
- How to Turn Off Flash Notification on iPhone (2024 Guide)
- How to Change the Name of a Flash Drive in Windows 7
- Can I Convert My Powerpoint to Google Slides?
- How to Get an Adobe Flash-Compatible Browser on iPhone: A Guide
- How to Put Files on a Flash Drive
- How to Email a PowerPoint Slideshow: A Step-by-Step Guide
- How to Convert PowerPoint Presentations to HTML: A Step-by-Step Guide
- How to Make a Powerpoint Slide Vertical in Powerpoint 2013
- How to Loop a Slideshow on Powerpoint 2013
- What is the Flash Notification on the iPhone?
- How to Save on a Flash Drive in Microsoft Word 2010
- How to Change Hyperlink Color in Powerpoint 2010 (An Easy 5 Step Guide)
- Can You Save a Powerpoint as a Video in Powerpoint 2013?
- iOS 17 – How to Stop Flash Notifications on iPhone
- How to Select Multiple Files in Google Drive
- How to Copy a PowerPoint to a New PowerPoint: A Step-by-Step Guide
- How to Make All Columns the Same Width in Excel 2013
- How to Drag Slides From One PowerPoint to Another: A Step-by-Step Guide
- How to Delete Files on a Flash Drive
View, manage, and install add-ins for Excel, PowerPoint, and Word
When you enable an add-in, it adds custom commands and new features to Microsoft 365 programs that help increase your productivity. Because add-ins can be used by attackers to do harm to your computer, you can use add-in security settings to help protect yourself.
Note: This article only applies to Microsoft 365 applications running on Windows.
View installed add-ins

You can directly install add-ins from this page or select More Add-ins to explore.
In the Office Add-ins dialog, select My Add-ins tab.
Select an add-in you want to view the details for and right-click to select Add-in details option.
Click a heading below for more information .
Add-in categories explained
Active Application Add-ins Add-ins registered and currently running on your Microsoft 365 program.
Inactive Application Add-ins These are present on your computer but not currently loaded. For example, XML schemas are active when the document that refers to them is open. Another example is the COM add-in: if a COM add-in is selected, the add-in is active. If the check box is cleared, the add-in is inactive.
Document Related Add-ins Template files referred to by open documents.
Disabled Application Add-ins These add-ins are automatically disabled because they are causing Microsoft 365 programs to crash.
Add-in The title of the add-in.
Publisher The software developer or organization responsible for creating the add-in.
Compatibility Look here for any compatibility issues.
Location This file path indicates where the add-in is installed on your computer.
Description This text explains the add-in function.
Note: Microsoft Outlook has one add-in option in the Trust Center: Apply macro security settings to installed add-ins . InfoPath has no security settings for add-ins.
Permanently disable or remove an add-in
To disable or remove an add-in follow these steps:
Select File > Get Add-ins . Alternatively, you can select Home > Add-ins .
In the Office Add-ins dialog, select My Add-ins tab.
Select an add-in you want to remove and right click to select Remove option.
View or change add-in settings
You can see and change add-in settings in the Trust Center, descriptions of which are in the following section. Add-in security settings may have been determined by your organization so not all options may be available to change.
Select File > Get Add-ins .
Select More Add-ins > Manage My Add-ins.
Select Trust Center > Trust Center Settings > Add-ins.
Check or uncheck the boxes you want.
Add-in settings explained
Require Application Add-ins to be signed by Trusted Publisher Check this box to have the Trust Center check that the add-in uses a publisher's trusted signature. If the publisher's signature hasn’t been trusted, the Microsoft 365 program doesn’t load the add-in, and the Trust Bar displays a notification that the add-in has been disabled.
Disable notification for unsigned add-ins (code will remain disabled) When you check the Require Application Extensions to be signed by Trusted Publisher box, this option is no longer grayed out. Add-ins signed by a trusted publisher are enabled, but unsigned add-ins are disabled.
Disable all Application Add-ins (may impair functionality) Check this box if you don't trust any add-ins. All add-ins are disabled without any notification, and the other add-in boxes are grayed out.
Note: This setting takes effect after you exit and restart your Microsoft 365 program.
While working with add-ins, you may need to learn more about digital signatures and certificates , which authenticate an add-in, and trusted publishers , the software developers who often create add-ins.
Manage and install add-ins
Use the following instruction to manage and install add-ins.
To install a new add-in:
You can directly install popular add-ins on the page or go to More Add-ins to explore.
Select the add-in and select Add . Or browse by selecting Store tab in the Office add-in dialog to find other add-ins to install and select Add for that add-in.
To manage your add-ins:
Select File > Get Add-ins and from the bottom, select More Add-ins. Or select Home > Add-ins > More add-ins.
In the Office dialog, select My Add-ins tab. If you are not able to see your add-ins, select Refresh to reload your add-ins.
Select Manage My Add-in to manage and select Upload to browse and add an add-in from your device.
How to cancel a purchased add-in
If you've subscribed to an add-in through the Microsoft 365 Store that you don't want to continue, you can cancel that subscription.
Open the Microsoft 365 application and go to the Home tab of the ribbon.
Select Add-ins and then select More Add-ins > My Add-ins tab to view your existing add-ins.
Select the app you want to cancel and select Manage My Add-ins .
Under the Payment and Billing section choose Cancel Subscription .
Select OK and then Continue .
Once that's complete you should see a message that says "You have cancelled your app subscription" in the comments field of your apps list.
Why is my add-in crashing?
Some add-ins might not be compatible with your organization's IT department policies. If that is the case with add-ins recently installed on your Microsoft 365 program, Data Execution Prevention (DEP) will disable the add-in and the program might crash.
Learn more about DEP
Get a Microsoft 365 Add-in for Outlook
Get a Microsoft 365 Add-in for Project
Taking linked notes
If you're looking for Help on linking notes in OneNote to a Word or PowerPoint document, see Take linked notes .
Excel Windows Add-ins
If you're looking for Help on specific Excel Add-ins, such as Solver or Inquire, see Help for Excel for Windows add-ins .
If you're looking for additional help with Excel add-ins using the COM Add-ins dialog box, see Add or remove add-ins in Excel .
Get a Microsoft 365 Add-in for Excel

Need more help?
Want more options.
Explore subscription benefits, browse training courses, learn how to secure your device, and more.

Microsoft 365 subscription benefits

Microsoft 365 training

Microsoft security

Accessibility center
Communities help you ask and answer questions, give feedback, and hear from experts with rich knowledge.

Ask the Microsoft Community

Microsoft Tech Community

Windows Insiders
Microsoft 365 Insiders
Find solutions to common problems or get help from a support agent.

Online support
Was this information helpful?
Thank you for your feedback.
IMAGES
VIDEO
COMMENTS
Save your presentation in an earlier version of PowerPoint. In PowerPoint 2013 and newer versions, you can save files to an earlier version of PowerPoint by selecting the version from the Save as type list in the Save As box. For example, you can save your PowerPoint presentation in the newest PowerPoint Presentation format (.pptx), or as a PowerPoint 97-2003 Presentation (.ppt).
Chrome: Finish the download. Google Chrome displays the file name at the bottom left corner of the PowerPoint for the web task bar. To open the downloaded file, select the arrow to the right of the file name, and then select Open. Internet Explorer: Finish the download. If Internet Explorer asks you what you want to do with the file, click Save as.
1. Open the email that contains the PowerPoint presentation. 2. Click on the Attachment icon to download the file. 3. Once the file is downloaded, click on it to open it with PowerPoint. 4. To save a copy of the presentation, click on the File tab. 5.
Saving a PowerPoint presentation to a thumb drive/data-stick is easy. All you need to do is open it up and save it as if you were saving it to your computer. ... Download Article. X. wikiHow is a "wiki," similar to Wikipedia, which means that many of our articles are co-written by multiple authors. To create this article, 13 people, some ...
Microsoft PowerPoint is a presentation design software that is part of Microsoft 365. This software allows you to design presentations by combining text, images, graphics, video, and animation on slides in a simple and intuitive way. Over time, PowerPoint has evolved and improved its accessibility to users.
Save in a video format. Select File > Export. (Don't use Save As, because it doesn't offer video options.) Open the File Format list and select the video format that you want ( MP4 or MOV ). If the MP4 and MOV options aren't in your version of PowerPoint, see Requirements below for more information. Select the video Quality you want ...
1. Open Google Drive in a web browser. 2. Locate and open the Slides deck that you want to convert to PowerPoint. You can zero in on your slides by clicking the three horizontal lines at the top ...
Click Install underneath the Microsoft 365 header. If prompted, select a save destination for the Microsoft Office setup file. 5. Double-click the Office installation file. This opens the setup wizard, which you'll use to set up Office and PowerPoint on your computer. 6.
Learn everything you need to know to get started using Microsoft PowerPoint! You'll learn all the basics plus more, including: how to choose a design theme...
One person. Sharing and real-time collaboration. PowerPoint for the web and PowerPoint desktop app for offline use. Premium templates, fonts, icons, and stickers with thousands of options to choose from. Dictation, voice commands, and transcription. Advanced spelling and grammar, in-app learning tips, use in 20+ languages, and more.
2. Download PowerPoint Mobile from the Microsoft Store, for free. 3. Download PowerPoint from the Office website, when you own a license for Microsoft Office 2019, 2016 or 2013. 4. Download PowerPoint using the Microsoft Windows and Office ISO Download Tool. Bonus: you do not need to download PowerPoint.
In this tutorial, you will learn how to save your Canva presentation as a PowerPoint presentation in a few simple steps. In this tutorial, you will learn how to save your Canva presentation as a PowerPoint presentation in a few simple steps. ... Download. iOS. Android. Windows. Mac. Company. About. Newsroom. Careers. Step Two. Sustainability ...
Step-1: Click on the "File" tab. The first step is to open any PowerPoint presentation file. Then click on the "File" tab, the first option in the menu ribbon at the top of the screen. Step-2: Click on the "New" option. The next step is to open a new presentation file with a template. To do so, click on the "New" option in the ...
In the Seconds spent on each slide box, select the default time you want to spend on each slide. Select Create Video. Enter a file name and then browse to the location you want to save your video. In the Save As type box, select if you want to save the video as a MPEG-4 Video or Windows Media Video. Tip: The MPEG-4 Video format is recommended ...
PowerPoint is a well-known name when it comes to the world of presentations and slideshows. It is part of the Microsoft Office suite and has been employed both for personal and professional use for many years. But when it's time to start making a presentation, you may worry about the amount of time you'll need to design all the content.
Navigate to your file (s) and then click "Open.". Alternatively, you can drag and drop a file from your computer directly into the web browser for an easy upload. Once your file uploads, right-click it, point to "Open With" on the context menu, and then select "Google Slides.". Google then converts your presentation into a Google ...
On the PowerPoint window, in the left sidebar, click the slide in which you want to add a video. At the top of the PowerPoint window, click the "Insert" tab. In the "Insert" tab, under the "Media" section (which is to the extreme right side of the interface), click "Video." You'll now see an "Insert Video From" menu.
Step 2: Go to "File" and select "Download". After opening your Google Slides presentation, the next step is to navigate to the "File" menu and select the "Download" option. This will allow you to choose the desired file format for download. Follow the steps below to complete this step:
Download Article. 1. Open PowerPoint. You can do this in the same way described for opening PowerPoint to insert a saved image. 2. Find the "Clip Art" heading or "Online Pictures" under the "Insert" heading. By choosing this option, you should open a search bar or dialogue box that reads "Insert Images." 3.
Create a new presentation. Open PowerPoint. Select Blank presentation, or select one of the themes. Select More themes to view the gallery and search for more. Add a slide. Select the slide you want your new slide to follow. Select Home > New Slide. Select Layout and the you type want from the drop-down.
Step 4: Select the "Powerpoint" Option. After clicking on the "Download" button in Canva, a dropdown menu will appear with various file format options. Look for the "Powerpoint" option in the dropdown menu and select it. This will ensure that your Canva presentation is downloaded in a Powerpoint-compatible format.
Summary. Insert your flash drive into a USB port on your computer. Open the PowerPoint presentation you wish to transfer. Click on the 'File' tab in PowerPoint. Select 'Save As' from the menu. Choose your flash drive from the list of available locations. Click 'Save' to transfer the presentation to your flash drive.
People can view the slides even if they don't have PowerPoint, but they can't make changes to it. Select File > Export. Click Create PDF/XPS Document, then click Create PDF/XPS. In the Publish as PDF or XPS dialog box, choose a location to save the file to. If you want it to have a different name, enter it in the File name box.
Note: This article only applies to add-ins in Excel, PowerPoint, and Word.For guidance on how to view, install, and manage add-ins in Outlook, see Use add-ins in Outlook.