- Skip to primary navigation
- Skip to main content
- Skip to primary sidebar
- Skip to footer

PyImageSearch
You can master Computer Vision, Deep Learning, and OpenCV - PyImageSearch
Deep Learning Keras Semantic Segmentation Tutorials
U-Net Image Segmentation in Keras
by Margaret Maynard-Reid on February 21, 2022
In this tutorial, you will learn how to create U-Net, an image segmentation model in TensorFlow 2 / Keras. We will first present a brief introduction on image segmentation, U-Net architecture, and then walk through the code implementation with a Colab notebook.
To learn how to implement a U-Net with TensorFlow 2 / Keras, just keep reading.
Looking for the source code to this post?
Image segmentation is a computer vision task that segments an image into multiple areas by assigning a label to every pixel of the image. It provides much more information about an image than object detection, which draws a bounding box around the detected object, or image classification, which assigns a label to the object.
Segmentation is useful and can be used in real-world applications such as medical imaging, clothes segmentation, flooding maps, self-driving cars, etc.
There are two types of image segmentation:
- Semantic segmentation: classify each pixel with a label.
- Instance segmentation: classify each pixel and differentiate each object instance.
U-Net is a semantic segmentation technique originally proposed for medical imaging segmentation. It’s one of the earlier deep learning segmentation models, and the U-Net architecture is also used in many GAN variants such as the Pix2Pix generator.
U-Net Architecture
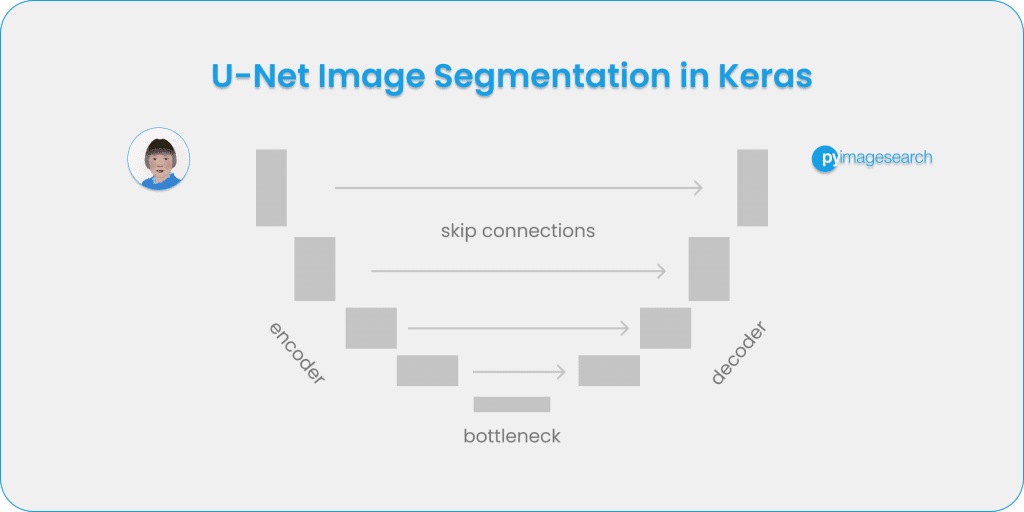
U-Net was introduced in the paper, U-Net: Convolutional Networks for Biomedical Image Segmentation . The model architecture is fairly simple: an encoder (for downsampling) and a decoder (for upsampling) with skip connections. As Figure 1 shows, it shapes like the letter U hence the name U-Net.
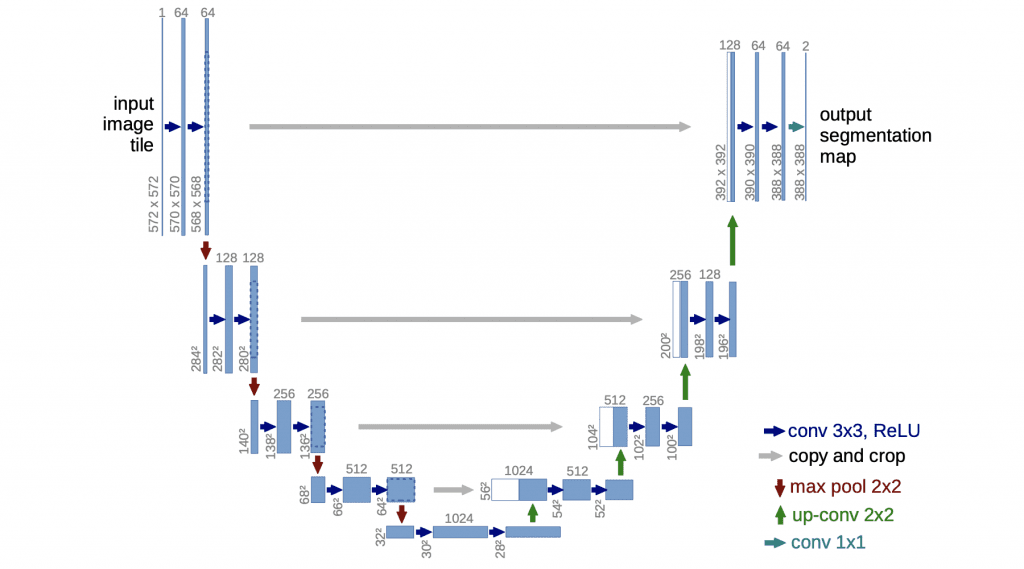
The gray arrows indicate the skip connections that concatenate the encoder feature map with the decoder, which helps the backward flow of gradients for improved training.
Now that we have a basic understanding of semantic segmentation and the U-Net architecture, let’s implement a U-Net with TensorFlow 2 / Keras. Please follow the tutorial below with this Colab notebook .
We will be using Colab for model training, so make sure you set “Hardware accelerator” to “GPU under Runtime / change runtime type.” Then import the libraries and packages this project depends on:
We will use the Oxford-IIIT pet dataset , available as part of the TensorFlow Datasets (TFDS). It can be easily loaded with TFDS, and then with a bit of data preprocessing, ready for training segmentation models.
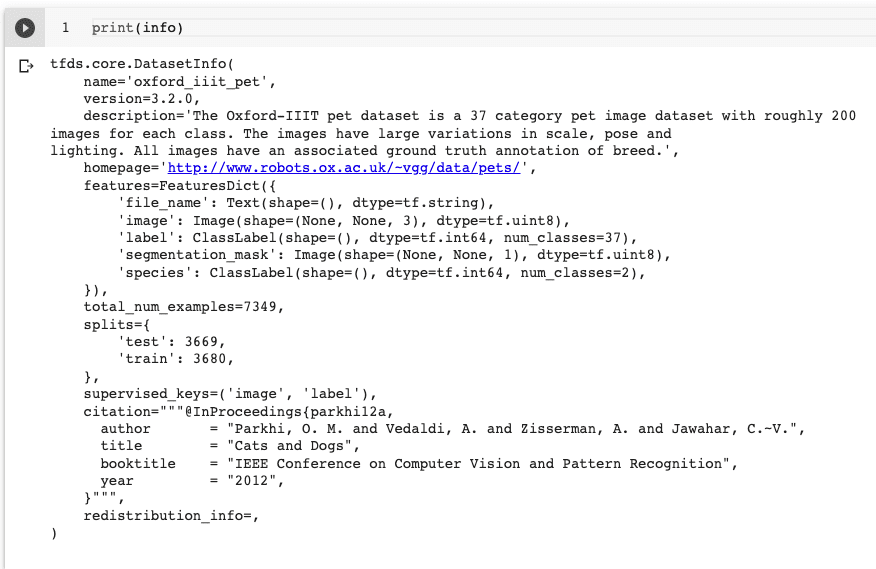
With just one line of code, we can use tfds to load the dataset by specifying the name of the dataset, and get the dataset info by setting with_info=True :
Print the dataset info with print(info) , and we will see all kinds of detailed information about the Oxford pet dataset. For example, in Figure 2 , we can see there are a total of 7349 images with a built-in test/train split.
Let’s first make a few changes to the downloaded data before we start training U-Net with it.
First, we need to resize the images and masks to 128x128 :
We then create a function to augment the dataset by flipping them horizontally:
We create a function to normalize the dataset by scaling the images to the range of [-1, 1] and decreasing the image mask by 1 :
We create two functions to preprocess the training and test datasets with a slight difference between the two – we only perform image augmentation on the training dataset.
Now we are ready to build an input pipeline with tf.data by using the map() function:
If we execute print(train_dataset) , we will notice that the image is in the shape of 128x128x3 of tf.float32 while the image mask is in the shape of 128x128x1 with the data type of tf.uint8 .
We define a batch size of 64 and a buffer size of 1000 for creating batches of training and test datasets. With the original TFDS dataset, there are 3680 training samples and 3669 test samples, which are further split into validation/test sets. We will use the train_batches and the validation_batches for training the U-Net model. After the training finishes, we will then use the test_batches to test the model predictions.
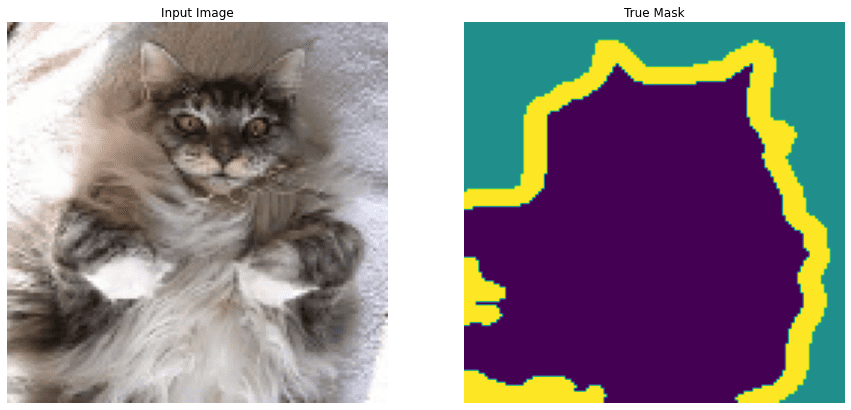
Now the datasets are ready for training. Let’s visualize a random sample image and its mask from the training dataset, to get an idea of how the data looks.
The sample input image of a cat is in the shape of 128x128x3 . The true mask has three segments: the green background; the purple foreground object, in this case, a cat; and the yellow outline. Figure 3 shows both the original input image and the true mask image.
Model Architecture
Now that we have the data ready for training, let’s define the U-Net model architecture. As mentioned earlier, the U-Net is shaped like a letter U with an encoder, decoder, and the skip connections between them. So we will create a few building blocks to make the U-Net model.
Building blocks
First, we create a function double_conv_block with layers Conv2D-ReLU-Conv2D-ReLU , which we will use in both the encoder (or the contracting path) and the bottleneck of the U-Net.
Then we define a downsample_block function for downsampling or feature extraction to be used in the encoder.
Finally, we define an upsampling function upsample_block for the decoder (or expanding path) of the U-Net.
U-Net Model
There are three options for making a Keras model, as well explained in Adrian’s blog and the Keras documentation:
- Sequential API: easiest and beginner-friendly, stacking the layers sequentially.
- Functional API: more flexible and allows non-linear topology, shared layers, and multiple inputs or multi-outputs.
- Model subclassing: most flexible and best for complex models that need custom training loops.
U-Net has a fairly simple architecture; however, to create the skip connections between the encoder and decoder, we will need to concatenate some layers. So the Keras Functional API is most appropriate for this purpose.
First, we create a build_unet_model function, specify the inputs, encoder layers, bottleneck, decoder layers, and finally the output layer with Conv2D with activation of softmax . Note the input image shape is 128x128x3 . The output has three channels corresponding to the three classes that the model will classify each pixel for: background, foreground object, and object outline.
We call the build_unet_model function to create the model unet_model :
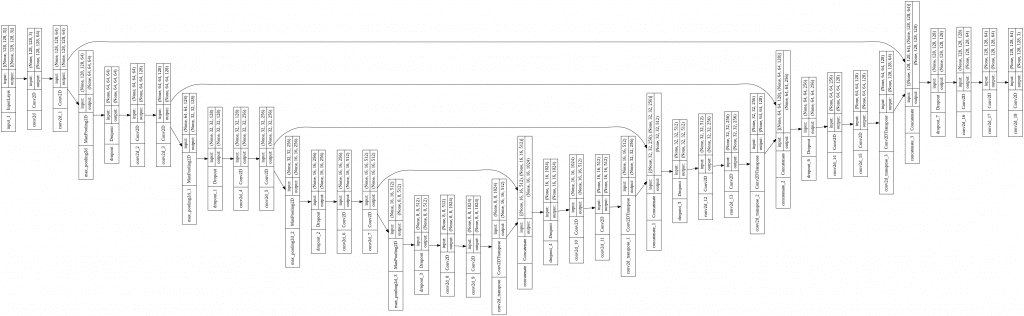
And we can visualize the model architecture with model.summary() to see each detail of the model. And we can use a Keras utils function called plot_model to generate a more visual diagram, including the skip connections. The generated image generated in Colab is rotated 90 degrees so that you can see U-shaped architecture in Figure 4 (see the details better in the Colab notebook):
Compile and Train U-Net
To compile unet_model , we specify the optimizer, the loss function, and the accuracy metrics to track during training:
We train the unet_model by calling model.fit() and training it for 20 epochs.
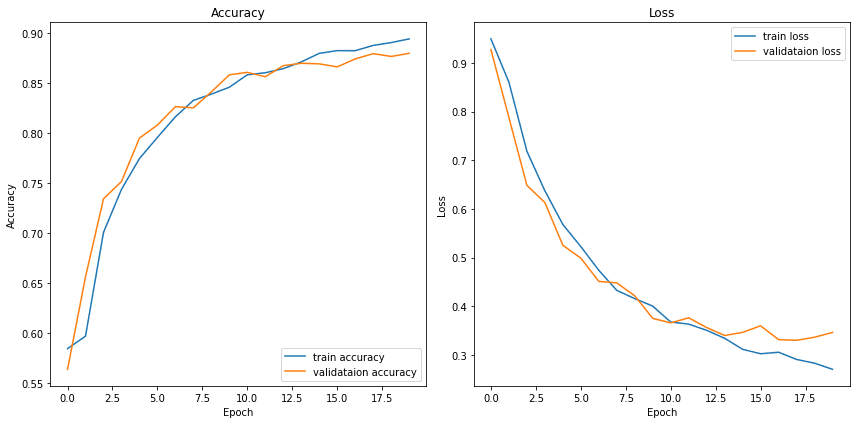
After training for 20 epochs, we get a training accuracy and a validation accuracy of ~0.88 . The learning curve during training indicates that the model is doing well on both the training dataset and validation set, which indicates the model is generalizing well without much overfitting ( Figure 5).
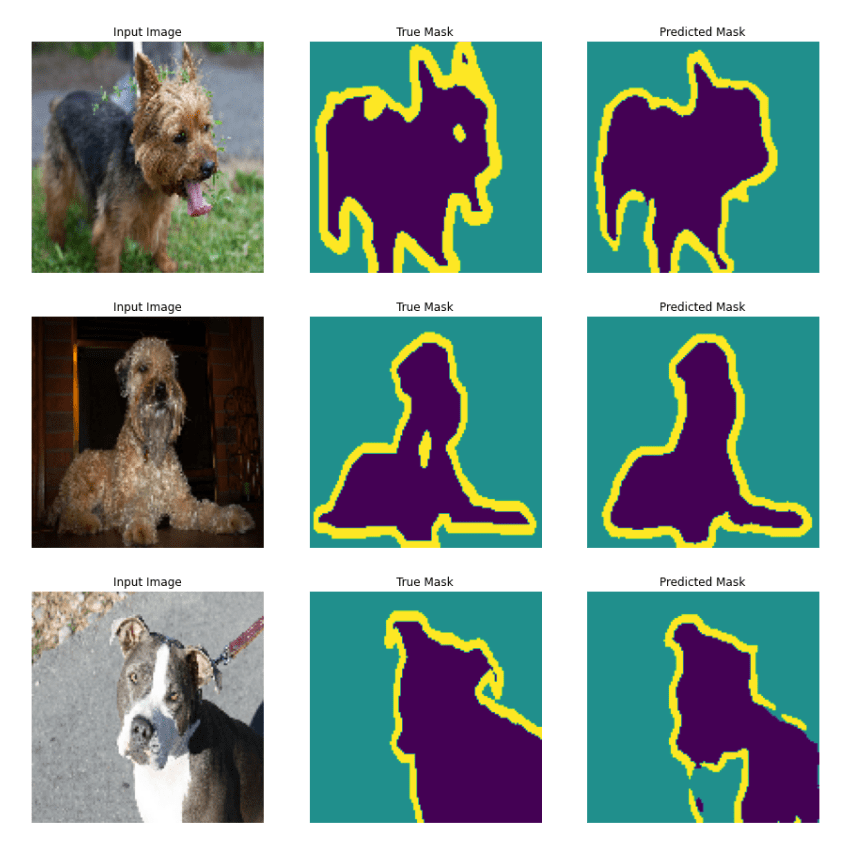
Now that we have completed training the unet_model , let’s use it to make predictions on a few sample images of the test dataset.
See Figure 6 for the input images, the true masks, and the masks predicted by the U-Net model we trained.
What's next? We recommend PyImageSearch University .
I strongly believe that if you had the right teacher you could master computer vision and deep learning.
Do you think learning computer vision and deep learning has to be time-consuming, overwhelming, and complicated? Or has to involve complex mathematics and equations? Or requires a degree in computer science?
That’s not the case.
All you need to master computer vision and deep learning is for someone to explain things to you in simple, intuitive terms. And that’s exactly what I do . My mission is to change education and how complex Artificial Intelligence topics are taught.
If you're serious about learning computer vision, your next stop should be PyImageSearch University, the most comprehensive computer vision, deep learning, and OpenCV course online today. Here you’ll learn how to successfully and confidently apply computer vision to your work, research, and projects. Join me in computer vision mastery.
Inside PyImageSearch University you'll find:
- ✓ 86 courses on essential computer vision, deep learning, and OpenCV topics
- ✓ 86 Certificates of Completion
- ✓ 115+ hours of on-demand video
- ✓ Brand new courses released regularly , ensuring you can keep up with state-of-the-art techniques
- ✓ Pre-configured Jupyter Notebooks in Google Colab
- ✓ Run all code examples in your web browser — works on Windows, macOS, and Linux (no dev environment configuration required!)
- ✓ Access to centralized code repos for all 540+ tutorials on PyImageSearch
- ✓ Easy one-click downloads for code, datasets, pre-trained models, etc.
- ✓ Access on mobile, laptop, desktop, etc.
Click here to join PyImageSearch University
In this post, you have learned how to load the Oxford-IIIT pet data with the TensorFlow dataset and how to train an image segmentation U-Net model from scratch. We created the U-Net with Keras Functional API and visualized the U-shaped architecture with skip connections. This post has been inspired by the official TensorFlow.org image segmentation tutorial and the U-Net tutorial on Keras.io, which uses keras.utils.Sequence for loading the data and has an Xception-style U-Net architecture. U-Net is a great start for learning semantic segmentation on images. To learn more about this topic, read segmentation papers on modern models such as DeepLab V3 , HRNet , U2-Net , etc., among many other papers.
Citation Information
Maynard-Reid, M. “U-Net Image Segmentation in Keras,” PyImageSearch , 2022, https://pyimg.co/6m5br

Unleash the potential of computer vision with Roboflow - Free!
- Step into the realm of the future by signing up or logging into your Roboflow account . Unlock a wealth of innovative dataset libraries and revolutionize your computer vision operations.
- Jumpstart your journey by choosing from our broad array of datasets, or benefit from PyimageSearch’s comprehensive library, crafted to cater to a wide range of requirements.
- Transfer your data to Roboflow in any of the 40+ compatible formats. Leverage cutting-edge model architectures for training, and deploy seamlessly across diverse platforms, including API, NVIDIA, browser, iOS, and beyond. Integrate our platform effortlessly with your applications or your favorite third-party tools.
- Equip yourself with the ability to train a potent computer vision model in a mere afternoon. With a few images, you can import data from any source via API, annotate images using our superior cloud-hosted tool, kickstart model training with a single click, and deploy the model via a hosted API endpoint. Tailor your process by opting for a code-centric approach, leveraging our intuitive, cloud-based UI, or combining both to fit your unique needs.
- Embark on your journey today with absolutely no credit card required. Step into the future with Roboflow.
Join Roboflow Now
To download the source code to this post (and be notified when future tutorials are published here on PyImageSearch), simply enter your email address in the form below!

Download the Source Code and FREE 17-page Resource Guide
Enter your email address below to get a .zip of the code and a FREE 17-page Resource Guide on Computer Vision, OpenCV, and Deep Learning. Inside you'll find my hand-picked tutorials, books, courses, and libraries to help you master CV and DL!

About the Author
Margaret Maynard-Reid is an ML research engineer and avid artist. Previously computer vision team of Microsoft AI & Research and the University of Washington. She is recognized for her ML expertise as a Google Developer Expert (GDE). Follow her on Twitter, Medium and GitHub: @margaretmz.
Previous Article:
Image Super Resolution
Next Article:
Multi-Column Table OCR
Comment section.
Hey, Adrian Rosebrock here, author and creator of PyImageSearch. While I love hearing from readers, a couple years ago I made the tough decision to no longer offer 1:1 help over blog post comments.
At the time I was receiving 200+ emails per day and another 100+ blog post comments. I simply did not have the time to moderate and respond to them all, and the sheer volume of requests was taking a toll on me.
Instead, my goal is to do the most good for the computer vision, deep learning, and OpenCV community at large by focusing my time on authoring high-quality blog posts, tutorials, and books/courses.
If you need help learning computer vision and deep learning, I suggest you refer to my full catalog of books and courses — they have helped tens of thousands of developers, students, and researchers just like yourself learn Computer Vision, Deep Learning, and OpenCV.
Click here to browse my full catalog.
Similar articles
How-to: python compare two images, computer vision talks – tutorials, digests, and cv in the cloud, deep learning and medical image analysis with keras.

You can learn Computer Vision, Deep Learning, and OpenCV.
Get your FREE 17 page Computer Vision, OpenCV, and Deep Learning Resource Guide PDF. Inside you’ll find our hand-picked tutorials, books, courses, and libraries to help you master CV and DL.
- Deep Learning
- Dlib Library
- Embedded/IoT and Computer Vision
- Face Applications
- Image Processing
- Keras & Tensorflow
- OpenCV Install Guides
- Machine Learning and Computer Vision
- Medical Computer Vision
- Optical Character Recognition (OCR)
- Object Detection
- Object Tracking
- OpenCV Tutorials
- Raspberry Pi
Books & Courses
- PyImageSearch University
- FREE CV, DL, and OpenCV Crash Course
- Practical Python and OpenCV
- Deep Learning for Computer Vision with Python
- PyImageSearch Gurus Course
- Raspberry Pi for Computer Vision
- Get Started
- Privacy Policy
Access the code to this tutorial and all other 500+ tutorials on PyImageSearch
Enter your email address below to learn more about PyImageSearch University (including how you can download the source code to this post):
What's included in PyImageSearch University?
- Easy access to the code, datasets, and pre-trained models for all 500+ tutorials on the PyImageSearch blog
- High-quality, well documented source code with line-by-line explanations (ensuring you know exactly what the code is doing)
- Jupyter Notebooks that are pre-configured to run in Google Colab with a single click
- Run all code examples in your web browser — no dev environment configuration required!
- Support for all major operating systems (Windows, macOS, Linux, and Raspbian)
- Full access to PyImageSearch University courses
- Detailed video tutorials for every lesson
- Certificates of Completion for all courses
- New courses added every month! — stay on top of state-of-the-art trends in computer vision and deep learning
PyImageSearch University is really the best Computer Visions "Masters" Degree that I wish I had when starting out. Being able to access all of Adrian's tutorials in a single indexed page and being able to start playing around with the code without going through the nightmare of setting up everything is just amazing. 10/10 would recommend. Sanyam Bhutani Machine Learning Engineer and 2x Kaggle Master
- Español – América Latina
- Português – Brasil
- Tiếng Việt
- TensorFlow Core
Image segmentation
This tutorial focuses on the task of image segmentation, using a modified U-Net .
What is image segmentation?
In an image classification task, the network assigns a label (or class) to each input image. However, suppose you want to know the shape of that object, which pixel belongs to which object, etc. In this case, you need to assign a class to each pixel of the image—this task is known as segmentation. A segmentation model returns much more detailed information about the image. Image segmentation has many applications in medical imaging, self-driving cars and satellite imaging, just to name a few.
This tutorial uses the Oxford-IIIT Pet Dataset ( Parkhi et al, 2012 ). The dataset consists of images of 37 pet breeds, with 200 images per breed (~100 each in the training and test splits). Each image includes the corresponding labels, and pixel-wise masks. The masks are class-labels for each pixel. Each pixel is given one of three categories:
- Class 1: Pixel belonging to the pet.
- Class 2: Pixel bordering the pet.
- Class 3: None of the above/a surrounding pixel.
Download the Oxford-IIIT Pets dataset
The dataset is available from TensorFlow Datasets . The segmentation masks are included in version 3+.
In addition, the image color values are normalized to the [0, 1] range. Finally, as mentioned above the pixels in the segmentation mask are labeled either {1, 2, 3}. For the sake of convenience, subtract 1 from the segmentation mask, resulting in labels that are : {0, 1, 2}.
The dataset already contains the required training and test splits, so continue to use the same splits:
The following class performs a simple augmentation by randomly-flipping an image. Go to the Image augmentation tutorial to learn more.
Build the input pipeline, applying the augmentation after batching the inputs:
Visualize an image example and its corresponding mask from the dataset:

Define the model
The model being used here is a modified U-Net . A U-Net consists of an encoder (downsampler) and decoder (upsampler). To learn robust features and reduce the number of trainable parameters, use a pretrained model— MobileNetV2 —as the encoder. For the decoder, you will use the upsample block, which is already implemented in the pix2pix example in the TensorFlow Examples repo. (Check out the pix2pix: Image-to-image translation with a conditional GAN tutorial in a notebook.)
As mentioned, the encoder is a pretrained MobileNetV2 model. You will use the model from tf.keras.applications . The encoder consists of specific outputs from intermediate layers in the model. Note that the encoder will not be trained during the training process.
The decoder/upsampler is simply a series of upsample blocks implemented in TensorFlow examples:
Note that the number of filters on the last layer is set to the number of output_channels . This will be one output channel per class.
Train the model
Now, all that is left to do is to compile and train the model.
Since this is a multiclass classification problem, use the tf.keras.losses.SparseCategoricalCrossentropy loss function with the from_logits argument set to True , since the labels are scalar integers instead of vectors of scores for each pixel of every class.
When running inference, the label assigned to the pixel is the channel with the highest value. This is what the create_mask function is doing.
Plot the resulting model architecture:

Try out the model to check what it predicts before training:

The callback defined below is used to observe how the model improves while it is training:

Make predictions
Now, make some predictions. In the interest of saving time, the number of epochs was kept small, but you may set this higher to achieve more accurate results.

Optional: Imbalanced classes and class weights
Semantic segmentation datasets can be highly imbalanced meaning that particular class pixels can be present more inside images than that of other classes. Since segmentation problems can be treated as per-pixel classification problems, you can deal with the imbalance problem by weighing the loss function to account for this. It's a simple and elegant way to deal with this problem. Refer to the Classification on imbalanced data tutorial to learn more.
To avoid ambiguity , Model.fit does not support the class_weight argument for targets with 3+ dimensions.
So, in this case you need to implement the weighting yourself. You'll do this using sample weights: In addition to (data, label) pairs, Model.fit also accepts (data, label, sample_weight) triples.
Keras Model.fit propagates the sample_weight to the losses and metrics, which also accept a sample_weight argument. The sample weight is multiplied by the sample's value before the reduction step. For example:
So, to make sample weights for this tutorial, you need a function that takes a (data, label) pair and returns a (data, label, sample_weight) triple where the sample_weight is a 1-channel image containing the class weight for each pixel.
The simplest possible implementation is to use the label as an index into a class_weight list:
The resulting dataset elements contain 3 images each:
Now, you can train a model on this weighted dataset:
Now that you have an understanding of what image segmentation is and how it works, you can try this tutorial out with different intermediate layer outputs, or even different pretrained models. You may also challenge yourself by trying out the Carvana image masking challenge hosted on Kaggle.
You may also want to see the Tensorflow Object Detection API for another model you can retrain on your own data. Pretrained models are available on TensorFlow Hub .
Except as otherwise noted, the content of this page is licensed under the Creative Commons Attribution 4.0 License , and code samples are licensed under the Apache 2.0 License . For details, see the Google Developers Site Policies . Java is a registered trademark of Oracle and/or its affiliates.
Last updated 2024-08-16 UTC.
Implement U-Net from Scratch for Image Segmentation
This type of image classification is called semantic image segmentation. It's similar to object detection in that both ask the question: "What objects are in this image and where in the image are those objects located?," but where object detection labels objects with bounding boxes that may include pixels that aren't part of the object, semantic image segmentation allows you to predict a precise mask for each object in the image by labeling each pixel in the image with its corresponding class. The word “semantic” here refers to what's being shown, so for example the “Car” class is indicated below by the dark blue mask, and "Person" is indicated with a red mask:
As you might imagine, region-specific labeling is a pretty crucial consideration for self-driving cars, which require a pixel-perfect understanding of their environment so they can change lanes and avoid other cars, or any number of traffic obstacles that can put peoples' lives in danger.
By the time you finish this notebook, you'll be able to:
Build your own U-Net
Explain the difference between a regular CNN and a U-net
Implement semantic image segmentation on the CARLA self-driving car dataset
Apply sparse categorical cross-entropy for pixelwise prediction
Preprocess Your Data
Normally, you normalize your image values by dividing them by 255 . This sets them between 0 and 1 . However, using tf.image.convert_image_dtype with tf.float32 sets them between 0 and 1 for you, so there's no need to further divide them by 255 .
U-Net, named for its U-shape, was originally created in 2015 for tumor detection, but in the years since has become a very popular choice for other semantic segmentation tasks.
U-Net builds on a previous architecture called the Fully Convolutional Network, or FCN, which replaces the dense layers found in a typical CNN with a transposed convolution layer that upsamples the feature map back to the size of the original input image, while preserving the spatial information. This is necessary because the dense layers destroy spatial information (the "where" of the image), which is an essential part of image segmentation tasks. An added bonus of using transpose convolutions is that the input size no longer needs to be fixed, as it does when dense layers are used.
Unfortunately, the final feature layer of the FCN suffers from information loss due to downsampling too much. It then becomes difficult to upsample after so much information has been lost, causing an output that looks rough.
U-Net improves on the FCN, using a somewhat similar design, but differing in some important ways. Instead of one transposed convolution at the end of the network, it uses a matching number of convolutions for downsampling the input image to a feature map, and transposed convolutions for upsampling those maps back up to the original input image size. It also adds skip connections, to retain information that would otherwise become lost during encoding. Skip connections send information to every upsampling layer in the decoder from the corresponding downsampling layer in the encoder, capturing finer information while also keeping computation low. These help prevent information loss, as well as model overfitting.
- Model Details
Contracting path (Encoder containing downsampling steps):
Images are first fed through several convolutional layers which reduce height and width, while growing the number of channels.
The contracting path follows a regular CNN architecture, with convolutional layers, their activations, and pooling layers to downsample the image and extract its features. In detail, it consists of the repeated application of two 3 x 3 same padding convolutions, each followed by a rectified linear unit (ReLU) and a 2 x 2 max pooling operation with stride 2 for downsampling. At each downsampling step, the number of feature channels is doubled.
Crop function : This step crops the image from the contracting path and concatenates it to the current image on the expanding path to create a skip connection.
Expanding path (Decoder containing upsampling steps):
The expanding path performs the opposite operation of the contracting path, growing the image back to its original size, while shrinking the channels gradually.
In detail, each step in the expanding path upsamples the feature map, followed by a 2 x 2 convolution (the transposed convolution). This transposed convolution halves the number of feature channels, while growing the height and width of the image.
Next is a concatenation with the correspondingly cropped feature map from the contracting path, and two 3 x 3 convolutions, each followed by a ReLU. You need to perform cropping to handle the loss of border pixels in every convolution.
Final Feature Mapping Block : In the final layer, a 1x1 convolution is used to map each 64-component feature vector to the desired number of classes. The channel dimensions from the previous layer correspond to the number of filters used, so when you use 1x1 convolutions, you can transform that dimension by choosing an appropriate number of 1x1 filters. When this idea is applied to the last layer, you can reduce the channel dimensions to have one layer per class.
The U-Net network has 23 convolutional layers in total.
Important Note:
The figures shown in the assignment for the U-Net architecture depict the layer dimensions and filter sizes as per the original paper on U-Net with smaller images. However, due to computational constraints for this assignment, you will code only half of those filters. The purpose of showing you the original dimensions is to give you the flavour of the original U-Net architecture. The important takeaway is that you multiply by 2 the number of filters used in the previous step. The notebook includes all of the necessary instructions and hints to help you code the U-Net architecture needed for this assignment.
Encoder (Downsampling Block)
The encoder is a stack of various conv_blocks:
Each conv_block() is composed of 2 Conv2D layers with ReLU activations. We will apply Dropout , and MaxPooling2D to some conv_blocks, as you will verify in the following sections, specifically to the last two blocks of the downsampling.
The function will return two tensors:
next_layer : That will go into the next block.
skip_connection : That will go into the corresponding decoding block.
Note : If max_pooling=True , the next_layer will be the output of the MaxPooling2D layer, but the skip_connection will be the output of the previously applied layer(Conv2D or Dropout, depending on the case). Else, both results will be identical.
Decoder (Upsampling Block)
The decoder, or upsampling block, upsamples the features back to the original image size. At each upsampling level, you'll take the output of the corresponding encoder block and concatenate it before feeding to the next decoder block.
There are two new components in the decoder: up and merge . These are the transpose convolution and the skip connections. In addition, there are two more convolutional layers set to the same parameters as in the encoder.
Here you'll encounter the Conv2DTranspose layer, which performs the inverse of the Conv2D layer. You can read more about it here.
Model Summary
Loss Function
In semantic segmentation, you need as many masks as you have object classes. In the dataset you're using, each pixel in every mask has been assigned a single integer probability that it belongs to a certain class, from 0 to num_classes-1. The correct class is the layer with the higher probability.
This is different from categorical crossentropy, where the labels should be one-hot encoded (just 0s and 1s). Here, you'll use sparse categorical crossentropy as your loss function, to perform pixel-wise multiclass prediction. Sparse categorical cross-entropy is more efficient than other loss functions when you're dealing with lots of classes.
Dataset Handling
Below, define a function that allows you to display both an input image, and its ground truth: the true mask. The true mask is what your trained model output is aiming to get as close to as possible.
Predictions
Last updated 9 months ago

Image segmentation with U-Net
In image segmentation, every pixel of an image is assigned a class. Depending on the application, classes could be different cell types; or the task could be binary, as in “cancer cell yes or no?” Area of application notwithstanding, the established neural network architecture of choice is U-Net. In this post, we show how to preprocess data and train a U-Net model on the Kaggle Carvana image segmentation data.
Sure, it is nice when I have a picture of some object, and a neural network can tell me what kind of object that is. More realistically, there might be several salient objects in that picture, and it tells me what they are, and where they are. The latter task (known as object detection ) seems especially prototypical of contemporary AI applications that at the same time are intellectually fascinating and ethically questionable. It’s different with the subject of this post: Successful image segmentation has a lot of undeniably useful applications. For example, it is a sine qua non in medicine, neuroscience, biology and other life sciences.
So what, technically, is image segmentation, and how can we train a neural network to do it?
Image segmentation in a nutshell
Say we have an image with a bunch of cats in it. In classification , the question is “what’s that?” and the answer we want to hear is: “cat.” In object detection , we again ask “what’s that,” but now that “what” is implicitly plural, and we expect an answer like “there’s a cat, a cat, and a cat, and they’re here, here, and here” (imagine the network pointing, by means of drawing bounding boxes , i.e., rectangles around the detected objects). In segmentation , we want more: We want the whole image covered by “boxes” – which aren’t boxes anymore, but unions of pixel-size “boxlets” – or put differently: We want the network to label every single pixel in the image.
Here’s an example from the paper we’re going to talk about in a second. On the left is the input image (HeLa cells), next up is the ground truth, and third is the learned segmentation mask.

Figure 1: Example segmentation from Ronneberger et al. 2015.
Technically, a distinction is made between class segmentation and instance segmentation . In class segmentation, referring to the “bunch of cats” example, there are two possible labels: Every pixel is either “cat” or “not cat.” Instance segmentation is more difficult: Here every cat gets their own label. (As an aside, why should that be more difficult? Presupposing human-like cognition, it wouldn’t be – if I have the concept of a cat, instead of just “cattiness,” I “see” there are two cats, not one. But depending on what a specific neural network relies on most – texture, color, isolated parts – those tasks may differ a lot in difficulty.)
The network architecture used in this post is adequate for class segmentation tasks and should be applicable to a vast number of practical, scientific as well as non-scientific applications. Speaking of network architecture, how should it look?
Introducing U-Net
Given their success in image classification, can’t we just use a classic architecture like Inception V[n] , ResNet , ResNext … , whatever? The problem is, our task at hand – labeling every pixel – does not fit so well with the classic idea of a CNN. With convnets, the idea is to apply successive layers of convolution and pooling to build up feature maps of decreasing granularity, to finally arrive at an abstract level where we just say: “yep, a cat.” The counterpart being, we lose detail information: To the final classification, it does not matter whether the five pixels in the top-left area are black or white.
In practice, the classic architectures use (max) pooling or convolutions with stride > 1 to achieve those successive abstractions – necessarily resulting in decreased spatial resolution. So how can we use a convnet and still preserve detail information? In their 2015 paper U-Net: Convolutional Networks for Biomedical Image Segmentation ( Ronneberger, Fischer, and Brox 2015 ) , Olaf Ronneberger et al. came up with what four years later, in 2019, is still the most popular approach. (Which is to say something, four years being a long time, in deep learning.)
The idea is stunningly simple. While successive encoding (convolution / max pooling) steps, as usual, reduce resolution, the subsequent decoding – we have to arrive at an output of size same as the input, as we want to label every pixel! – does not simply upsample from the most compressed layer. Instead, during upsampling, at every step we feed in information from the corresponding, in resolution, layer in the downsizing chain.
For U-Net, really a picture says more than many words:

Figure 2: U-Net architecture from Ronneberger et al. 2015.
At each upsampling stage we concatenate the output from the previous layer with that from its counterpart in the compression stage. The final output is a mask of size the original image, obtained via 1x1-convolution; no final dense layer is required, instead the output layer is just a convolutional layer with a single filter.
Now let’s actually train a U-Net. We’re going to use the unet package that lets you create a well-performing model in a single line:
So we have a model, and it looks like we’ll be wanting to feed it 128x128 RGB images. Now how do we get these images?
To illustrate how applications arise even outside the area of medical research, we’ll use as an example the Kaggle Carvana Image Masking Challenge . The task is to create a segmentation mask separating cars from background. For our current purpose, we only need train.zip and train_mask.zip from the archive provided for download . In the following, we assume those have been extracted to a subdirectory called data-raw .
Let’s first take a look at some images and their associated segmentation masks.

The photos are RGB-space JPEGs, while the masks are black-and-white GIFs.
We split the data into a training and a validation set. We’ll use the latter to monitor generalization performance during training.
To feed the data to the network, we’ll use tfdatasets . All preprocessing will end up in a simple pipeline, but we’ll first go over the required actions step-by-step.
Preprocessing pipeline
The first step is to read in the images, making use of the appropriate functions in tf$image .
While constructing a preprocessing pipeline, it’s very useful to check intermediate results. It’s easy to do using reticulate::as_iterator on the dataset:
While the uint8 datatype makes RGB values easy to read for humans, the network is going to expect floating point numbers. The following code converts its input and additionally, scales values to the interval [0,1):
To reduce computational cost, we resize the images to size 128x128 . This will change the aspect ratio and thus, distort the images, but is not a problem with the given dataset.
Now, it’s well known that in deep learning, data augmentation is paramount. For segmentation, there’s one thing to consider, which is whether a transformation needs to be applied to the mask as well – this would be the case for e.g. rotations, or flipping. Here, results will be good enough applying just transformations that preserve positions:
Again, we can use as_iterator to see what these transformations do to our images:

Here’s the complete preprocessing pipeline.
Training and test set creation now is just a matter of two function calls.
And we’re ready to train the model.
Training the model
We already showed how to create the model, but let’s repeat it here, and check model architecture:
The “output shape” column shows the expected U-shape numerically: Width and height first go down, until we reach a minimum resolution of 8x8 ; they then go up again, until we’ve reached the original resolution. At the same time, the number of filters first goes up, then goes down again, until in the output layer we have a single filter. You can also see the concatenate layers appending information that comes from “below” to information that comes “laterally.”
What should be the loss function here? We’re labeling each pixel, so each pixel contributes to the loss. We have a binary problem – each pixel may be “car” or “background” – so we want each output to be close to either 0 or 1. This makes binary_crossentropy the adequate loss function.
During training, we keep track of classification accuracy as well as the dice coefficient , the evaluation metric used in the competition. The dice coefficient is a way to measure the proportion of correct classifications:
Fitting the model takes some time – how much, of course, will depend on your hardware. 1 But the wait pays off: After five epochs, we saw a dice coefficient of ~ 0.87 on the validation set, and an accuracy of ~ 0.95.
Predictions
Of course, what we’re ultimately interested in are predictions. Let’s see a few masks generated for items from the validation set:

Figure 3: From left to right: ground truth, input image, and predicted mask from U-Net.
If there were a competition for the highest sum of usefulness and architectural transparency, U-Net would certainly be a contender. Without much tuning, it’s possible to obtain decent results. If you’re able to put this model to use in your work, or if you have problems using it, let us know! Thanks for reading!
Expect up to half an hour on a laptop CPU. ↩︎
Comment on this article Share:
Text and figures are licensed under Creative Commons Attribution CC BY 4.0 . The figures that have been reused from other sources don't fall under this license and can be recognized by a note in their caption: "Figure from ...".
For attribution, please cite this work as
BibTeX citation
- Stack Overflow for Teams Where developers & technologists share private knowledge with coworkers
- Advertising & Talent Reach devs & technologists worldwide about your product, service or employer brand
- OverflowAI GenAI features for Teams
- OverflowAPI Train & fine-tune LLMs
- Labs The future of collective knowledge sharing
- About the company Visit the blog
Collectives™ on Stack Overflow
Find centralized, trusted content and collaborate around the technologies you use most.
Q&A for work
Connect and share knowledge within a single location that is structured and easy to search.
Get early access and see previews of new features.
Image Segmentation U-Net model Assignment
My U-Net model
... In the Above Unet Model, the fisrt half of the model is completed i.e., upto cblock5 but from the second half of the model i.e., from cblock6 till cblock9 I got bit confused at ...
# Chain the output of the previous block as expansive_input and the corresponding contractive block output. # Note that you must use the second element of the contractive block i.e before the maxpooling layer. # At each step, use half the number of filters of the previous block
... Please help me with the above instruction meaning. ...
- conv-neural-network
- image-segmentation
- he is probably asking you to create residual blocks, and to create encoding and decoding blocks – BestDogeStackoverflow Commented Sep 4, 2021 at 16:49
2 Answers 2

The unet in the picture has 4 encoding block ( the descending one) and 4 decoding blocks.
in a unet the input of the decoding blocks (the ones where the tensor returns at the previous dimension) its the concatenation of the block "at the same level" and the previous block, the assignment is asking you to do this concatenation ( you can see in the picture how 2 different arrows go in the decoding level, this are the 2 inputs)
at each step use half the filters : just use half the filters on each decoding level ( in the picture there are 4 decoding levels, so say you use N filters on the first decoding layer ( the one lower) you then use N/2 on the second decoding layer and so on)
Note that you must use the second element of the contractive block i.e before the maxpooling layer. : hard to tell, i think he is sayng that when you take the output of the encoder at level 3, at some point, you will want to give this input to the decoder at level 3 (the horizontal grey arrows in the figure, the input you need to concatenate), you need to take this input BEFORE the maxpooling, or it will not have the same dimensions (basically from an encoder there are 2 outputs, the red (maxpool) one and the grey (copy) one)
here you go the problem was tracing the cblocks in the second half
- you saved me 😂 – noob Commented Jan 2, 2022 at 12:15
Your Answer
Reminder: Answers generated by artificial intelligence tools are not allowed on Stack Overflow. Learn more
Sign up or log in
Post as a guest.
Required, but never shown
By clicking “Post Your Answer”, you agree to our terms of service and acknowledge you have read our privacy policy .
Not the answer you're looking for? Browse other questions tagged conv-neural-network image-segmentation or ask your own question .
- The Overflow Blog
- Battling ticket bots and untangling taxes at the frontiers of e-commerce
- Ryan Dahl explains why Deno had to evolve with version 2.0
- Featured on Meta
- We've made changes to our Terms of Service & Privacy Policy - July 2024
- Bringing clarity to status tag usage on meta sites
- Feedback requested: How do you use tag hover descriptions for curating and do...
Hot Network Questions
- Is there a way to say "wink wink" or "nudge nudge" in German?
- How does DS18B20 temperature sensor get the temperature?
- Electric moped PWM MOSFETs failure
- Trigger (after delete) restricts from deleting records
- How to report the between study variance through tau2 for vaccine effectiveness using R's metafor?
- How common is it for external contractors to manage internal teams, and how can we navigate this situation?
- Can mending be used to attach the unbroken ends of a pole together?
- Is there a source for jumping strait to techiyat ha metim without having to die?
- I don’t know what to buy!
- Did anyone ever ask Neil Armstrong whether he said "for man" or "for a man?"
- Adverb for Lore?
- If a body in free fall, according to general relativity is weightless, that is, not experiencing force, how does the object gain kinetic energy?
- For applying to a STEM research position at a U.S. research university, should a resume include a photo?
- Pressure of water in a pipe submerged in a draining tank
- Is "UN law" a thing?
- Move line matching string to top of the file
- Cryptic crossword: London calling
- Print lines between two patterns where first pattern appears more than once before second pattern
- Gauss and recursion – would defining factorial recursively have been quite surprising to him?
- Small debris which has punctured a tubeless tire: to leave or to remove?
- Can there be clouds of free electrons in space?
- Can science inform philosophy?
- Has any spacecraft ever been severely damaged by a micrometeriote?
- Why does the size of a struct change depending on whether an initial value is used?

CoCalc’s goal is to provide the best real-time collaborative environment for Jupyter Notebooks , LaTeX documents , and SageMath , scalable from individual use to large groups and classes.
Image segmentation with u-net.
Welcome to the final assignment of Week 3! You'll be building your own U-Net, a type of CNN designed for quick, precise image segmentation, and using it to predict a label for every single pixel in an image - in this case, an image from a self-driving car dataset.
This type of image classification is called semantic image segmentation. It's similar to object detection in that both ask the question: "What objects are in this image and where in the image are those objects located?," but where object detection labels objects with bounding boxes that may include pixels that aren't part of the object, semantic image segmentation allows you to predict a precise mask for each object in the image by labeling each pixel in the image with its corresponding class. The word “semantic” here refers to what's being shown, so for example the “Car” class is indicated below by the dark blue mask, and "Person" is indicated with a red mask:

As you might imagine, region-specific labeling is a pretty crucial consideration for self-driving cars, which require a pixel-perfect understanding of their environment so they can change lanes and avoid other cars, or any number of traffic obstacles that can put peoples' lives in danger.
By the time you finish this notebook, you'll be able to:
Build your own U-Net
Explain the difference between a regular CNN and a U-net
Implement semantic image segmentation on the CARLA self-driving car dataset
Apply sparse categorical crossentropy for pixelwise prediction
Onward, to this grand and glorious quest!
Table of Content
1 - packages, 2 - load and split the data, 2.1 - split your dataset into unmasked and masked images, 2.2 - preprocess your data, 3.1 - model details, 3.2 - encoder (downsampling block), exercise 1 - conv_block, 3.3 - decoder (upsampling block), exercise 2 - upsampling_block, 3.4 - build the model, exercise 3 - unet_model, 3.5 - set model dimensions, 3.6 - loss function, 3.7 - dataset handling, 4 - train the model, 4.1 - create predicted masks, 4.2 - plot model accuracy, 4.3 - show predictions.
Run the cell below to import all the libraries you'll need:
Check out the some of the unmasked and masked images from the dataset:
U-Net, named for its U-shape, was originally created in 2015 for tumor detection, but in the years since has become a very popular choice for other semantic segmentation tasks.
U-Net builds on a previous architecture called the Fully Convolutional Network, or FCN, which replaces the dense layers found in a typical CNN with a transposed convolution layer that upsamples the feature map back to the size of the original input image, while preserving the spatial information. This is necessary because the dense layers destroy spatial information (the "where" of the image), which is an essential part of image segmentation tasks. An added bonus of using transpose convolutions is that the input size no longer needs to be fixed, as it does when dense layers are used.
Unfortunately, the final feature layer of the FCN suffers from information loss due to downsampling too much. It then becomes difficult to upsample after so much information has been lost, causing an output that looks rough.
U-Net improves on the FCN, using a somewhat similar design, but differing in some important ways. Instead of one transposed convolution at the end of the network, it uses a matching number of convolutions for downsampling the input image to a feature map, and transposed convolutions for upsampling those maps back up to the original input image size. It also adds skip connections, to retain information that would otherwise become lost during encoding. Skip connections send information to every upsampling layer in the decoder from the corresponding downsampling layer in the encoder, capturing finer information while also keeping computation low. These help prevent information loss, as well as model overfitting.

Contracting path (Encoder containing downsampling steps):
Images are first fed through several convolutional layers which reduce height and width, while growing the number of channels.
The contracting path follows a regular CNN architecture, with convolutional layers, their activations, and pooling layers to downsample the image and extract its features. In detail, it consists of the repeated application of two 3 x 3 unpadded convolutions, each followed by a rectified linear unit (ReLU) and a 2 x 2 max pooling operation with stride 2 for downsampling. At each downsampling step, the number of feature channels is doubled.
Crop function : This step crops the image from the contracting path and concatenates it to the current image on the expanding path to create a skip connection.
Expanding path (Decoder containing upsampling steps):
The expanding path performs the opposite operation of the contracting path, growing the image back to its original size, while shrinking the channels gradually.
In detail, each step in the expanding path upsamples the feature map, followed by a 2 x 2 convolution (the transposed convolution). This transposed convolution halves the number of feature channels, while growing the height and width of the image.
Next is a concatenation with the correspondingly cropped feature map from the contracting path, and two 3 x 3 convolutions, each followed by a ReLU. You need to perform cropping to handle the loss of border pixels in every convolution.
Final Feature Mapping Block : In the final layer, a 1x1 convolution is used to map each 64-component feature vector to the desired number of classes. The channel dimensions from the previous layer correspond to the number of filters used, so when you use 1x1 convolutions, you can transform that dimension by choosing an appropriate number of 1x1 filters. When this idea is applied to the last layer, you can reduce the channel dimensions to have one layer per class.
The U-Net network has 23 convolutional layers in total.

The encoder is a stack of various conv_blocks:
Each conv_block() is composed of 2 Conv2D layers with ReLU activations. We will apply Dropout , and MaxPooling2D to some conv_blocks, as you will verify in the following sections, specifically to the last two blocks of the downsampling.
The function will return two tensors:
next_layer : That will go into the next block.
skip_connection : That will go into the corresponding decoding block.
Note : If max_pooling=True , the next_layer will be the output of the MaxPooling2D layer, but the skip_connection will be the output of the previously applied layer(Conv2D or Dropout, depending on the case). Else, both results will be identical.
Implement conv_block(...) . Here are the instructions for each step in the conv_block , or contracting block:
Add 2 Conv2D layers with n_filters filters with kernel_size set to 3, kernel_initializer set to 'he_normal' , padding set to 'same' and 'relu' activation.
if dropout_prob > 0, then add a Dropout layer with parameter dropout_prob
If max_pooling is set to True, then add a MaxPooling2D layer with 2x2 pool size
The decoder, or upsampling block, upsamples the features back to the original image size. At each upsampling level, you'll take the output of the corresponding encoder block and concatenate it before feeding to the next decoder block.

There are two new components in the decoder: up and merge . These are the transpose convolution and the skip connections. In addition, there are two more convolutional layers set to the same parameters as in the encoder.
Here you'll encounter the Conv2DTranspose layer, which performs the inverse of the Conv2D layer. You can read more about it here.
Implement upsampling_block(...) .
For the function upsampling_block :
Takes the arguments expansive_input (which is the input tensor from the previous layer) and contractive_input (the input tensor from the previous skip layer)
The number of filters here is the same as in the downsampling block you completed previously
Your Conv2DTranspose layer will take n_filters with shape (3,3) and a stride of (2,2), with padding set to same . It's applied to expansive_input , or the input tensor from the previous layer.
This block is also where you'll concatenate the outputs from the encoder blocks, creating skip connections.
Concatenate your Conv2DTranspose layer output to the contractive input, with an axis of 3. In general, you can concatenate the tensors in the order that you prefer. But for the grader, it is important that you use [up, contractive_input]
For the final component, set the parameters for two Conv2D layers to the same values that you set for the two Conv2D layers in the encoder (ReLU activation, He normal initializer, same padding).
This is where you'll put it all together, by chaining the encoder, bottleneck, and decoder! You'll need to specify the number of output channels, which for this particular set would be 23. That's because there are 23 possible labels for each pixel in this self-driving car dataset.
For the function unet_model , specify the input shape, number of filters, and number of classes (23 in this case).
For the first half of the model:
Begin with a conv block that takes the inputs of the model and the number of filters
Then, chain the first output element of each block to the input of the next convolutional block
Next, double the number of filters at each step
Beginning with conv_block4 , add dropout of 0.3
For the final conv_block, set dropout to 0.3 again, and turn off max pooling. (Here n_filters=n_filters* 16 )
For the second half:
From here, at each step, use half the number of filters of the previous block
Use cblock5 as expansive_input and cblock4 as contractive_input, with n_filters * 8. This is your bottleneck layer.
Chain the output of the previous block as expansive_input and the corresponding contractive block output.
Note that you must use the second element of the contractive block before the max pooling layer.
conv9 is a Conv2D layer with ReLU activation, He normal initializer, same padding
Finally, conv10 is a Conv2D that takes the number of classes as the filter, a kernel size of 1, and "same" padding. The output of conv10 is the output of your model.
Check out the model summary below!
In semantic segmentation, you need as many masks as you have object classes. In the dataset you're using, each pixel in every mask has been assigned a single integer probability that it belongs to a certain class, from 0 to num_classes-1. The correct class is the layer with the higher probability.
This is different from categorical crossentropy, where the labels should be one-hot encoded (just 0s and 1s). Here, you'll use sparse categorical crossentropy as your loss function, to perform pixel-wise multiclass prediction. Sparse categorical crossentropy is more efficient than other loss functions when you're dealing with lots of classes.
Below, define a function that allows you to display both an input image, and its ground truth: the true mask. The true mask is what your trained model output is aiming to get as close to as possible.
Now, define a function that uses tf.argmax in the axis of the number of classes to return the index with the largest value and merge the prediction into a single image:
Let's see how your model did!
Next, check your predicted masks against the true mask and the original input image:
With 40 epochs you get amazing results!
You've come to the end of this assignment. Awesome work creating a state-of-the art model for semantic image segmentation! This is a very important task for self-driving cars to get right. Elon Musk will surely be knocking down your door at any moment. 😉
What you should remember :
Semantic image segmentation predicts a label for every single pixel in an image
U-Net uses an equal number of convolutional blocks and transposed convolutions for downsampling and upsampling
Skip connections are used to prevent border pixel information loss and overfitting in U-Net
Navigation Menu
Search code, repositories, users, issues, pull requests..., provide feedback.
We read every piece of feedback, and take your input very seriously.
Saved searches
Use saved searches to filter your results more quickly.
To see all available qualifiers, see our documentation .
- Notifications You must be signed in to change notification settings
Sankar-DS/Programming-Assignment-Image-Segmentation-with-U-Net
Folders and files.
| Name | Name | |||
|---|---|---|---|---|
| 2 Commits | ||||
Repository files navigation
Programming-assignment-image-segmentation-with-u-net.
- Jupyter Notebook 100.0%
IMAGES
COMMENTS
Welcome! We'll be building our own U-Net, a type of CNN designed for quick, precise image segmentation, and using it to predict a label for every single pixel in an image - in this case, an image from a self-driving car dataset. This type of image classification is called semantic image segmentation.
Welcome! We'll be building our own U-Net, a type of CNN designed for quick, precise image segmentation, and using it to predict a label for every single pixel in an image - in this case, an image from a self-driving car dataset. This type of image classification is called semantic image segmentation.
Welcome to the final assignment of Week 3! You'll be building your own U-Net, a type of CNN designed for quick, precise image segmentation, and using it to predict a label for every single pixel in an image - in this case, an image from a self-driving car dataset. This type of image classification is called semantic image segmentation.
In this article, we will implement a U-Net model (as depicted in the diagram below) and trained on a popular image segmentation dataset. Training a U-Net from scratch is a hard, so instead we will leverage transfer learning to get good result after only few epochs of training. For reference, you can read the original U-Net paper arxiv.org.
U-Net Architecture. U-Net was introduced in the paper, U-Net: Convolutional Networks for Biomedical Image Segmentation. The model architecture is fairly simple: an encoder (for downsampling) and a decoder (for upsampling) with skip connections. As Figure 1 shows, it shapes like the letter U hence the name U-Net.
Author: Margaret Maynard-Reid ( @margaretmz) This Colab notebook is a U-Net implementation with TensorFlow 2 / Keras, trained for semantic segmentation on the Oxford-IIIT pet dataset. It is associated with the U-Net Image Segmentation in Keras, a PyImageSearch blog post published on 2022-02-21. You may find this Colab notebooks in the author's ...
U-Net architecture for image segmentation is an encoder-decoder convolutional neural network with extensive medical imaging, autonomous driving, and satellite imaging applications.However, understanding how the U-Net performs segmentation is important, as all novel architectures post-U-Net develop on the same intuition.
This tutorial focuses on the task of image segmentation, using a modified U-Net. What is image segmentation? In an image classification task, the network assigns a label (or class) to each input image. However, suppose you want to know the shape of that object, which pixel belongs to which object, etc. In this case, you need to assign a class ...
In our age, semantic segmentation on image data is frequently used for computer vision. U-Net is a backbone network that contains convolutional neural networks for masking objects. 🧶U-Nettakes its name from its architecture similar to the letter U as seen in the figure. The input images are obtained as a segmented output map at the output.
The U-Net network has 23 convolutional layers in total. Important Note: The figures shown in the assignment for the U-Net architecture depict the layer dimensions and filter sizes as per the original paper on U-Net with smaller images. However, due to computational constraints for this assignment, you will code only half of those filters.
In the second part, we will use this U-Net model to perform Segmentation on real-world data. Part 1 — Introduction to Segmentation and Coding a U-Net (this article) Part 2 — Performing ...
In their 2015 paper U-Net: Convolutional Networks for Biomedical Image Segmentation ( Ronneberger, Fischer, and Brox 2015), Olaf Ronneberger et al. came up with what four years later, in 2019, is still the most popular approach. (Which is to say something, four years being a long time, in deep learning.) The idea is stunningly simple.
This is the final episode of the 6 part video series on U-Net based image segmentation. In this video we'll execute the Python code to train the model and se...
Welcome to the final assignment of Week 3! You'll be building your own U-Net, a type of CNN designed for quick, precise image segmentation, and using it to predict a label for every single pixel in an image - in this case, an image from a self-driving car dataset. This type of image classification is called semantic image segmentation.
The U-Net was first developed by Olaf Ronneberger et al. in their 2015 paper titled " U-Net: Convolutional Networks for Biomedical Image Segmentation .". Its structure involves an encoding ...
The following code performs a simple augmentation of flipping an image. In addition, image is normalized to [0,1]. Finally, as mentioned above the pixels in the segmentation mask are labeled either {1, 2, 3}. For the sake of convenience, let's subtract 1 from the segmentation mask, resulting in labels that are : {0, 1, 2}.
1. U-Net is a "fully convolutional network" (CNN). These types of architectures do not have any fully connected layers in them. Consequently, they do not depend on the input image size - and the size of the prediction varies according to the input image size. Thanks for your answer.
My U-Net model. input_size -- Input shape. n_filters -- Number of filters for the convolutional layers. n_classes -- Number of output classes. model -- tf.keras.Model. # Chain the first element of the output of each block to be the input of the next conv_block. # Add the first upsampling_block.
Welcome! We'll be building our own U-Net, a type of CNN designed for quick, precise image segmentation, and using it to predict a label for every single pixel in an image - in this case, an image from a self-driving car dataset. This type of image classification is called semantic image segmentation.
You signed in with another tab or window. Reload to refresh your session. You signed out in another tab or window. Reload to refresh your session. You switched accounts on another tab or window.
If the issue persists, it's likely a problem on our side. Unexpected token < in JSON at position 4. keyboard_arrow_up. content_copy. SyntaxError: Unexpected token < in JSON at position 4. Refresh. Explore and run machine learning code with Kaggle Notebooks | Using data from Butterfly Dataset.
Image Segmentation with U-Net. Welcome to the final assignment of Week 3! You'll be building your own U-Net, a type of CNN designed for quick, precise image segmentation, and using it to predict a label for every single pixel in an image - in this case, an image from a self-driving car dataset. This type of image classification is called ...
Contribute to Sankar-DS/Programming-Assignment-Image-Segmentation-with-U-Net development by creating an account on GitHub. ... Programming-Assignment-Image-Segmentation-with-U-Net. About. No description, website, or topics provided. Resources. Readme Stars. 1 star Watchers. 1 watching Forks.