- Skip to primary navigation
- Skip to main content


8 Things I’ve Learned Using an iPad for Presentations
I love using my iPad for travel to conferences, and not just because it’s so lightweight and its battery lasts all day. For one thing, with the LTE version I’m not beholden to conference Wi-Fi; while some conferences have good connectivity, I never want to count on it. With the iPad I can nearly always get online.
But the iPad isn’t convenient only for attending conferences. It’s a good tool for presentations, too-or at least an excellent backup for a dedicated computer. I can easily be ready to present if I have a last-minute computer replacement.
Still, I had some things to learn the hard way about using an iPad for presentations. Perhaps I can save you a few steps.
The Basics of Getting Started
Learn the differences between “desktop” keynote and the ipad version.
While I present nearly exclusively from an iPad, I usually build my initial presentation on a Mac. I build all of my presentations in Keynote, and store them in iCloud. I can (and do) make tweaks to a presentation on-site via the iPad version of Keynote, but it always feels as though I’m slightly fighting with the software.
Keynote supports a customizable presenter display in both versions. On the Mac desktop version, you can pick three ways to give yourself that during-the-talk cheat sheet, instructing it to show you the current slide, next slide, and presenter notes. On the iPad, the presenter display options only give you a “two out of three” option, between current slide, next slide, and presenter notes. I begrudgingly pick Next Slide and Presenter Notes, and then I hope the venue has a confidence monitor that shows me what’s on the projector behind me.
Some folks prefer to use Powerpoint or Google Slides. This distills down to religion, and I can confidently state that those people are wrong. Both tools offer iPad versions as well, but I’m not well versed in them. Deckset doesn’t offer an iPad version, and I’ve not had much patience for the swath of custom JavaScript-based presentation tools that render Markdown inside of browsers. I want to like them, but I can’t quite get there yet. As a result, use Keynote; you’ll be happier. As an added bonus, the presentations live in iCloud; with a bit of notice you can grab a copy on someone’s Mac, iPhone, or iPad and be back in business should calamity befall your iPad.
Do be aware that this means that if your presentation requires a demo in a terminal or a web browser, you either get to do some awkward transitions—or accept that presenting from an iPad isn’t right for this talk. I still haven’t found a good way to give my “Terrible Ideas in Git” talk from an iPad due to its live demos…
Invest in a presentation remote
A presentation remote is a necessity, unless you enjoy being trapped behind the podium. I treated myself to a little luxury with the Logitech Spotlight .
This device does it all. It speaks its own wireless protocol via a USB-A dongle that plugs into most laptops, but the Spotlight also speaks Bluetooth with a great range. Its battery charges using a built-in USB-C port that hides behind the dongle, and a single charge lasts for months.
I freely accept that most folks find the idea of paying $129 for a single-purpose device a bit nutty. Those folks generally don’t give double-digit numbers of presentations a year. A word of caution: Don’t leave it behind at the podium after your talk. It’s expensive enough to buy the first time. Please don’t ask me how I know.
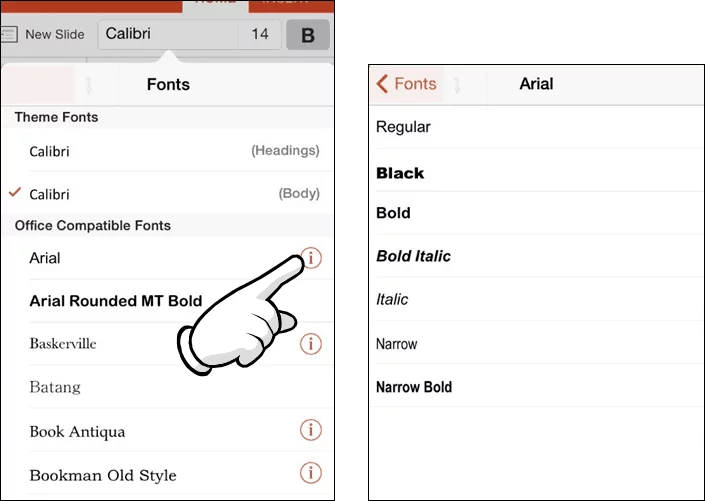
Pay attention to fonts and typefaces
I have a condition I jokingly refer to as “typeface blindness.” I can’t tell the difference between most fonts unless I stare at them and actively work out what I’m seeing. I’m told this is atypical, and whenever I forget this fact I get reminded on Twitter. “Well, that’s the fifth talk so far today that uses Helvetica (the system default)” always makes me facepalm. As a result, I make it a point to not use system default fonts.
Contrary to what many folks believe, you can use custom fonts on iOS, but the process is a bit arcane. Do yourself a favor and drop the $2 for AnyFont . This magic app streamlines an otherwise incredibly painful process.
Lessons I’ve Learned
I’m conservative here; while you can save money by buying third party adapters, I find that minimizing the risk of screwing up a presentation in front of 400 people is worth the extortionate rate that Apple charges for first party adapters. You’ll want both HDMI and VGA adapters. Both of these are available in Lightning and USB-C flavors, depending upon which generation of iPad you’re using. Note that this is less of a concern with USB-C than it is with Lightning adapters—just make certain you test all of your adapters before you leave home.
Save time; don’t bother looking for DVI adapters. The iPad officially doesn’t support it, Apple doesn’t sell them for Lightning, and I’ve only ever encountered it on the speaking circuit once. Your test a few hours before your talk will validate that you’ll be okay.
You can never be too rich, too thin, or have a big enough battery pack
Grab a beefy battery pack, and you can go days without finding a power outlet. You don’t want to discover that the podium power strip is full, the extension cord is a trip hazard, or that you don’t have the right adapter for the country you’re in when it’s time to give a talk. Having a battery pack that can borderline jump-start a car means you’re fine so long as your iPad battery level is anywhere about roughly 3%. (Too much lower and the tablet won’t boot at all.)
I like Anker products for this, but your mileage may vary. I soundly endorse finding reputable brands. Saving a few bucks on chargers, cables, or batteries that (a) plug into a very expensive electronic device and (b) have a propensity to include “sets the building on fire” in their list of failure modes just never seemed worth the trade-off to me.
Note: If you need to give away something at a booth, don’t use branded USB battery packs or chargers, as swag. At best, they’re cheap and feel flimsy. At worst, something with your logo on it started a fire.
Spend extra for an LTE connection
You can tether your iPad to a mobile device or ride on conference Wi-Fi. However, if you’re presenting frequently it’s worth the extra money to get an iPad version that can speak to the cell networks. Suddenly you no longer care what the conference Wi-Fi password is, whether you remembered to charge your phone, or if the captive portal login page is going to expire and pop up again mid-presentation.
Speaking of which…
Before the presentation, turn on both “Do Not Disturb” and “Airplane Mode”
In presentation mode, Keynote swears that it blocks pop-ups, reminders, incoming calls, and other distractions. To its credit, I’ve never seen it do otherwise.
That said, I always enable Do Not Disturb on my iPad. I put the device in airplane mode. And only then do I plug in the projector. Perhaps I’m paranoid, but you’re also not seeing horrible screenshots from my talks that feature embarrassing notifications, either.
Update nothing before your presentation
If a new iOS version or a Keynote update comes out the same week as your presentation, fine. But resist the upgrade. It can wait a day.
There have been enough regressions in software over the years that I’m extremely hesitant to trust that everything will “just work” an hour before I go on stage.
These are the sometimes-hard-won lessons I’ve learned after spending a year giving talks solely from an iPad.

Corey is the Chief Cloud Economist at The Duckbill Group, where he specializes in helping companies improve their AWS bills by making them smaller and less horrifying. He also hosts the "Screaming in the Cloud" and "AWS Morning Brief" podcasts; and curates "Last Week in AWS," a weekly newsletter summarizing the latest in AWS news, blogs, and tools, sprinkled with snark and thoughtful analysis in roughly equal measure.
More Posts from Corey

AWS’s (de)Generative AI Blunder
AWS has been very publicly insecure about the perception that it’s lagging behind in the Generative AI space for the past year. Unfortunately, rather than setting those perceptions to rest, AWS’s GenAI extravaganza at re:Invent 2023 seemed to prove them true. Of the 22 GenAI-related announcements, half of them are still in preview. Many were […]

Generative AI Builds a re:Invent Scavenger Hunt
Let’s begin with the tl;dr: At this year’s re:Invent, I’m hosting a photo scavenger hunt with significant prizes for “most items found” and “most creative entry.” Sign up through my webapp at findme.lastweekinaws.com. The rest of this post details how I built this app.

How to Stop Feeding AWS’s AI With Your Data
AWS may be using your data to train its AI models, and you may have unwittingly consented to it. Prepare to jump through a series of complex hoops to stop it.
Get the newsletter!
Stay up to date on the latest AWS news, opinions, and tools, all lovingly sprinkled with a bit of snark.
Critical PowerPoint Shortcuts – Claim Your FREE Training Module and Get Your Time Back!
PowerPoint for iPad: A Visual Guide
- PowerPoint Tutorials
- Miscellaneous
- October 29, 2017
In this first ever visual guide for the iPad version of Microsoft PowerPoint (iPad PPT), we show you step-by-step how to use the app, as well as all of the nitty gritty details behind it that you likely don’t know.
We highlight those “little hiccups” that will drive you up the wall (it’s still not the same experience as your desktop version), and we’ve done our best to show you the workarounds, if and when they exist.
Make sure to note the orange boxes we’ve sprinkled through the guide with pro tips and tricks based on years of experience building PowerPoint presentations…ignore them at your own peril
We will do our best to keep this guide up to date with each new Microsoft update. If you see something that we’ve missed, PLEASE let us know and we’ll do our best to update this guide ASAP.
Don’t have the PowerPoint app on your iPad yet? Download it by clicking here .
Things that go well with your iPad
Here are some useful resources for working with PowerPoint for the iPad:
Microsoft apps for the iPad
If you want to edit or display your Microsoft documents in their native environments on your iPad or iPhone, you’ll need to download the Microsoft PowerPoint, Word, Excel, OneNote, and OneDrive apps on your iPad and iPhone through the iTunes store. Find them here .
Microsoft Office 365
Get automatic upgrades and unlimited storage by signing up for the Microsoft 365 subscription model. Check out the latest of version of Microsoft Office here .
Lightning to VGA adapter
If you’re giving presentations with your iPad, don’t assume the meeting room will have the right adapters for you. So make sure you always bring one with you. I like apple’s adapters as they’re sleek and are 100% compatible with your device.
Bluetooth speaker
Again, if you’re giving a presentation in a meeting room and need to play music/video, be aware that your ipad’s speakers will probably not be strong enough to fill the whole room. This super compact wireless speaker hooks up incredibly easily to your ipad or iphone with no software or app necessary, and provides really high quality sound for the price.
iPhone/iPad stand
Although the iphone and ipad are designed to be light and portable, carrying them around throughout a presentation, especially if you’re moving around a room, can be a bit cumbersome. Keep your device upright and in front of you with this no-frills stand. It will fit just about any device.
Disclosure: please note that some of the links below are affiliate links, and at no additional cost to you, we will earn a commission if you decide to make a purchase. Please understand that we have experience with all of these companies, and we recommend them because they are helpful and useful, not because of the small commissions we make if you decide to buy something. Please do not spend any money on these products unless you feel you need them or that they will help you achieve your goals.
FINALLY…PowerPoint on our tablet! Down with the laptop and the desktop! Not so fast…
Although it is EXCITING to finally have PowerPoint on the iPad….there are MANY more versions to come before it can replace the desktop PowerPoint environment.
Until then, PowerPoint on your iPad is best thought of as an “extension” of the desktop experience, not as a replacement.
Yes, with each new PowerPoint for iPad update, you do get some new features, but the vast majority of REAL work that you do in PowerPoint (in our humble opinion) should still be done on your desktop.
Why? Because it’s just plain faster!
Yes, we are biased…we live, die and breath shortcuts on our keyboard AND we use LOTS of tips and tricks that haven’t come onto the iPad (yet)….so it’s okay to disagree with us.
With all that said, this is a GREAT step forward and we are PSYCHED for all the future updates and the new Office 2015.
We hope this guides helps make PowerPoint on your iPad a little bit, if not A LOT, easier for you to figure out.
This guide is organized according to the different Views in the app, and then according to each element within those Views. You can access all of these pieces using the tables of contents bar on the left.
If you want a fast way to find a command, simply hit Ctrl + F on your keyboard to search this page.
Account Settings
In this section, we look at the different things you can do in the Account Settings, such as signing out, signing in, and how to add multiple OneDrive accounts. To do any of these, you’ll have to go into the File View. In the top left hand corner, you have your Account Settings icon (with or without your account picture).

Signing out

Pro Tip: Instead of signing out of your account, you can add multiple OneDrive services to the same account so that you can access your business and personal files.
If you accidentally get signed out, here’s a step-by-step guide for how to sign back into your account. To sign into your account, follow these 4 steps (click to open gallery & instructions):
Microsoft Account: Sign in with the account you use for OneDrive, Xbox, LIVE, Outlook.com or other Microsoft services.
Organizational Account: Sign in with the account provided by your work, school or university.
Adding a service
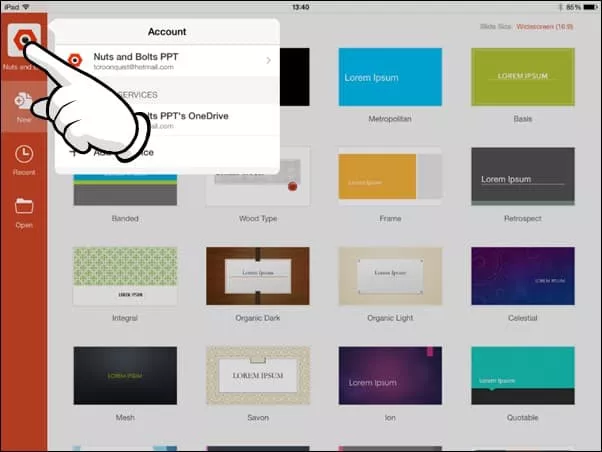
Pro Tip: Your Office 365 account starts with a OneDrive service attached to it (whether or not you have anything in it). If you have multiple OneDrive accounts, you can add them to your account (home or office accounts), allowing you to access those files directly on your iPad.
Note: Only Microsoft OneDrive, SharePoint, and Dropbox are currently supported on Office for iPad.
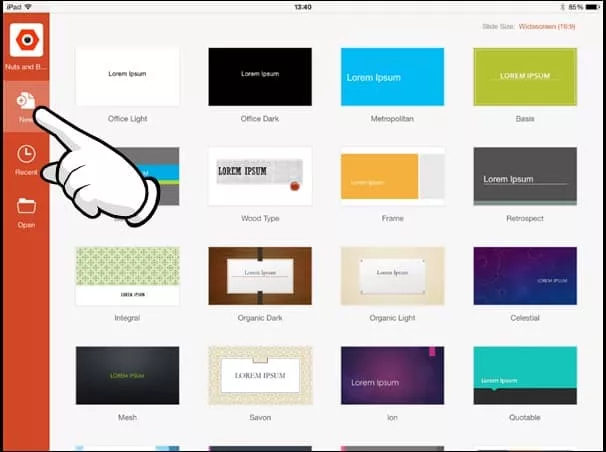
In this section, you will learn how to create a new file/presentation, from scratch, as well as some key tips to keep in mind. To create a new presentation, follow these 2 steps (click to open gallery & instructions):

Recent files
- If you have an internet connection, the most recent version of the file will be downloaded from your OneDrive and will open on your iPad.
- If you do not have an internet connection BUT have previously opened the document on your iPad before, the document will open, but it will not reflect any recent changes made to the version on your OneDrive (if you’ve made any changes from your desktop).
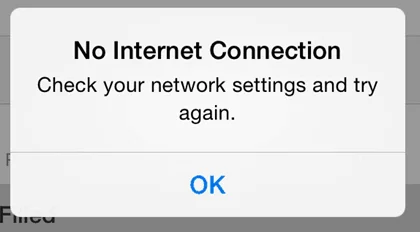
- If you do not have an internet connection and have never opened the document before on your iPad. You will receive a ‘No Internet Connection’ dialog box (below).
- Email as Link: Creates a “View Only” link or a “View and Edit” link of your file and launches the Mail App.
- Email as Attachment: Attaches the presentation to an email, the recipient can open and edit the document natively.
- Copy Link: Creates a “View Only” link or a “View and Edit” link of your file that you can paste into other documents or emails.
Move to Cloud: Allows you to move a presentation stored locally on your iPad onto your OneDrive. This option is only available when working with a file that is stored locally on your iPad.
Remove from Recent: Removes a file from this Recent menu here on your iPad AND on your desktop. This is not the same as deleting a file, it merely removes it from the Recent files list. To delete a file, you’ll have to go into Properties in the Open menu.
Discard Changes: Still not really clear what this does. If you figure it out, let us know.
Properties: Shows you additional properties about your file including filename, location, type, size, author, created, last modified, modified by and company.
Note: You can only create links for files stored on your OneDrive. If you have a locally stored file that you want to share a link to, you first need to move it to your OneDrive before you can create and share a link.
Note: You cannot edit any of these properties from your iPad, you must do so from your desktop version of PowerPoint. However, there are work arounds that will allow you to change the file name from your iPad. To see how that works, check out the section on renaming and duplicating your files.
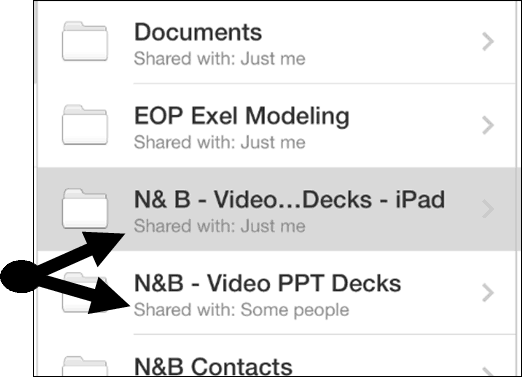
Sharing: Below the file name, you can see if the document is being shared with anyone else.
Reloading Your Files: If you don’t see a file that you have recently saved to the OneDrive, push and drag down with your finger to reload the file menu. Sometimes there is some lag time depending on the speed of your internet connection.
- To Pin a file: Simply select a non-colored pin
- To Unpin a file: Simply reselect the colored pin

Pro Tip: Keep in mind that pinned documents’ names do not update in this recent list if you change their file name. If you try and open a pinned file that has been renamed, you will receive an error message. So if you pin files and rename them, you will need to do some pin-maintenance either on your iPad or desktop version of PowerPoint.
The ‘Open’ area of the File View is where you will find all of the documents on your OneDrive services, as well as those saved on your iPad. So in this section, we’ll cover how to go about opening your files, as well as some EXTREMELY handy Pro Tips about sharing your documents and editing their properties.

- Email as Link: Creates a “View Only” link or a “View and Edit” link of your file and launches the Mail App.
- Email as Attachment: Attaches the presentation to an email, the recipient can open and edit the document natively.
- Copy Link: Creates a “View Only” link or a “View and Edit” link of your file that you can paste into other documents or emails.
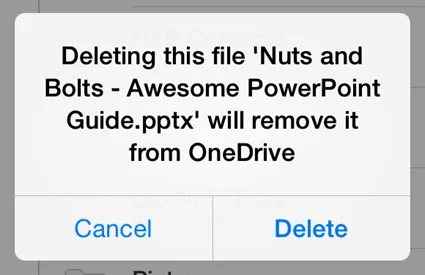
Delete: This is the only place where you can delete files from your different OneDrive accounts or from your iPad.
Properties: Shows you additional properties about your file, including: filename, location, type, size, author, created, last modified, modified by and company.
The Normal View

Navigation buttons

1. Back Button

The undo and redo commands are the iPad keyboard of the CTRL + Z and CTRL + Y keyboard shortcuts on the desktop version of PowerPoint. Similar to the desktop version, you are given 15 commands in both directions, you can undo undo up to 15 actions, or redo 15 actions.
Note: The Navigation Bar is fixed as is. You currently cannot add other commands to it like you can on a Windows based version of PowerPoint with the Quick Access Toolbar. We hope to see this updated in a later version!
4. Autosave
The AutoSave command controls whether or not changes to your presentation are automatically saved and synced with OneDrive. By default, PowerPoint for your iPad is set to AutoSave, which occurs:
- Periodically as you are working within your presentation
- Immediately when you hit the back button to return to the file menu view
Don’t make the same mistake I made – save your presentation!

This might sound obvious, but before closing PowerPoint on your iPad, hit the Back Button to return to the file menu view to ensure that the latest edits to your presentation are saved.
If you close the PowerPoint app by double-clicking the Apple button and swiping up (thus closing the app), you can lose the latest changes to your presentation…not fun!
So to ensure you save your latest changes, hit the button BEFORE closing the PowerPoint app.

If you choose this mode, to save your presentation, you need to either:
- Open the file menu and hit the green save button
- Hit the back button to return to file menu view to launch the Save dialog box
The Name command allows you to edit the name of a newly created AND unsaved PowerPoint presentation. As 90% of the presentations you work on your iPad will not be newly created or unsaved, this option will likely always be greyed out.
For example, if you create a new presentation on your iPad and have not saved it, the name command option is available. That said, as soon as you save the file with a name, this option becomes greyed out (forever).
How do you rename a file on your iPad?
To rename a presentation (or other office file) on your iPad, you either have to:
#1: Duplicate the presentation and save it with a new name. This will create a brand new document, so if you don’t want the older document, you will need to navigate to where it is saved on your iPad, or on your OneDrive and delete it. Painful, I know!
#2: Use the OneDrive app to rename your document (see our blog post on how to rename files in your OneDrive app).
6. Duplicate
The duplicate command creates a new copy of your current presentation and takes you to the File Menu View to rename your presentation (the same is true for the other Microsoft Office apps on your iPad). This is the Save As equivalent, or F12 keyboard shortcut on your desktop version of PowerPoint.
Note: Duplicating a presentation will not overwrite the original presentation, it will only create a new presentation with the new name you give it.
How to move my Presentation from OneDrive to my iPad:
To move a file from OneDrive to your iPad, you need to open the file, duplicate it and then select your iPad as the storage device. There is currently not a “move to iPad” command like there is a “move to cloud” command.
Note: Files stored on your iPad open faster than their OneDrive equivalents as they do not need to download the latest version.

The restore command gives you a options for reverting back to an earlier version of your PowerPoint presentation.
You can either:
- Back to the original you started with: Revert back to when it was last opened (PowerPoint will give you the specific time that it was opened). Doing so you get a warning indicating at what time the file was opened, so you get a sense of how far back you are going. Note: If this option is greyed out, it means there is currently nothing to revert back to.
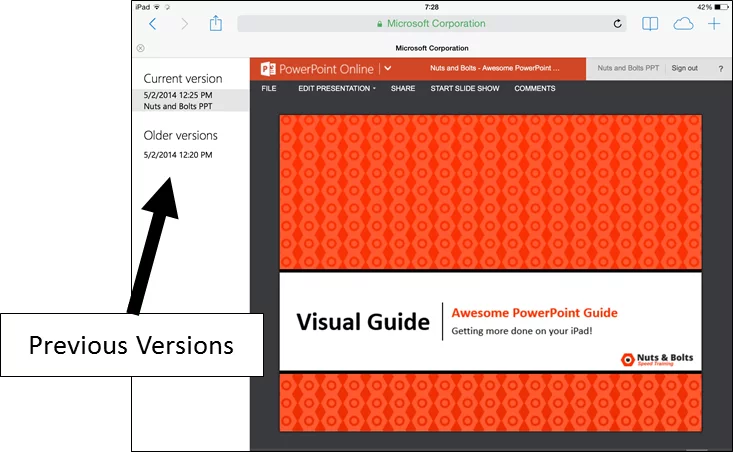
- Back to an online saved version of your presentation: Can revert back to an online saved version of your presentation. This option assumes that the file is saved on OneDrive and that you have an internet connection. Selecting this option launches safari and takes you to OneDrive. Log in with your Microsoft account and you will see all of the previous versions of your file by date on the left (assuming you have some) and allows you to revert back to that specific date.
9. Properties
Shows you the properties of your PowerPoint presentation including:
- Last modified
- Modified by
Note: File Properties (other than Name) are only editable on the desktop version of PowerPoint. To modify a presentation’s name, you can duplicate the presentation and save it as a new name, or use the OneDrive app for PowerPoint to edit the presentation’s name on your OneDrive. To learn more about this, check out our article on using the OneDrive App .
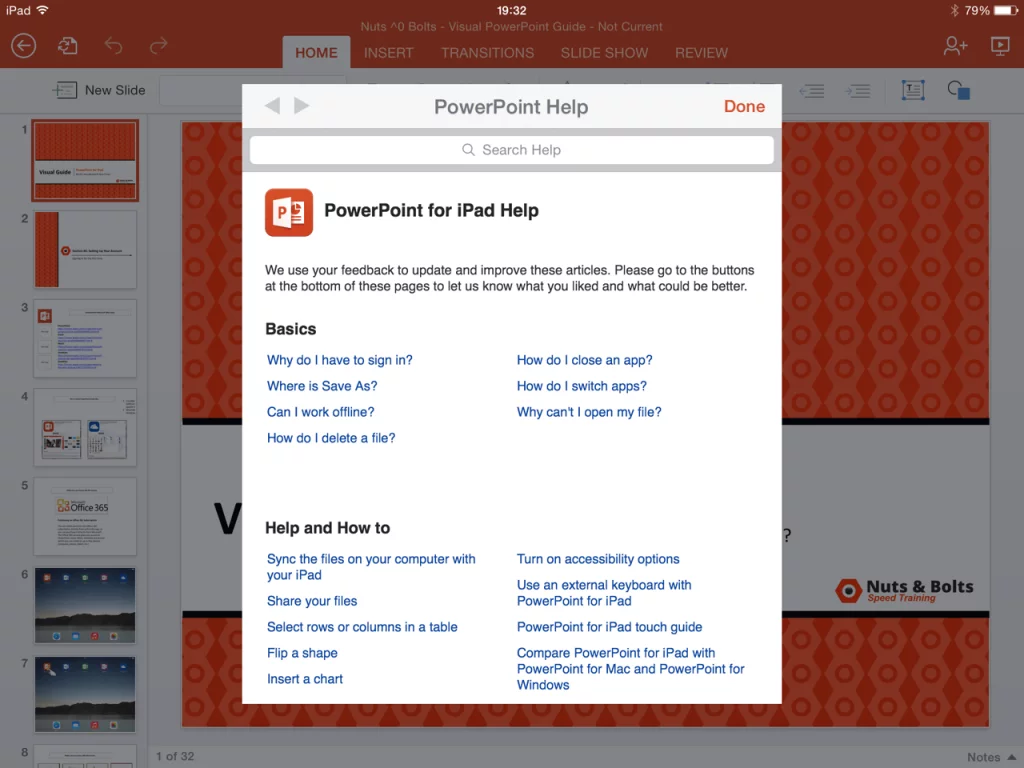
The Help and Support button launches basic help, support and tutorials for PowerPoint on your iPad. This menu is not extensive, but does offer solutions to simple questions you might have.
Note: You do need an internet connection to launch this dialog box.
The Home tab
1. New slide

This opens the PowerPoint slide gallery and allows you to pick from the available layouts within your presentation.
The five slide layouts shown in the picture are the standard layouts we use at Nuts & Bolts Speed Training for 99% of all of our PowerPoint presentations, you might have more or less slides layouts depending on your setup.
The Price of iPad Portability
Limited to Inserting Slides Only: You are limited to inserting slides layouts on your iPad. The Slide Master View is currently unavailable for PowerPoint on your iPad.
Changing a Slide’s Layout: You are limited to inserting new slides on your iPad, you cannot push a layout onto an existing slide.
To move an existing slide onto an new layout, you either need to wait until you are on your desktop version of PowerPoint, or insert a new slide layout, and copy and paste the different objects onto the new slide layout….kind of sucks, but that’s the price of portability.
2. Font styles
Copying and Pasting Style: If you are simply trying to match the font style of an object, it is often faster to copy and paste the font style you are trying to match, rather than identifying the font style, and then changing the font elsewhere
Microsoft Account: Sign in with the account you use for OneDrive, Xbox, LIVE, Outlook.com or other Microsoft services.
3. Font size

The font size dropdown in PowerPoint for iPad gives you three different ways to change the font size of your text:
#1 Pre-set Sizes: Select a preset size in the dropdown menu
#2 Clicker: You can use the plus and minus signs to select a font size
#3 Manually: You can double-tab the number between the plus sign and minus sign, and manually type in your desired font size
4. Bold / italics / underline
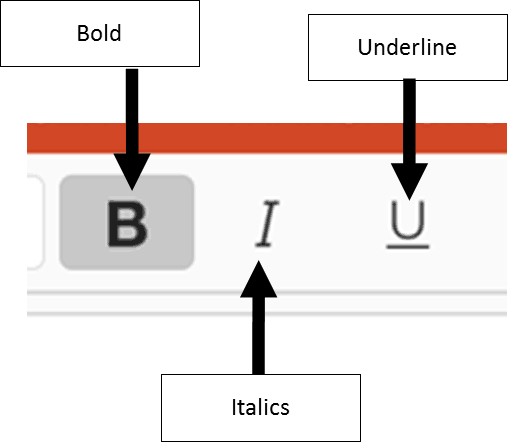
- Bold: Creates bold text for highlighting information, often used in titles.
- Italics: Creates italicized text for highlighting information, often used in subtitles and quotes.
- Underline : Creates an underline text for highlight information, often used in titles and subtitles.
Note: There is no way to make a double underline in PowerPoint for your iPad. Pro Tip: Don’t overdo it
If everything is important, nothing is important. Use text highlighting sparingly to better emphasize your points.
5. Formatting

- Strikethrough: Creates a strikethrough effect to emphasize that something should be removed
- Subscript & Superscript : Creates the -25% offset subscript and +30% offset superscript formatting. These are typically used in formulas, mathematical expressions and specifications for chemicals and isotopes

Includes the basic theme colors for your PowerPoint presentation, and their resulting gradients (which you cannot manually set).
Automatic: The automatic color is determined by the “Windows Text” color set in Control Panel Display Appearance. Changing this color will affect text color in all Windows applications.
Editing Your Presentation’s Theme: Currently you are not allowed to change or edit your PowerPoint presentation’s theme on your iPad. All theme editing or updating must be done on your desktop version of PowerPoint.
Setting Your Presentation’s Defaults on Your Desktop: You can set the default formatting for your objects on your desktop version of PowerPoint and those defaults will carry over into PowerPoint for your iPad.
6b. More colors

#1 More Colors: Selecting more colors gives you a dialog box with standard colors to choose from.
#2 Recent Colors: If you use the Custom Color option to create your own colors within your presentation, this second row of recent colors populates.
#3 Custom Color: Allows you to select your own color from a color grid (which is not very useful as you cannot get a precise color).
Advanced Color Formatting: Currently there are no options to input RGB or HSL codes to create specific custom colors or apply transparencies in PowerPoint for your iPad. The eyedropper tool is also not available.
To copy a custom color style (font color, shape fill or shape outline) into your recent colors to reuse somewhere else, see our blog post on using custom colors in PowerPoint on your iPad. 7. Text styles

Includes standard WordArt styles you can apply to highlight your message.
Style Note: WordArt is often distracting and hard to read and should be used sparingly if at all. See the example of Aqua, Accent 1, Reflection below the font styles gallery I created.
Note: You do not have the Text Fill, Text Outline and Text Effect options that you have on your desktop version of PowerPoint. You are currently limited to these 20 styles.
Left / Center / Right / Justify: Dictates the horizontal text alignment for text within a given PowerPoint object.
Top / Middle / Bottom: Dictates vertical text alignment for text within a given PowerPoint object.
Horizontal / Rotate Clockwise / Rotate Counterclockwise / Stacked: Dictates the rotation of your text within a given PowerPoint object. See next page for examples of each.
Columns: Controls how many columns of text are within an object. This is often used for objects with lots of text to visually break up the text.
Note: Notice that the alignment drop down stays open so that you can make multiple selections at the same time while working in your presentation…very handy!

Allows you to select bullet and numbers options for your lists in PowerPoint, but there are number of limitations that you should be aware of:
Limitation #1 : The Ruler – As you cannot access the ruler in PowerPoint for your iPad, you are stuck with the default bullet and numbering tab spacing
Limitation #2: Custom Bullets – You cannot create custom bullets like you can on your desktop version. That said, custom bullets and numbering created on the desktop version of PowerPoint does carry over into PowerPoint for your iPad, but you are not allowed to use it outside of the shape that it is currently set in.
Limitation #3: Numbers Start at 1 – All numbers on the iPad start at 1. You cannot adjust the starting number.
10. List level increase / list level decrease

Decrease List Level: SHIFT + TAB equivalent on the desktop version of PowerPoint. Moves a bullet or numbering backwards one indent level
Increase List Level: TAB equivalent on the desktop version of PowerPoint. Moves a bullet or numbering forward one indent level.
11. Text box
Inserts a text box into the middle of your PowerPoint slide.
Note: All inserted objects always start in the middle of your slide. There is currently no setting to manually place/draw your objects in after you have selected them.
12. Shapes gallery

Opens the shapes gallery and allows you to pick a shape to insert into the middle of your PowerPoint slide.
Shapes Always Default to the Center of Your Slide: Whenever you insert an object, it always defaults to the center of your slide.
You will need to manually drag it around and position it. To make sure your shapes are the same size, either copy and paste an existing shape on your slide, or line it up next to your shape, and resize it using your SmartGuides.
The Insert tab
Inserting a table immediately gives you a default 3 by 3 table in the center of your PowerPoint slide and opens the Table Tab on the Ribbon. See Table Tab for Table Options.
3. Pictures

Selecting pictures opens the Photo Gallery. Currently, you are only allowed to insert pictures that are stored locally on your iPad (in your Camera Roll, Photo Streams, etc.).
If you have company pictures on your computer that you want to access on your iPad, you can share those pictures wireless through the iCloud service so that you can access them in PowerPoint on your iPad.
Check out Apple’s step-by-step walk-through of the iCloud service .

Opens the shapes gallery and adds the Shape Tab on the Ribbon.
Default Your Shapes on Your Desktop: To avoid clumsy formatting in PowerPoint for your iPad, I highly recommend setting default formatting on the desktop version of PowerPoint for your specific decks as it carries over onto your iPad.
To set the default formatting on your desktop version of PowerPoint, simply right-click the shape you want to default the formatting for, and in the right-click menu, select set as default shape (line or text box, depending on what you are defaulting).
5. Text boxes

Inserts a text box into the middle of your PowerPoint slide and opens the Shapes tab on the Ribbon.
Pro Tip: Insert rectangles instead of text boxes to avoid the default “resize shape to fit text” setting. All text boxes start with this default setting and there is no way to un-select or change this formatting option in PowerPoint for your iPad.
The Transitions tab
1. Transition effect
Represents the 39 different types of transitions you can apply to your PowerPoint slides on your iPad.

32 of the 39 transition effects have effect options associated with them which changes the direction of the transition. These variations are often from left to right, or from top to bottom. For the style effects to be active, a transition with effects has to first be applied to a slide.
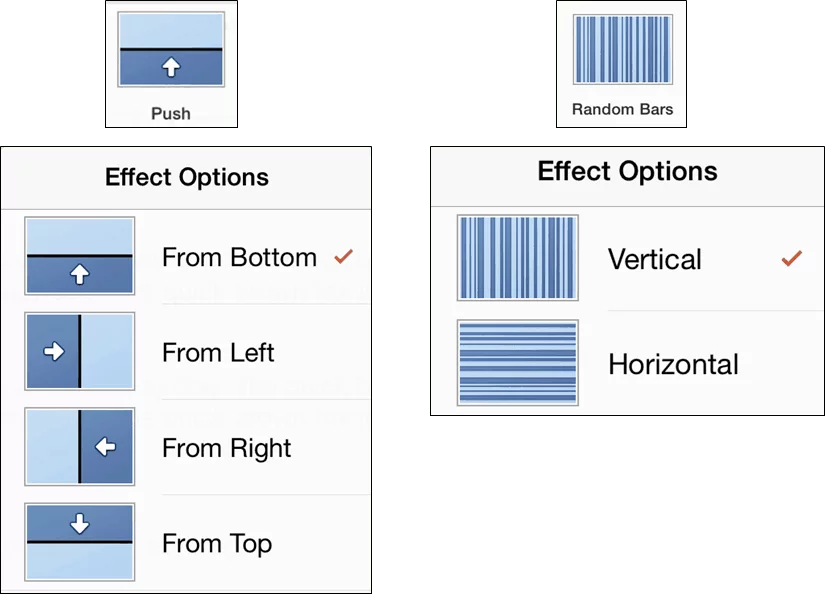
To change the effect options, simply select the alternative transition effect you would like for your slide.
Style Note: As transitions are often distracting when giving a presentation, I highly recommend using them sparingly (if at all) within your presentations.

Previewing a Transition: To preview your transition, hit the “from current” icon in the upper right hand corner of your screen to start the presentation form the current slide. Once in presentation mode, swipe right once to move to the previous slide, and then swipe left to preview the transition you just set for your slide.
Transitions without effects:
- The Flash, Curtains

3. Apply to all styles

The Review tab
1. Show comments

Allows you to turn comments on or off in your PowerPoint presentation. Comments appear either in the upper left hand corner of the slide, or on the specific objects they have been added to.
Note: Comments can be only be viewed on the iPad, there is currently no support for editing, adding or removing comments from a presentation.

2. Previous

Cycles backwards to the previous com ment within your presentation, starting from your current slide

The Picture tab
1. Picture styles
Represents the 28 different preset picture styles you can apply to your pictures in PowerPoint.

2. Picture shadows
Represents the 23 different preset picture shadows you can apply to your pictures in PowerPoint.

4. Re-order
All objects on a PowerPoint slide exist in a stacking or layering order based on when they were inserted onto the slide.

- Bring Forward: Brings an object forward, one layer.
- Bring to Front: Brings an object to the front layer of all the other objects on the slide
- Send Backward: Sends an object backwards one layer.
- Send to Back: Sends an object all the way to the back layer behind all the other objects on the slide.
Pro Tip 2: The Bring to Front and Send to Back commands are the fastest and easiest commands to use, as you know exactly where your objects will go. Best practice is to use these first, and then readjust any other objects that you want behind or in front of your other objects.
Note: More than one object has to be present on the slide for this command to be active.
The Shapes tab

1. Text Styles

The Text Styles gallery includes the 20 standard WordArt text styles that you can use to bring emphasis to or highlight the text within your presentation.
Are text styles worth using? Typically not, but it really depends on what you are trying to accomplish.
For example, for corporate presentations, WordArt is distracting and hard to read and should be used sparingly, if at all. That said, if you are using PowerPoint as a medium for creating a poster or a graphic for a website, the WordArt text styles could be useful.
Missing Text Styles Options: In PowerPoint for your iPad, the Text Fill, Text Outline and Text Effect formatting options are not available, you can currently only play with these options on your desktop version of PowerPoint.
2. Shape Styles

The Shapes Styles represent the 42 different default shape formatting styles you can apply to your shapes in PowerPoint. Now although these are tempting to use, keep in mind that anyone who has PowerPoint has access to these shape styles, so simply using these default formatting styles will result in a very default looking PowerPoint presentation.
Can I change the default shapes styles in the gallery? Yes, the shape styles are dictated by your PowerPoint theme settings, so manipulating or building a corporate theme will change these default formatting styles.
3. Shape fill
Allows you to change the shape outline color in PowerPoint.

- Bring Forward: Brings an object forward, one layer
- Bring to Front: Brings an object to the front layer of all the other objects on the slide
- Send Backward: Sends an object backwards one layer
- Send to Back: Sends an object all the way to the back layer behind all the other objects on the slide

The Table tab
- Single tap a table: Get the standard object edit menu.
- Double tap a cell within a table: Get the table specific edit menu.
- Cut: Cuts the text out of the selected cell.
- Copy: Copies the text in the selected cell.
- Paste: Pastes in your last copied text or object. Note that you cannot copy and paste formatting between tables.
- Clear: Clears the contents of the cell.
- Delete: Opens an additional menu allowing you to either delete the column or row you are currently in.
- Insert: Allows you to insert a column to the left of the current cell, or a row above your current cell.
- AutoFit: Collapses the column width to fit the text within it.

- Header Row: Formats the first row in your table as a header row
- Total Row: Formats the last row in your table as a total
- Banded Row: Adds a rotating fill color to the horizontal rows of your table
- First Column: Highlights the first column in a table
- Last Column: Highlights the last column in a table
- Banded Columns: Adds a rotating fill color to the vertical columns of your table

Note: As you make table selections, the style gallery will populate with a live preview of those options for the different table styles.
2. Table styles

From a formatting perspective, I highly recommend starting with a pre-formatted table style that gets you closest to your end result, and then manually tweaking the table from there.
Lists the different default table styles you can apply to your tables in PowerPoint.
Note: The Styles Options (discussed above) that you have selected, will be shown within the Table Styles Gallery making it easier to pick the default style that get you closest to your end goal.
Style Note: Use the formatting / highlighting sparing to increase the effectiveness of your table.
Tapping the fill colors opens the theme colors drop down, which you can use to manually override any of the Table Styles you have already applied to your table.

Pro Tip: To reverse the banding of your rows or columns, first, manually format the first row or column with a fill color, and then toggle on or off the header row option or the first column option.
Note: You are not able to change the outline weights or colors of a table or cells within a table in PowerPoint on your iPad. All table border formatting will have to wait until you are on your desktop of PowerPoint.
Gives you options to insert rows above or below the current cell you have selected within your table, or columns to the left or right of the current cell you have selected.

How can I insert multiple rows or columns at the same time? To insert multiple rows or columns within your table, first select multiple rows or columns within your table. With multiple rows or columns selected, when you click insert, the same number of rows or columns will be added to your table.
Deletes the row, column or table that you currently have selected.

How do I AutoFit multiple columns at the same time? First select the individual columns (or the entire table) before selecting AutoFit.
7. Alignment

The Text Alignment command changes the horizontal text alignment (Left, Center, Right) or the vertical text alignment (Top, Middle, Bottom) of a cell within the selected cell in your table (similar to using the Text Alignment tool on your shapes or other PowerPoint objects).
The Reorder command allows you to change the layering of the objects on your PowerPoint Slide. All objects on your slide exist in a stacking or layering order (one on top of the other) based on when they were inserted on to the slide.
- Bring Forward: Brings an object forward, one layer
- Bring to Front: Brings an object to the front layer of all the other objects on the slide
- Send Backward: Sends an object backward one layer
- Send to Back: Sends an object all the way to the back layer behind all the other objects on the slide

Pro Tip: When using the reorder command on a busy PowerPoint slide with lots of objects, the Bring to Front and Send to Back commands are the fastest and easiest to use, as you know exactly where your objects will end up.
Why is the reorder command grayed out? More than one PowerPoint object has to be present on your slide for the Reorder command to be active.
The Notes pane
1. Opening the Notes pane To open the Notes Pane, tap in the lower right-hand corner of your screen where it says ‘Notes’.

How do I best use the Notes pane on your iPad? I find the notes pane useful for quickly reviewing notes prior to your presentation, as the automatic full screen mode makes it easy to both review the notes for a particulate slide, and see the thumbnail of that particular slide, outlined in orange on the left side of the screen. The notes pane will also conveniently stay open on your iPad until you manually close it.
2. Closing the Notes pane
To close the Notes Pane in PowerPoint on your iPad, simply click the notes icon in in the upper right-hand corner of the slide, and you will return to the Normal View of your presentation.

Share & Slide Show View
These are the options for sharing your documents:
- Email as Link: Creates a “View Only” link or a “View and Edit” link of your file and launches the Mail App.
- Email as Attachment: Attaches the presentation to an email, the recipient can open and edit the document natively.
- Copy Link: Creates a “View Only” link or a “View and Edit” link of your file that you can paste into other documents or emails.
The Slide Show icon starts your presentation in slide show mode starting form the current slide. Besides running your presentation, this is great for spot checking your content and for reviewing any transitions you have applied as there is no “live preview” for them on your iPad.
The Slide Show icon is the equivalent of hitting the F5 keyboard shortcut on your desktop version of PowerPoint.
Help us keep this article updated
We hope you’ve found this PowerPoint for iPad guide helpful.
If you’ve see something that we’ve missed, PLEASE let us know and we’ll do our best to update this guide ASAP.
Oh, and we hope you’ve paid special attention to the pro tips and tricks we’ve sprinkled through the guide to help you avoid major errors, or to help you troubleshoot issues.
What’s next?
Related articles.
- Bar chart trick: Right aligning categories (PPT, Word, and Excel)
- PowerPoint settings: program level vs. presentation level
- Set Up Slide Show: Customize how your PPT presentations run
- What is the Popup Toolbar in PowerPoint?
- Strikethrough Shortcut (l̶i̶k̶e̶ ̶t̶h̶i̶s̶) for Word, Excel & PowerPoint
About The Author

Popular Tutorials
- How to Strikethrough Text (l̶i̶k̶e̶ ̶t̶h̶i̶s̶) in Word, Excel & PowerPoint
- How to Make Animated Fireworks in PowerPoint (Step-by-Step)
- How to Create a Flash Card Memory Game in PowerPoint (Like Jeopardy)
- Keyboard Shortcuts Not Working: Solved
PowerPoint Tutorial Categories
- Strategies & Opinions
- Shortcuts & Hacks
- Presentation Design
- Pictures, Icons, Videos, Etc.
- New Features
- Charts & Data Viz
We help busy professionals save hours and gain peace of mind, with corporate workshops, self-paced courses and tutorials for PowerPoint and Word.
Work With Us
- Corporate Training
- Presentation & Template Design
- Courses & Downloads
- PowerPoint Articles
- Word Articles
- Productivity Resources
Find a Tutorial
- Free Training
- For Businesses
We help busy office workers save hours and gain peace of mind, with tips, training and tutorials for Microsoft PowerPoint and Word.
Master Critical PowerPoint Shortcuts – Secure Your FREE Training Module and Save Valuable Time!
⌛ Master time-saving expert techniques.
🔥 Create powerful presentations.
🚀 Propel your career to new heights.
We value your privacy – we keep your info safe.
Discover PowerPoint Hacks Loved by Industry Giants - KKR, AmEx, HSBC!
Over 114,880 professionals in finance, marketing and sales have revolutionized their PPT skills with our proven methods.
Gain FREE access to a full module of our premium PowerPoint training program – Get started today!
We hate spam too and promise to keep your information safe.
You are currently viewing a placeholder content from Facebook . To access the actual content, click the button below. Please note that doing so will share data with third-party providers.
Can I do a PowerPoint presentation using an iPad?
By: Author Shrot Katewa

I love my iPad, and If you are like me, you would want to carry it wherever you go. It is compact, light and allows me to get things done that can’t be done using my phone due to its small size! In fact, it is so convenient that it makes me wonder if I could replace my laptop with an iPad even for my client meetings?
But, can I create a PowerPoint presentation using an iPad? Yes, you can create a PowerPoint presentation using an iPad. In fact, iPad has a bunch of different apps that allow you to run PowerPoint presentations on it. iPad’s built-in Keynote presentation software also allows you to view the PPT files. You can also install Microsoft PowerPoint to run, edit and create a PowerPoint presentations from scratch on iPad just as you run it on a laptop!
Running a PowerPoint presentation on your iPad is actually a lot easier than you think. There are, however, a few things you should be aware of. Let’s get into the details of the workings of a PowerPoint presentation on an iPad.
How to put a PowerPoint presentation on an iPad?
Sometimes, you may already have a PPT file that was shared by your colleague or a client. However, many a times, it is you who has to create a PowerPoint presentation that dazzles your audience! Creating a presentation that holds our audiences’ attention is hard. We wrote a post that covers the steps that you should be taking while creating a PowerPoint presentation. We’ve broken it down to a step-by-step process that is designed to help you with creating a presentation. (Link – www.owlscape.in/what-are-the-steps-to-create-a-powerpoint-presentation )
If you have already created a presentation using a laptop or any other computer, you’ll first need to transfer it to your iPad. There are multiple ways you could do this. I would like to share my top 3 favourite method as they are free, doesn’t take too much time, and are easy to carry out as it doesn’t require any technical expertise.
1. Transfer the PPT file to your iPad using your email
This is probably the easiest of all the three options. In all likelihood, you may already have received a PPT file from your colleagues through an email. In this case, all you need to do is simply open your email account on your iPad, click on the email that contains the PowerPoint file, and download it.
2. Transfer the PPT file to your iPad using a cloud storage service
Another quick and easy option is using a cloud storage services. There are plenty of cloud storage services such as Google Drive, Dropbox, and even iCloud. Most of these services offer at least a few GBs of free data storage. Simply upload your PPT file from your computer. Then, login to your cloud storage service on your iPad and download the PPT file on your iPad.
3. Transfer the PPT file to your iPad using WhatsApp
https://www.youtube.com/watch?v=kHShrP6cR88
Video on how to login to WhatsApp on your iPad
Another great way to download the file directly to your iPad is by using WhatsApp. While WhatsApp is a great way to stay in touch with you friends, it is also great to share files. You can ask your colleague to send the file to you over WhatsApp. All you need to do is simply log in to your WhatsApp account on your iPad, open your colleague’s chat message, and download the file.
What is the best app for PowerPoint presentation on iPad?
In our experience, Microsoft PowerPoint is by far one of the best apps to work with PPT presentations on iPad. You can easily download and use, and if you have an Office365 subscription, it allows you access to additional functionalities which come in handy especially if you plan to edit files on-the-go on your iPad. PowerPoint presentation has been the brainchild of Microsoft, and it has been the leader by a long stretch when it comes to the presentation software.
With Microsoft PowerPoint, not only do you resolve the compatibility issues of the PPT files with software, you also get an interface you are familiar with. You can be absolutely sure that PPT file will look exactly as it is intended to when using Microsoft PowerPoint on iPad.
You can download the Microsoft PowerPoint app for your iPad from the App Store.
Is Microsoft PowerPoint app FREE for iPad?

Microsoft PowerPoint app is FREE to download and use on an iPad. Microsoft realise that the future of technology is more towards smartphones and tablets. Thus, they have a strong focus on providing access to user files on-the-go. Although you can edit PowerPoint presentations on-the-go, if you wish to get advanced functionalities, you may want to get an Office365 subscription. Having said that, most of your basic editing needs are covered in the base version of the app.
Are there any other apps for PowerPoint presentation on iPad?
Absolutely! There are several other applications that you can use to open and edit a PowerPoint presentation on iPad. All the other applications have their pros and cons. We have listed down the top 3 alternatives to Microsoft PowerPoint on iPad. They are in no order to preference.
Keynote is the native software that offers an office suite on Mac and iOS devices including iPad. It has been built from the ground up for iPad and iPhone devices. Needless to say, it is one of the most powerful software when working with presentations.
While Keynote allows you to view, open and edit a PowerPoint file, the overall functionalities are different. We’ve also seen that the look and feel of the PPT file does change when using it on Keynote. However, the changes are not major and if you are only planning to view the major contents of the PPT file on your iPad, Keynote is effective.
2. Google Slides
The best part about Google Slides is that it allows real-time collaboration on projects with its online office suite. This is great especially when your team is not based in the same location as you are.
Google Slides is also compatible with PPT files. It allows you or open, view and edit PowerPoint files on your iPad. Google Slides is FREE . All you need is a Google account to start using it.
3. WPS Office

Image credit – Mr. Phone
WPS stands for Writer (W), Presentation (P), Spreadsheets (S). It is our favourite alternative to Microsoft Office suite. It has been designed with Microsoft Office users in mind. Thus, the look and feel of WPS Office has striking similarities to that of MIcrosoft Office. For all the Microsoft Office users, WPS Office makes you surprisingly feel just at home.
If you are looking to a cheaper/free alternative to Microsoft Office suite that looks and feels just like MS Office, in our experience WPS Office by far the best option for you. It was designed with Microsoft Office users in mind. It was originally launched for Windows, however, WPS Office suite 2019 version has been expanded to both Linux and Mac users as well.
WPS Office is now also available for Mac and iOS users. You can download WPS Office directly from the App Store or visit the download section on their website . WPS Office is FREE to use although simply signing up for an account with them gives you access to premium feature for 1 year.
What equipment will I need to do a PowerPoint presentation using an iPad?
What makes the iPad really powerful is that it allows you to connect to a projector and project the presentation on a bigger screen. This comes in really handy as this negates the need to carry any laptop. Alternatively, if you consider laptop to be your first choice, instead of carrying an additional spare laptop, you can keep an iPad device as a backup just in case your laptop fails to work.
https://www.youtube.com/watch?v=y0Z6VGNlxbc
Video on how you can connect your iPad to a projector
There are multiple ways to connect your iPad to a Projector. Two of the most common ways are –
- HDMI connection
- VGA connection
For both the connections, you will need to buy an additional connector cable that allows you to connect the two devices.
Our personal preference is to use the VGA connector. Main reason for this is the fact that a VGA connector allows the sound to be played from the iPad itself as opposed to a HDMI connector. In an HDMI connection for an iPad, the sound is played through your projector. Another reason for preference of a VGA connector over an HDMI connector is that it is more widely available as a default connection option to the projector in most corporate offices. However, connector preference comes down to a personal choice.
So, is it worth it???
We started this article wondering whether we could do a PowerPoint presentation using an iPad, and whether we could carry an iPad to our meetings instead of a laptop. With the availability of Microsoft PowerPoint application for iPad and several other alternatives to open a PPT file on iPad, as well as the possibility to connect the iPad to a projector, we can safely conclude that an iPad can be used as a replacement to a laptop while meeting clients!
Psst… please share!
If you enjoyed reading the article, please leave us a comment below and share this with you network. This acts as a great motivation for us to keep creating useful content for your folks!
📒 FREE FOCUS ASSESSMENT : All-New → Get Started!
Capture Your Ideas : Learn Ulysses → Brand New Course!
💌 NEW: Calm Inbox : Less Email, More Focus → Get Access
📒 NEW: 2023 Digital Planner : Made for iPad → Yes, Please!
FREE! Plan Your Ideal Week : Bonus Workshop + Planner → Get the Workshop
NEW! All the Things : Productivity Course → Check it Out
Productivity Workshop : The 4-Part Flywheel → GET ACCESS!
Bundle Up and Save : 25% discount on all app courses → Learn More
Simplify Your Time Management : New Course → Finally!
🧠 To Obsidian and Beyond : All-New Course → GET ACCESS
A Beginner’s Guide to PowerPoint on the iPad

This is the third in our series of articles about Microsoft Office for the iPad, and the results so far have been decidedly mixed. We found Word to be surprisingly powerful and a good alternative to the desktop version for all but the most hardcore word processors out there. Excel was more of a let down with lots more functionality missing, including many elements that would be notable to even light spreadsheet users. We’re happy to report that PowerPoint is much closer to Word than Excel, and even more than either of those apps, you could use PowerPoint perfectly well on your iPad and never touch the desktop version. In fact, some of the design decisions Microsoft have made might even make you put together better presentations than if you had the complete desktop app at your disposal.

Our Must-Have, Most Used Productivity Apps
We spend an inordinate amount of time sorting through hundreds of apps to find the very best. We put together a short list of our must-have, most-used apps for increasing productivity.
PowerPoint for iOS is free from the App Store and allows you to view PowerPoint files from anywhere. If you want to edit or create presentations from the iPad though, you’re going to need to subscribe to Office 365 , which runs $6.99/month or $70/year for individuals on up to 5 devices. An Office 365 subscription comes with the full Microsoft Office suite of apps as well was 1TB of OneDrive storage, so there is quite a bit of value there.
Whether this is a fair price is a matter we can only leave to you, but the software package on offer, and especially the 1TB of cloud storage that works across iOS, Android, macOS, Windows, and Linux, makes this a pretty compelling subscription in our eyes.
Of note, Microsoft only requires iPads over 10.1” to pay up to get editing functionality. If you have a 9.7” iPad, iPad Mini, or even an iPhone, then you can use the full version of PowerPoint (and all other Office apps) without an Office 365 subscription. Apparently productivity starts at 10.1” in Microsoft’s world — not that we’re complaining.
Out of the Box Experience
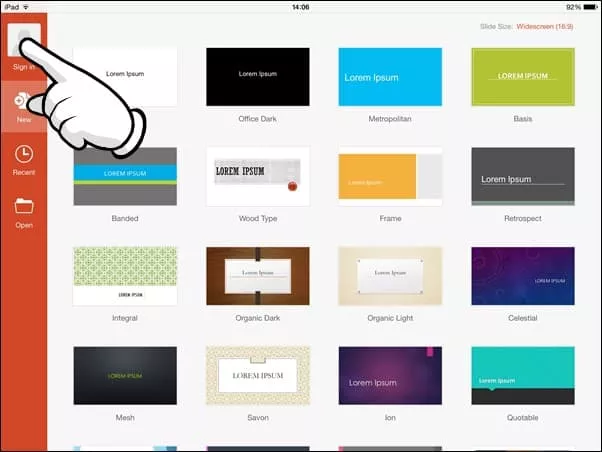
If you start with PowerPoint on the iPad and want to begin building presentations from scratch, the iPad version gives you everything you need to start creating right away.

There are 25 built-in templates you can start with. While not all of them are great, ones like Parcel, Celestial, Ion, and Mesh are all really nice templates that you can use to create professional-looking presentations. Some of them are more fun and offer a more distinct look, but for many people, simplicity is king and the options here are more than capable of making you look good at your next speaking gig.
As you would expect, each of these 25 templates have an assortment of slide types so you can move between titles, lists, and giant images with a consistent experience for your audience.
And if you were worried about getting your content into these slides, fear not because PowerPoint for iPad has tons of tools around adding animations to elements on your slides, transitions between slides, drawing on and marking up content, and adding things like tables, images, icons, and videos into your slides.
Basically, if you work entirely from the iPad, you’ll have more than enough control over everything to put together a presentation that you can be proud of.
Adding Some Flair
PowerPoint has quite a few tools for customizing the feel of your presentations, and while I’d contend that adding too many effects and transitions to a slide deck can be detrimental, these can of course be used well and the fact that so much is here should allow most people to create exactly what they want.

There are 35 ways you can have items on a slide appear or disappear and 17 different ways you can emphasize specific elements on a slide. And if you like transitions, there are a sweeping 49 options for how you move from one slide to another. Should you use all of these? God no. Does this level of flexibility enable a bunch of cool one-off effects? Oh yes!
And then there are a bunch of different drawing tools you can use to add a little panache. Similar to most markup apps you know and love , there are several drawing tools like pencils, markers, and highlighters, as well as a cool cosmic pen that is just fun. You can make this animate into the slide so you can have custom-looking animations that call out something specific on your slides.
Another thing I really like is a feature called Design Ideas. This is found under the Design tab and you can use it on any slide in your presentation. PowerPoint will look at the content of the slide and give you a few suggestions for alternative styling. For example, I had a basic bulleted list and it suggested this nicer layout for a short list:

One of the things I love about how this is set up in the PowerPoint UI is that none of these effects are visible from the main tabs you’ll use when creating your slides. This breaks up the workflow between content and style. You’ll likely find yourself putting together all your content together across however many slides you need and then going back through it all to add whatever animations and transitions you think you need. Again, since the content of a slide deck is far more important than the flair on top of it, this behavioral encouragement is spot on.
Collaboration
As with Microsoft’s other Office apps, the collaboration features from the desktop and web versions are here and they work great. You can work in real time with anyone else whom you’ve shared the document. You can see their edits in real time and they’ll see yours, no matter the platform they are on.
Comments are supported as well, and you or others can leave comments on certain points of the presentation, and there is even version control so you can go back to potentially dozens of versions of the presentation and restore them (or save them as a new copy).
Giving Your Presentation
The presentation itself is the whole reason for making a slide deck — that experience is rock solid — but might be limited compared to what you have on the desktop.
First off, you can present a presentation you created on the iPad on any device that runs PowerPoint, but if you want to present from an iPad, the easiest way to do so is to plug into the screen you are going to be using via a DisplayPort/HDMI/DVI cable that uses Lightning or USB-C (depending on your iPad). After you’re connected to an external display, you’ll see your slides in all their glory on the external display and the presenter view will appear on the iPad itself.
If you happen to be somewhere that has an AirPlay compatible screen (most likely through an Apple TV), then you can also mirror your screen to the AirPlay device and you’ll get the same effect where the slides show on the AirPlay receiver and the presenter view shows on the iPad.

Whether using wired or wireless connections for the presentation, you can always tap and hold on your iPad screen to bring up a virtual laser pointer to point out whatever you want to highlight on a particular slide. It’s actually pretty slick and more useful than I expected it to be.
PowerPoint as a Good iOS Citizen

Unlike some other companies who take forever to support iOS’s latest and greatest features, Microsoft has done a pretty decent job of keeping up with the times. Using PowerPoint in late 2019 feels like using an app built to use most of iOS’s (and iPadOS’s) latest features.
Pretty much all the main contenders are here: drag and drop works well and lets you drag in your own media straight from things like Files, Photos, or even Safari and drop them into your slides with ease. The UI for this is rather limited, and you don’t quite know what will happen when you drop something like a photo onto a slide, but you can of course resize and reorient objects once they’re on the slide.
PowerPoint also supports split screen, which is very useful for this sort of app as it allows you to have your research on one side of the iPad and your presentation on the other. I constantly find myself bouncing back and forth when putting together a PowerPoint presentation, and this would be a near deal-breaker for me personally.
The one major iPadOS feature this doesn’t currently support is multi-window. iPadOS 13 enabled apps to have multiple documents open at once and PowerPoint does not support this at all. This is a less egregious omission since most people tend to work on one presentation at a time, but sometimes you might want to reference another presentation that you’ve created or are comparing your slides to ones someone else made.
Overall, PowerPoint strikes a good balance of being unmistakably Microsoft without feeling like a Windows app on the iPad.
Apple Keynote and Google Slides

While PowerPoint is the undisputed standard for presentations, the options from Apple and Google are also compelling and have the distinct advantage of each being completely free. Without getting too much into the weeds here, the short overviews of each of these competitors are:
Apple Keynote lets you more easily create great-looking slides with modern, elegant templates. The app also feels more finely tuned to iPadOS’s UI is a very smooth experience from start to finish. Collaboration is a big issue though if you are not working with others on iPads or Macs. And even if you are, the collaborative editing capabilities are far less robust than what Microsoft has in PowerPoint.
Google Slides is a very minimal presentation tool, but it gets the job done. If your needs are very basic and you value a cloud-based solution with great real-time collaborate editing, then Slides can serve your needs very well. But if you want to have a little more style in your deck, then you’re going to be left wanting here. It’s not the end of the world, but it’s certainly not the best in class.
In short, if you value compatibility and collaboration, PowerPoint is the clear winner. If you value great design in your slides and a delightful iPadOS experience, Keynote is king. And if you just want what is on the web and included in your Google account, then Slides will be okay for you, but you’re probably not going to fall in love with it.
Ultimately, many of us don’t have a choice in the apps we use to give presentations. These usually happen at work and the company has some standard in place for creating presentations, so the choice has been made for you already. If you have any say at all in what presentation software to use, then we think PowerPoint is a great way to make them on the iPad.

With a rich set of tools to make everything from basic to wild and flashy presentations possible, it’s bolstered by a robust set of collaboration features as well as the simple fact that it’s the de-facto standard across most of the business world. You’ll probably have little-to-no friction in making this work for you and your business.
If you are working solo or there really isn’t any need to use one app or another, then Keynote is a very compelling alternative, and is the feather in iWork’s cap. it’s an excellent app that makes is dead simple to create professional-looking presentations with very little effort. Oh yeah, and it’s completely free! Not everyone will love this, but it’s definitely something to consider using if you’re not totally sold on PowerPoint.
Can You Create a PowerPoint on an iPad? Here’s How!
Creating a PowerPoint on an iPad is simple! All you need is to download the PowerPoint app from the App Store, sign in with your Microsoft account, and you can start creating your presentation right away. It’s an efficient way to work on your slides whether you’re on the go or don’t have access to a computer.
After you complete your PowerPoint, you can easily present it directly from your iPad, share it with others, or transfer it to your computer for further editing.
Introduction
In the world of presentations, PowerPoint has been a long-standing favorite. Its user-friendly interface and robust features make it the go-to choice for professionals, educators, and students alike. But what if you don’t have access to a computer? Can you still whip up a compelling presentation? Absolutely! Thanks to the technological advancements of tablets like the iPad, creating a PowerPoint presentation is not only possible but also incredibly convenient.
The iPad, with its portability and intuitive touch screen, offers a unique way to create and edit presentations. This is particularly relevant for those who are always on the move or simply prefer the tactile interaction that tablets provide. In this article, we’ll explore how to create a PowerPoint presentation on an iPad, why it’s a useful skill, and who stands to benefit from this knowledge. Whether you’re a student preparing for a class project, a business professional crafting a pitch, or a teacher planning your next lesson, mastering PowerPoint on the iPad will elevate your presentation game.
Step by Step Tutorial: Creating a PowerPoint on an iPad
Before we dive into the steps, let’s clarify what we’ll achieve. By following these instructions, you’ll be able to create a fully-functional PowerPoint presentation on your iPad, complete with text, images, and various slide designs.
Step 1: Download the PowerPoint App
First things first, download the PowerPoint app from the App Store.
Once you’ve downloaded and installed the PowerPoint app, you’re ready to get started. The app is free, but for full functionality, you might need an Office 365 subscription.
Step 2: Sign in to Your Microsoft Account
Open the app and sign in with your Microsoft account.
Signing in allows you to access your saved presentations and utilize the full range of PowerPoint’s features. If you don’t have an account, you can create one easily within the app.
Step 3: Create a New Presentation
Select ‘New Presentation’ to start creating your slides.
Here, you’ll choose from a variety of templates or start with a blank slide. Templates can give you a head start with pre-designed layouts and color schemes.
Step 4: Add Content to Your Slides
Tap on the slide to add text, insert images, or create shapes.
Using the toolbar at the top, you can customize your fonts, add bullet points, and more. Playing around with these features will help you create a more visually engaging presentation.
Step 5: Save and Share Your Presentation
Once you’re satisfied, save your presentation and share it as needed.
You can save your presentation to the iPad, to OneDrive, or to another cloud service. Sharing options include email, a link, or exporting it in a format like PDF.
Additional Information
Creating a PowerPoint on an iPad is a breeze once you get the hang of it. But there are a couple of tips that can make your experience even smoother. For instance, pairing your iPad with a keyboard can speed up your typing and make editing text less fiddly. Also, practicing with different gestures can help you discover shortcuts for a more efficient workflow.
Remember, while the iPad version of PowerPoint is robust, it might not have every single feature that the desktop version has. But for most users, the convenience and mobility it offers can outweigh those minor limitations. And guess what? If you’re presenting directly from your iPad, you can also use your device as a remote control, swiping through slides with a mere touch or click. This can be a game-changer for a seamless presentation experience.
- Download the PowerPoint app from the App Store.
- Sign in with your Microsoft account.
- Create a new presentation.
- Add content to your slides.
- Save and share your presentation.
Frequently Asked Questions
Can i edit a powerpoint on an ipad.
Yes, you can edit PowerPoint presentations on an iPad using the PowerPoint app.
Do I need a Microsoft subscription to use PowerPoint on an iPad?
You can use the PowerPoint app for free, but for full functionality, a subscription might be necessary.
Can I print my PowerPoint from an iPad?
Absolutely, as long as you have a compatible printer.
Will my PowerPoint look the same on an iPad as on a computer?
Mostly yes, although there may be some minor differences due to the app’s features.
Can I use Presenter View on an iPad?
Yes, Presenter View is available on the PowerPoint iPad app.
A PowerPoint presentation can make or break your pitch, project, or lesson. And being able to create one on an iPad not only adds convenience to your process but also ensures you’re never caught off guard without your slides at hand. With just a few taps and swipes, you can craft a professional and engaging presentation from wherever you are.
So next time you’re away from your computer but need to prep for that big meeting or class, remember that your iPad is more than up to the task. Happy presenting!

Matthew Burleigh has been writing tech tutorials since 2008. His writing has appeared on dozens of different websites and been read over 50 million times.
After receiving his Bachelor’s and Master’s degrees in Computer Science he spent several years working in IT management for small businesses. However, he now works full time writing content online and creating websites.
His main writing topics include iPhones, Microsoft Office, Google Apps, Android, and Photoshop, but he has also written about many other tech topics as well.
Read his full bio here.
Share this:
Join our free newsletter.
Featured guides and deals
You may opt out at any time. Read our Privacy Policy
Related posts:
- Can I Convert My Powerpoint to Google Slides?
- How to Save Powerpoint as PDF with Notes
- How to Make a Powerpoint Slide Vertical in Powerpoint 2013
- How to Set Time for Slides in Powerpoint
- How to Insert Slides from Another Presentation in Powerpoint 2010
- What Are Benefits of PowerPoint? A Comprehensive Guide
- How to Check Word Count on Powerpoint 2010
- How to Change Hyperlink Color in Powerpoint 2010 (An Easy 5 Step Guide)
- How to Loop a Slideshow on Powerpoint 2013
- How to Unhide a Slide in Powerpoint 2013
- How to Convert a PowerPoint to Word and Edit with Ease
- How to: Effortlessly Create PowerPoint Looping Presentations
- How to Change the Font on All Slides in Google Slides
- How to Copy a PowerPoint to a New PowerPoint: A Step-by-Step Guide
- How to Delete Email Account on iPhone
- How to Start PowerPoint: A Step-by-Step Guide for Beginners
- How to Change Line Spacing in Powerpoint for Every Slide at Once
- How to Download a Google Slides Presentation as a Powerpoint File
- How to Show Speaker Notes in Google Slides
- How to Insert Check Mark in Powerpoint for Office 365
How to Play a PowerPoint Presentation on an iPad
- Small Business
- Business Communications & Etiquette
- Presentations
- ')" data-event="social share" data-info="Pinterest" aria-label="Share on Pinterest">
- ')" data-event="social share" data-info="Reddit" aria-label="Share on Reddit">
- ')" data-event="social share" data-info="Flipboard" aria-label="Share on Flipboard">
How to Rotate a Slide in PowerPoint
Can you create a powerpoint on an ipad, how to turn on presentation mode on a dell laptop.
- The Difference Between PowerPoint, Pages and Keynote
- How to Remove a Hidden Footer From Microsoft PowerPoint
If you use PowerPoint, there are several ways you can create, edit, view and share the files right from your iPad. As long as you have a reliable data connection, you can use either the SkyDrive app or Microsoft's PowerPoint Web app -- from within the Safari browser -- to access presentations that have been saved to your Microsoft SkyDrive cloud. Other solutions offer presentation management regardless of whether you're online or offline.
SkyDrive and Web-Based Apps
For basic viewing of your PowerPoint presentations, the SkyDrive iOS app does the trick. However, for comprehensive file management including accessing, editing and presentation creation, use the Safari browser to log in to and launch presentations from the SkyDrive Web interface instead. While it offers you a seamless PowerPoint experience, the Web app does not offer all the features you'd find on the desktop PowerPoint software. You won't, for example, have access to some of the presentation views and the Find/Replace feature was been omitted in the online version.
Third-Party Alternatives
For a non-Microsoft presentation app that enables offline access to your Powerpoint files, try QuickOffice, SlideShark or HopTo. QuickOffice is a Google app that offers presentation viewing, editing and creating -- and then backs it all up to your Google Drive. While both SlideShark and HopTo apps only allow viewing of presentations, they support sophisticated presentation features -- such as animations, videos and hyperlinks -- that may not work properly in other presentation-viewing applications.
- Microsoft Office Support: Using Office Web Apps in SkyDrive
- ZDNet: Microsoft Delivers Updated SkyDrive App for iOS
- CNet: Microsoft Office HopTo App Hops Onto the iPad
- Mac Rumors: Google Releases New Universal 'Quickoffice' iOS App for Free
- ITunes Preview: SkyDrive
Based in Tampa, Fla., Danielle Fernandez been writing, editing and illustrating all things technology, lifestyle and education since 1999. Her work has appeared in the Tampa Tribune, Working Mother magazine, and a variety of technical publications, including BICSI's "Telecommunications Distribution Methods Manual." Fernandez holds a bachelor's degree in English from the University of South Florida.
Related Articles
Checklist for the logistics of a powerpoint presentation, how to read powerpoints on the iphone 4, can a powerpoint presentation created on a pc run on a mac, how to do a powerpoint without ms office, what are benefits of powerpoint, how to convert a powerpoint to word and make it editable, how to change powerpoint odp to work on microsoft word, what is the ppsx format, how to make a new slide in google docs, most popular.
- 1 Checklist for the Logistics of a PowerPoint Presentation
- 2 How to Read PowerPoints on the iPhone 4
- 3 Can a PowerPoint Presentation Created on a PC Run on a Mac?
- 4 How to Do a PowerPoint Without MS Office
Can You Make a Powerpoint on iPad? Here’s How To Do It
Are you familiar with Microsoft PowerPoint on your laptop or desktop computer, but don’t know how to use it on your iPad? You’re not alone.
With the popularity of tablets and iPads, many people are looking to make the switch and take advantage of the portability of their device.
In this article, we’ll guide you through the steps to create a presentation on your iPad.
We’ll cover topics such as what Microsoft PowerPoint for iPad is, how to add text, images, charts, and other elements, and how to navigate between slides.
With this knowledge, you’ll be able to create a presentation on your iPad with ease.
So let’s get started!
Table of Contents
Short Answer
Yes, you can make a PowerPoint on an iPad.
You can use the Microsoft PowerPoint app for iOS, which is available on the App Store.
You can also create and edit presentations online with PowerPoint for the web.
If you have an Office 365 subscription, you can also use the desktop version of PowerPoint on an iPad with the Office app.
What is Microsoft PowerPoint for iPad?
Microsoft PowerPoint for iPad is an app designed by Microsoft to allow users to create and present their PowerPoint presentations on an Apple iPad.
It is a powerful and easy-to-use tool that allows users to create professional-looking presentations with the help of the iPads touchscreen and Apple Pencil.
The app also offers a wide range of features that make it easy to create engaging and visually appealing presentations.
With the Microsoft PowerPoint for iPad app, users can easily create a new presentation, add text, images, charts, and other elements to their slides.
The app also allows users to use the iPads touchscreen to navigate between slides and add shapes, arrows, and other elements to their presentation.
Additionally, the app allows users to use the Apple Pencil to draw directly on the slides.
The app also offers other features such as the ability to share presentations with others, or present them on a larger screen with AirPlay.
Additionally, the iPads portability and HD display make it the perfect device for creating and sharing presentations with ease.
With its powerful features and easy-to-use interface, Microsoft PowerPoint for iPad is the perfect tool for creating professional-looking presentations on the go.
How to Create a Presentation on iPad
Creating a presentation on an iPad is an easy and convenient way to share information with others.
With the help of Microsoft PowerPoint for iPad apps, you can create a presentation, add text, images, charts, and more to create a professional-looking presentation.
With the iPad’s portability and HD display, you can create and share presentations with ease.
The first step in creating a presentation on an iPad is to download the Microsoft PowerPoint app.
Once you have downloaded the app, you can open it and begin creating your presentation.
You can add text, images, charts, and more to create a professional-looking presentation.
Additionally, you can use the Apple Pencil to draw directly on the slides, as well as use the iPads touchscreen to navigate between slides and add shapes, arrows, and other elements to your presentation.
Once you have added all of the necessary elements to your presentation, you can preview it on your iPad before sharing it with others.
You can also use the iPads AirDrop feature to quickly and easily share your presentation with others.
Additionally, you can use the PowerPoint app to collaborate with others on the presentation remotely.
Finally, you can export your presentation to a variety of formats, such as PDF, PowerPoint, and more.
This allows you to share your presentation with a variety of audiences, from colleagues to clients.
With the iPads portability and HD display, you can create and share presentations with ease.
In conclusion, creating a presentation on an iPad is easy and convenient.
With the help of Microsoft PowerPoint for iPad apps, you can create a professional-looking presentation with ease.
Additionally, you can use the iPads AirDrop feature to quickly and easily share your presentation with others, as well as export it to a variety of formats.
Adding Text, Images, and Charts to the Presentation
Adding text, images, and charts to your PowerPoint presentation on an iPad is a great way to make it look professional and engaging.
With the Microsoft PowerPoint for iPad apps, you can easily add text to your slides by simply tapping on the slide and typing in the text you want to include.
You can also use the iPads built-in dictation feature to quickly add text to your slides, or you can use the iPads on-screen keyboard to type out your text.
In addition to text, you can also add images and charts to your presentation.
You can upload images from your iPads photo library or from an online source, such as Google Images, to add to your presentation.
Similarly, you can also add charts to your presentation by using the chart feature in the PowerPoint app.
This feature allows you to quickly create bar, line, and pie charts from data you enter, as well as customize the chart to fit your presentation.
Finally, if you have an Apple Pencil, you can use it to draw directly on the slides.
This allows you to add arrows, shapes, and other elements to your presentation that would be difficult to add with the mouse or touchscreen.
With the Apple Pencil, you can quickly add any elements you need to make your presentation look professional and engaging.
Using the Apple Pencil to Draw on the Slides
Using the Apple Pencil to draw on PowerPoint slides is a great way to add a personal touch and creative flair to presentations.
With the Apple Pencil, users can draw directly onto slides with precision and detail, as well as directly write text and add shapes.
The Apple Pencil is also pressure-sensitive, meaning that it can be used to draw lightly or heavily depending on the desired effect.
It is also possible to use the Apple Pencil to erase, adjust, and move objects on the slides, allowing for easy editing of the presentation.
Additionally, the Apple Pencil can be used to easily add diagrams and other graphical elements, such as arrows and circles, to the slides.
With the Apple Pencil, slides can be quickly and easily designed to look professional and eye-catching.
Navigating Between Slides on the iPad
Navigating between slides on an iPad is made easy with its multitouch display and intuitive interface.
With a few taps, you can quickly move between slides in your presentation.
To navigate between slides, simply tap the left and right arrows in the bottom left corner of the PowerPoint for iPad app.
This will move you through the presentation slides sequentially, making it easy to review and edit your slides.
Additionally, you can select a specific slide from the Slide Navigator, which can be accessed by tapping the three dots icon in the bottom left corner of the PowerPoint app.
This will open up a list of all your slides, allowing you to quickly jump to a specific slide with just a tap.
Additionally, you can use the Apple Pencil to draw directly on the slides, as well as use the iPads touchscreen to quickly move between slides.
With the iPad’s portability and HD display, you can create and share presentations with ease, making it a great tool for creating professional presentations.
Adding Shapes, Arrows, and Other Elements
Adding shapes, arrows, and other elements to a PowerPoint presentation on an iPad is very easy to do.
With the iPads touchscreen, you can quickly and easily add a variety of shapes, arrows, lines, and other elements to your presentation.
You can use the Apple pencil to draw directly on the slides, allowing you to add intricate details to the presentation quickly and easily.
Additionally, you can use the iPads built-in shape tools to add rectangles, circles, and other shapes to the presentation.
Sharing the Presentation on iPad
Sharing a presentation on iPad is a breeze.
With the help of Microsoft PowerPoint for iPad apps, you can easily share your presentation with others from anywhere in the world.
You can share presentations in a variety of formats, including PDF, PowerPoint, and HTML.
Additionally, you can share your presentation as a read-only or a full-editable version, which allows others to make changes to the presentation if necessary.
The PowerPoint for iPad app allows you to easily send your presentation in an email, post it on social media, or even share it with a link.
If you have an Office 365 subscription, you can save your presentation to OneDrive and access it from any device with an internet connection.
You can also share your presentation with others directly from the iPad, with the ability to add notes and comments while the presentation is being shared.
The iPad also has a variety of other features that can help you share your presentation.
You can use AirPlay to mirror the contents of your iPad onto a larger display, such as a television or projector.
This feature allows you to present your presentation to a large group of people without having to carry a laptop with you.
Additionally, you can use an HDMI or VGA adapter to connect your iPad directly to a projector or monitor.
Finally, you can also share your presentation with others using a variety of cloud-based services, such as Dropbox, Google Drive, and iCloud.
With these cloud services, you can easily store and share your presentation without having to worry about copying it onto a USB drive or sending it through email.
These services also make it easy to collaborate on a presentation, as multiple users can access the same presentation and make changes and additions to it.
By leveraging the power of the iPad and the features of the Microsoft PowerPoint for iPad apps, you can easily create and share a presentation with ease.
Whether you’re giving a presentation to a large group of people or collaborating on a project with colleagues, the iPad provides an easy and efficient way to create and share presentations.
Final Thoughts
Making a PowerPoint presentation on an iPad is now easier than ever with Microsoft PowerPoint for iPad.
With its portability and HD display, you can create professional-looking presentations on the go and share them with ease.
Now that you know how to make a PowerPoint on iPad, why not give it a try? You’ll be surprised at what your creative mind can come up with.
James Wilson
James Wilson has extensive knowledge in the information technology industry.His second love, besides dealing with computers, is smart home technology. He is continually updating information to better comprehend this problem and has a deep understanding of the apartment’s support system.
Recent Posts
How To Search Airtable? Unleashing Advanced Tips and Techniques
To search in Airtable, simply navigate to the search bar located at the top of your Airtable workspace. Enter the keyword or term you are looking for, and Airtable will display relevant results...
How To Use Airtable for Inventory Management? (Master Your Stock Control)
To use Airtable for inventory management, start by creating a new base in Airtable and choosing the Inventory template to get started quickly. Customize the fields to suit your specific inventory...
- PRO Courses Guides New Tech Help Pro Expert Videos About wikiHow Pro Upgrade Sign In
- EDIT Edit this Article
- EXPLORE Tech Help Pro About Us Random Article Quizzes Request a New Article Community Dashboard This Or That Game Popular Categories Arts and Entertainment Artwork Books Movies Computers and Electronics Computers Phone Skills Technology Hacks Health Men's Health Mental Health Women's Health Relationships Dating Love Relationship Issues Hobbies and Crafts Crafts Drawing Games Education & Communication Communication Skills Personal Development Studying Personal Care and Style Fashion Hair Care Personal Hygiene Youth Personal Care School Stuff Dating All Categories Arts and Entertainment Finance and Business Home and Garden Relationship Quizzes Cars & Other Vehicles Food and Entertaining Personal Care and Style Sports and Fitness Computers and Electronics Health Pets and Animals Travel Education & Communication Hobbies and Crafts Philosophy and Religion Work World Family Life Holidays and Traditions Relationships Youth
- Browse Articles
- Learn Something New
- Quizzes Hot
- This Or That Game New
- Train Your Brain
- Explore More
- Support wikiHow
- About wikiHow
- Log in / Sign up
- Computers and Electronics
- Presentation Software
- PowerPoint Presentations
How to Open a PPTX File on iPhone or iPad
Last Updated: July 24, 2021 Tested
This article was co-authored by wikiHow staff writer, Travis Boylls . Travis Boylls is a Technology Writer and Editor for wikiHow. Travis has experience writing technology-related articles, providing software customer service, and in graphic design. He specializes in Windows, macOS, Android, iOS, and Linux platforms. He studied graphic design at Pikes Peak Community College. The wikiHow Tech Team also followed the article's instructions and verified that they work. This article has been viewed 99,020 times. Learn more...
This wikiHow teaches you how to open PPTX files on iPhone and iPad. The latest versions of Microsoft PowerPoint (2007 and newer) save as PPTX files. If you have an Office 365 subscription, you can open and and edit PowerPoint files using PowerPoint for iOS. If you do not have an Office 365 subscription, you can still open and view PowerPoint files using PowerPoint for iOS. You can also open, view and edit PowerPoint files using Keynote. However, PowerPoint files make not work properly in Keynote.
Using Microsoft PowerPoint

- If you open PowerPoint and it displays the last presentation you opened, tap the Back arrow in the upper-left corner to display the red bar to the left.

- If you do not see the cloud based service in the Locations menu, make sure you have downloaded and installed the app from the App Store and signed in to the app. Then tap " Edit " at the top of the Locations menu, and tap the toggle switch next to the Cloud service you have installed on your device.

- If you have an Office 365 and you need to sign in, tap Sign In in the upper-right corner and sign in using the email address and password associated with your Office 365 account.
Using Keynote

- If Keynote is not installed on your iPhone or iPad, you can download it for free from the App Store.

- On iPad, Keynote opens the last presentation you were working on. Tap Presentations in the upper-left corner to return to the Recent Files screen. On iPhone, tap the Back arrow in the upper-left corner to return to the Recent Files screen.

- Tap the slides in the bar to the left to view the slides. Tap and hold the text to edit the text in the slide.
- Tap the square icon with the plus (+) in the middle to add a new slide. It's at the bottom of the slide bar to on the left.
- Tap the 'Play' triangle to play the slide show. It's in the upper-right corner.
- Tap the paintbrush icon in the upper-right corner to edit the slide format.
- Tap the plus (+) icon in the upper-right corner to add images, text boxes, shapes, graphs, tables, and other objects.
- Tap the button with three dots (…) to open the More options menu. It's in the upper-right corner.
- To save and export your work in Keynote as a PowerPoint file, tap " … " in the upper-right corner. Then tap Export and then select tap PowerPoint .
Opening A PPTX From Email

- Some email apps may require you to download the attachment before you can view it. Tap the attachment to download it.

Opening a PPTX file from Files

- If you tap a PPTX file without holding it, it automatically opens the file in Keynote.

Expert Q&A
You might also like.

About This Article

- Send fan mail to authors
Is this article up to date?

Featured Articles

Trending Articles

Watch Articles

- Terms of Use
- Privacy Policy
- Do Not Sell or Share My Info
- Not Selling Info
Keep up with tech in just 5 minutes a week!
How To Make A Powerpoint On A Tablet

- How-To Guides
- Software Tutorials

Introduction
Whether you are a student preparing for a class presentation or a professional delivering a business pitch, creating a visually compelling PowerPoint presentation on a tablet can be a game-changer. Tablets offer the flexibility of a touch-screen interface, allowing you to easily navigate through slides and interact with your content in a more intuitive way. With the right app and a few simple steps, you can bring your ideas to life and captivate your audience.
In this guide, we will walk you through the process of making a PowerPoint presentation on a tablet. We will provide you with step-by-step instructions on how to choose the right app, create a new presentation, customize your slides, and add engaging elements like images, text, transitions, and animations. You’ll also learn how to format your presentation and share it with others.
Whether you’re using an iPad, Android tablet, or any other tablet device, the principles and techniques covered in this guide are applicable across platforms. So, let’s dive in and explore how you can create a powerful and visually stunning PowerPoint presentation on your tablet.
Step 1: Choose a PowerPoint App
The first step in creating a PowerPoint presentation on your tablet is to choose a suitable app. There are several options available, each with its own unique features and user interface. Here are a few popular apps you can consider:
- Microsoft PowerPoint: If you’re already familiar with Microsoft Office products, using the PowerPoint app on your tablet may be the most seamless option. It offers a wide range of features and compatibility with PowerPoint files.
- Google Slides: For those who prefer cloud-based solutions, Google Slides is an excellent choice. It allows you to create, edit, and collaborate on presentations seamlessly across different devices.
- Keynote: Keynote is a powerful presentation app developed by Apple. It offers a variety of beautiful templates and advanced animation and transition effects.
- Prezi: If you want to create dynamic and visually engaging presentations, Prezi is worth considering. It uses a unique zooming interface to create fluid presentations that stand out.
- Adobe Spark: Adobe Spark is a user-friendly app that lets you create stunning visual presentations with ease. It offers a variety of templates and customization options to make your presentation look professional.
Take some time to explore these apps and choose the one that best fits your needs and preferences. Consider factors such as user interface, feature set, compatibility with your tablet, and ease of use. Once you have selected the app, download and install it from your device’s app store.
Now that you have chosen the perfect PowerPoint app for your tablet, you’re ready to move on to the next step: creating a new presentation.
Step 2: Create a New Presentation
With your PowerPoint app at the ready, it’s time to start creating your new presentation. Follow these steps to get started:
- Open the PowerPoint app on your tablet. You’ll usually find it in the list of installed apps or on your home screen.
- Once you’re in the app, look for an option to create a new presentation. It may be labeled as “New Presentation” or “Create” and is typically located at the top or in the main menu.
- Select a default layout or template for your presentation. Most PowerPoint apps offer a range of visually appealing templates that you can customize to your liking. If you prefer a blank slate, choose the option for a blank presentation.
- Give your presentation a relevant and catchy title. This will help you stay organized and make it easier for others to identify your presentation. You can usually set the title in the designated field on the first slide or in the presentation settings.
- Consider setting up the presentation’s dimensions. By default, the app will likely use a standard aspect ratio, such as 16:9, but you can adjust this according to your needs. Common aspect ratios include 4:3 for traditional presentations and 16:9 for widescreen displays.
Once you’ve completed these steps, you’ll have a blank canvas to start building your presentation. The next section will guide you through the process of selecting a template and customizing the slides to create a visually appealing and cohesive presentation.
Step 3: Select a Template
Now that you have created a new presentation, it’s time to choose a template that suits the theme and style of your presentation. Templates provide a professional and consistent look to your slides, saving you time and effort in designing each slide from scratch. Follow these steps to select a template:
- In your PowerPoint app, navigate to the slide selector or template gallery. This is usually accessible from the main menu or a sidebar.
- Browse through the available templates and preview them to get a sense of their design and layout. Pay attention to the color scheme, typography, and overall aesthetic to ensure it aligns with your presentation’s theme.
- Once you find a template that appeals to you, select it by clicking or tapping on it. The template will be applied to your slides, giving you a starting point for your content.
- If you change your mind or want to explore more templates, feel free to browse through the options until you find the perfect match.
- After selecting a template, you can start customizing it further in the next steps. You can modify the colors, fonts, and other elements to make it uniquely yours.
Choosing the right template sets the tone for your presentation and helps in creating a visually appealing and cohesive look throughout. Remember that templates are customizable, so don’t hesitate to make adjustments to best fit your content and style. With the template selected, we can move on to the next step: customizing the slides to convey your message effectively.
Step 4: Customize the Slides
Once you have selected a template for your presentation, it’s time to customize the slides to make them visually appealing and aligned with your content. Customization allows you to add your personal touch and enhance the overall impact of your presentation. Follow these steps to customize your slides:
- Open the slide editor or customization options in your PowerPoint app. This is where you can modify the content, layout, and design of each slide.
- Start by adding your content to the slides. This may include text, images, charts, graphs, or multimedia elements. Simply click or tap on the designated areas of the slide and begin typing or inserting the desired content.
- Adjust the font styles and sizes to make your text easier to read. You can format the text using bold, italic, or underline styles to emphasize important points.
- Consider using appropriate color schemes that match your presentation’s theme. Use contrasting colors to ensure readability and choose a combination that creates a visually appealing presentation.
- Customize the layout of each slide to optimize the arrangement of your content. Rearrange the elements by dragging and dropping, or use the layout options provided by the app to achieve a balanced and aesthetically pleasing composition.
- Highlight key points by utilizing bullets, numbering, or subheadings. This helps guide your audience and improves the clarity of your message.
- Add relevant images or graphics to enhance the visual impact of your slides. Make sure they are high-quality and properly sized to maintain the overall professionalism of your presentation.
- Review and edit each slide for consistency, coherence, and clarity. Ensure that the content flow and transitions between slides are smooth and logical.
By customizing your slides, you can create a unique and engaging presentation that effectively communicates your message. Take your time to experiment with different layouts, colors, and designs until you achieve a look that best represents your content and style. As you move on to the next step of adding text and images, keep in mind the overall visual appeal and coherence of your presentation.
Step 5: Add Text and Images
Adding text and images to your presentation is an essential step in conveying your message effectively and engaging your audience visually. Follow these steps to incorporate text and images into your slides:
- Identify the areas on your slides where you want to add text. This may include titles, subtitles, bullet points, or captions.
- Click or tap on the designated text box or placeholder and start typing to add your content. Make sure to keep your text concise, clear, and easy to read. Use a font size and style that is legible, even from a distance.
- Consider using headings and subheadings to structure your content and make it easier to follow. This helps your audience grasp the main points of each slide quickly.
- Utilize bullet points to break down complex information into digestible chunks. This not only improves readability but also allows you to emphasize key ideas.
- To enhance visual interest, incorporate relevant images into your presentation. This could be photos, illustrations, icons, or graphics that support your content.
- Ensure that the images you choose are high-quality and relevant to the information presented on each slide. Use them sparingly and strategically, avoiding clutter and distractions.
- Align your text and images in a visually pleasing manner, maintaining balance and proper spacing. Experiment with different layouts to find the most effective arrangement for your content.
- Remember to attribute any images or graphics used that are not your own. This can be done through a small caption or a separate slide dedicated to image credits.
By incorporating well-written text and visually appealing images, you can grab your audience’s attention and make your presentation more memorable. Be mindful of the amount of text and the visual impact of the images to strike the right balance and keep your slides engaging without overwhelming your audience. With text and images added, you’re one step closer to a captivating presentation.
Step 6: Format the Presentation
Formatting your presentation is crucial for creating a polished and professional look. Consistency in design and style across slides enhances the overall visual appeal and readability. Follow these steps to format your presentation:
- Choose a consistent color scheme for your presentation. Use colors that align with your topic and create a harmonious visual experience. Apply the selected color scheme to text, backgrounds, and other design elements throughout the presentation.
- Standardize your font style and size across slides. A cohesive font choice enhances readability and maintains a professional appearance. Select a font that is easy to read and suitable for your presentation’s theme.
- Use formatting options provided by the app to enhance the visual hierarchy of your content. Adjust text alignment, indents, line spacing, and spacing between elements to create a clean and organized layout.
- Apply consistent formatting to headers, subheadings, and body text. Use bold, italic, or underline styles strategically to emphasize important points and create visual variation.
- Consider using slide master or layout templates provided by the app to ensure consistent formatting across all slides. This saves time and effort by applying changes to multiple slides at once.
- Pay attention to the readability of your presentation by adjusting the contrast between text and background. Ensure that the text is easily distinguishable from the background color or image.
- Add appropriate slide transitions to create a smooth flow between slides. Use transitions sparingly and purposefully, choosing ones that support the content and style of your presentation.
- Preview your presentation in slideshow mode to ensure that all elements are properly aligned, formatted, and visually appealing.
By formatting your presentation consistently and paying attention to design details, you create a visually cohesive experience for your audience. A well-formatted presentation not only enhances understanding but also demonstrates professionalism and attention to detail. With your presentation formatted, you’re almost ready to bring it to life with transitions and animations.
Step 7: Add Transitions and Animations
Adding transitions and animations to your slides can significantly enhance the overall visual impact of your presentation. These effects help engage your audience and create a seamless transition between slides. Follow these steps to incorporate transitions and animations into your presentation:
- Select the slide that you want to add a transition effect to. This could be the current slide or the one that follows.
- Access the transition options in your PowerPoint app. Look for a menu or tab specifically dedicated to transitions.
- Browse through the available transition effects and choose the one that best suits the style and content of your presentation. Each effect has its own unique visual impact, such as fades, slides, or zooms.
- Apply the selected transition effect to the slide. You can preview the effect to ensure it aligns with your desired outcome.
- To add animations to specific elements within a slide, select the element you want to animate, such as text, images, or shapes.
- Access the animation options in your PowerPoint app. This may be located in the same menu or tab as the transitions or in a separate animation menu.
- Browse the available animation effects and select the one that enhances the visual presentation of the element. Common animations include appearing, fading, or moving.
- Adjust the duration and timing of the animation to create the desired effect. You can specify when the animation starts, how long it lasts, and if it happens automatically or on user interaction.
- Repeat the process for all the elements you wish to animate throughout your presentation.
Remember, while transitions and animations can add visual interest to your presentation, it’s important not to overdo it. Use them strategically and sparingly to avoid overwhelming your audience or detracting from the content. The goal is to enhance the presentation without creating unnecessary distractions. With transitions and animations added, your presentation is ready to be saved and shared.
Step 8: Save and Share the Presentation
Once you have created and polished your PowerPoint presentation, it’s time to save and share it with your intended audience. Follow these steps to ensure your presentation is accessible and shareable:
- Click or tap on the “Save” or “Save As” option in your PowerPoint app to save your presentation. Choose a recognizable file name and select a location on your tablet or cloud storage where you want to save it.
- Consider saving a backup copy of your presentation to prevent any potential loss or accidental changes.
- If your PowerPoint app provides different file format options, such as PPTX or PDF, choose the appropriate format based on your sharing requirements. PDF format is generally preferred if you want to ensure the presentation’s layout remains intact on different devices.
- Check if your app provides an option to password-protect the presentation or restrict editing privileges, if necessary.
- Determine the method of sharing your presentation. You can share it through email, cloud storage services, or collaborative platforms.
- If sharing via email, attach the presentation file to your email and include any necessary instructions or context for the recipient.
- If using cloud storage services, upload the file to your chosen platform and generate a shareable link. Ensure that the access permissions are set correctly for the intended recipients.
- If using collaborative platforms, such as Google Slides, follow the platform’s specific sharing guidelines to grant access and collaborate with others in real-time.
- Double-check that all external files, images, or videos linked to the presentation are included or accessible, especially if you are sharing the presentation with someone who may not have access to those files.
- Communicate with your recipients and provide any necessary instructions for accessing or viewing the presentation. Consider providing a brief summary or key points to accompany the presentation.
By saving and sharing your presentation, you can effectively deliver your content and engage with your audience. Ensure that your sharing method aligns with the preferences and needs of your audience, making it easy for them to access and view the presentation. Now you’re ready to present your masterpiece!
Creating a PowerPoint presentation on a tablet can be an exciting and innovative way to deliver engaging content to your audience. With the right app and following the step-by-step process outlined in this guide, you can confidently craft a visually stunning and impactful presentation.
We started by choosing a suitable PowerPoint app for your tablet, considering factors such as user interface and features. Then, we walked through the process of creating a new presentation, selecting a template, and customizing the slides to align with your content and style. Adding text and images helped bring your presentation to life, and formatting ensured a polished and professional look throughout.
We also explored the importance of incorporating transitions and animations strategically to enhance the visual flow of your presentation while avoiding overwhelming your audience. Finally, we concluded with steps on saving, sharing, and distributing your presentation, ensuring it reaches your intended audience in the most accessible and convenient manner.
Remember, while this guide provides a solid foundation for creating a PowerPoint presentation on a tablet, don’t be afraid to explore and experiment with your own creative ideas. With practice, you can develop your unique style and presentation techniques that captivate and inspire your audience.
So, grab your tablet, unleash your creativity, and start crafting powerful and captivating PowerPoint presentations that leave a lasting impression on your audience!
Leave a Reply Cancel reply
Your email address will not be published. Required fields are marked *
Save my name, email, and website in this browser for the next time I comment.
- Crowdfunding
- Cryptocurrency
- Digital Banking
- Digital Payments
- Investments
- Console Gaming
- Mobile Gaming
- VR/AR Gaming
- Gadget Usage
- Gaming Tips
- Online Safety
- Tech Setup & Troubleshooting
- Buyer’s Guides
- Comparative Analysis
- Gadget Reviews
- Service Reviews
- Software Reviews
- Mobile Devices
- PCs & Laptops
- Smart Home Gadgets
- Content Creation Tools
- Digital Photography
- Video & Music Streaming
- Online Security
- Online Services
- Web Hosting
- WiFi & Ethernet
- Browsers & Extensions
- Communication Platforms
- Operating Systems
- Productivity Tools
- AI & Machine Learning
- Cybersecurity
- Emerging Tech
- IoT & Smart Devices
- Virtual & Augmented Reality
- Latest News
- AI Developments
- Fintech Updates
- Gaming News
- New Product Launches
- AI Writing How Its Changing the Way We Create Content
- How to Find the Best Midjourney Alternative in 2024 A Guide to AI Anime Generators
Related Post
Ai writing: how it’s changing the way we create content, unleashing young geniuses: how lingokids makes learning a blast, 10 best ai math solvers for instant homework solutions, 10 best ai homework helper tools to get instant homework help, 10 best ai humanizers to humanize ai text with ease, sla network: benefits, advantages, satisfaction of both parties to the contract, related posts.

How To Install Microsoft Office On Tablet

How To Play Powerpoint Presentation On Samsung Smart TV

How To Download Music To Powerpoint

What Is A Windows Rt Tablet

How To Download Microsoft Office On Chromebook

13 Best Logitech Clicker for 2024

Which Tablet Has Microsoft Office

15 Amazing Logitech Presentation Remote for 2024
Recent stories.

How to Find the Best Midjourney Alternative in 2024: A Guide to AI Anime Generators

How to Know When it’s the Right Time to Buy Bitcoin

How to Sell Counter-Strike 2 Skins Instantly? A Comprehensive Guide

10 Proven Ways For Online Gamers To Avoid Cyber Attacks And Scams

- Privacy Overview
- Strictly Necessary Cookies
This website uses cookies so that we can provide you with the best user experience possible. Cookie information is stored in your browser and performs functions such as recognising you when you return to our website and helping our team to understand which sections of the website you find most interesting and useful.
Strictly Necessary Cookie should be enabled at all times so that we can save your preferences for cookie settings.
If you disable this cookie, we will not be able to save your preferences. This means that every time you visit this website you will need to enable or disable cookies again.
Keynote User Guide for iPad
- What’s new in Keynote 14.0
- Intro to Keynote
- Intro to images, charts, and other objects
- Create a presentation
- Choose how to navigate your presentation
- Open a presentation
- Save and name a presentation
- Find a presentation
- Print a presentation
- Prevent accidental editing
- Undo or redo changes
- Quick navigation
- Change the working view
- Customize the toolbar
- Copy text and objects between apps
- Basic touchscreen gestures
- Use Apple Pencil with Keynote
- Create a presentation using VoiceOver
- Add or delete slides
- Reorder slides
- Group or ungroup slides
- Skip or unskip a slide
- Change the slide size
- Change a slide background
- Add a border around a slide
- Show or hide text placeholders
- Show or hide slide numbers
- Apply a slide layout
- Add and edit slide layouts
- Change a theme
- Add an image
- Add an image gallery
- Edit an image
- Add and edit a shape
- Combine or break apart shapes
- Save a shape to the shapes library
- Add and align text inside a shape
- Add 3D objects
- Add lines and arrows
- Add and edit drawings
- Add video and audio
- Record video and audio
- Edit video and audio
- Add live video
- Set the movie and image formats
- Position and align objects
- Use alignment guides
- Place objects inside a text box or shape
- Layer, group, and lock objects
- Change object transparency
- Fill shapes and text boxes with color or an image
- Add a border to an object
- Add a caption or title
- Add a reflection or shadow
- Use object styles
- Resize, rotate, and flip objects
- Add linked objects to make your presentation interactive
- Select text
- Copy and paste text
- Format a presentation for another language
- Use phonetic guides
- Use bidirectional text
- Use vertical text
- Change the look of text
- Use text styles
- Change text capitalization
- Add drop caps
- Make characters superscript or subscript
- Format fractions automatically
- Format dashes and quotation marks
- Format Chinese, Japanese, or Korean text
- Set tab stops
- Format text into columns
- Adjust line spacing
- Format lists
- Add mathematical equations
- Add borders and rules (lines) to separate text
- Add or delete a table
- Select tables, cells, rows, and columns
- Add or remove rows and columns
- Move rows and columns
- Resize rows and columns
- Merge or unmerge cells
- Change the look of table text
- Show, hide, or edit a table title
- Change table gridlines and colors
- Use table styles
- Resize, move, or lock a table
- Add and edit cell content
- Format dates, currency, and more
- Highlight cells conditionally
- Format tables for bidirectional text
- Alphabetize or sort table data
- Add or delete a chart
- Change a chart from one type to another
- Modify chart data
- Move, resize, and rotate a chart
- Change the look of data series
- Add a legend, gridlines, and other markings
- Change the look of chart text and labels
- Add a chart border and background
- Use chart styles
- Animate objects onto and off a slide
- Animate objects on a slide
- Change build order and timing
- Add transitions
Present on your iPad
- Present on a separate display
- Present on iPad over the internet
- Use a remote
- Make a presentation advance automatically
- Play a slideshow with multiple presenters
- Add and view presenter notes
- Rehearse on your device
- Play a recorded presentation
- Check spelling
- Look up words
- Find and replace text
- Replace text automatically
- Set your author name for comments
- Highlight text
- Add and print comments
- Send a presentation
- Intro to collaboration
- Invite others to collaborate
- Collaborate on a shared presentation
- See the latest activity in a shared presentation
- Change a shared presentation’s settings
- Stop sharing a presentation
- Shared folders and collaboration
- Use Box to collaborate
- Create an animated GIF
- Post your presentation in a blog
- Use iCloud Drive with Keynote
- Export to PowerPoint or another file format
- Restore an earlier version of a presentation
- Move a presentation
- Delete a presentation
- Password-protect a presentation
- Create and manage custom themes
- Transfer files with AirDrop
- Transfer presentations with Handoff
- Transfer presentations with the Finder
- Keyboard shortcuts
- Keyboard shortcut symbols
Play a Keynote presentation on iPad
To advance through the presentation, do any of the following:
Go to the next slide: Tap the slide.
Go back a slide or reset the builds on the slide: Swipe right. Avoid the left edge of the screen as you swipe, so the slide navigator doesn’t appear.
Jump to a different slide: Tap the left side of the screen to show the slide navigator, then tap the slide you want. You may need to swipe up or down to see all the slides. Tap anywhere on the slide to hide the slide navigator. Even if your device is connected to an external display, the slide navigator appears only on the device.
To see the toolbar, touch and hold anywhere on the screen, then tap a button to show the slide navigator, live video sources , multipresenter slideshow , or drawing and laser pointer controls. Tap away from the toolbar to dismiss it.
To stop playing a presentation, pinch anywhere on the screen.
Draw on a slide as you present
You can draw on your slides as you present to emphasize information on the slide. If you’re using Keynote Remote to control a presentation from your iPad, you can draw on your iPad and have your drawing appear on the Mac, iPhone, or iPad that’s playing your presentation.

Do any of the following:
Draw with a color: Tap a color, then draw with your finger on the slide.
Use the laser pointer: Tap the laser pointer and move your finger around the slide; the laser pointer follows your movements.
Return to the previous slide or advance a slide: Tap the left or right arrow on the slide.
Hide the drawing tools: Tap Done.

View, manage, and install add-ins for Excel, PowerPoint, and Word
When you enable an add-in, it adds custom commands and new features to Microsoft 365 programs that help increase your productivity. Because add-ins can be used by attackers to do harm to your computer, you can use add-in security settings to help protect yourself.
Note: This article only applies to Microsoft 365 applications running on Windows.
View installed add-ins

You can directly install add-ins from this page or select More Add-ins to explore.
In the Office Add-ins dialog, select My Add-ins tab.
Select an add-in you want to view the details for and right-click to select Add-in details option.
Click a heading below for more information .
Add-in categories explained
Active Application Add-ins Add-ins registered and currently running on your Microsoft 365 program.
Inactive Application Add-ins These are present on your computer but not currently loaded. For example, XML schemas are active when the document that refers to them is open. Another example is the COM add-in: if a COM add-in is selected, the add-in is active. If the check box is cleared, the add-in is inactive.
Document Related Add-ins Template files referred to by open documents.
Disabled Application Add-ins These add-ins are automatically disabled because they are causing Microsoft 365 programs to crash.
Add-in The title of the add-in.
Publisher The software developer or organization responsible for creating the add-in.
Compatibility Look here for any compatibility issues.
Location This file path indicates where the add-in is installed on your computer.
Description This text explains the add-in function.
Note: Microsoft Outlook has one add-in option in the Trust Center: Apply macro security settings to installed add-ins . InfoPath has no security settings for add-ins.
Permanently disable or remove an add-in
To disable or remove an add-in follow these steps:
Select File > Get Add-ins . Alternatively, you can select Home > Add-ins .
In the Office Add-ins dialog, select My Add-ins tab.
Select an add-in you want to remove and right click to select Remove option.
View or change add-in settings
You can see and change add-in settings in the Trust Center, descriptions of which are in the following section. Add-in security settings may have been determined by your organization so not all options may be available to change.
Select File > Get Add-ins .
Select More Add-ins > Manage My Add-ins.
Select Trust Center > Trust Center Settings > Add-ins.
Check or uncheck the boxes you want.
Add-in settings explained
Require Application Add-ins to be signed by Trusted Publisher Check this box to have the Trust Center check that the add-in uses a publisher's trusted signature. If the publisher's signature hasn’t been trusted, the Microsoft 365 program doesn’t load the add-in, and the Trust Bar displays a notification that the add-in has been disabled.
Disable notification for unsigned add-ins (code will remain disabled) When you check the Require Application Extensions to be signed by Trusted Publisher box, this option is no longer grayed out. Add-ins signed by a trusted publisher are enabled, but unsigned add-ins are disabled.
Disable all Application Add-ins (may impair functionality) Check this box if you don't trust any add-ins. All add-ins are disabled without any notification, and the other add-in boxes are grayed out.
Note: This setting takes effect after you exit and restart your Microsoft 365 program.
While working with add-ins, you may need to learn more about digital signatures and certificates , which authenticate an add-in, and trusted publishers , the software developers who often create add-ins.
Manage and install add-ins
Use the following instruction to manage and install add-ins.
To install a new add-in:
You can directly install popular add-ins on the page or go to More Add-ins to explore.
Select the add-in and select Add . Or browse by selecting Store tab in the Office add-in dialog to find other add-ins to install and select Add for that add-in.
To manage your add-ins:
Select File > Get Add-ins and from the bottom, select More Add-ins. Or select Home > Add-ins > More add-ins.
In the Office dialog, select My Add-ins tab. If you are not able to see your add-ins, select Refresh to reload your add-ins.
Select Manage My Add-in to manage and select Upload to browse and add an add-in from your device.
How to cancel a purchased add-in
If you've subscribed to an add-in through the Microsoft 365 Store that you don't want to continue, you can cancel that subscription.
Open the Microsoft 365 application and go to the Home tab of the ribbon.
Select Add-ins and then select More Add-ins > My Add-ins tab to view your existing add-ins.
Select the app you want to cancel and select Manage My Add-ins .
Under the Payment and Billing section choose Cancel Subscription .
Select OK and then Continue .
Once that's complete you should see a message that says "You have cancelled your app subscription" in the comments field of your apps list.
Why is my add-in crashing?
Some add-ins might not be compatible with your organization's IT department policies. If that is the case with add-ins recently installed on your Microsoft 365 program, Data Execution Prevention (DEP) will disable the add-in and the program might crash.
Learn more about DEP
Get a Microsoft 365 Add-in for Outlook
Get a Microsoft 365 Add-in for Project
Taking linked notes
If you're looking for Help on linking notes in OneNote to a Word or PowerPoint document, see Take linked notes .
Excel Windows Add-ins
If you're looking for Help on specific Excel Add-ins, such as Solver or Inquire, see Help for Excel for Windows add-ins .
If you're looking for additional help with Excel add-ins using the COM Add-ins dialog box, see Add or remove add-ins in Excel .
Get a Microsoft 365 Add-in for Excel

Need more help?
Want more options.
Explore subscription benefits, browse training courses, learn how to secure your device, and more.

Microsoft 365 subscription benefits

Microsoft 365 training

Microsoft security

Accessibility center
Communities help you ask and answer questions, give feedback, and hear from experts with rich knowledge.

Ask the Microsoft Community

Microsoft Tech Community

Windows Insiders
Microsoft 365 Insiders
Find solutions to common problems or get help from a support agent.

Online support
Was this information helpful?
Thank you for your feedback.
Contribute to the Microsoft 365 and Office forum! Click here to learn more 💡
April 9, 2024
Contribute to the Microsoft 365 and Office forum!
Click here to learn more 💡
PowerPoint Top Forum Contributors: Steve Rindsberg - John Korchok 👍✅
April 17, 2024
PowerPoint Top Forum Contributors:
Steve Rindsberg - John Korchok 👍✅
- Search the community and support articles
- Microsoft 365 and Office
- Search Community member
Ask a new question
Animation within PowerPoint for iPad slides?
Report abuse.
Currently, PowerPoint for iPad does not support creation or editing of animations. It will, however, fully support playback of existing animations.
Can you tell me more about what you would like to do, as it will help us prioritize our work in this area for future updates?
5 people found this reply helpful
Was this reply helpful? Yes No
Sorry this didn't help.
Great! Thanks for your feedback.
How satisfied are you with this reply?
Thanks for your feedback, it helps us improve the site.
Thanks for your feedback.
Replies (8)
Question info.
- iPhone or iPad
- Norsk Bokmål
- Ελληνικά
- Русский
- עברית
- العربية
- ไทย
- 한국어
- 中文(简体)
- 中文(繁體)
- 日本語
IMAGES
VIDEO
COMMENTS
Playing a PowerPoint presentation on an iPad involves a few simple steps that will get your slides up and ready for viewing. Let's dive in! Step 1: Download the PowerPoint app ... Your iPad will switch to presentation mode, displaying your slides full-screen. Swipe left or right to navigate through the slides.
Clicking the Option key and a pencil tap on the screen brings up the menu, but only once. After you select a pen, it's stuck on the pen with no apparent way to deselect/select another drawing/pointer option. What I would like is to present a PowerPoint via sidecar AND be able to select the normal drawing tools in PowerPoint so I can draw ...
Design and edit slides. Create professional slide layouts with PowerPoint Designer. Add pictures or videos. Video and audio file formats supported in PowerPoint. Add animation effects to your presentation. Delete a slide. Apply a slide layout.
You tap the File button to print in PowerPoint for iPad. Watch this video to learn how. At this time, you can only print to an AirPrint compatible printer. Run a slideshow in PowerPoint for iPad. (You are here!) There are some special finger gestures you can use to advance, go back, and end a slideshow. You can even use a laser pointer and ink ...
Double-tap on the text box. With the onscreen keyboard activated, tap anywhere in the text box to position the cursor. Tap the Keyboard key. Double-tap the word. This also activates the Edit menu. Triple-tap within the paragraph. Double-tap the first word and drag the selection handle right to the last word you want to select.
Before the presentation, turn on both "Do Not Disturb" and "Airplane Mode". In presentation mode, Keynote swears that it blocks pop-ups, reminders, incoming calls, and other distractions. To its credit, I've never seen it do otherwise. That said, I always enable Do Not Disturb on my iPad. I put the device in airplane mode.
PowerPoint for iPad: A Visual Guide. October 29, 2017. In this first ever visual guide for the iPad version of Microsoft PowerPoint (iPad PPT), we show you step-by-step how to use the app, as well as all of the nitty gritty details behind it that you likely don't know. We highlight those "little hiccups" that will drive you up the wall ...
In this case, all you need to do is simply open your email account on your iPad, click on the email that contains the PowerPoint file, and download it. 2. Transfer the PPT file to your iPad using a cloud storage service. Another quick and easy option is using a cloud storage services. There are plenty of cloud storage services such as Google ...
Pricing. PowerPoint for iOS is free from the App Store and allows you to view PowerPoint files from anywhere. If you want to edit or create presentations from the iPad though, you're going to need to subscribe to Office 365, which runs $6.99/month or $70/year for individuals on up to 5 devices. An Office 365 subscription comes with the full ...
2. Move back and forth in your presentation. To start presenting in slideshow mode, click the little Slide Show icon at the top right corner or click the "Slide Show" tab and select "From Start" or "From Current". To move forward in the presentation swipe from right to left, to move back swipe from left to right.
Step 1: Download the PowerPoint App. First things first, download the PowerPoint app from the App Store. Once you've downloaded and installed the PowerPoint app, you're ready to get started. The app is free, but for full functionality, you might need an Office 365 subscription.
How to Play a PowerPoint Presentation on an iPad. If you use PowerPoint, there are several ways you can create, edit, view and share the files right from your iPad. As long as you have a reliable ...
Microsoft has not (yet) released Office 20xx for iOS, so the Powerpoint presentation needs to be opened and certified in Apple's Keynote on a OSX Mac. You can then present on the iPad with Keynote for iOS. RTFM the Keynote dox as there are some things to take into consideration when building a presentation on OSX to be used on iOS.
The PowerPoint for iPad app allows you to easily send your presentation in an email, post it on social media, or even share it with a link. If you have an Office 365 subscription, you can save your presentation to OneDrive and access it from any device with an internet connection.
4. Navigate to the PPTX file. If the PPTX file is saved to a specific folder, tap that folder to view the contents of that folder. 5. Tap and hold the PPTX file. This displays a menu bar above the file. If you tap a PPTX file without holding it, it automatically opens the file in Keynote.
Select the Use Presenter View checkbox. Select which monitor to display Presenter View on. Select From Beginning or press F5. In Presenter View, you can: See your current slide, next slide, and speaker notes. Select the arrows next to the slide number to go between slides. Select the pause button or reset button to pause or reset the slide ...
Step 1: Choose a PowerPoint App. The first step in creating a PowerPoint presentation on your tablet is to choose a suitable app. There are several options available, each with its own unique features and user interface. Here are a few popular apps you can consider:
In the slide navigator, tap to select the slide you want to begin with, then tap .. To advance through the presentation, do any of the following: Go to the next slide: Tap the slide. Go back a slide or reset the builds on the slide: Swipe right.Avoid the left edge of the screen as you swipe, so the slide navigator doesn't appear.
I would open PowerPoint on my iPad and the start presentation icon would show that the iPad was connected to an external display (instead of a triangle plat button it was slightly different--I don't recall the exact icon). Presentation mode would show on the iPad (with notes and slide previews), and through Quicktime I could view the ...
Report abuse. Hi ivtec, Thanks for posting in our forum. If you want to add notes in PowerPoint in iPad, you may click Notes in the lower right coiner. Then, it will show the Notes panel. You are able to tap to add notes there. If you want to add or view the notes in presenter view, you may click the icon in upper right corner like below:
If you're looking for Help on linking notes in OneNote to a Word or PowerPoint document, see Take linked notes. Excel Windows Add-ins. If you're looking for Help on specific Excel Add-ins, such as Solver or Inquire, see Help for Excel for Windows add-ins.
The transition settings between consecutive slides are obvious and fairly comprehensive. Unfortunately, I can't figure out how to create, or indeed modify, animations within slides. Presentations created on windows PC / Mac preserve the animations when played back from the iPad but, as stated, I can't see a way to create or modify them?