- Campus Life


17 Study Apps Every College Student Needs to Have

Using study apps is a great way to make student life easier and highly productive.
Want help with your math? Download an app. Need help fixing an essay? There’s an app for that too!
From writing your research paper to keeping track of day-to-day tasks, these 17 apps will make college life a breeze.
- 1. Quizlet: The Easiest Way to Memorize Tricky Topics
- 2. Grammarly: Professional Writing in an App
- 3. Scribd: Thousands of Books in a Single App
- 4. Evernote: Study App for All Your College Notes
- 5. Duolingo: The Easy Way to Learn Languages
- 6. Forest: Focus on Study With an App
- 7. Voice Notebook: A Record of Every Lecture
- 8. MindMeister: A Visual Learner’s Favorite Study App
- 9. Mathway: For Math and Science Students
- 10. Todoist: Keep Track of Your College Life
- 11. Exam Countdown Lite: Never Miss a College Deadline
- 12. Notion: All Your Study Notes in One App
- 13. ScannerPro: Full-Fledged Scanner in Your Pocket
- 14. WiFi Finder: Never Be Disconnected
- 15. RealCal Scientific Calculator: Formulas at Your Fingertips
- 16. DropBox: Your College Life on the Cloud
- 17. Vocabulary.com: Talk the Talk With This Study App
Best Apps for Studying: Frequently Asked Questions
1. quizlet : the easiest way to memorize tricky topics.

Quizlet makes physical flashcards a thing of the past. It’s a simple flashcard tool that uses spaced repetition to help you learn.
You can freely access millions of pre-made flashcard sets and practice just about any topic — from medieval history to intermediate Italian.
Better still, you can make your own flashcard sets and carry them around with you on your phone, or use them on your laptop!
✅ What we loved:
- Different learning modes make sure you never get bored
- Quizlet Live helps you study through interactive games with other group members
- Can share your flashcards with friends or among groups
❌ What could be improved:
- The free version is ad-supported, which can make it difficult to concentrate
- No guarantee that user-uploaded flashcard sets are accurate
2. Grammarly : Professional Writing in an App

You’ve crafted the perfect essay or research paper, handed it in to your professor, and received it back, only to find spelling errors, misplaced punctuation, and awkward sentences galore.
This is where Grammarly can help. This online proofreading tool checks your hard work for typos, readability, and makes valuable suggestions for how you can improve. You can even use this study app for error-free blogs, presentations, or emails.
- Detects plagiarism and provides information about the original source
- Makes you a better writer by including easy explanations of your mistakes
- Handy browser extension checks what you’re writing online
- Not accessible offline
- Often doesn’t understand technical or science jargon
- Premium version can be pricey
3. Scribd : Thousands of Books in a Single App
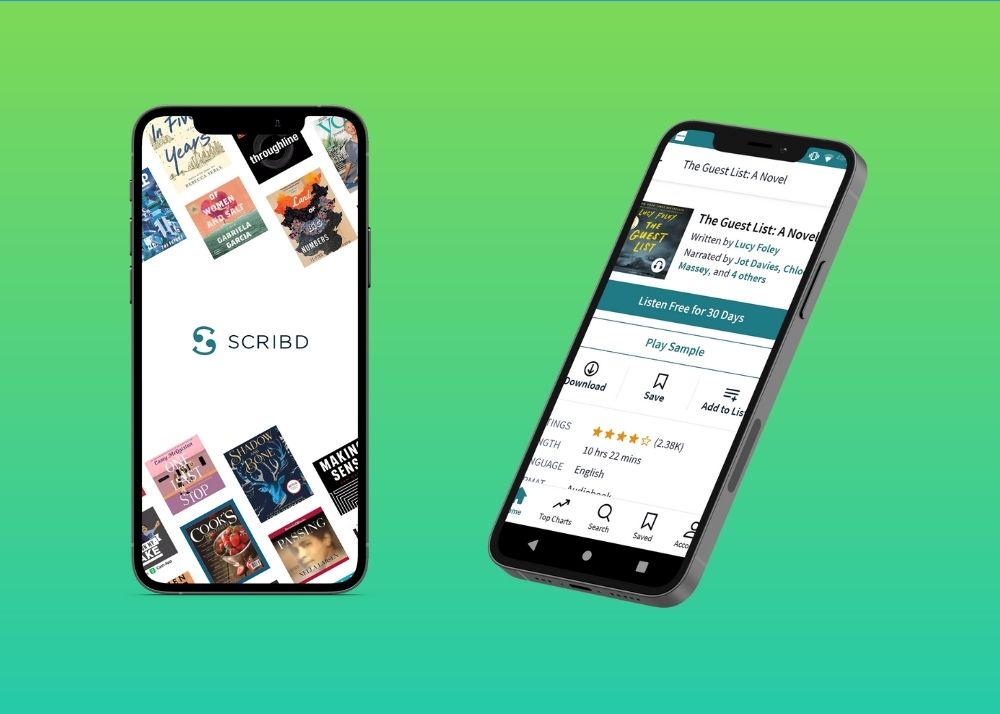
Scribd is the “Netflix of books.” It is a digital library where subscribers can read ebooks, articles, and listen to audiobooks.
You also have access to millions of user-uploaded documents to help you with your studies.
N eed a pricey textbook? Check Scribd first to see if another friendly user has already uploaded it for you to view for free!
- Can download books to read while offline
- Gives you access to high-end magazines, heaps of textbooks, audiobooks, and even sheet music for a monthly price
- Audiobook addicts can set timers to stop narration after the chosen time elapses
- Popular books sometimes have restricted access
- Some users report being charged after canceling their subscriptions
- N eed to provide credit card details, even for the free trial
4. Evernote : Study App for All Your College Notes

Did your friend miss a lecture and ask you for notes? You’ve got them covered. Evernote is the go-to app for note-taking and task management.
This study app organizes your notes, to-do lists, and even audio in one place.
Whether it’s the link to a blog you read last night or a family recipe your mother shared with you, Evernote is useful to store literally anything you run the risk of forgetting.
TIP: Use the audio recording feature to capture classroom lectures!
- Supports images, drawings, and other attachments
- Can share documents with team members who can contribute and edit
- Syncs with your computer, smartphone, and tablet
- No way to password protect your notes on the desktop version (although you can on your phone)
- The app can be sluggish if you have a ton of notes, or when running it on older phones
5. Duolingo : The Easy Way to Learn Languages

Couldn’t get enough of your French classes in school? Wanted to learn Spanish after binging Money Heist ? If you are intrigued by foreign cultures, you might consider learning a second language.
Language skills look great on your resume, improve your professional prospects, and you can even flaunt a few lines from Dante or Baudelaire for your friends.
Duolingo is a fun and interactive study app for language learning, which is why it’s such a hit (or maybe a hoot — since their mascot is an owl 😉).
- Can set daily or weekly goals to help you achieve your language-learning targets
- Mini-stories available in different languages to make the learning process more engaging
- Speech recognition features are lacking
- Grammar and vocabulary exercises are inadequate for advanced levels
6. Forest : Focus on Study With an App

If you constantly find yourself reaching out for the cellphone while you have tonnes of college tasks to complete, it’s time to download Forest.
Forest is a time management app for anyone who struggles with procrastination .
Every time you need to focus on an essay, homework, or a lecture, you plant a ‘seed.’ The seed slowly grows into a tree as you work uninterrupted.
In the meantime, if you touch your phone, the app reminds you to focus.
- Great way to unplug from your phone
- Can track your focus with useful visual graphics
- Forest partners with a tree-planting NGO so you can use your points to plant actual trees in African countries
- The app isn’t visible on the lock screen while running
- Your trees can only grow if you keep the app constantly running in the background
7. Voice Notebook : A Record of Every Lecture

Fell asleep in the middle of a boring lecture? Voice Notebook has got your back.
The speech-to-text app lets you take voice notes and save them in a neat folder so you can replay them in your free time and stay on track with the rest of the class.
Voice Notebook recognizes five languages and also allows you to edit text without stopping dictation.
✅ What we loved:
- Recognizes speech in both online and offline modes
- Save notes on cloud and share them with friends
❌ What could be improved:
- The free version supports ads
8. MindMeister : A Visual Learner’s Favorite Study App

MindMeister is a mind mapping tool that allows individuals and groups to capture and share ideas.
Whether you’re working on a group project or planning a trip with friends, this app lets you brainstorm, take notes, video call (through the integrated live chat), and execute other online tasks.
- Customize maps with colors, themes, styles, and formats
- Documents are hosted on cloud so you can access them safely across different devices
- The free plan has limited features
- Users might struggle with large and complex maps
9. Mathway : For Math and Science Students

Why buy a fancy scientific calculator if you can just use your phone? Mathway is a full-featured calculator that can help you solve complex mathematical problems.
This study app covers advanced fields including algebra, trigonometry, and statistics — now that’s something your standard phone calculator won’t do!
- The app has an easy-to-use touchpad
- The in-built glossary has hundreds of math concepts, definitions, and formulas
- If you’re still having problems, the app allows you to chat with experts
- The app can’t solve word problems
- The interface is suited for smartphones which means some of the features might not work well on tablets and other devices
10. Todoist : Keep Track of Your College Life

Life’s smoother if you have a plan but that’s not always the case. There are days when you have piles of tasks and you wish you had someone to organize your schedules and deadlines.
Todoist will do all that and much more — for free. With this work management tool, it’s easy to create projects, labels, and tasks.
Even better, this app will keep you on task by sending notifications of all your pending activities.
- Add emails directly to your list of tasks
- Use Siri, Google, or Alexa to set due dates or new tasks
- Customize your weekly or monthly goals and turn on Vacation Mode if you want to disconnect
- The free version doesn’t include reminders which makes it easier to miss deadlines unless you get an upgrade
- The app doesn’t have time-tracking features to check how long you’re spending on each task
11. Exam Countdown Lite : Never Miss a College Deadline

Test anxiety is a real thing. To make sure you’re not overwhelmed before an exam, use this app to keep track of all your test dates and deadlines.
With Exam Countdown Lite, you keep all of those tricky dates in one place. The study app also gives you regular notifications so that you stay focused on your goals.
- Color code your tests and add visually-appealing icons to make each one distinguishable
- Add notes about assessments to remember the important details
- You cannot customize alerts
- Ads in the free version can affect user experience
12. Notion : All Your Study Notes in One App

Need an app to keep track of every nitty-gritty of your academic life? Notion is an all-in-one workspace.
The entire platform is structured into blocks that create and customize weekly agendas, projects, and class schedules.
Don’t feel like building your own? Use one of the thousands of templates found online!
- Clean, simple, but modern feel
- Endlessly customizable
- Collaborate with team members and work on assignments in real-time
- Plenty of features and uses can be overwhelming to new users
- No proper offline feature
13. ScannerPro : Full-Fledged Scanner in Your Pocket
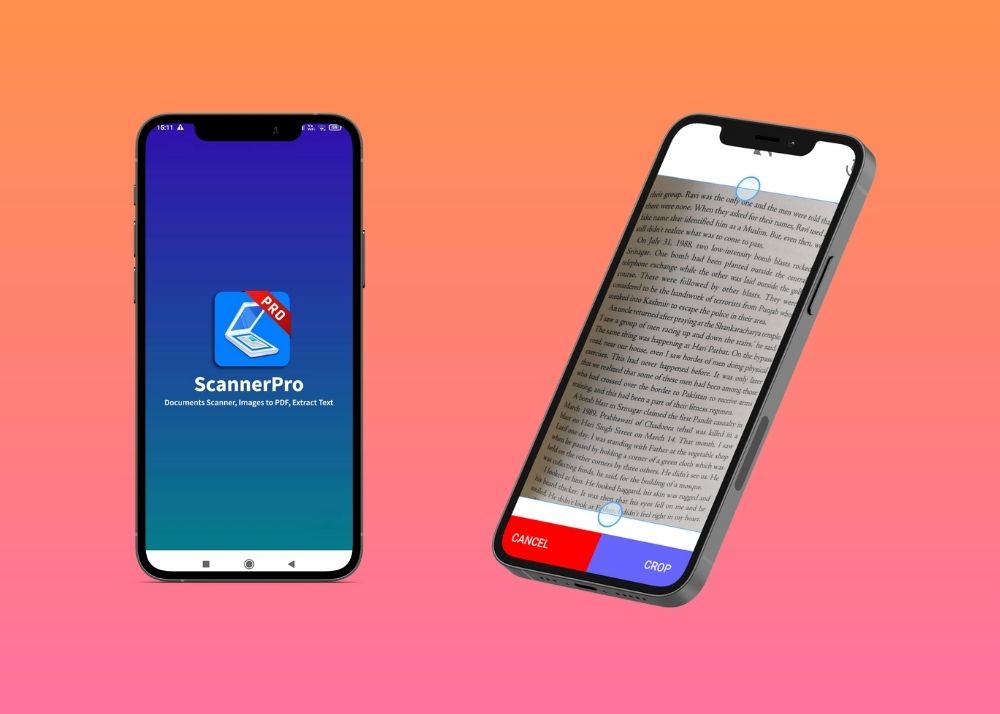
ScannerPro lets you turn your phone into a real scanner — with no bulk!
This is incredibly useful for when you want to avoid carrying your books around. You can even scan study materials in the library without checking out all the books.
Once your texts are scanned, you can upload them directly to the cloud — a great way to go paperless.
- The Optical Character Recognition feature lets you extract text from images
- In-built image editor allows you to adjust image quality
- Slow to scan lengthy documents
14. WiFi Finder : Never Be Disconnected
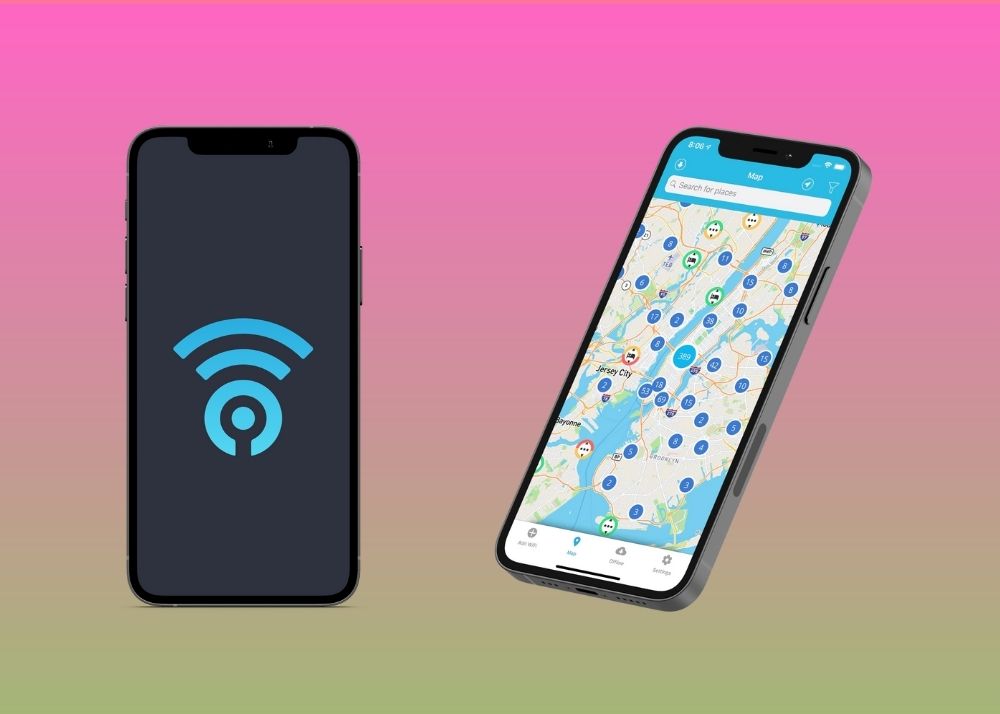
Bored with writing assignments in your dorm? We know finding free campus WiFi is the shackle that is holding you back.
No more wandering around campus looking for a place to submit your trigonometry assignment!
With WiFi Finder, you can now look for free and paid WiFi hotspots in your area and finish your study tasks from a nearby park or coffee shop.
- Download maps for offline use
- Save addresses that you might need in the future
- You need to pay to access maps offline
15. RealCal Scientific Calculator : Formulas at Your Fingertips

Forget spending money on expensive scientific calculators. This handy study app offers all the benefits of a scientific calculator, without having to buy one.
RealCalc has all kinds of traditional algebraic operations, unit conversions, percentages, and display modes.
Want to go back to a previous calculus problem? The app’s memory function also stores your results.
- Convenient customization features make solving problems quicker
- Different layouts, including pocket, compact, or expanded depending on your device and preferences
- Not available on iOS
16. DropBox : Your College Life on the Cloud

Being organized is a superpower (one that most students lack). One day you’re downloading PDFs on your phone, on others you’re writing your C++ project on your cousin’s laptop.
If you’re looking for an app that keeps all your documents in one neat folder, then DropBox is the app for you.
With the DropBox app, you can store and share files, scan documents using your phone’s camera, and even work on your tasks offline.
All you need to do is sign in using your email and password, or use a single sign-on with your Google or Apple account.
- Cloud-storage makes it an ideal platform to access your files from anywhere
- Password protect your files to ensure it isn’t accessed by external users
- Only 2 GB of storage for free users
17. Vocabulary.com : Talk the Talk With This Study App

An average 20-year-old American knows 42,000 words. That might sound like a lot but once you start writing your Macbeth essay, you’ll soon be looking for words to describe the three witches.
Enter Vocabulary.com — an award-winning app that expands your vocabulary at lightning speed and helps you complete your essay well within time.
At once a learning tool and an addictive game, the app lets you create personalized word lists, answer multiple-choice vocabulary questions, and compete against Facebook friends to earn badges and rewards.
Vocabulary.com claims to use sophisticated algorithms to pull out the “most essential English vocabulary words… that you need to succeed in an academic or business environment.”
- Standardized test takers can take advantage of 350,000 ready-to-learn lists, speeches, breaking news
- Ability to track progress by logging in to your account
- The interface can be tricky for first-time users
College is tough. You need to be a multitasker to juggle late nights, internships, and extracurriculars.
Whether you’re a freshman or writing your final exams at the senior level, these 17 study apps will keep you on the fast track and help you bring your A-game to the table.
🤔 What is the best study app to focus?
If you need to concentrate on your study, the best app is Forest . This free study app allows you to start a timer when you start your study session and grow a forest. The longer you study, the more your forest grows! It’s the perfect app for students who struggle with procrastination.
🏆 What is the best app for studying?
The best app for studying depends on what you need it for: do you want an app to stop procrastinating your study ? Do you want a flashcard app to help you memorize tricky topics ? Do you want to organize your study materials ? We’ve found 17 of the best apps for students to get their study done.
📱 What is the best productivity app for students?
There are hundreds of apps available to help students be productive. We love Evernote , Forest , and ToDoist when we’re studying, but there are plenty of study apps that can help you nail your schoolwork.
💰 What are the best free study apps?
It’s important to find study apps that fit a student’s budget. Notion , Quizlet , and Exam Countdown Lite are some of our favourite study apps that are useful, perfect for college students, and have completely free versions.
Other Readers Loved:
31 states with free community college to save you money, 12 best books for college students: 2024 must-reads, 13 best college traditions in the us to ignite school spirit.
The College Post is part of Globe Post Media, a US digital news organization publishing the world’s best targeted news sites.
Latest Posts
These 10 us colleges offer awesome work-study programs, most popular, these are the cheapest colleges in the us, 73 top side hustles for college students to make fast cash in 2024, fast access.
© Globe Post Media | All rights reserved
12 Best Study Apps for Students

Technology is continually making it easier for students to study more effectively. This means you’ll find a range of good study apps for students that will help you achieve your specific study needs—whether you want to stay organised, take notes, record lectures, revise, brainstorm, or get assignment help .
This quick and helpful guide will point out some of the best study apps for students that will enhance your student life, and you can start using them instantly.
1. Note-Taking and Annotation: Notability

Do you want to access your notes at any time without carrying your paper notes? Well, you could be looking for an app like Notability. It is a note-taking app that also allows you to store information and organise all your course materials in one place. You can type or handwrite notes on a virtual notes board, sketch illustrations, import course materials, annotate documents, and record lectures as audios. Once you create or import your materials, you can edit and organise them as you please.
You can also browse the notes published by other people on the Notability Gallery and save or download them.
- Cost: Free, premium subscription available at $11.99 per year
- Review: 4.6/5 on Mac App Store
- Available On: iOS and macOS
2. Note-Taking and Task Management: Evernote

Evernote is an extremely useful app that comes in handy when taking notes or organising your research materials. Once you create your notes, you can add images, links, web clippings, to-do lists, audio recordings, and more. The platform syncs your study notes to your devices so you can access them from anywhere.
When you want to find something, you can use the app’s search tool, which allows you to find what you need even in handwritten notes.
- Cost: Free for basic features, premium subscription available at $9.99/month
- Review: 4.4/5 on App Store, 3.7 on Mac App Store, 4.1/5 on Google Play
- Available on: iOS , Android , Mac , Windows
3. Scanning: Microsoft Lens

Microsoft Lens is designed to help you take pictures of printed documents and handwritten texts—such as whiteboards, course handouts, and receipts—and convert them to Word, PDF, PowerPoint, or Excel files. You can save the captured documents in OneDrive, OneNote, or phone storage.
Scanning text—like certain pages of a physical book—using Microsoft Lens will save you time that you’d otherwise spend on writing notes.
- Review: 4.8/5 on App Store, 4.8/5 on Google Play
- Available on: iOS , Android
4. Proofreading and Editing: Grammarly

If you want to submit error-free essays or any other piece of writing, then Grammarly is a must-have. It is an AI-powered app that spots mistakes in grammar, spelling, punctuation, etc., and provides suggestions to correct them. Using the app frequently can also help you perfect your grammar skills because it offers concise explanations for every highlighted mistake.
With the advanced features of the paid version, you will get suggestions to improve tone, clarity, style, fluency, and vocabulary to ensure you communicate effectively.
- Cost: Free, premium available at $12/month
- Review: 4.3/5 on App Store, 4.1/5 on Google Play
- Available on: iOS , Windows , Mac , Android
5. Productivity App: Forest

Do you find yourself wasting valuable study time by constantly scrolling through social platforms? The Forest app is one of the best productivity apps to help you avoid such distractions and stay focused during your study sessions.
Whenever you want to focus on your assignment or anything, you plant a virtual tree and hold it hostage for a set amount of time. The tree will either flourish if you stay productive or die if you leave the app during the study session.
Over time, you build a forest that acts as a reminder of your productivity. If you want to avoid giving in to interruptions and build solid time management skills, then using the Forest app is an excellent solution.
- Cost: $3.99 on App Store, free but with in-app purchases on Play Store
- Review: 4.8/5 on App Store, 4.7/5 on Google Play
6. Organizational Study App: iStudiez Pro Legendary Planner

University is the first place your time and task management skills are tested. If you are not careful, you could end up missing deadlines for assignments or other crucial school work. Creating and observing a schedule will make your uni and study life more manageable. iStudiez Pro is a planner that lets you organise your daily student life, from lectures to assignments. You can sync your events on Google Calendar or Apple Calendar app with iStudiez.
Once you create your schedule, you can view your day’s activities and get alerts for all your classes, upcoming assignment deadlines, exam schedules, and other school work. Knowing what you need to do daily and what time will give you complete control over your uni life.
- Cost: Free, multi-platform cloud sync at $2.99 for mobile version and $9.99 for PC both macOS and Windows
- Review: 4.4/5 on App Store, 4.1 on Mac App Store
- Available on: Windows , Mac , iOS
7. Brainstorming Study App: MindMeister

Do you need a great app to brainstorm ideas? MindMeister is a mind mapping app that provides a graphic organiser to help you organise your thoughts and create new ideas. You can create several subtopics as you explore your thoughts, use the available map themes, and customise your maps by adding colours and attachments.
The maps are stored in the cloud, and you can convert them into slideshow presentations.
- Cost: Free for up to 3 mind maps, personal plan for $2.49/month, and pro plan for $4.19/month
- Review: 4.3/5 on Google Play, 4.5/5 on App Store
- Available on: Android , iOS
8. Dictation: Dragon Anywhere

Writing essays can be time-consuming, but you can speed up the process by dictating the text instead of typing. Dragon Anywhere enables you to create and edit documents by voice. It is more useful when using your phone to write lengthy texts. The app has high recognition capability and voice commands, such as “correct that,” which allow you to edit the text if you make a mistake.
- Cost: One-week free trial, $14.99/month or $149.99/year
- Review: 2.8/5 on App Store, 2.2/5 on Google Play
9. Homework and Assignment Help: Zookal Study

Are you struggling with homework or assignments? Zookal Study , one of the best study apps for students, will come through for you in a flash. All you have to do is post your question as a snap or text and add any information you think is helpful. In a matter of minutes, you will get a step-by-step solution from a subject matter expert.
Getting quality answers from expert tutors in a short time will help you save time, complete your homework hassle-free, and understand your course topics better.
In addition to homework help, Zookal Study has numerous study tools, such as flashcards , quizzes, and video lessons, making it one of the best revision apps for college students.
- Cost: 30-day free trial, $7.99/month
- Review: No ratings available yet on both Google Play and App Store
10. Computations: Wolfram Alpha

Wolfram Alpha is a calculation app that will come in handy if your course involves a lot of formulas and computation, for instance, maths, physics, and chemistry. All you have to do is type the math problem such as algebra , calculus and Wolfram will compute the answer. The app will also provide a step-by-step solution to ensure you understand how to tackle similar questions.
- Cost: Free for basic features, a pro version available at $6.99 per month or up to $65.99/year
- Review: 4.1/5 on App Store, 4.5/5 on Play Store
- Available on: iOS , Android , Web
11. Academic Reading and Referencing: RefMe

RefMe stands for Referencing Made Easy. Do you find referencing your essays or research work to be a tedious process? RefMe will save you the headache. You can scan a journal or a book’s barcode or search via book titles, and RefMe will generate the citations that match the required style. With referencing out of the way, you will have more time to improve the quality of your work.
The app also has numerous educational resources that you can use for extra learning or conducting research.
- Cost: Free app
- Review: Not available
- Available on: Android
12. Focus Music: Study Music-Memory Booster

If you find yourself struggling to focus on your studies due to noise or deafening silence, you should try listening to productivity-boosting sounds. Study Music-Memory Booster contains sounds that will help you focus and reduce fatigue. The app allows you to select the sounds that will match your activities, such as concentrating, studying, reading, memorising, and meditating.
The best part is that you can use your device while the music is playing, and you don’t need to have an internet connection.
Working with such sounds playing in the background can help you remain focused for longer study sessions.
- Cost: $0.99 on App Store, free on Android
- Review: 4.7/5 on Google Play, 1.0 on App Store

You May Also Like

The Best Study Tips From High Achieving Students

Your Guide to Ultralearning and Self-Directed Study Time

How Do Zookal Flashcards Work?

5 Study Tips To Quickly Boost Productivity
16 Easy Ways to Save Money As A Student
Australian University Life in 2022 – What Can Students Expect?
College Info Geek
The 40+ Best Apps for College Students

C.I.G. is supported in part by its readers. If you buy through our links, we may earn an affiliate commission. Read more here.

College can be a lot of fun, but it can also be overwhelming. Between challenging new classes, unfamiliar living arrangements, and trying to figure out what to do after you graduate, it’s easy for things to feel out of control.
Wouldn’t it be great if there were an app to make college easier and reduce that overwhelming feeling? Well, there isn’t just one app, but there are quite a few that can help.
In this article, we’re going to take a look at the best apps for college students. Whether you’re looking for an app to help you stay focused while studying or a tool to split the utility bill with your roommates, you’ll find it (and so much more) in this guide.
Let’s start with, well, the reason you’re in college. These apps will help with everything from solving that stubborn math equation to ensuring that your essays are free of errors.
Chegg Study

Professors’ office hours are great for getting help with homework , but most professors don’t have time to walk you through the solutions to a bunch of problems. This is where Chegg Study comes in.
They offer 24/7 homework help, including step-by-step solutions to thousands of textbook problems and guided video walkthroughs. And if they don’t already have the answer to your question, you can take a picture of it and get help from one of Chegg’s experts.
Wolfram Alpha

Need to look up a formula or get an answer to just about any factual question? Then Wolfram Alpha is the tool you need.
It’s great for checking answers on homework problems, and the Pro version allows you to see step-by-step solutions to almost any question you can think of. Just make sure you don’t use it to replace the hard (and necessary) work of understanding the material.

Flashcards are some of the best tools for memorizing large amounts of information. Traditional paper flashcards, however, have some disadvantages. They’re easy to lose, and they can be difficult to manage once you have more than a few dozen.
Anki solves both of these problems. It’s a digital flashcard tool that not only helps you learn information but also uses spaced repetition to ensure that you retain what you’re studying.
You don’t have to remember when to study a flashcard; Anki will automatically show it to you just as you’re about to forget the information. It’s a lifesaver for learning foreign language vocabulary, formulas, or historical dates.
Google Docs

If you’re still using Microsoft Word to write papers, then Google Docs will be a delightful change. It strips away all of the unnecessary junk in Word and leaves you with only the writing tools you need.
Plus, it automatically backs up your work to the cloud so that you can access it from anywhere and never worry about your final paper getting lost.

English grammar and spelling are a mess. Even if you’ve been speaking and writing the language your whole life, it’s still easy to spell a word wrong (not to mention make a typo). While you can catch most mistakes by carefully proofreading your work, that process is time-consuming.
To catch more errors more quickly, you can use Grammarly . It automatically checks your work for common grammar, spelling, and usage errors. When it finds an error, it highlights it and even explains what you should write instead. It’s not perfect, but it’s lightyears better than the built-in spelling/grammar checker in any word processor.

Sometimes, it’s much easier to understand a concept if you draw it out. Coggle takes this concept into the digital realm, letting you produce “mind maps” and flow charts on any topic you want.
We love using Coggle to brainstorm ideas for articles and videos, but you could also use it to break down anatomical systems, chemical processes, or any other complex topic you’re studying.

As you become more advanced in your studies, you’ll probably have to write a research paper , thesis, or another long-form piece of academic writing. As your professors no doubt remind you, it’s essential to keep track of (and cite) all the sources you use.
If you’re using more than a few sources, however, it quickly becomes difficult to manage them. This is where Zotero comes in. The app keeps track of all your sources, from web pages to books. And when it’s time to turn your paper in, Zotero can automatically generate a bibliography in the format of your choosing.
TomatoTimer

Ever find yourself unable to start a homework assignment? Procrastination is a powerful force, and the internet is a siren song that will pull you in every direction but your homework.
To overcome the inertia required to get started, we recommend the Pomodoro technique . All you do is set a timer for 25 minutes and focus on one task until the timer is up.
And to make the Pomodoro technique easier, you can use TomatoTimer . It’s the best Pomodoro timer we’ve found, and it’s sure to help you stop procrastinating and start working.

College language classes can be a great tool for learning how to read and write a foreign language, but they’re usually less than stellar at teaching you how to speak. If you’re serious about achieving conversational fluency in another language , then you need to spend time speaking the language, ideally with native speakers.
And thanks to iTalki , you don’t need to travel to a different country to do this. iTalki connects language students with teachers all across the world. For as little as $5 per lesson, you can get personalized instruction in almost any language out there.
Group Project Apps
Let’s not kid ourselves — group projects suck. With the right apps, however, you can make them suck a little less. Here are our favorite apps for keeping your group organized and productive.

One of the worst parts about working on a group project is making sure that everyone does their share of the work.
Trello is a great tool for doing this. It lets you lay out all of the steps required for a project, assign them to the project members, and then track each person’s progress.
Sure, it won’t prevent people from being lazy, but it can at least make them more accountable.

Using group messages to communicate about projects can quickly turn into a confusing mess. Plus, giving out your phone number to someone you barely know is less than ideal.
Instead, we recommend using Slack to communicate with your group project members. It keeps all of your messages in a centralized, searchable place. And it also lets you communicate without having to give out your phone number to someone you just met.

One of the most painful parts of organizing any group project is finding a time when everyone can meet. Instead of sending endless texts and emails, you can use Doodle .
Doodle lets everyone vote on the times that work best for them. While it won’t solve all of your scheduling woes, it will certainly reduce them.
Google Slides

PowerPoint is an excellent tool for making presentations if you’re the only person working on a project. With a group, however, emailing PowerPoints back and forth gets messy.
This is why we prefer Google Slides for group presentations. Everyone can collaborate on the presentation, which hopefully ensures that each person will contribute something . Just be sure to have someone proofread the final version before you present it to the rest of the class.
Travel Apps
Classes and extracurriculars are great, but sometimes you need to get away and see the world that exists outside the campus bubble. These apps will make your travels easier and more fun.
Hostelworld

When you’re traveling on a student budget, hotels can feel like an impossibly expensive luxury. Luckily, you don’t need hotels to find a place to stay.
Instead, we recommend staying in a hostel. In exchange for sharing a room with a few other people, you can get super cheap accommodation and meet cool people from all over the world.
Our favorite place for finding and booking hostels is Hostelworld . Many hostels have outdated (or nonexistent) websites, so it’s great to have a tool that lets you compare prices, read reviews, and make bookings in one place.

Hostels are fun, but they aren’t available everywhere. And if you’re traveling with a group, they may not provide enough space. In these cases, you should check out Airbnb . It’s a website that lets people rent out rooms or even entire houses.
The accommodations range from as basic as a futon to as elaborate as an entire villa. And there’s plenty of room in between for just about any budget. Plus, you can read reviews from previous travelers and even get local tips on the best places to visit during your stay.
Couchsurfing

What do you do if you want to travel to a place, but you can only afford the flight? Find a free place to stay on Couchsurfing , of course!
Couchsurfing is a community of people across the world who work together to promote cultural exchange and provide free places for travelers to stay.
To get started, all you have to do is create a profile explaining who you are and that you’re not some crazed serial killer (more or less). You can then request to stay at the homes of other members of the site.
Couchsurfing is certainly best for adventurous travelers who don’t mind sleeping on a couch or floor. But if that describes you, it’s a great way to stay for free while also meeting cool people.
Google Flights

There are lots of flight search engines out there, but Google Flights is our favorite. It’s easy to use, comprehensive, and great for comparing prices across airlines and travel dates.
If you want to get the lowest price on a flight, Google Flights is the place to go. Just be aware that it doesn’t include flight information for certain budget airlines like Southwest (you’ll have to check those airlines’ websites directly).

A lot of people think of Meetup as a tool for making friends in your local community. And while it is great for that, I’ve also found it useful for meeting people while traveling.
Meetup is available in most major cities around the world, and it allows you to connect with people at events based around a common interest. Whether you’re into mountain biking, tabletop games, or crocheting, there’s likely a Meetup event for you.
In this section, we’ve collected apps that will make your life easier. Whether you’re hunting for an apartment, trying to stay fit, or working to build better habits, you’ll find an app for it below.

If you’re no longer a freshman, then there’s a good chance that your university will let you live off campus. If you decide to do this, you’ll need to find a place to live. While we encourage you to ask older classmates for recommendations, another great place to find apartments is Zillow .
Zillow makes it easy to search for an apartment that fits your budget, location, required number of bedrooms, and desired amenities. And in many cases, Zillow listings will even include contact information for the landlord or leasing manager.
For best results, we recommend starting with Zillow and then also searching Apartments.com to make sure you’re seeing as many listings as possible. Zillow has our favorite interface, but it doesn’t include every listing.
Looking for more information about how to find an apartment? Check out our guide to moving to a new city .

Odds are good you’ve at least heard of Craigslist , but I want to emphasize how useful it can be as a college student.
Need to sell or buy some furniture for your apartment? Use Craigslist.
Trying to find an apartment or house to share with friends? Plenty of local landlords list on Craigslist (just watch out for scams ).
Pocket Casts

Podcasts are some of our favorite tools for learning and being entertained while commuting, washing the dishes, or exercising. While your phone likely has a built-in podcast app, we think Pocket Casts is a vastly superior alternative.
In addition to making it easy to keep track of your shows, Pocket Casts also automatically trims out brief moments of silence, dramatically increasing the number of shows you can listen to (without affecting the listening experience).
Looking for new podcasts? Here’s a list of our favorites .

The right habits are the building blocks of a happy, healthy, fulfilling life. But forming good habits (and breaking bad ones) can be a challenge when you’re also juggling classes, homework, extracurriculars, and a part-time job .
For this reason, we like to use habit tracking apps to keep ourselves accountable. Habitica is our favorite habit tracking app by far. It turns habit-building into an RPG, letting you level up and customize a character as your habits strengthen. And best of all, Habitica lets you form parties with other users for an extra dose of accountability.

Have you ever wanted to accomplish something but struggled to make it a reality? There are many reasons people don’t accomplish their goals , but often it’s simply a lack of accountability. Beeminder solves this problem through the ultimate form of accountability: money .
All you do is tell Beeminder what you want to accomplish and how you plan to track it. The goal can be anything from doing a certain number of push-ups each day to practicing a new skill for a certain number of hours. And the tracking method can range from data logged on your smartwatch to tasks completed in Todoist. If you can quantify it, Beeminder can track it.
As long as you’re logging data for your goal, nothing will happen. But if you fail to log data, then Beeminder will charge you money. It starts at $5 and then increases exponentially, so it’s a pretty sure-fire way to stay on track even when you don’t feel like it .
7 Minute Workout

With as busy as most college students are, fitness often takes a backseat. This is a mistake, however, as regular exercise is essential to staying healthy and keeping your brain performing at its peak .
While there are thousands of ways to get exercise, we prefer to keep things simple (especially if you’re building an exercise habit).
And it doesn’t get much simpler than the 7 Minute Workout ( Android | iPhone ). The app guides you through each of the exercises, which are sure to help you work up a sweat. I don’t care how busy you are; you can always find 7 minutes to exercise.
Organization Apps
College brings with it a lot more responsibilities and commitments than high school. Keeping all of this organized can be a struggle, but it doesn’t have to be with these apps.

The internet is full of interesting articles, but you don’t always have time to read an article the moment you discover it. While you could bookmark the article for later, this gets unwieldy when you have more than a few articles saved. So instead, I recommend you use Pocket .
Pocket lets you save articles to read offline, stripping out all of the annoying ads and other junk. And if you get Pocket Premium, you can search all of the articles you’ve saved. This makes it super useful for research, as well as learning about new topics.

Long, complex, unique passwords are key to keeping your online accounts secure. But it can be difficult to remember even a couple of simple passwords, let alone dozens of long ones. To keep your accounts secure without having to remember a bunch of passwords, we recommend Dashlane .
With Dashlane, you only have to remember one “master password.” All of your other passwords are stored securely within Dashlane, and the app can automatically enter them into just about any website or app. Plus, Dashlane can generate a strong password each time you create a new account.

Computers these days are far more reliable than they used to be, but it’s still possible for your computer to crash or your hard drive to get fried. When this happens, you risk losing all of your data.
To prevent this nightmare, we recommend Backblaze . The app automatically backs up your hard drive to a secure server. If you ever need to retrieve your data, you can download it immediately. And if downloading isn’t an option, Backblaze can also ship you a hard drive with your data for a small fee.
Google Drive

Have you ever gone to class to give a presentation, only to realize that you left your laptop in your dorm? If you use a cloud storage service like Google Drive , then such situations won’t be a problem.
Google Drive lets you store up to 15GB of data for free. This is enough for all of your homework assignments, projects, and plenty of photos. And not only can you store your files safely; you can also access them from any device with an internet connection.
Looking for more cloud storage options? Check out this comprehensive guide .

If you’re a student, then you probably spend a lot of time taking notes (and if not, you should).
While writing your notes in a physical notebook or a word document on your computer can work, it’s less than ideal. These methods make it difficult to search and review your notes when you’re studying for an exam, and you also run the risk of losing your notes if you misplace the notebook or your computer crashes.
Instead, we recommend you use Evernote . It’s a simple, powerful note-taking app that makes it easy to search and organize your notes. And if you prefer to take notes on paper, the Evernote app makes it simple to digitize your notes for later review.
Google Sheets

Even with all the other cool organization apps out there, we still find ourselves returning to the humble spreadsheet. Spreadsheets are useful for organizing and calculating all kinds of things, from a monthly budget to your GPA .
While Excel is still the preferred tool for complex statistical calculations and data analysis, Google Sheets is a simple, lightweight alternative that’s sufficient for most spreadsheet needs. Plus, Google Sheets are accessible across devices and allow you to collaborate with others.
Google Calendar

If I had to give just one piece of productivity advice, it would be “Use a calendar.” If you get in the habit of putting meetings, classes, appointments, and other events on your calendar, it will become so much easier to remember things and be on time.
There are many calendar apps out there, but Google Calendar is still our favorite. It’s simple, works across devices, and is great at reminding you of events. For most people, that’s all a calendar app needs to do.
Productivity Apps
The apps in the previous section are great at keeping you organized, but all the organization in the world is useless if you don’t do things. The apps in this section will help you do all the things (or at least most of them).

I said earlier that my number one piece of productivity advice is to use a calendar. A very close second to that is “Use a to-do list.” Your calendar will make sure that you’re where you’re supposed to be, but your to-do list will make sure you do what you need to do.
We’ve tried dozens of to-do list apps, and Todoist is still our favorite. It has a clean interface, works great on mobile, and makes it easy to organize your tasks.
In addition, Todoist has excellent natural language processing. This means that if you type something like “Walk my pet llama at 3 pm every day,” Todoist will turn that into a task without any extra work on your part.

As amazing of a technology as smartphones are, they can also destroy your productivity. If you find your phone distracting you while you’re trying to study, then Forest offers a simple, fun solution.
At its core, Forest is a timer app…with a catch. Once you turn on Forest, the app will begin to grow virtual trees. As long as you don’t touch your phone while the timer is going, the trees will continue to grow. But if you pick your phone up, the forest will wither and die.
It sounds silly, but it can actually be really motivating, particularly because the trees grow into a larger forest the more you use the app. This offers a fun way to visualize your progress.

Do you know how you spend your time on your computer and phone? You may think you do, but I’m willing to bet you’re wrong. Most people vastly overestimate how much time they spend doing productive things and underestimate how much time they waste on social media, Netflix, and games.
RescueTime offers a simple way to take an honest look at how you spend your time on your devices. All you have to do is install the app and then forget about it. After a week or so, RescueTime will send you a report showing how you spent your time in the digital realm. The results will probably surprise you.

RescueTime is great for learning how you spend your time, but what can you do to change it? What can you do to spend more time on productive, fulfilling activities and less on empty, distracting ones ?
Freedom is the answer. It lets you define a list of apps and websites to block. Once you turn the app on, you won’t be able to access any of the things on the list, no matter what you do.
It’s an extreme solution, but it can do wonders for your focus and productivity.

Are you still using a flatbed scanner to digitize documents? If so, then you’ll be delighted to learn that there’s an easier way.
With Scanbot , you can create high-quality scans using just your smartphone. Not only does this save you time and space, but it’s also a lot cheaper than investing in a dedicated scanner.

Magical study music created by robots? Okay, we were a bit skeptical when we heard about Brain.fm , but it’s proven to be a very effective tool for focusing and entering the flow state .
To use Brain.fm, just tell the app what you want to do (working, meditating, sleeping, etc.) and how long you want to do it. The app will then play instrumental music that’s specially designed to block out distractions. Sure, it might be a placebo effect, but we’ve still found it helpful.

Video calling has advanced massively over the last few years, making it easier than ever to have conversations with people across the country and the world. If you’re still using Skype for video calls, then let us introduce you to Zoom .
Zoom is a lot like Skype, but better. In our experience, it’s far more reliable and much easier to use. And it excels when you need to do a video call with several people. The picture and audio quality are also superb.
Looking for more video chat apps? Here’s a comprehensive list .
My Study Life

Is it a calendar, to-do list, or class schedule? My Study Life is all of the above (and more). If you’re looking for an all-in-one productivity app that’s built for students, My Study Life is the app for you.
It has all of the standard features you want in a calendar and to-do list, but it also includes features for scheduling exams, managing classes, and staying on top of homework. It even works offline, meaning you can use it in that lecture hall with spotty WiFi.
If you’re like a lot of students, college is the first time that you need to manage your money. If you’ve just gotten your first part-time job and need help keeping track of your cash, these apps will help you out.

While you can absolutely make a budget with nothing but a spreadsheet, that method has some disadvantages. Mainly, you have to remember to update the spreadsheet, which is easy to forget with all of the other things you have going on.
To make it easy to manage your money, we recommend Mint . Mint synchronizes the info from your bank accounts, credit cards, and other financial accounts in one place.
And after you’ve used Mint for a few weeks, it can show you all kinds of useful data about how you’re spending your money and how to save. You can even create budgets and savings goals (not to mention look at all kinds of fun graphs and pie charts).

Using a tool like Mint is a great first step to ensuring that you aren’t blowing all of your money on stupid things. But once you’ve gotten your spending under control and are starting to save some cash, the next step is to put that money to work. That’s right: I’m talking about investing.
If you’re in college, then one of the easiest ways to get started investing is with Betterment . The app lets you invest in index funds (collections of stocks and bonds), and you can get started with as little as $1.
Want to learn more about how to start investing as a college student? Check out our investing guide .

Once you move out of the dorms and start living in an apartment, you’ll likely have to deal with splitting expenses with your roommates. This could be anything from rent to utilities to that pizza you ordered during a late-night D&D campaign.
Apps like Venmo are great for sending money, but they’re not so great at keeping track of expenses or calculating how much each person owes. That’s why we love Splitwise .
All you have to do is enter the amount you need to split and the people you want to split it with. Splitwise will then calculate the amount and give you the option to pay using everything from Venmo to PayPal. Trust us, this will save you a lot of roommate drama.
College? There’s an App for That
We hope the apps in this guide will help make your college experience more productive and less stressful.
And as always, remember that you don’t need an app to succeed at college; everything on this list is just a tool. Use the tools that are helpful, and discard the ones that aren’t.
Looking for apps to stay organized and productive beyond college? Check out our guide to the best productivity apps .

The 8 Best Homework Apps to Help Students Stay on Track
W hether you're a school student or a college student, homework is an essential part of the learning process. Fortunately, there are plenty of apps that can help you get your homework done, the only trouble is knowing which apps are best to download. If you're a student, read on to take a look at some of the best homework apps for Android and iPhone.
Do you need help with math, biology, history, or physics? Brainly is the homework app for you. Using the app for homework help is as straightforward as taking a photo, typing, or voice searching the question or equation and then waiting for an answer.
All the answers come from Brainly's online community of other students as well as experts from around the world. However, if you aren't happy with the answers, you also have the option to ask the app's AI tutor, Ginny.
Moreover, you can assist other students with their own homework by answering their questions. Which questions you help out with can be filtered according to school level and subject.
Download: Brainly for iOS | Android (Free, subscription available)
2. Photomath
Unlike Brainly, the Photomath app is a pretty straightforward homework app and has one single core focus—math. Photomath is truly one of the best apps to help you solve math problems , and it works similarly in that you merely have to scan the problem with your phone and the app gives you instant answers.
But Photomath doesn't stop there, the app actually breaks down the entire equation and gives you a step-by-step explanation of how it came to the solution. What's more, you can tap on each step to see an even more detailed animated lesson with voice instructions.
In addition, the Photomath app includes a built-in calculator where you can type the question out instead of snapping a photo.
Download: Photomath for iOS | Android (Free, subscription available)
3. Chegg Study
Chegg Study is an app that provides many different homework and study tools on various subjects. If you have a basic question, you can either snap a photo, upload an image, or type it out. On the other hand, you can just scan the barcode of the textbook you're using with your mobile phone to find answers.
Another tool Chegg Study includes is over 500 million free flashcards on subjects like astronomy, business, chemistry, and psychology. Alternatively, you can use the app to create your own set of flashcards.
But the Chegg Study app also comes in handy if you need help with a specific course. All you have to do is add the course and the app provides everything you need to ace it, like expert Q&A and exam prep. Alternatively, there are a selection of Chegg alternatives you can try , too.
Download: Chegg Study for iOS | Android (Free, subscription available)
4. Course Hero
To get help with your homework, all you have to do is ask Course Hero. And asking is super simple. You can type in your question, snap a picture, or upload a document. If you're looking for assistance with math homework, there's even a dedicated Scan to Calculate option.
Using the Course Hero app, you can keep a library of all your homework documents and any other learning materials you need if you're completing a course.
What's more, Course Hero is available in your web browser if you need access to AI-powered homework assistance and a range of study resources while using your laptop or PC.
Download: Course Hero for iOS | Android (Free, subscription available)
5. Bartleby
The Bartley app can solve your math homework problems in a single snap. Yet possibly the best part is the 24/7 homework help from actual tutors. Simply select the subject, type out the question, and add an optional image.
Once you've sent in your question, all you have to do is wait and pretty soon you'll get assistance from an expert with Masters or PhDs. However, there is another way to get homework help and that's by using the Search tab.
Type in what you're looking for, and you can filter through the solutions according to the solution type or subject. Alternatively, you can search for homework help based on the textbooks you're using.
Download: Bartleby for iOS | Android (Free, subscription available)
6. ScanSolve
Quick, uncomplicated, and to the point is what you can expect from this homework app. ScanSolve uses AI to answer your questions and covers subjects like math, English, and science.
As with many of the other apps on this list, using ScanSolve is as easy as taking a picture of the questions you are struggling with. From there, you can either read the explanation of the results or chat with the AI tutor if you're unsure of the answer you received.
Download: ScanSolve for iOS | Android (Free, subscription available)
7. Homework.ai
The Homework.ai app offers homework help using the power of artificial intelligence. Some of the subjects the app covers include art, biology, computer science, math, music, and a selection of languages like Spanish and German.
To get started, choose a subject, type out or audio record your question, and AI does the rest. For a quicker solution, you can simply scan the question using your mobile phone. Keep in mind that everything in the app is generated by AI, so you might need to double-check the answers if you're not 100% sure.
Along with answering your basic homework questions, Homework.ai can help you with language translation, rewriting text, and summarizing text.
Download: Homework.ai for iOS | Android (Free, subscription available)
8. Zookal Study
If you need homework help immediately, but you'd prefer to get it from an actual experienced tutor instead of AI, then Zookal Study is the app for you.
The best bit is that you won't have to wait hours for solutions to your questions—Zookal promises to deliver in as little as 20 minutes. Zookal keeps track of all your questions and answers, and you have access to a library of online solutions on the Zookal website.
The app centers on one main tool, Ask a Question, which is where you can type out or snap a picture of your homework question. Additionally, Zookal is a study app you can use in any browser with an impressive selection of online tools ranging from test prep and textbooks to flashcards and videos.
Download: Zookal Study for iOS | Android (Free, in-app purchases available)
Access Homework Help When You Really Need It
Have you ever been stuck trying to handle your homework all by yourself? Well, you don't have to. Now, getting homework help is as easy as downloading one or a couple of mobile apps.
There are a range of handy homework apps available, with some using artificial intelligence and some using expert online tutors. And the good news is that these homework apps can work wonders for both students in school and students in college.

- Games Review
- Tips & How To’s
- Cloud Computing
- Machine Learning
- Online Tips

The 11 Best Loan Amortization Software

3 Best Video Quality Enhancer Software

How to Create a Slideshow on Windows PC?

The Best Top 5 Photo Editors for Windows 11

The Best Tool to Record a Video for YouTube
The 15 best study apps and homework apps for android.
Technology has entered every span of our life in this modern era. You can find technical support in almost every aspect of your life. So, why not use it in making your study plan? A study planner app can make your learning period more enjoyable than before. MyHomework is one of the best study apps. It has become very much popular since 2009. But some other myHomework alternatives can be your best study companion. If you are new to using apps that help you study, this article will be worth reading. Here I will show you the best Homework Apps like myHomework Student Planner .
What is myHomework Planner?
“ myhomeworkapp.com ” is one of the best Homework apps. It helps you to organize your study materials. It is trendy among English-speaking students. We can use this highly-rated app quickly. The free version of the myHomework app offers to organize your homework.
MyHomework app also helps to make your study schedule, maintain a homework calendar, etc. You can access other advanced features by buying the premium version at $4.99 annually. It will provide you with sharing options too. You may import homework and add accessible features to it.
MyHomework also accesses the external calendar option, attaches files with your study plan, etc. This app can sync between several devices. It shows you the upcoming homework widgets. But nowadays, the myHomework app is losing its efficiency. So, the users want to find other apps that can serve their purposes.
How Do You Use myHomework as a Student Planner?
MyHomework study planner app does not require any advanced knowledge to use it. Students can download this app from Google Play for their Android. Create an account using your email address to sign up. You should turn on the location of your device. It requires an internet connection to sync with the official website.
MyHomework Study Planner helps to design your study plan more precisely. After using the myHomework app, you will never have to waste your time remembering your to-do list. It will convert the premium version into a free version when the premium time expires.
How Can an Android App Help My Study?
There are many reasons a person cannot achieve maximum success in his study area. Lack of organizing quality is a common reason for it. You have to plan your academic activities properly to achieve maximum success. Laziness is a barrier to making correct plans. You may also face time managing problems while making a study plan.
A homework app can reduce this burden of your life. It can give you a well-organized plan for your study life. It is also easy to maintain a connection between the teachers, students, and parents. A digital app that helps you in your Study may offer incredible benefits. Those benefits can increase the outcome of your learning process to times more.
Significant Benefits of Using a Study App
1. Improving the organizing capacity: A study planner app makes you confident about organizing your study plan. Such an app can help you to track your classes and assignments. It can also remind you of the deadlines and take notes on necessary matters.
2. Increasing responsibility: A homework tool will make you responsible for completing the tasks you have planned in the application. The app can develop your commitment level. This app makes you accountable for working according to your study plan.
3. The achievement-tracking process: The best study planner apps will help you track your achievements. Those apps encourage a lot in your study area. This skill will help you to gain success throughout your whole life.
4. Creating Communication-line: A study planner significantly reduces the communication gap between teachers and parents.
5. Alternative to traditional study plan: A digital app can change your study planning experience. It will record your activities and help you to carry on your consistency. It also increases your concentration level. A study planner app gives you the motivation to study harder too.
Why Do You Need a myHomework Alternative?
MyHomework Student Planner app has some drawbacks, so we feel the requirements of some alternatives. The app is not working according to the desire of the users. There is a crashing problem in the app. Users are also facing problems in using this app on their Android devices. In some cases, the app is not easy to handle. Most of the users opined that this app was a great one when it arrived. But unfortunately, the myHomework Student Planner app has lost its previous glory and efficiency.
Best 15 Study Apps As myHomework Alternatives
MyHomework is undoubtedly one of the best study planner apps. But recently, there have been some terrible reviews of this app. So, users are now searching for some myHomework alternatives to get their work done. I’m here to inform you about the best study planner apps available for Android.
1. School Planner Pro- Best Homework App
You can trust School Planner Pro to find your study-related activities systematically. It is one of the best myHomework alternatives that will organize your study plan according to your wish. School Planner Pro is very suitable for teachers, parents, and students. This app works as a timely reminder. It notifies you about all your tasks. You can also determine your next lesson plan using the app.

The School Planner Pro app is free of cost. No advertisement will annoy you while using it. This app keeps a record of all your assignments and exams. The School Planner Pro offers a sharing option too. The app gives you an overview of what has happened recently and which event is nearby. This homework app also informs you of the essential notices of your school regarding tests, classes, etc.
Key Features
- School Planner Pro shows you detailed information about your school, including classes, tasks, assignments, exam results, etc.
- This app summarizes the most important events of your study plan.
- It is a great time management app for students.
- School Planner Pro can schedule all your tasks and never allows you to forget that.
2. My Study Life- School Planner

My Study Life is a free homework app similar to the myHomework app. More than that, it has a storage feature. This allows you to access your classes and other records from anywhere.
My Study Life offers you to sync your data on different devices. My Study Life is one of the best study apps that work as a great supporting hand in achieving the best result. The app is perfect for parents to track their child’s progress. There is no complaint about crashing the app while using it. My Study Life app integrates all the aspects of your academic life easier.
- My Study Life keeps track of your assignments, classes, and other school activities and keeps them safe in the cloud or other online drives.
- It also stores your essential exams, including revision tasks.
- This app manages your classes and helps you to follow the Timetable.
- It is one of the best apps, like myHomework that notify you about all your study events.

You can track your study plan here by importing items from Google Calendar. Chipper also has the option of setting a timer for your study period. But recently, a bug has been showing an empty event in the app. When the user clicks on that event, the app crashes. There is also an issue with the widget display.
- Chipper provides you with Study organizing plans by using a homework calendar.
- It reminds you to complete homework in due time.
- This app offers an effective learning process by helping to improve your study focus.
- The app contains a to-do list feature to track your daily progress.
- Chipper also motivates you to utilize your time through its ‘earning’ feature.
4. Class Timetable
Are you facing problems in maintaining your time? If yes, then Class Timetable can be the best app for you. This app is one of the best time management apps for students. Class Timetable offers your multi-week support along with homework planning features. It can help you track classes and assignments with no mistakes. This app also makes a schedule that you can follow easily.

Class Timetable contains an excellent color-filled interface. This feature removes the boredom of studying. The app also supports dark mode and home screen widgets. It contains data import and export options too. We can download the class Timetable free from Google Play.
- Class Timetable is one of the best-scheduled apps for school, college, and university students.
- It keeps track of your homework to organize your Study.
- This app notifies you about class time.
- Class Timetable reminds you to finish your home tasks and helps you to reach your goal.
5. Any.do – The to-do list, planner & Calendar

Any. do is a great planner app. It organizes your daily activities and gives you a precise plan of what you must do. You can find your daily activities according to your preference list.
Any. do app can play a significant role as your project tracker. This homework app will remind you of every pending work on your list. It improves its working capacity. They integrated this app with popular sites like Outlook, Google Calendaetcat App, Google Task, and Gmailetcty. Any.do app also contains note-taking facilities. This single app can re-organize your puzzled life planning and helps you to get the best result in your studies.
- Any. do app contains an advanced tracking calendar and reminder features.
- It offers sync facilities between different devices.
- This app provides you with an organized study plan.
- This app has a collaboration option with other friends about your Study.
- Any. do app Increases your productivity by working as an all-in-one planner.
6. Bartleby: Best Study App

This is one of the best study apps to solve problems using the question/answers feature. The app will assist you in studying Math , Social Science, Science, Engineering, Business, and the branches of these heads. You can find answers to your questions 24/7 using this app’s ‘digital key’ feature. This free app offers the fastest online service to solve your academic problems.
- Homework Helper & Homework Answers app solves the textbook Math problems using Bartleby’s math answer scanner and calculator.
- It can find the Bartleby homework helper’s answers to the History, Science, Engineering, and Business-related questions.
- This app offers you 24/7 online support to help you finish your learning.
- It supports the fastest reply features.
- The app provides you with an easy search option on their digital database.
7. Todoist: Best Homework App for Android

The Todoist Android app focuses on essential features like capturing and organizing the events in your mind, creating the study plan according to your priority level, fixing a due date to finish your task, etc.
Todoist is one of the best study apps to recognize your needs by typing simple info. This app can personalize your study plan. It is integrated with tools like Google Calendar, Amazon Alexa, Gmail, etc. The app offers syncing options between other devices. You can get a lock screen widget, quick add title, assistance, and notifications while using it in Androids.
- Todoist tracks your study progress and personalizes plans to record productivity.
- It organizes your activities very systematically.
- This app contains a collaborating option that helps you to share your plan with others.
- Todoist helps you to complete your tasks within the due date.
- It offers you an easily functional homework-tracking system.
8. Power Planner: Homework/Grades
Power Planner can take the place of one of the best myHomework alternative apps. This app is perfectly made for middle school, high school, or University students. Power Planner helps you to track your daily lessons. It also makes you aware of completing your assignments or homework. This app manages all your essential Study matters like semester plans, study schedules, etc.

Power Planner has enhanced its effectiveness by integrating with Google Calendar. This app made your study planning task easier. The widgets of this application allow you to know about your upcoming homework. You can also pin a widget for your convenience.
The Power Planner app supports grade and GPA calculations. Power Planner requires an online account. The paid version of this study planner app allows more advanced functions like adding over five grades per class, using multiple semesters, and so on.
- Power Planner manages your daily study plan effectively.
- It notifies you about upcoming home tasks.
- This app uses Google Calendar to track your activities.
- The app calculates Grades and GPAs perfectly.
- Power Planner offers an online sync option.
9. Easy Study

The Easy Study app can be one of the best apps like myHomework as it contains even better features than myHomework. Easy Study will organize your study plan in cycles. This feature facilitates you to review the subjects. The app effectively prepares students for a particular school, college, or higher studies exam.
- Easy Study offers a plan of the subjects you must study every day.
- This app contains an option to make a to-do list related to each study session.
- You can track the record of your study history (courses, duration of the Study, etc.) for each day, week, month, and so on.
- The app notifies the summary of your daily study plan.
- Easy Study allows you to customize your subjects with different colors mentioning the time you need to spend on each.
10. Student Calendar

The Student Calendar will track your study activities. It reminds you to finish your homework within the due time. By using the app, you will never miss a deadline for submission. It is like embedding Google Calender but for your studies.
The Student Calendar app makes a to-do list of your daily studies and highlights the important ones. When you complete the task, it will no longer remain highlighted. This app also groups your past and future study activities to help you to maintain the Timetable. This light-weighted, straightforward app can make your study life more organized and stress-free.
Student Calendar can be an alternative to the myHomework student planner app. Users can download the app from Google Play for free, but it also offers in-app purchases.
- Student Calendar proves its efficiency in managing your study timetable.
- The notification option of this app never allows forgetting your deadlines.
- This app creates a schedule for your study-related events and maintains a calendar.
- It also records the marks you have obtained in your exams.
- Student Calendar designs your plan according to the order by day, month, or year.
11. Task Agenda: Organize and Remember Your Tasks!

Task Agenda will turn your unsystematic study life into a well-organized one. It will show you ways to remember your daily tasks efficiently.
Task Agenda Personalize your routine with your favorite colors and widgets. It also notifies the work which you have finished. The app straightforwardly manages your activities. But this free app lacks in setting time duration for a task. Sometimes it doesn’t show all the events put there by the user. Still, the app is considered one of the best apps like myHomework.
- Task Agenda enables you to maintain your time in an organized way.
- It helps you to remember all your daily academic events and tasks.
- This app offers a personalized customizing option for your plan.
- The app is free of complexity, and everyone can use it.

Today app increases the productivity of your Study and makes you more confident. It helps to organize your substantial study materials and complete those systematically.
Today provides a study routine that lets you figure out which course you should start reading. It creates your habit regarding a routine-based study plan and remaining accountable to your academic plans. You must let the app know how many hours you want to spend studying each course a week.
Todait will divide your study materials and organize them according to your time. It is one of the best study apps available for free on Google Play, containing an in-app purchase option.
- Today app emphasizes more on your Study rather than planning for it.
- It shows your weekly study progress and manages your time perfectly.
- The app uses a calendar to track your activities.
- Maintaining a study diary and checking your activity list is an option.
- Today reminds you to finish your tasks and prevents you from being distracted by notifications from other apps using the ‘lockout mode.’
13. StudySmarter: Flashcards, Notes, Quizzes & Planner

You can access various online and offline study materials in this app. Study Smarter also provides sketch features to make hand notes and create a comprehensive study plan.
Study Smarter provides different features for three different categories of people- University students, School/college-going students, and one for everyone. It acts as an aid to study and helps you achieve the best result in your academic life. You can sign in free from different devices to use this app. This app offers an in-app purchase option too.
- Study Smarter helps you to create goals, make a routine, and track your progress using artificial intelligence.
- It provides your study statistics and summarizes the report.
- The app shares PDF files, class notes, lecture notes, flashcards, etc., to make your Study easier.
- It provides all the necessary tools to make you prepared for your exam.
- This app offers a sharing option that helps you learn more from the other students.
- Study Smarter also allows taking hand notes and sketches.
14. Egenda – School Planner & Assistant

Egenda offers the easiest way to record and find your study activities quickly. Add some classes in the app, add your assignment lists, and complete your home tasks. This app will manage your study materials perfectly. Egenda is an app requiring no subscription fee. After adding a task in the app, there is no option to delete and repeat it the following week. This issue might bother you a little.
- Egenda offers you a well-featured homework management option
- This app has a note-adding option.
- It sorts your assignments by order of classes, due date, and completion.
- The app always reminds you to finish your tasks in due time.
15. Trello: Study Apps

Trello can be an excellent companion in your academic life. The app minimizes your mental stress by making you an easy study plan. It records all your necessary articles and reduces your tension in remembering them. This free app also notifies you of your pending and completed tasks. It would have worked better to add a calendar for tracking activities.
- Trello offers you an easily maintainable study plan.
- This app Keeps a record of your study progress.
- It reminds you about critical academic events and deadlines.
- Trello offers an offline working facility.
Final Thoughts
So, after going through this article, I’m sure you will use an app that helps you study. You don’t have to worry about choosing any myHomework alternative now. This article will help you select the best Homework Apps to serve your needs. Don’t forget to share your feedback! And I hope you can solve your study problems with the help of these apps and reach the desired goal in your life.
- Best Homework App
- Best study apps
- knowing apps
- Learning Apps
- myHomework alternative

Related Articles
Internet service provider: the best isp you must have in 2024, top 10 best ssl certificate providers in 2024, top 12 most popular combat sports games in 2024, leave a reply cancel reply.
Save my name, email, and website in this browser for the next time I comment.
Latest Articles
The best 10 gst software for return filing in 2024, the 15 best pixel art games for your pc in 2024.
- Comment Policy
- Copyright Policy
- Privacy Policy
- Advertisement
- Log in Join
- Student Life
- Entertainment
- Student Magazine
- Competitions
- Submit Content

Golden Homework Apps to Boost Productivity and Learning
In today’s digital age, homework doesn’t have to be a solitary struggle. With the help of innovative apps, students can tackle their assignments more efficiently and effectively. Whether you need assistance with math, science, or language arts, there’s an app out there to lend a helping hand. In this comprehensive guide, we’ll explore the top eight homework apps available for Android and iPhone users. From AI-powered solutions to expert tutoring, these apps are designed to help students stay on track and excel academically. Clicking on “ help me on my homework ” will find you a great homework service to hire a helper for your homework tasks.
1. Homework.ai: Harness the Power of AI for Academic Success
Homework.ai is an app that leverages artificial intelligence to provide comprehensive homework help. With support for various subjects such as art, biology, computer science, math, music, and languages, Homework.ai is a versatile tool for students. Simply choose a subject, type or record your question, and let the AI-powered system do the rest.
2 . Bartleby: Get Instant Help from Expert Tutors
Bartleby is an app that combines AI-powered homework assistance with access to real tutors. With Bartleby, you can simply snap a photo, type your question, or add an optional image to receive prompt assistance from experts holding Masters or PhDs. The app also offers a convenient search feature, allowing you to find homework help based on specific textbooks or topics. Bartleby covers a wide range of subjects, making it a valuable resource for students across various disciplines. Whether you need help with math, English, science, or more, Bartleby has you covered.
3 . ScanSolve: Simplify Homework with AI Assistance
When you’re looking for quick and straightforward homework help, ScanSolve is the app to turn to. Powered by AI, ScanSolve provides answers and explanations for questions in subjects like math, English, and science. Simply take a picture of the problem you’re struggling with, and the app will provide a detailed explanation of the results. ScanSolve is designed to simplify the homework process, making it easier for students to understand and complete their assignments.
4 . Zookal Study: Connect with Experienced Tutors in Real-Time
For students who prefer personalised assistance from experienced tutors, Zookal Study is the ideal app. The app features an “Ask a Question” tool, where you can type or snap a picture of your assignment and receive timely responses. Zookal Study also provides access to a library of online solutions and a range of study tools, including test prep, textbooks, flashcards, and videos.
Homework no longer has to be a daunting task. With the help of these top-rated homework apps, students can enhance their learning experience, boost productivity, and excel academically. Whether you need assistance with math, science, language arts, or any other subject, these apps offer a range of features to support your academic journey. From AI-powered solutions to real-time tutoring, these apps provide the tools you need to stay on track and succeed in your studies.

Before you go! Have you read our Magazine?
Never forget a class or assignment again.
Unlock your potential and manage your classes, tasks and exams with mystudylife- the world's #1 student planner and school organizer app..

School planner and organizer
The MyStudyLife planner app supports rotation schedules, as well as traditional weekly schedules. MSL allows you to enter your school subjects, organize your workload, and enter information about your classes – all so you can effortlessly keep on track of your school calendar.
Homework planner and task tracker
Become a master of task management by tracking every single task with our online planner – no matter how big or small.
Stay on top of your workload by receiving notifications of upcoming classes, assignments or exams, as well as incomplete tasks, on all your devices.

“Featuring a clean interface, MyStudyLife offers a comprehensive palette of schedules, timetables and personalized notifications that sync across multiple devices.”
” My Study Life is a calendar app designed specifically for students. As well as showing you your weekly timetable– with support for rotations – you can add exams, essay deadlines and reminders, and keep a list of all the tasks you need to complete. It also works on the web, so you can log in and check your schedule from any device.”
“MyStudyLife is a great study planner app that makes it simple for students to add assignments, classes, and tests to a standard weekly schedule.”
“I cannot recommend this platform enough. My Study Life is the perfect online planner to keep track of your classes and assignments. I like to use both the website and the mobile app so I can use it on my phone and computer! I do not go a single day without using this platform–go check it out!!”
“Staying organized is a critical part of being a disciplined student, and the MyStudyLife app is an excellent organizer.”

The ultimate study app
The MyStudyLife student planner helps you keep track of all your classes, tasks, assignments and exams – anywhere, on any device.
Whether you’re in middle school, high school or college MyStudyLife’s online school agenda will organize your school life for you for less stress, more productivity, and ultimately, better grades.

Take control of your day with MyStudyLife

Stay on top of your studies. Organize tasks, set reminders, and get better grades, one day at a time.

We get it- student life can be busy. Start each day with the confidence that nothing important will be forgotten, so that you can stay focused and get more done.

Track your class schedule on your phone or computer, online or offline, so that you always know where you’re meant to be.

Shift your focus back to your goals, knowing that MyStudyLife has your back with timely reminders that make success the main event of your day

Say goodbye to last minute stress with MyStudyLife’s homework planner to make procrastination a thing of the past.

Coming soon!
MyStudyLife has lots of exciting changes and features in the works. Stay tuned!
Stay on track on all of your devices.
All your tasks are automatically synced across all your devices, instantly.
Trusted by millions of students around the world.

School can be hard. MyStudyLife makes it easier.
Our easy-to-use online study planner app is available on the App Store, the Google Play Store and can be used on desktop. This means that you can use MyStudyLife anywhere and on any device.
Discover more on the MyStudyLife blog
See how MyStudyLife can help organize your life.

JEE Main 2024: Best Tips, Study Plan & Timetable
Las 10 mejores apps gratis para estudiar mejor en 2024 , filter by category.
- Career Planning
- High School Tips and Tricks
- Productivity
- Spanish/Español
- Student News
- University Advice
- Using MyStudyLife
Hit enter to search or ESC to close
The Best Homework App for Students in 2021
The education sector keeps evolving, and with various ed-tech startups and online learning, things have changed a lot in the past few years. This has not only led to an extra burden on students but also increased their homework and assignments.
Homework planners and apps are a great way to track your child’s progress and get them the help needed with critical questions that may bother them. Students can easily download the below-listed applications and stay updated about their lectures, homework, tests, and projects, making it easier to follow up with the homework and stay productive in study sessions.
Another use case of such apps is in the digital world right now. Along with the apps, your child should know how to type on a keyboard, and hence those typing programs would now come in handy.
If you, as a student or a parent and are confused with which homework app to go for, we have brought you this article with the nine best homework apps to do the dealbreaker, so read ahead to find more!
9 Best Homework Apps For Students
Take a look at the best picks of homework apps for students which will ease their workload and help them keep up with their study schedules:
Evernote

A great way to go paperless and keep your work organized, Evernote is an excellent app for students and professionals to work with. It is an efficient note-taking apl that helps students and workers arrange their thoughts and ideas in a singular app.
Work anywhere with Evernote as it automatically syncs every note you take in the device to never lose any critical file at the last moments of presenting in a seminar or lecture. If you ever plan to change devices and worry that your notes disappear, the sync option allows you to download them easily from your cloud.
With Evernote, make your notes more captivating and engaging by the features of adding images, audio files, documents, scans, and PDFS. You can also create tasks in your notes to keep up with your lectures and get consistent output.
Evernote also provides a smart way to save and access notes with its fast search option, saves your scrolling time, and gets your notes displayed instantaneously on your screen. Compact and minimalistic, as a student, you can set goals, lists, schedules, important contacts, and shortcuts to compile your schoolwork in just one application.
Evernote is the best pick for note-taking and homework planning apps for both students and workers, providing three different plans, from the basic being free to use to premium plans for professionals.
- Sync and organize your notes.
- Web clipper.
- Bring your notes and to-do lists together.
- Connect your schedules and notes in the Calendar.
- Templates for faster note-taking.
- Search panel to find your homework.
- Go paperless with document scanning.
Class Manager
Specifically designed for students looking to organize and arrange their homework and work according to their schedule, Class Manager is a great way to handle your school and college projects and works right from your iOS device.
Plan your classes, assignments, homework, and submissions with the Class manager to always be on time and never miss a deadline. With Class Manager, students are provided with a user-friendly interface to link their assignments with class and sort them out based on submission dates, completion status, priority, and the class it belongs to.
As mentioned in reviews by students, the best feature is that you can set multiple reminders for homework to keep yourself on track. The app will notify you of the due dates of each homework so you will never miss out on your work.
The app covers a wide variety of subjects from Economics, science, computer, math, etc., for homework. You can get easy help from tutors by simply clicking on the “get help” button below every homework assignment.
The Class Manager is a one-stop app to view all your assignment details and class lists to make an excellent pick for students looking to keep up with their classes and homework.
- Know the due dates of homework.
- Set up homework reminders.
- View schedules and class lists.
- Seek tutor’s help for homework.
- Plan your schedule easily.

Chegg is the top pick for students looking to get instant results for their homework doubts with the best study tools. It is one of the best writing apps in the market right now that helps your kid with homework.
Chegg has excellent 24/7 assistance from experts and qualified professors. Simply snap a picture of the problem or query in your assignment, upload, and get your answers in less than 30 minutes!
The app also provides results for similar homework problems for better explanation and a clear understanding of the concept. Their vast libraries of answers give you access to almost all the problems that may stop you from finishing your assignments on time.
500+ flashcard revision helps to memorize faster and tests customized for your courses to have hands-on practice of topics and chapters. Expert proofreaders analyze your tests, so rest assured and get your assignments checked within 24 hours.
Designed for personal use, track your progress, and update your dashboard to the list of concerns and pointers you wish to work on and get better write-ups with plagiarism checks and citations with Chegg.
- Homework help.
- Exam preparation and practice.
- Videos related to concerning subjects and topics.
- Subscription-based app.
- Plagiarism check and expert proofread.
My Study Life

Say goodbye to your paper planner with the My Study Life app! Easy to use and free of cost, you can organize your lectures, exams, and assignments without missing a due date.
My Study Life aims to make your student life easier to manage with great features to keep up with your school or college. The app supports week and day rotation timetables and traditional weekly schedules to check on your lectures and important seminars to attend.
Keep track of your homework and projects to stay updated and productive with your subjects of interest with the to-do lists. Reminders and notifications allow you to figure out incomplete projects and upcoming lectures and exams with the My Study Life app.
The app is compatible with all Android, iOS, and Windows systems, so worry not about missing out on the download button! With the cross-platform feature, keep your notes synced and accessible on various devices from anywhere without losing notes you finished making.
- Compatible on all devices.
- Easy to use and access.
- Free of charge.
- Reminders and to-do lists.
- Organize and manage your planners.
iStudiez Pro

The best choice for any student, get your daily schedules and tasks just at one glance with the iStudiezPro app.
The real-time mode feature of this app only shows you the upcoming schedules and what may happen shortly. It makes the application more manageable and easy to use for students looking to keep their planners in check.
Avoid using sticky notes for jotting due dates and assignments; with this app, you can efficiently deal with the mess of your homework by tabulating all its details in one column and assigning it to your homework. You can sort your tasks based on dates, priority lists, set the due dates, and also track your exam marks all in one.
Not only this, you can edit and change the priority and status of your homework with just one click. Plan your classes with an excellent planner feature to check your lectures, teachers, holidays, and grades. You will get your subjects sorted based on your GPA and quickly access and edit your classes with the planner.
Have your notes synced and accessible on any device with the cloud sync feature of iStudiezPro to have your school projects right on your screen in a second!
- Multi-feature planner.
- Grade calculator.
- Cloud-sync.
- Two-way integration with Google calendar.
- Reminders and notifications feature.
Quizlet

With new expert explanations, an AI Learning Assistant, and effective flashcards, Quizlet is the best stop to get every kind of help regarding school projects and homework.
Quizlet offers a step-to-step solution to every query from 64 different subjects, so you will not run out of help at all. It has become the most popular online learning tool in the US, with advanced learning features and various topics covered to help students.
The more you try and recall a piece of information, the better you remember it. Quizlet offers study tools based on flashcards to maintain consistent learning amongst youngsters and students.
90% of the students reported an upgrade on their marks with Quizlet as it focuses on question types designed for efficient studies, such as MCQs instead of long answer types. The learning assistant of the application also helps you set goals for your studies to achieve better and progressive results.
With pretesting, Quizlet’s assistant helps you fix your tasks of learning a lesson more effectively than mugging up all the subjects and remembering nothing. Pretesting will keep your recalling power in check between attempting a test for the subjects of the matter.
- Flashcards for better learning.
- Learning AI assistant.
- MCQ-based questions.
- Homework helps with step-to-step guides for tough questions.
- Millions of study sets.
iHomework

A perfect schoolwork organizer, iHomework is a great portable buddy for iOS devices. With this app, keep your works organized to get them done on time.
With the planner feature, the app encourages you to start your work timely instead of procrastinating. Easily organize and view assignments daily to keep up with your deadlines and work progress at its best.
A complete calendar view gives access to all the assignments and pending tasks to keep track of your works and estimate the difficulty of the task you face.
Keep all your essential files segregated according to your liking and access them easily with unique taglines to check your tasks and quickly get to your goals.
With iHomework, you can see the progress in your studies and track your grade progress. The grading insight feature gives you an easy graphical representation of just the way you get graded in school.
Manage your courses with the Organizer to keep all your contacts in place and get your grading answers right from the website without having to bug your teachers for questions! With the iMessage feature, you can also send your assignments to and fro and drop quick emails to teachers and colleagues.
Now track your due dates and pending works right from your Apple watch with the application featured in the device. With premium subscriptions, you can make the most out of iHomework!
- iOS compatible only.
- Planner-based application.
- Track your work and grades.
- Keep frequent contacts and quick messaging features to send assignments.
Khan Academy

A non-profitable organization, Khan Academy provides free education to children all across the globe. The application uses interactive features to help students plan and progress their studies with free access from anywhere.
With personalized learning, students get to plan their courses at their own pace of learning and understanding. It makes focusing easier and memorizing constant and fun with various courses to target students’ weak spots.
The application is made using the knowledge and guidance of trusted professors worldwide to provide study materials from K-12 along with competitive tests like SAT and LSAT. You do not have to invest a penny to get your hands on the modules, as it is completely free for teachers and students.
A learning dashboard gives the students freedom to modify and plan their courses to their needs, along with practice test papers and educational videos linked to the topic of interest.
Khan Academy can be said to be the best app for homeschooling and learning at your own pace.
- Free to access.
- Learn anytime and anywhere.
- Practice tests and a progress dashboard.
- Various courses to learn.

Introduced by Google and powered by Google AI, get the pressure off your shoulders and find answers to questions with the Socratic app.
Simply ask Socratic questions, and it will search the entire web to give you the perfect answer to finish your homework and assignments on time. Supporting a high-level education, the app is built to provide the best sources of information to young learners and students.
With Socratic, you can easily tackle a doubt that stops you from progressing by finding guide videos, clear explanations, and visual concepts to get the best out of learning.
Wake the app by your voice or camera to ask questions and connect to the multi-space of online education resources and guides for a perfect outcome.
Free to download from the Play store, Socratic currently supports doubts and queries from subjects like Algebra, Geometry, Trigonometry, Biology, Chemistry, Physics, History, and Literature.
- Google AI feature.
- Interactive and user-friendly.
- Get results for doubts quickly.
Microsoft Math Solver

Are you looking to get help in solving challenging mathematical problems? Microsoft has come up with an excellent application called Math Solver for students struggling with different topics in math and algebra.
With the Microsoft Math Solver, you will get immediate calculated answers to complex math problems concerning pre-algebra, algebra, trigonometry, and calculus. Simply put your query in the type box, and press enter to get a step-by-step guide on how to do the problem.
You can also easily create graphs of problems with the graph chart provided in the application to map relations between variables and check their values. With additional learning content and videos, you can get more out of the app for topics you want to learn more about in maths sections.
Minimalistic and straightforward in function, get the best out of the app, which comes in various languages for easy interpretation of mathematical problems.
- Quickly solve any math problem.
- Additional content related to the topic of concern.
Homework apps and planners are of great help for students to keep their progress up and track their workload and dues on assignments. With these apps, students can learn time management and boost their learning to achieve better grades and touch their subject goals.
In this article, we talked about the top nine picks we have reviewed and gathered on Homework apps and hope that it has been helpful to find the right one for you. So, happy learning to all!
Is there an app that answers homework?
Chegg is the best choice of app that answers homework quickly. All you have to do is click a picture of your homework doubt and notify the solution within 30 minutes.
About yogome
6 best robot building kits in 2021, 8 best spelling apps in 2021.
10 Best Homework Planner Apps for Students To Use in 2023

If you’re a student, you know life can get pretty busy. Between classes, extracurriculars, and the mandatory fun of being in college, it’s hard to find time for everything else—including homework! Students look for cheap homework help to complete their assignments, Homework Planner Apps can be lifesavers.. The good news is that today’s students have access to more tools than ever to help organize their workload.
Top Ten Homework Planner Apps to Keep You on Top of Your Assignments
Homework planner apps have emerged as indispensable tools, offering features such as assignment tracking, reminders, and scheduling functionalities. These ten apps cater to various student needs, ensuring efficient management of coursework and deadlines. Whether you’re juggling multiple classes, extracurricular activities, or personal commitments, incorporating these homework planner apps into your routine can significantly enhance productivity and alleviate the stress associated with academic responsibilities.
My Study Life
My Study Life is the perfect app for students who need help staying organized. You can create a study plan and add notes, reminders, and to-do lists. You can also track assignments on this app, which will come in handy when recording your grades.
This free homework planner apps lets you add multiple subjects to your study plan. If you’re enrolled in multiple classes at once, this is a great way to keep track of them. This feature also makes it easy for you to share your schedule with other people. Parents or guardians who want extra assurance that their kids are doing well in school, teachers are looking over their students’ progress. Is anyone interested in knowing what classes they have taken on any given day?
myHomework Student Planner
myHomework Student Planner is a free app that helps students keep track of their homework and schedule. It has all the features you need to organize as a student: a calendar, a to-do list, and a schedule planner. The calendar can be customized by adding events, classes, and assignments you have. The to-do list lets you organize your tasks by the due date or priority level, so you keep track of what needs doing and when.
The schedule planner makes it easy for students to see what’s coming up in their day or week with its color-coded blocks for each day of the week (along with weekends).
ClassUp is a free app for students to help them plan, track and manage their homework. It has many great features that allow you to plan your school schedule. Set reminders and even share your homework with other students in the class. You can also get feedback from teachers and parents.
This app is perfect because it gives you the tools you need to be fully prepared for everything that comes with being a student—especially when it comes to keeping up with those pesky tasks like writing papers or completing projects.
Wunderlist is a free, cross-platform app that allows you to create and manage lists in various ways. You can add due dates, set reminders, add notes to tasks and even add files to your tasks.
Unlike many other task management apps that only allow one level of subtasks (aka “subtasks”). Wunderlist allows you to create as many levels of sub-tasks as your heart desires! It also has useful features like comments on individual items (valuable if you have a team member working with you). And sharing lists with other people via email or the built-in messaging system (perfect for homework assignments).
Get Organized
Get Organized is a free app that helps students manage their time and stay on top of their assignments. The app is available for Android and iOS devices. It allows users to create a daily schedule, set reminders for upcoming assignments, and view class schedules. You can take notes during class, share information with other students or teachers, track grades, and more.
Studious is a free app that makes it easy for students to manage their time and stay organized. It has a clean and intuitive interface with a lot of valuable features. This homework planner app has won many awards, including Best Student App in the Google Play Store Awards 2017.
Studious lets you create subjects, assign tasks (like assignments or studying), set due dates and reminders—even add files from Dropbox or Google Drive. With Studious, you can even set up collaborative projects with other students in your class. So everyone knows their responsibilities regarding group work, like sharing notes and planning group projects!
The best thing about Studious is that it syncs across all your devices. Desktop computers (Mac or PC), Android phones/tablets/Chromebooks/etc., iPhone/iPad devices using iCloud…the list goes on!
SnapHomework
SnapHomework is a free app for iOS and Android that can help you plan, track and manage your schoolwork. It’s great for students who need to organize their assignments, stay on top of deadlines and keep track of what they have or still need to do.
StudyBlue Flashcards & Quizzes
With the StudyBlue app, all your flashcards and quizzes are in one place. Even better, you can share them with friends and classmates. The app has a built-in social network that allows users to interact with one another by creating their study groups. Ask each other questions about homework or help and share notes or other educational materials as needed. The best part? All these features are entirely free!
Panther Connect Mobile
Panther Connect Mobile is a mobile app that allows students to access their PantherConnect account. The app lets students directly check their grades, assignments, and class schedules.
Panther Connect Mobile also offers quick links to other resources on campus, including. Accommodation & Residences, Athletics & Recreation, Auxiliary Services & Governance Services Office (ASGO), Bookstore, Library, Medical Clinic, and Student Affairs & Enrolment Services.
Students can create folders within their mobile devices to store important documents such as scanned assignments or syllabi. The app also allows them to take photos of whiteboards in a lecture hall and save them as PDFs. So they don’t have to draw out the notes themselves later!
iStudiez Pro Legend
iStudiez Pro Legend is a student planner app that helps you manage your assignments, exams, and overall schedule. It has a simple interface that makes it easy to use on iOS and Android devices, and the data syncs across them. You can also add reminders to attend all assignments and exams.
There are so many great apps out there that can help you organize your homework and make sure you’re on top of things. We’ve highlighted our picks for the best planners for students, but there are also tons of options available to every type of student. Whether you need an app to keep track of your assignments or want a way to stay organized, there’s something here for everyone! With the convenience and efficiency of homework planner apps included, students can easily manage their workload and excel in their studies.
Leave a Reply Cancel reply
Sign in to your account
Username or Email Address
Remember Me
The Edvocate
- Lynch Educational Consulting
- Dr. Lynch’s Personal Website
- Write For Us
- The Tech Edvocate Product Guide
- The Edvocate Podcast
- Terms and Conditions
- Privacy Policy
- Assistive Technology
- Best PreK-12 Schools in America
- Child Development
- Classroom Management
- Early Childhood
- EdTech & Innovation
- Education Leadership
- First Year Teachers
- Gifted and Talented Education
- Special Education
- Parental Involvement
- Policy & Reform
- Best Colleges and Universities
- Best College and University Programs
- HBCU’s
- Higher Education EdTech
- Higher Education
- International Education
- The Awards Process
- Finalists and Winners of The 2022 Tech Edvocate Awards
- Finalists and Winners of The 2021 Tech Edvocate Awards
- Finalists and Winners of The 2020 Tech Edvocate Awards
- Finalists and Winners of The 2019 Tech Edvocate Awards
- Finalists and Winners of The 2018 Tech Edvocate Awards
- Finalists and Winners of The 2017 Tech Edvocate Awards
- Award Seals
- GPA Calculator for College
- GPA Calculator for High School
- Cumulative GPA Calculator
- Grade Calculator
- Weighted Grade Calculator
- Final Grade Calculator
- The Tech Edvocate
- AI Powered Personal Tutor
College Minor: Everything You Need to Know
14 fascinating teacher interview questions for principals, tips for success if you have a master’s degree and can’t find a job, 14 ways young teachers can get that professional look, which teacher supplies are worth the splurge, 8 business books every teacher should read, conditional admission: everything you need to know, college majors: everything you need to know, 7 things principals can do to make a teacher observation valuable, 3 easy teacher outfits to tackle parent-teacher conferences, 10 apps to help students with their science homework.

Science can be hard. Science homework can be harder, especially when the teacher isn’t there to help. Many parents now are struggling to help students with their STEM and Common Core aligned science homework, no matter what specific scientific branch it is.
Rather than spend money on a tutor, surf the Internet for hours, or try to squeeze a few minutes out of a teacher’s free time, students can, instead, use these ten apps to help themselves with their homework. This way, students can take charge of their own learning and homework skills.
#1 The Chemical Touch
This amazing resource will help students ace Chemistry. A full periodic table is given on the app. Once a student touches a specific element, they can study it more in depth such as its atomic mass and properties. It also has an amino acid chart with in-depth information. Each element and amino acid also have a link to a Wikipedia article for more information.
#2 Frog Dissection
One of the most stereotypical science experiments, frog dissecting, can now be done virtually. For students who get queasy or who would prefer to avoid this experiment due to religious reasons, this app is a perfect alternative for them. Featuring step-by-step instructions, there is plenty of in-depth information on each of the frog’s organs including anatomical comparisons to human organs.
#3 Kahn Academy
With over 40,000 interactive Common Core aligned practice questions and over 10,000 videos and explanations in math, science, economics, history, and more, Kahn Academy is the perfect app for students of all ages to study. Kahn Academy is free of charge and is the perfect study resource and tutoring app for students who are struggling in science (as well as other subjects).
#4 Stephen Hawking’s Snapshots of the Universe
Based on the writings and work of Stephen Hawking, one of the world’s most renowned scientists, this app is a wonderful interactive source of information for space science. This app includes 10 interactive experiments and video segments to help students study our universe.
#5 NASA Visualization Explorer
Perfect for expanding upon concepts learned in class or research for projects, this NASA app helps students explore our universe even more. With articles and visuals, students can discover more about the earth, the solar system, and beyond in depth. NASA adds new stories every week to keep the app and its information up to date.
#6 Project Noah
Project Noah “is a tool to explore and document wildlife and a platform to harness the power of citizen scientists everywhere.” This app is a great way to get students involved in biology and ecology at home with interactive homework assignments. Rather than studying animals and plants from a textbook, students can go out in nature and take pictures of their assigned plant or animal. They can even earn “badges” which also makes this a great app for the Boy Scouts.
Students studying for the SAT, chemistry, or physics can get extra help and explanations with this app. Employing experts in the STEM standards, students can upload a snapshot of their homework question and get one-on-one help to understand the problem. Students get a free 10-minute session for each problem. It even includes SAT prep questions and practice tests.
#8 Anatomy 4D
For high school and college students, Anatomy 4D is a great resource for studying anatomy. Students can study specific parts of the body or the entire body. Views can be switched from male body to female body. Views are in 3D to give a more life-like experience to students using the app. Information is also available for students to read as they study specific organs or systems.
#9 Physics Calculator
High schoolers who need extra help with their physics homework can benefit from this app. With fill-in-the-blank equations for kinematics, motion, energy, power, gravity, temperature, thermodynamics, and many more physic properties, this app is a quick solving tool for those hard to answer physics problems.
#10 iCell App
Studying the cell became easier with this 3-D cell app. Students can view the cell structures and dynamics for plants, animals, and bacteria. There are even different levels of information for students varying in age and grade level. Students can zoom in on different parts of the cell and compare cells with each other. It even includes color-coded DNA and more in-depth information about cell size and scale, skin, and much more.
This list is not all-inclusive—there are many more apps in all the branches of science available as resources and interactive games to help students study and learn more about science. By relying on these apps, students can learn more about science while doing their homework and develop a love of learning on their own time.
Black Boys in Crisis: The Poverty Paradox
The edvocate’s list of 13 assistive technology ....

Matthew Lynch
Related articles more from author, false positives: low student loan default scores.
Ineffective assessments, part VI: More digital access needed
Peer Feedback: How Students Can Learn More while Saving Teachers Time

How Did We Get Here? Part II: Early Learning in America

Personalized Learning Starts with Less Teacher Talk, More Student Voice

Case Study: ASB Online School
- Home (current)
- App Categories
- App Reviews
- English Learning Apps for Kids
- Alphabet Apps
- Spelling Apps
- Math Resources
- Multiplication Apps
- Science Apps
- Chemistry Apps
- Physics Apps
- AI Tools Directory
- AI Tools for Education
- Apps for Parents
- Apps for Students
- Augmented Reality Apps
- Computer Science Apps
- Coloring Apps
- Special Education Apps
- Language Learning Apps
- Best of Lists
- Apps for Education
- Best Maths Apps
- Best Apps for Kids
- Free Apps for Kids
- Toddler Apps
- Preschool Apps
- Kindergarten Apps
- EdTech Articles
- Game Reviews
- Brain Training Apps
- Brain Games for Kids
- Word Game Apps
- iPad Games for Kids
- Free Games for Kids
- Website Reviews
Best Websites for Kids
- Preschool Websites
- Math Websites for Kids
- Submit your App
- How we certify apps
- AI Assessment
- Try for free
Best AI Tools for Homework

As a student, homework can be a daunting task. You may often feel overwhelmed by the sheer volume of assignments, or frustrated by the difficulty of certain questions. But what if there was a way to make homework easier?
Enter artificial intelligence (AI) tools. AI has the potential to revolutionize the way students learn and do homework. By using AI tools, students can access vast amounts of information quickly and efficiently, and get help with complex problems.
Here is the list of the best AI tools that will help you with your homework and expand your knowledge on different subject matters.
ChatGPT is a helpful tool for students who are struggling with their homework. It can provide step-by-step explanations for math problems, generate code, write essays, translate text, and answer questions about a variety of topics.
ChatGPT can generate code in a variety of programming languages, which can be helpful for students who are struggling with their computer science assignments. ChatGPT can write essays, stories, and other creative writing assignments. This can be helpful for students who are struggling with their writing assignments or who need help coming up with ideas.
ChatGPT can answer questions about a variety of topics, which can be helpful for students who are struggling with their homework or who need help with research.
2. Socratic
Socratic, a revolutionary app powered by Google AI, transforms how students learn and complete homework assignments. With its advanced artificial intelligence technology, Socratic offers step-by-step solutions to problems in various subjects, including math, science, and history. Whether students prefer to snap a picture of a problem or type in a question, Socratic generates detailed solutions complete with explanations and helpful tips.
Using cutting-edge machine learning algorithms, the app recognizes different questions and provides relevant responses. Furthermore, Socratic includes video explanations and interactive quizzes, enabling students to understand the material better. With its user-friendly interface and reliable solutions, Socratic is a must-have resource for students looking to enhance their academic performance.
3. Oddity AI
Oddity AI is an innovative tool that lets students get the homework assistance they need simply and conveniently. All they have to do is sign up with their email and choose from a wide variety of subjects, such as math, science, literature, and history. They can ask any question and get clear and detailed answers.
Oddity AI is more than just a homework solver. It's also a learning enhancer. The app uses natural language processing and machine learning to help students grasp the core concepts of each topic. It gives personalized suggestions and feedback to help students boost their understanding.
Oddity AI is easy to use and fun to explore. It's a great tool for students who want to improve their academic skills. So if you're stuck on a hard math question or need help analyzing a complex literary work, Oddity AI is here to support you.
Price:
Smodin is designed for students that want instantaneous answers to homework problems. It is designed for students who want to see related information on problems to their homework they cannot easily get from searching on the web. Smodin is also designed to be a replacement for most tutor-related needs.
Their AI student answer generator can help students review material more effectively and efficiently. They can also provide students with automatic feedback and suggestions that they should incorporate into their work or study practices.
Smodin will search their large question-and-answer database as well as the internet for the solution to your question. It can help popular languages such as Spanish, Portuguese, Italian, Russian, Arabic, German, French, Norwegian, and many other languages.
5. Tutor AI
Tutor AI is a revolutionary digital tool that harnesses the power of artificial intelligence to offer students unmatched homework help. Its advanced natural language processing features allow students to pose questions. The app provides detailed answers and explanations across various subjects, from math and science to history and literature.
With its easy and friendly interface, Tutor AI gives personalized, trustworthy support to students who want to improve their comprehension of coursework and excel academically. Whether you’re dealing with tricky algebraic problems or exploring the subtleties of a Shakespearean poem, Tutor AI is the ultimate partner for any student aiming for academic excellence.
6. AIR Math
For students struggling with math, homework can be a source of frustration and stress. That’s where AIR Math comes in – an innovative new tool that harnesses the power of artificial intelligence to provide personalized assistance and instant feedback on math problems.
Using advanced machine learning algorithms, AIR Math analyzes the steps taken by students in solving problems, providing real-time feedback and guidance to improve their understanding of key concepts. This intuitive interface offers detailed explanations and step-by-step solutions to various math problems, making it an invaluable resource for students seeking to boost their math skills and confidence.
With AIR Math, students can enjoy the benefits of personalized assistance tailored to their learning style and pace. Whether you’re struggling with algebra, geometry, or calculus, this AI-powered tool has you covered. So say goodbye to hours of frustration and confusion – and hello to a world of math mastery with AIR Math.
7. Grammarly
In today’s fast-paced world, effective communication has become more critical than ever, and Grammarly is the perfect tool to ensure that your writing stands out. With its cutting-edge AI technology, Grammarly has become one of the top homework-help tools for students, professionals, and writers.
One of the primary reasons for Grammarly’s immense popularity is its ability to identify and correct grammatical, punctuation, and spelling errors. Whether you’re working on a writing assignment, essay, or research paper, Grammarly provides helpful suggestions to improve the clarity and conciseness of your writing.
Grammarly also goes beyond correcting mistakes by providing detailed explanations and suggestions for improvement. As a result, it has become an invaluable educational resource for students looking to improve their writing skills.
Are you tired of struggling with your homework? Look no further than AISEO, the AI-powered writing tool that provides many features to help students excel academically. Although not exclusively designed for students, AISEO is highly effective in generating answers and helping with paraphrasing. Utilizing advanced algorithms and natural language processing capabilities, AISEO offers instant solutions and insights for various academic subjects. With the convenience of its Chrome extension, students can easily access its features from any location on the web.
Whether writing essays or seeking answers to complex questions, AISEO is the go-to resource for students looking to improve their academic performance. So why struggle with homework when AISEO can help you achieve your educational goals?
9. Nerdy Bot
Nerdify, the education technology company, has developed a cutting-edge AI tool called Nerdy Bot to revolutionize how students approach their homework. Using the latest advancements in natural language processing and machine learning, Nerdy Bot can provide students with instant answers and detailed explanations for a wide range of academic subjects, including math, science, history, and literature.
The tool is designed to quickly analyze a student’s question and generate a response in seconds, making it an efficient and reliable study companion. With its intuitive chatbot interface, Nerdy Bot is easily accessible to students of all ages and skill levels, making it an ideal tool for anyone seeking help with their homework. In addition to providing instant answers, Nerdy Bot offers personalized feedback and recommendations to help students improve their understanding of complex topics. So whether you’re struggling with a difficult math problem or need help analyzing a literary work, Nerdy Bot has covered you!
10. Explain Like I’m Five
Have you ever struggled to understand a difficult concept while doing your homework? Well, fear not! ELI5 (Explain Like I’m Five) is an innovative AI tool to help you. This user-friendly tool simplifies complex ideas and concepts, making them easy to understand. The name “ELI5” perfectly captures the essence of this tool, as it breaks down complex topics into simple and engaging language that is easy to comprehend.
Currently, in beta, ELI5 uses advanced natural language processing algorithms and machine learning to analyze your question and provide a clear and concise answer. By leveraging the power of AI, ELI5 helps students to learn more effectively and efficiently, making homework a breeze. Furthermore, with its conversational tone and playful language, ELI5 is an ideal resource for students looking to improve their understanding of various academic subjects. So next time you struggle with a challenging concept, just ask ELI5 for help and watch your understanding grow!
These are just a few of the many AI tools that can help students with their homework. With so many options available, you're sure to find the perfect tool to help you succeed in school.
You may also like:
- AI Tools for Math Students
- AI Story Generators
- AI Writing Tools
- AI Video Generators
- AI Presentation Makers
See Our Rating and Review Process | Meet Our Review Board

Similar Best App Lists
AI Tools for Teachers
Best AI Note Taking Apps for Students
Best AI Presentation Makers
AI Story Generator
Best AI Tools for Education
To access all the app lists
Recent Posts
- Financial Literacy for Kids
- Artificial Intelligence (AI) for Kids
- Benefits of Personalized Learning
Most Popular
- Apps for Schools
- Apps for Kids
Related Content

AI for Education Learning Hub

How can Teachers use AI to Save Time
Best Apps to Improve Math Skills for Adults
35 of the BEST Educational Apps for Teachers (Updated 2024)
There are so many different educational apps for students out there, and because we have such busy schedules, it can be a bit of a gamble choosing the right ones, especially as they can sometimes take a while to set up with all of our classes.
This has certainly been the case for me; I start the year intending to break out all the bells and whistles, but I end up getting bogged down in the everyday running of my classes and the thought of investing time in researching apps and getting them set up seems too bigger task.
In this post, I review 35 of the most popular and innovative teacher apps. They are not ranked in any order.
Which ones will you be using?
I have arranged the educational apps reviews into the following sections:
- Classroom Management.
- Learning and Assessment.
- Augmented Reality.
Classroom Management Classroom Apps For Teachers
1. google classroom.

Google Classroom is excellent.
I have been using it for a couple of years now and it has revolutionized my teaching.
It pulls together all of the G-Suite apps (Docs, Slides, Sheets and Draw).
Teachers can create assignments and announcements for individual classes. They can attach worksheets slideshows or weblinks (along with many other things) and set deadlines.
The work can be marked/graded and returned to students for further work.
When a student completes work it gets saved automatically to their Google Classroom class folders in their Google Drive (these are set up automatically). All work is saved securely. Students may submit class comments that are viewable to all students and teachers assigned to that “Classroom”, this leads to collaborative working.
Students may also submit private comments to their teachers if they require assistance and don’t want to share their questions with the rest of the students.
For further reading, I have written an entire review post; The Definitive Google Classroom Review. 2020 Update , it breaks down in detail, from my own experiences, everything Google Classroom can do.
2. Apple Classroom

Whilst the name “ Apple Classroom ” suggests a similar app to Google Classroom the two are vastly different.
Apple Classroom is an iOS and macOS app that is a student monitoring solution.
If you have Apple devices in your school or class then this app is fantastic, it allows teachers to monitor what students are doing on their Apple devices. You can see what they are doing and see what other apps they have open (handy for those sneaky game players!) but that’s not all, you can actually control their device! It’s great for behavior management.
On the surface, this seems like a simple app to dictate what students are doing but it is way more. You can open apps or web pages on all devices and lock them so they can only see what you are controlling, an excellent idea for guided lessons.
Although only available on Apple devices it is a great tool with huge scope for use in the classroom.

iDoceo is fantastic if you use an iPad to manage your classes at school.
I have used it for several years and would be lost without it!
However, it is only available on iPads. It is a planner, diary, schedule and grade-book, it also contains seating plan configuration tools (including my favorite…the randomizer!)
You can create classes and import class data from other sources. One of the best features of iDoceo is that you can add files and resources to any of your classes bulletin boards and send individual and bulk emails to your students.
It is a great app and will definitely make your life easier. At present, it costs $11.99 in the US and £11.99 in UK.

Vivi is awesome! It is a wireless presentation and screen mirroring tool (it allows all students and teachers to see the same screen on their devices).
Students and teachers can annotate and save content in real-time. It can be used by all devices (so no worry about whether students have Apple, Microsoft or Android etc. devices).
It requires a Blue box to be plugged in your classroom which allows you to be free to move around the class untethered! It is quite costly (about US$300 or £230) so in my opinion its a solution that needs to be bought by your school.
However, if you do get them in your school I’m sure you will love them.
5. Flipgrid

All your students need to use Flipgrid is a device with a camera.
Basically, students can record video responses to topics or questions you set. in this day and age, students spend huge amounts of time on social media, this app allows that ethos to be bought into the classroom and hopefully this fervour to translate into classroom engagement.
It also has the benefit of allowing those students who are less likely to contribute to the class discussion to weigh in and have a voice; we all have those students that give epic responses when spoken to one to one but never feel able to share them openly with the class. Flipgrid eliminates this!
Students can respond to homework questions or explain more complex ideas in a visual way.
They can even post YouTube-style reviews on books, videos watched in class or even get their feedback and what they’ve learnt from a particular lesson.
I’ve seen it used by students recording news reporter style videos, which was pretty cool.
6. ClassDojo

When doing the research for this article, ClassDojo was suggested by my subscribers and Instagram followers more than any other.
In short, it is a classroom behavior management reward system. Students receive +1 or-1 behavior points but unlike other behavior management systems that focus on nondescript gold stars, ClassDojo allows the emphasis to be based on positive feedback with teachers being able to create their own targeted behaviors.
Class Dojo creates reports that can be shared with students and/or parents publicly or privately.
Each student has an avatar of a little monster (very apt in some cases!) which keeps the app rather fun.

Seesaw is another app that helps keep parents in the loop.
As we all know collaboration between home and school is essential in education. Seesaw is an online portfolio where students can upload their best work to share with their parents and teachers can add examples of students strengths and areas of development.
I see this as a valuable tool for parent-teacher meetings, it could also help parents from feeling excluded from their child’s learning, thus reducing the time teachers spend in contact with parents as all the work will be there for them to see.

Remind is another parent contact app with a very good added extra.
It allows you to communicate with students and their parents beyond the classroom, the added extra is that your messages can be translated into over 70 languages, totally eliminating the isolation felt by parents for whom English is not their first language.
You can make class announcements, group chats, or contact individuals privately through the app.
9. Classtree

Classtree is similar to Remind but goes a little further.
It connects teachers, students and parents but acts a little like a social media platform in that you can post photos and documents (like classwork) and the parents, student and teacher in question can “like” and comment on them.
Users get instant notifications (like social media) and teachers and parents can communicate through a chat function.
An added benefit of Classtree is that you can attach consent forms for field trips and get them signed, returned and downloaded through the app.
That one gets a big “like” from me!
10. Google Hangouts

Essentially Google Hangouts is a messaging app but with a whole lot more built-in.
The obvious uses are easy communication with parents, students and other teachers (especially good if you need another teacher or leader to come and collect a student needing to be removed!) however so much more can be done with it.
Google Hangouts allows you to record and save video footage (for instance a visiting speaker that not all students/teachers can get to see) and then send it whoever needs to see it.
You can create groups (e.g. classes) for students to allow them to study for a test together, virtually.
I have even used it for flipped homework; I sent a video I wanted students to debate for homework. In our next lesson, we looked at the conversation the students had and discussed the points raised.
11. DropBox

Dropbox has been around a while and is an excellent alternative to Google Drive.
Where Google Drive allows you to create and edit G Suite files, DropBox lets you create and edit Microsoft Office files.
Storing all your teaching files remotely saves you carrying all sorts of drives around with you and the ability to share files with students means you don’t have to fill their inbox with huge attachments.
The basic free account gets you 500Mb of storage but my top tip is if you use their referral scheme to invite your students, you get extra storage when they sign up, which they will need to do if you are going to use it for your classes. Win!

Trello is basically an advanced to-do list app with the potential to be very useful for you and your students.
It syncs via a cloud across all devices so they will never be without their work schedule.
You can create multiple lists of tasks to be done. You can upload images assign tasks to other students in a group (particularly useful when students are doing a group project). You or your students can share todo lists to work through together.
I have been using it daily for a couple of years. for work, home and running this website. It helps me keep me organized (rather than having lots of crumpled bits of paper in my pockets which invariably get lost…resulting in missing deadlines!

Edmodo works in a similar but simpler way to Google Classroom in that teachers can post assignments, messages, polls and quizzes to students.
Students, in turn, can submit their work and receive grades.
14. Classcraft

Classcraft has me super excited.
It’s a totally nerdy version of a classroom and behavior management reward and sanction system.
It takes all those elements and turns it into a game similar to World of Warcraft. Students “play” in teams and gain XP (experience points) for positive behaviors and lose HP (health points) for negative behavior.
I used this last year when I had a year/grade 7 tutor group and it worked wonderfully for engagement.
I have included a video from the developers as they can explain it more clearly than I can.
Learning and Assessment Classroom Apps For Teachers
15. freckle.

Freckle is great! It can be used for practice and reinforcement of ideas but also contains valuable opportunities for engagement; A click from the dashboard takes you to videos and lessons from YouTube, Khan Academy and LearnZillion.
Students can complete activities of work independently and earn coins to spend in the “piggy store”.
There a large amount of customizable, printable worksheets in many subject areas. It is a great all-round app for use mainly with younger students in my opinion.
16. Prodigy

Prodigy is a math game and is very engaging for students, I have seen whole classes get very competitive and work a such a fast and thorough rate through the quizzes, pitting their wits against other classes. Students need to create an account and need a parents email to sign up.
It is mainly aimed at practice rather than initial instruction, it gives excellent feedback for incorrect answers so really helps students of all abilities to show progress.
It is set in a fantasy world where students encounter monsters to battle (with their math skills !). As they defeat the monsters students earn coins, spells and other rewards.
It also has the benefit of allowing parents to track their child’s progress.
17. Evernote

Essentially Evernote is a note-taking app and is great for brainstorming presentations and making lists.
You can create checklists, record audio notes, handwrite notes, attach files, drop links and create tables as well. It’s great for creating and organizing all of your notes for every subject.
It is great for teachers and students alike.
18. Edulastic

Like other apps I have mentioned teachers can share assignments with their students but as students complete their tasks, teachers can differentiate follow up instructions on an individual basis.
Edulastic even works seamlessly with Google Classroom.
19. Quizalize

Quizalize can be used as a pre-assessment tool as well as for summative and formative assessments.
Students can design their own quizzes to challenge classmates and teachers can share the results of all quizzes with the class (there is a tool to hide anything that identifies the students when doing this).
It contains a multiple-choice mode and survey and self-reflection tools.
20. Nearpod

Teachers can create entire lessons on Nearpod or use one of a huge number of pre-made lessons (some are free, others chargeable).
You can even upload your PowerPoint lessons to Nearpod but the formatting can be a little off doing it this way but can easily be rectified in the Nearpod dashboard.
When teaching a Nearpod lesson, teachers share the lesson to the screen of all students and can play videos to each individual screen.
You can take polls or ask questions that students can respond to, the teacher gets all the answers individually and can share model answers to the screen of all students. It can take a little while to get prepared but the benefits far outweigh this minor inconvenience.
21. Formative

With Formative , teachers can create formative assessments that students can complete at their own pace and submit them on their device.
One brilliant feature is that it allows file uploads and video and audio to be embedded in the assessments.
You can even attach a Quizlet (see review below).
All data from the assessments can be gathered during or after the lessons to inform future lessons and to challenge misconceptions.
22. Plickers

Plickers is very accessible for ALL students as it doesn’t require students to have a device at all!
Teachers set up their assessments on the Plickers website and create classes with the names of their student, they use the Plicker app on their phone to control the live quiz.
Each student is given a pre-printed card (a paper clicker…Plicker!). The is quiz projected on to the screen in the class. The students then hold up their “Plicker” and the teacher then scans the class with the camera tool on the app.
The app then records the student’s responses and collates the scores on the projected screen.
This is great for introductions or end of lesson formative assessments. Plickers really builds engagement and students really enjoy the interactive quizzes.
23. Edpuzzle

Edpuzzle utilises any high-quality videos that can be uploaded from YouTube, TedTalks, Khan Academy etc.
They can be clipped to only show the portion that you want the use and you can record a voice-over of instructions for your students.
The best part of Edpuzzle is that it allows you to insert quizzes into the video for your students to do.
Edpuzzle is an excellent flipped lesson tool.
24. StudyBlue

StudyBlue utilizes flashcards but all wrapped up in an app. They can be viewed on any device by logging into your StudyBlue account.
Audio and Video can also be added to the flashcards. The Flashcards can then be shared with your students or students can share them with each other to help study or revise for tests.
A simple digital solution that like the original flashcards works fabulously!
Quiz Classroom Apps For Teachers
25. quizizz.

Quizizz provides a huge amount of ready-made quizzes for students to take (Teachers can also create their own).
Students answer the questions on their device and a leaderboard is generated on the main classroom screen.
Teachers get a report after the quiz where they can use the data to inform future lessons.
Quizizz can also be launched through Google Classroom, which is a neat feature.

Kahoot is very similar to Quizizz in the way it runs. It is the one that I personally use. It not only has educational quizzes but a vast amount of fun user-made quizzes too.
It is fantastic for formative assessment or just for end of term fun. I like to run a quiz in my class but also join it from my phone, this builds a huge level of engagement with all my students trying to beat me
(Tip: always practise the test at home first so your students have no chance of beating you!)

Gimkit is similar to Kahoot and Quizziz but supercharged.
It allows students to take quizzes in a similar fashion to the other two but unlike both Kahoot and Quizizz students answer questions independently earning “cash” for correct answers.
The quizzes are time-based or are by the amount of cash earned.
Teachers can create their own “kit” (quiz) or use a quizlet, it is VERY easy to set up.
A new feature just released is assignments that can be set in the same way as Google Classroom (In fact Gimkit quizzes can now be set in Google Classroom.
The first few kits you set up are free but after that, there is a monthly subscription, the reason for this is that it was created by high school students as a school project and therefore can’t have advertising on there.
It is less than $10 a month and in my opinion well worth that amount.
28. Quizlet

Quizlet is another quiz app (shocking!) like Quizizz, Kahoot and Gimkit but it also has other tools built-in.
It has flashcards and games. Again, you can make your own resources or use ones that are already made by other users.
As we have seen in a few of the above reviews, you can embed a Quizlet into some other apps, making Quizlet a very versatile tool for the classroom.
Augmented Reality Classroom Apps For Teachers
Augmented reality is changing the face of classroom apps for teachers, they can literally bring infinite possibilities into the classroom. I’ve tried to describe them in my reviews but I realized that it was tricky to adequately describe their depth with just words so I’ve included some YouTube clips so you can see how augmented reality works.
29. ChatterPix Kids

ChatterPix is great fun and has classroom applications for both students and teachers.
It allows the user to animate pictures from your device and make them say anything you want them to.
Students could use it to present work they’ve done on a historical figure or teachers could use it as a great hook to introduce a topic or to challenge common misconceptions.
30. Curiscope Virtuali-tee

This one was actually shown to me by one of my year 8 students (who’s mum is an anatomy professor at a local university).
As a Science teacher, I find this app super useful in the classroom but it is also amazing for bringing awe and wonder to younger children too.
It has huge learning potential!
You have to buy a curiscope t-shirt for the app to work but the cost is by far outweighed by the benefit.
When you point the camera tool in the app at someone wearing the t-shirt (or the t-shirt on a hanger) you can see an augmented reality projection of the internal anatomy of the wearer! I
t also works with the camera on selfie mode to allow your students to look inside their own body!
It has clickable parts to the images and audio descriptions and videos that describe the functions of different organs.
There’s also the option to explore with a VR headset but this doesn’t work in selfie mode and it might be a challenge to persuade a friend to stand still for a long time unless you’ve both got t-shirts and headsets.
31. Green Screen

For years we’ve seen green screen technology in films and TV shows but now Green Screen gives you the same experience in your classroom!
The possibilities are endless!
You don’t need expensive equipment or a dedicated green screen studio. Just the app and maybe a green curtain or plastic tablecloth (from a dollar/pound shop).
Put yourself or your students into space, at famous monuments or buildings around the world or even undersea!
32. Thinglink

The Thinglink app is amazing for so many classroom activities.
It is a web-based tool that lets you add text, video or web-links to a picture.
The interactive images you create can be shared on social media, links or can be embedded into a web page.
Like many of the other augmented reality apps in this review, the possibilities for classroom applications are endless!
33. Apple Clips

Where there is an opportunity for new tech ideas…you’ll find an Apple version somewhere and while this isn’t necessarily an augmented reality app it’s close!
Apple clips has many possible uses in the classroom. I find it great for flipped learning and to introduce a lesson. It’s also great for student project presentation work.
34. HP Reveal

HP Reveal (formerly called Aurasma) is an app that allows the user to create augmented reality triggers in textbooks, class posters or even school bulletin boards.
You take a picture of the “trigger” and add instructions, image or videos that pop up when a student scans that trigger with the app.
You could use a section from a textbook as a trigger that then brings up further learning opportunities when your students scan it.
You could use it on field trips (e.g. a museum) where students can scan areas of the museum that you have set up ahead of time to reveal the learning intentions that you want them to achieve.
35. Figment AR

I’ve saved the best augmented reality app (in my opinion) to last.
Figment AR allows you to completely manipulate the world around you.
Place animated 3D objects and creatures around you class or portals to different worlds. Add in stock images or videos to the portals or ones you have taken yourself.
No longer does your classroom just have 4 walls and a door, you can now take a journey anywhere in the world and beyond. I have been using this one a lot this year!
Which Educational Apps You Use?
I’m sure that you have some good ideas for what educational apps for students you could use in your lessons now.
From the research I’ve done for this post I know I will be trying some new ones this year and I’m excited to do so.
Do you know any better ones?
If so, email me or comment below and I’ll include your thoughts.
Similar Posts:
- Using Augmented Reality in the Classroom
- 20 Huge Benefits of Using Technology in the Classroom
- The Flipped Classroom: The Definitive Guide
1 thought on “35 of the BEST Educational Apps for Teachers (Updated 2024)”
I missed Blooket in this list. their classic mode is similar to Kahoot. they were first in using the animal avatars in kahoot. it’s got lots of different games, Quizlet can easily be imported to create games and some games have class version to play in class and some others are for homework. my students love it. and them Bamboozle and WordWall. Maybe Bookwidgets is also worth mentioning.
Leave a Comment Cancel reply
Save my name and email in this browser for the next time I comment.
7 Apps That Can Do Your Homework Much Faster Than You

In the field of educational technology, some apps might be getting too smart.
More and more apps are delivering on-demand homework help to students, who can easily re-purpose the learning tools to obtain not just assistance, but also answers. Whether or not that’s cheating—and how to stop it—is one of the concerns surrounding a new app that can solve math equations with the snap of a camera . While the software has inspired teachers to create real-world homework problems that can’t be automatically solved , that strategy doesn’t hold up to other apps that tap into real-life brains for solutions.
Here’s a look at 7 apps that can do your homework for you, and what they have to say about cheating:
Price : Free Availability : iOS, Android app coming in early 2015
The new, seemingly magic app allows users to take pictures of typed equations, and then outputs a step-by-step solution. As of Wednesday, the app is the number one free app on the App Store. But the biggest issue, one teacher argues , isn’t if students will use the app to cheat, because many will. Rather, it’s about how teachers will adapt. A PhotoMath spokeswoman said educators have welcomed the app with positive reviews, but the software remains “quite controversial.”
“We didn’t develop PhotoMath as a cheating tool. We really wanted kids to learn,” said Tijana Zganec, a sales and marketing associate at tech company MicroBlink, which created PhotoMath. “If you want to cheat, you will find a way to cheat. But if you want to learn, you can use PhotoMath for that.”
Whether you’re a high schooler with eight periods of classes or a college student tackling dozens of credits, there’s one thing you’ve got for sure: a mess of assignments. iHomework can help you keep track of all your work, slicing and dicing it in a variety of ways. Sorting it by due date, week, month, or by course, the app is more organized than a Trapper Keeper. And in integrating data from Questia, you can link your reading material to your assignments so you don’t have to dig through a pile of papers to find the right information.
A scheduling feature can help you keep track of those random bi-weekly Thursday labs, and you can even mark the location of your courses on a map so you don’t end up on the wrong side of campus. And finally, with iCloud syncing, you can access all this information on whatever Apple-compatible device you’re using at the moment — no need to dig for your iPad.
Google Apps for Education
Taking the search giant’s suite of free browser-based apps and sandboxing them so they are safe for school use, Google Apps for Education is an excellent alternative to the mainstream installable productivity software, but this one has a perk that almost school board will love—it’s free. Packaging together favorites like Gmail, Hangouts, Google Docs, Google Sheets, and Google Drive with Classroom, a digital hub for organizing assignments and sending feedback, the goal of this collection is to make learning a more collaborative process.
Though Google Apps for Education is cloud-hosted, the programs can be used offline, ideal for when your student needs to escape the internet and work distraction-free. And since it works on any device, it also helps students avoid buying overly expensive hardware. That means more money for extracurricular activities.
Price: Free, but some homework services require payment Availability: iOS and Android
HwPic is a tutoring service that allows students to take send pictures of their homework to tutors, who will then respond within minutes to your questions with a step-by-step solution. There’s even an option to expedite the answers if a student is in a hurry. HwPic Co-Founder Tiklat Issa said that the app was initially rejected by Apple’s App Store, which believed it would promote cheating, but he successfully argued that just because someone uses the app in a way that it’s not meant to be used doesn’t mean the app should be punished.
Issa added that HwPic prohibits cheating in its terms and conditions. Tutors don’t solve homework that has words like “Quiz” or “Exam,” and they often know if a student is sending a photo during a test if they’ve paid for expedited answers, and if the photo is dim, blurry and taken under a desk. “We’ve minimized cheating,” said Issa. “We haven’t eliminated it. That’s kind of unrealistic.”
Wolfram Alpha
Price : $2.99 Availability : iOS and Android
Wolfram Alpha is similar to PhotoMath, only that it targets older students studying high levels of math and doesn’t support photos. The service also outputs step-by-step solutions to topics as advanced as vector calculus and differential equations, making it a popular tool for college students.
“It’s cheating not doing computer-based math, because we’re cheating students out of real conceptual understanding and an ability to drive much further forward in the math they can do, to cover much more conceptual ground. And in turn, that’s cheating our economies,” said Conrad Wolfram, Wolfram Research’s Director of Strategic Development, in a TEDx Talk . “People talk about the knowledge economy. I think we’re moving forward to what we’re calling the computational knowledge economy.”
Homework Helper
Price: Free Availability: iOS and Android
Chinese Internet search company Baidu launched an app called Homework Helper this year with which students can crowdsource help or answers to homework. Users post a picture or type their homework questions onto online forums, and those who answer the questions can win e-coins that can be used to buy electronics like iPhones and laptops.
The app has logged 5 million downloads, much to the dismay of many some parents who argue that the students spend less time thinking about challenging problems. A Homework Helper staffer admitted to Quartz , “I think this is a kind of cheating.”
Price: Free, but some homework services require payment Availability: iOS
Slader is a crowdsourcing app for high school and college students to post and answer questions in math and science. While students can post original homework for help, many questions in popular textbooks have already been answered on the app, according to Fast Company . An Illinois high school said earlier this year that it suspected students were using the service to cheat on their math homework.
Slader argues that it’s “challenging traditional ideas about math and education,” and said that the ideas behind its app “aren’t a write-off to teachers,” according to its blog . Slader told San Francisco media outlet KQED that it shouldn’t be dismissed as a cheating tool, but rather considered a way for students to access real-time help.
More Must-Reads From TIME
- The 100 Most Influential People of 2024
- The Revolution of Yulia Navalnaya
- 6 Compliments That Land Every Time
- Stop Looking for Your Forever Home
- If You're Dating Right Now , You're Brave: Column
- The AI That Could Heal a Divided Internet
- Fallout Is a Brilliant Model for the Future of Video Game Adaptations
- Want Weekly Recs on What to Watch, Read, and More? Sign Up for Worth Your Time
Contact us at [email protected]
Struggling to complete homework assignments is a common challenge for students worldwide. Juggling multiple tasks simultaneously can be overwhelming. It often leads students to submit inaccurate work or in the worst case, they miss deadlines. Under these situations, students often get stressed and feel the need of guidance from subject matter experts. If you are feeling the same, fret not! We have a solution for you.
This blog will explore the best app that does your homework effectively and assists you with your homework to achieve academic excellence. Let’s discover how this TutorBin homework help app can revolutionize your academic journey by saving time, enhancing your productivity, and providing you required learning assistance.

An effective homework help app not only streamlines the process but also offers a range of benefits to students. Firstly, it saves precious time by providing organized tools and resources that aid in efficiently completing assignments. Additionally, it boosts productivity by offering features that enhance concentration, time management, and task prioritization.
Lastly, provides students expert guidance they need, offer solutions and explanations of these to help students in grasping complex concepts and improving their academic performance. Thus, become a top-notch homework help app is considered as a valuable learning aid. In this blog, we will explore how you can use TutorBin app to excel academically with its comprehensive homework assistance.
What is the Homework Help App? How Does It Work?
The homework help app is a cutting-edge digital platform designed to assist students in their academic pursuits. This user-friendly application provides a convenient way to access expert guidance and educational resources beyond the confines of the classroom. By downloading the app, students can easily submit their questions or homework assignments and receive comprehensive solutions and explanations from subject matter experts.
So, how does it work? The app connects students with qualified tutors who specialize in various subjects. Through personalized guidance and step-by-step solutions, students can better grasp the concepts they are studying. The app also offers features like live chat, file sharing, and virtual whiteboards to enhance the learning experience.
The homework help app has become a go-to resource for students seeking academic support due to its user-friendly interface and round-the-clock availability. Among the leading homework help apps, TutorBin stands out with its comprehensive features and high-quality tutoring services. With experienced tutors in math, physics, chemistry, computer science, and more, TutorBin caters to students of all levels. The app ensures the timely delivery of solutions while maintaining academic integrity and confidentiality.
To make the service accessible and reliable, TutorBin offers affordable pricing plans and flexible scheduling options. It provides students a trusted platform to receive the homework help they need to excel academically.
Why Do Students Need the Homework Help App?
In today’s fast-paced and highly competitive academic environment, students are often overwhelmed with assignments, projects, and deadlines. Balancing multiple subjects, extracurricular activities, and personal commitments can be intimidating for students, leaving little time for relaxation or self-care. Fortunately, the digital age has brought homework help apps, an amazing solution to alleviate some of these burdens.
These apps have gained popularity among students for ability to provide expert assistance and streamline the homework completion process. Let’s explore the key reasons why students need these apps that help with homework.
Time Management Made Easy
Managing time effectively is a crucial skill for students, but allocating sufficient time to each subject can often be challenging while maintaining a healthy balance. Apps that help with homework provide valuable support in streamlining time management through effective tools and features.
With features like reminders, notifications, and a centralized homework tracker, these apps help students stay organized and prioritize their assignments. By optimizing certain tasks, students can maximize their study time and create a schedule that works best for them.
Instant Help and Support
Completing homework assignments can be challenging when students encounter complex concepts or difficult problems. The homework help app offers instant assistance, helping students overcome hurdles and better understand their study material through real-time solutions, explanations, and step-by-step guidance. These apps aim to help students overcome their homework struggles and achieve academic success by connecting students with experts and tutors who provide immediate support.
Enhanced Learning Experience
The apps for homework help go beyond simply providing answers; it is an interactive learning tool that promotes a deeper understanding of the subject matter. Many apps include educational resources, video solutions, and a solved-question library that help you to complete homework assignments.
By engaging with these resources, students can reinforce their knowledge, fill gaps in their understanding, and enhance their overall learning experience. These apps also empower students to explore concepts more interactively and comprehensively, fostering a true passion for learning.
Reduced Stress and Anxiety
The academic journey can be stressful, especially when assignments start piling up. Homework-help apps play a vital role in reducing stress levels by providing efficient solutions and relieving the pressure of looming deadlines.
Additionally, by offering support and simplifying the homework process, these apps enable students to complete their assignments with clarity, fostering a healthier academic environment. Moreover, with an alleviated burden of homework, students can focus on their well-being enjoy their study and live a balanced lifestyle with increased academic inclination.
Flexibility and Convenience
One of the key advantages of getting help with homework apps is flexibility and convenience. Students can access the app anytime, and from anywhere, allowing them to work on their assignments at their own pace. This flexibility permits them to complete their assignments with the help of experts even after managing their personal commitments. By providing accessibility on various devices, you can get expert support from the comfort of your home.
Improved Productivity and Efficiency
The apps for homework help act as a catalyst in boosting students’ productivity and efficiency by streamlining the homework process. With features like online submission, and progress tracking, students can complete assignments more effectively and utilize their time more efficiently.
These apps that do your homework provide a structured workflow that guides students through their homework, allowing them to focus on the task without getting overwhelmed. By increasing productivity, students can allocate more time to other important aspects of their academic journey or personal lives, striking a healthy balance.
What to Look for in a Homework Help App?
You should consider several key features when looking for a homework-help app. Here are some important ones to look for:
- Assignment Tracking and Structure: The app to help with homework should provide a clear and organized way to keep track of your assignments. It should allow you to enter due dates, set reminders, and mark tasks as completed.
- Subject-Specific Assistance: Look for an app that offers subject-specific assistance. It should provide resources, explanations, and examples related to various subjects such as math, science, history, and literature. Look at the number of subjects for which they are offering their expert support.
- Step-by-Step Problem-Solving Guidance: Top homework helper apps should offer step-by-step guidance for solving problems. It should break down complex tasks into manageable steps, providing explanations and examples as well. This feature can be particularly helpful for subjects like math and science.
- Integration with Educational Resources: Choose homework apps that integrate with various educational resources. This feature allows you to access relevant materials directly from the app, making studying and completing assignments more convenient for you.
What Are the Pros & Cons of the App that Does Your Homework?
An app that does your homework is extremely useful for students struggling with their homework or stuck due to doubts and confusion. The homework help app has received high recommendations from experts.
However, it’s important to consider both pros and cons before you opt for it. Below we have created a visual content to shown the pros and cons of these homework help apps. Take a look. We are sure that this visual representation will help you make an informed decision when searching for an app that does your homework.

9 Tips to Help You Find the Homework Help App That’s Right for You
If you are sincerely looking for an app that does your homework efficiently, your search ends here. Our TutorBin experts help you with excellent tips that assist you in understanding how you can make an informed decision about a homework help app. Check the following fabulous pro tips from the EdTech industry experts.
- Determine Your Subject Needs: Start by looking for an app that offers the specific help you need for your subjects. Not all apps provide the similar services, so finding one that caters to your academic requirements is crucial.
- Conduct Thorough Research: Take the time to conduct thorough research and find an app that aligns with your specific needs. This saves you from negative experiences, harassment, wasted time, money, and effort.
- Pay Attention to Student Reviews: Don’t underestimate the power of student reviews. They offer valuable insights into other students’ experiences using the homework help app. Checking the app’s reviews and ratings helps you make an informed decision before using the service.
- Consider Budget and Cost-Value Analysis: Evaluate your budget before proceeding to avoid frustration and difficult situations. Look for services within your budget. Also, assess the app’s cost in relation to its value. Compare pricing plans and subscription options to determine if the benefits justify the expense.
- Check Compatibility: Ensure the app is compatible with your device’s operating system. Verify if it supports both iOS and Android platforms, allowing you to access the app seamlessly on your preferred device.
- Evaluate Features: Check the features of the app to ensure it meets your homework requirements. Look for features like real-time help, on-demand video solutions, reminders, progress tracking, and 24/7 expert availability.
- Easy to Use: Opt for an app that is user-friendly. Select one that is easy-to-navigate for students like you.
- Privacy and Security: Pay attention to the app’s privacy policy and security measures. Ensure that your personal information and data will be handled securely and that the app follows appropriate privacy standards.
- Seek Recommendations: Don’t hesitate to reach out to peers, teachers, or academic advisors for recommendations on reliable homework help apps. Their insights and experiences can guide you in making an informed decision.
TutorBin: The Popular Homework Help App in the Market
You can find many apps on the play store or app store, especially those claiming to fulfill your homework requirements. TutorBin is a highly sought-after homework help app that offers students prompt solutions and ensures everyone gets responsive learning assistance from experts.
It has gained immense popularity due to its effective use of technology. With TutorBin, students can receive on-demand help from subject matter specialists and overcome assignments and homework difficulties in any subject and topic.
The app utilizes cutting-edge technology to provide a seamless learning experience. You can type your question or query and easily add/upload files or take pictures. The app efficiently handles different content types, such as typed text, handwritten assignments, and word problems.
Furthermore, the TutorBin intelligent system matches students with highly qualified tutors based on their specific requirements. To download the TutorBin homework help app, you can find it on both the Google Play Store and the App Store .
TutorBin homework help app covers a wide range of academic help for advanced study pursuers to ensure that they will be able to get guidance from experts and personalized assistance round-the-clock. Here are key services that students can access throughout the app:
Comprehensive Homework Help Services by TutorBin
Step-by-step homework and assignment solutions: .
If you’re struggling with homework, TutorBin offers assignment help to assist you better. Our expert tutor team provides 100% accurate answers with step-by-step explanations done from scratch. Moreover, we prioritize ensuring that students understand the problems, learn the correct problem-solving methods, and gain clarity on concepts when you opt for our homework help app.
In-depth Learning Through Video Solutions and Live Sessions:
Experience in-depth learning with our video solutions and live sessions. Our video solutions provide step-by-step solutions and explain problem-solving approaches. It helps students understand the solutions to their problems better and clear their doubts if they have any.
On the other hand, live sessions are interactive online tutoring sessions that motivate students to explore their subjects more thoroughly and gain a deeper understanding of their studies. Students from prestigious universities rely on our live sessions to simplify complex concepts and obtain concept clarity. The detailed explanations & live sessions with students make learning effective and knowledge retention easier.
Information-Rich and Unique Writing Services:
In addition to these services mentioned above, TutorBin also offers students writing help. Our team of experts provides interpretative and well-researched essay writing services to support you in achieving good grades. We go the extra mile to thoroughly research and structure the content, ensuring it is unique and sets your work apart. Our information-rich writings not only showcase your efficiency but also leave a lasting impression on your readers.
Error-Free Project Work and Lab Help with Explanations:
At TutorBin, we understand the challenges of project work and lab report writing. Furthermore, our experts put their effort, knowledge, and time into making your projects unique and thoughtful about the findings. For lab reports, we focus on making them error-free and plagiarism-free. Additionally, our specialists provide detailed explanations and calculative analysis to ensure your project work and lab reports stand out. We strive to reflect your thoughts and leave a lasting impression on your teachers and professors.
Crafting Impactful Speeches and Presentations:
Another service that TutorBin offers is expert speech writing and presentation writing services. Our skilled writers create compelling speeches that engage and deliver your message effectively. Additionally, we analyze your goals and audience to customize speeches that leave a lasting impression. For presentations, we focus on visually appealing designs and concise content that captivate your audience. TutorBin empowers you to express your ideas confidently. It enables your presentation to leave a strong and positive impact on your audiences.
Why Choose TutorBin Homework Help App?
Discover the app that does your homework efficiently:- .
These pointers help you to know why students prefer TutorBin and consider the app as the best app for homework answers. Let’s check out the amazing features and what benefits TutorBin has to offer to the students.
TutorBin Homework Help App Features that Can’t be Ignored:
- On-demand personalized help for high school or college students.
- Flexibility to select your time slot.
- User-friendly dashboard access to track tasks.
- Instant alert for uploaded solutions.
- Average solution time: 30-60 minutes for every task.
- Add-ons with every order to ease your financial burden.
- Lifetime access to the library page and solutions.
- 24/7 help from subject matter experts, even at odd hours.
- A fully reliable organization with a strict privacy policy.
- Secure payment options.
- End-to-end customer support.

What Makes TutorBin Homework Help App a Preferred Choice for Students?
- Unique and high-quality tasks by subject matter experts.
- 24/7 availability and quick turnaround time.
- Personalized solutions tailored to individual needs.
- Unlimited access to a comprehensive resource library.
- Assured privacy and confidentiality.
- $20 sign-up bonus, exclusive offers, and referral programs.
- Multiple revisions and refund policy for student satisfaction.
Boost Your Learning with TutorBin New Tools
TutorBin has recently unveiled three cutting-edge tools designed to take your learning experience to the next level:
- Essay Generator: Say goodbye to the stress of essay writing with our revolutionary Essay Generator . This tool creates well-written, unique, and engaging essays, allowing you to focus on the content rather than the writing process.
- Essay Rewriter: Enhance your essay writing with our Essay Rewriter . This tool helps you rephrase and refine your essays, improving clarity and coherence.
- Paraphrase Writer: Improve your writing by using our Paraphrase Writer . This tool assists you in paraphrasing sentences and paragraphs, ensuring originality and avoiding plagiarism.
- Grammar and Spell Checker: Ensure error-free writing with our Grammar and Spell Checker . This tool detects grammar and spelling mistakes, allowing you to polish your work and maintain accuracy.
- Library: Our extensive questions and answers library is an instant answer bank for even the toughest questions. Get access to unlimited subject-wise textbook solutions, providing you with the resources you need to excel in your studies.
- Math Problem Solver: Tackle math problems confidently using our Math Problem Solver. This powerful tool assists you in solving math problems effectively and efficiently, guiding you through step-by-step solutions.
By harnessing the power of these new tools, you can enhance your learning journey and achieve academic success like never before. Embrace the possibilities offered by TutorBin and unleash your full potential.
Sign up for TutorBin today and experience the convenience and effectiveness of this popular homework help app.
Receiving Solutions at Any Time is a Reality with the Homework Help App
If you have read this article so far, you surely have understood that the days of struggling with academic tasks are behind you, thanks to the homework help app that does your homework. In reality, this helpful app assists you whenever you are stuck with homework or need to fill knowledge gaps while studying. The TutorBin app that does your homework not only saves your time and effort but also goes beyond the boundaries to improve your academic performance in every possible way.
Don’t hesitate to try the app and experience its benefits firsthand. Furthermore, the future of homework-help apps is bright as they revolutionize education. Embrace the power of technology and let TutorBin be your guide to academic achievement. Say goodbye to distractions and, instead, welcome a focused study environment. more tips on educational help, follow our TutorBin Blog regularly. Our experts also provide diverse services to ensure academic success. You can also take their help to boost your performance.
- E- Learning
- Online Learning
Leave a Reply Cancel reply
Your email address will not be published. Required fields are marked*
Comment * NEXT

Save my name and email in this browser for the next time I comment.
You May Also Like

10 Simple Python Projects for Beginners to Build Confidence

From Zero to Hero: Learning Python Through Online Resources

Real-World Java Projects to Enhance Your Portfolio and Skills

Challenges of Doing Calculus Homework & How You Can Overcome It?

Math Homework Help- Guidance to Excel in Math Learning
Online homework help, get homework help.
Get Answer within 15-30 minutes

Check out our free tool Math Problem Solver
About tutorbin, what do we do.
We offer an array of online homework help and other services for our students and tutors to choose from based on their needs and expertise. As an integrated platform for both tutors and students, we provide real time sessions, online assignment and homework help and project work assistance.

Who are we?
TutorBin is an integrated online homework help and tutoring platform serving as a one stop solution for students and online tutors. Students benefit from the experience and domain knowledge of global subject matter experts.
There’s a free iPhone app that will do your homework for you

If you buy through a BGR link, we may earn an affiliate commission, helping support our expert product labs.
Well boys and girls, we suppose it was only a matter of time. Since copying a question or math problem from your homework into Google is far too taxing, there’s now a free iPhone app that actually takes things a step further by reading the problems and actually doing your homework for you. The app uses text recognition to digitize questions and then it delivers instant results. More importantly (or at least, it should be more important), the app works through the problem, explaining each step so students can learn when they get stuck.
Here’s the full description from the App Store:
Tech. Entertainment. Science. Your inbox.
Sign up for the most interesting tech & entertainment news out there.
By signing up, I agree to the Terms of Use and have reviewed the Privacy Notice.
Take a PHOTO of your homework question and get explanations, videos, and step-by-step help instantly. Supports Math, Science, History, English, Econ and more. Completely free, NO in-app purchases. “This app is a lifesaver” • Fast – Take a photo, get instant results, no waiting • Explainers – Teaches you exactly what you need to learn • Videos – The best Youtube videos for your question • Powerful – Better than Google for homework help • Free – Free to use and always will be ~~ Students LOVE this 5 star app ~~ *Amazing* “Whenever I don’t get homework I use this and it is helpful and useful. Usually apps either don’t give you what you want or just give you the answer straight up. This app actually shows you the site the whole paragraph they found it in and more it’s not like cheating” *Wow!!* “I only got this today, and it’s already been a lifesaver. I’ve had apps that only helped with one subject or were too difficult to operate, but this one is so easy! I love it!” *<3<3<3<3* “It’s way easier to search up things for hw instead of typing I really love the camera. I like how the whole system works!!! It helps me learn how to go search and get the answers for myself.” ~~ How it works ~~ Socratic is a homework app that combines cutting-edge Artificial Intelligence (AI) with amazing learning content to make learning on your phone easy. Take a picture of a homework question and our AI instantly figures out which concepts you need to learn in order to answer it, and shows you simple, high-quality content designed to make learning easy. Socratic’s AI combines cutting-edge computer vision technologies, which read questions from images, with machine learning classifiers built using millions of sample homework questions, to accurately predict which concepts will help you solve your question. Socratic’s team of educators is creating highly-visual, jargon-free content to teach every important high school curriculum concept, and is curating the best online videos from sources like Khan Academy, Crash Course, and others. Together, the Socratic app represents a huge improvement in how students learn on the Internet.
This article talks about:

Zach Epstein has been the Executive Editor at BGR for more than 10 years. He manages BGR’s editorial team and ensures that best practices are adhered to. He also oversees the Ecommerce team and directs the daily flow of all content. Zach first joined BGR in 2007 as a Staff Writer covering business, technology, and entertainment.
His work has been quoted by countless top news organizations, and he was recently named one of the world's top 10 “power mobile influencers” by Forbes. Prior to BGR, Zach worked as an executive in marketing and business development with two private telcos.
- LG LRYKC2606S review: Smart Mirror InstaView Counter-Depth MAX Refrigerator
- Nolah Evolution 15 mattress review: Update after 2 years
- Beko refrigerator review: Special tech keeps food fresh for 30 days
More Lifestyle

EVgo’s Autocharge+ expansion is a real threat to Tesla’s Supercharger dominance

Best fitness apps for Apple Watch and iPhone

I completed 100 Apple Fitness+ treadmill workouts: Here’s how it went

The Polestar 4 is driving right at Tesla’s Model Y with its new price cut
Latest news.

Sam Raimi might return to the MCU to direct Spider-Man 4

One of the best shows on Apple TV+ is getting a spinoff set in Russia

iPhone game emulators will never replace retro handhelds for me

This company makes an AI exoskeleton to give people superhuman power
Sign up for the most interesting tech & entertainment news out there.
Homework - Your AI Study Buddy 4+
Snap & solve study questions, filippo ferraris, designed for iphone.
- Offers In-App Purchases
iPhone Screenshots
Description.
Simplify Your Study Sessions with AI-Powered Help! Struggling with endless homework questions? The Homework app is here to transform your study routine! Our app uses advanced AI to provide you with instant solutions and clear explanations for your school questions, quizzes, or homework. Make learning more accessible, efficient, and enjoyable with the Homework app! Key Features: - Instant Solutions: Just snap a photo of your homework question, and our AI will provide an accurate answer promptly. - Detailed Explanations: Not just answers, but also step-by-step explanations to enhance your understanding of the topic. - Wide Range of Subjects: Whether it’s Math, Science, English, or History, our AI is equipped to tackle questions from various subjects. - Efficient Learning: Reduce the time you spend stuck on problems and increase your productivity. - Global Accessibility: No matter where you are, the Homework app is your reliable study companion. = User-Friendly Interface: Easy and intuitive design, perfect for quick learning on the go. - Revision Tool: Ideal for reviewing and reinforcing key concepts before exams. Subscription Plan: - Free Daily Quota: Our app offers a flexible number of free questions each day, which varies based on server capacity. This dynamic approach ensures optimal performance for all users. The current day's quota is clearly displayed in the app's settings area and main interface, providing transparency on the availability of free questions for that day. - Pro: Unlimited Access Subscription, for those requiring more extensive assistance, the Homework app offers an unlimited questions plan as a paid service. This option allows you unrestricted access to our AI-powered solutions and expert explanations. Note: The number of free questions available each day is subject to change based on server availability. This information, along with details on the unlimited access subscription, including pricing and terms, is prominently displayed within the app for your convenience. Why this Homewroks App? The Homewroks App is more than just a homework helper; it’s your personal AI tutor. It’s designed for students of all levels who want a more efficient and effective way to study. No more hours spent on confusing questions. With the Homewroks App, learning is simplified, and your potential is unlocked. Download the Homework App Today! Join thousands of students who are enhancing their learning experience with the Homework App. Download the app now and step into a world where homework is no longer a hurdle, but a stepping stone to academic success!
Version 1.1.1
Dear users, We've fixed a bug that was causing problems solving some questions. Thanks for your support.
App Privacy
The developer, Filippo Ferraris , indicated that the app’s privacy practices may include handling of data as described below. For more information, see the developer’s privacy policy .
Data Not Collected
The developer does not collect any data from this app.
Privacy practices may vary, for example, based on the features you use or your age. Learn More
Information
- Value Pro Access (6 Months) $44.99
- Value Pro Access (1 Month) $9.99
- Value Pro Access (1 Week) $3.99
- Pro Access, Unlimited 6 Months $59.99
- Pro Access, Unlimited 1 Month $12.99
- Pro Access, Unlimited 1 Week $6.99
- App Support
- Privacy Policy
More By This Developer
ShapeUp: Toned Body in 30 Days
17 Best AI Tools For Students In 2024
Link Copied
Share on Facebook
Share on Twitter
Share on LinkedIn

AI...AI...AI...Got This Feeling In My Bones!
In the current age of the Internet, where everything is available at your fingertips, from ordering your favourite meal to watching that new web series on Netflix, everything has been simplified using the best AI tools for students, making the lives of its users much more effortless. You must have heard about the uses of AI for businesses and conglomerates, but today, we will be talking about the best AI tools for students.
Understanding AI and Its Benefits
Understanding AI is like getting to know a helpful friend for computers. Picture it as a clever assistant that learns and understands things. It's not a robot taking over; it's more like a digital buddy here to assist. AI is all about making life easier, like a helpful friend lending a hand. It's not replacing us; it's just here to make things smoother and cosier. So, think of AI as your tech-savvy pal, making life a bit brighter! Now, let's dive into the perks of having this friendly tech sidekick:
1. Time Saver
AI is like a wizard that speeds up tasks, giving you more time for the things you love.
2. Smart Suggestions
Think of AI as your personal recommender, suggesting movies, songs, or even the perfect study playlist.
3. Efficiency Booster
Teachers have a virtual assistant with AI, making grading homework quicker and leaving more time for engaging lessons.
4. Health Support
AI helps doctors by processing tons of data, making it easier to find effective treatments and improving healthcare.
5. Everyday Assistance
From organising your schedule to reminding you of important dates, AI is like a reliable friend keeping you on track.
Top 17 Best AI Tools for College Students
The heated discussion that AI for students might take the place of real-life human beings is the talk of the town these days. However, we believe that AI for students are nothing but merely tools to increase productivity in the daily lives of humans. So, without further ado, let's discuss the best AI tools for college students!
1. Open AI Playground
OpenAI, a long-standing and widely embraced tool, stands out as a go-to for students and professionals. Its text-davinci-03 module is a game-changer, crafting plagiarism-free content, including research papers. If you're finding yourself with writer's block, it can also help you frame and create a structure for your blogs and essays, which you can use to ace your assignments. OpenAI's playground ranks high among the best AI tools for students, making it a must-have for academic and professional excellence.
Common Use Cases
1. Testing prompts to refine model responses.
2. Learning API interactions for OpenAI's language models.
3. Prototyping and validating AI-driven ideas quickly.
4. Serving as an educational tool for AI and NLP understanding.
OpenAI's chatbot, a top-tier among the best AI tools for students, offers sophistication and is entirely free. Ideal for obtaining quick answers and tailored communication, it's a powerhouse for learning efficiently. With a vast resource pool, it saves time and enhances productivity. The GPT-3 module, a gem for students, is free, while the GPT-4 module comes with a subscription. This user-friendly AI for students aims to boost productivity and learn faster, making it a standout choice as the best writing assistant.
1. Streamlining content creation by producing high-quality written material on topics. 2. Providing efficient and 24/7 customer support, resolving queries and issues promptly. 3. Facilitating smooth communication across languages through real-time translation assistance.
3. QuillBot
QuillBot is an AI for students that empowers you to create captivating and remarkable writing pieces. QuillBot is an incredibly powerful tool that can comprehend text in its context and provide relevant paraphrases for single lines or entire paragraphs. It stands out as one of the best AI tools for students, offering paraphrasing capabilities and the ability to summarise long-form content, identify and resolve plagiarism issues, provide grammar checks , and offer language translation . Furthermore, QuillBot can collaborate with you in co-writing, making it one of the top AI applications.
1. Offers AI-powered paraphrasing and grammar checking to improve the quality of written content. 2. Assists language learners in enhancing their writing skills by providing instant suggestions and corrections. 3. Used by professionals to efficiently rephrase and refine text, saving time and effort in content creation and editing.
4. PaperTyper
Get yourself a secret weapon for effective essay writing with PaperTyper.net . AI Essay Generator is the star of the show, helping students get great essay examples and finish their own papers. These examples work as inspiration and guidance. Powered by the latest algorithms and AI technology, it's a go-to writing tool for students of any academic level. Its user-friendly interface lets you input a topic and get a well-written example in a couple of minutes. The tool is available 24/7 and has free and cheap subscription options with advanced features. Plus, there are features like plagiarism detection, grammar checking, and source citation, which are perfect for students and researchers!
1. Quickly overcome writer's block and generate examples on any topic when you have a tight deadline. 2. Ensure your academic papers are original, accurate, and properly formatted with this all-in-one tool. 3. Improve writing skills with helpful instant feedback and a free knowledge database.
Fotor AI, a standout among the best AI tools for students, unleashes creativity in art and design. With limitless possibilities guided by your imagination, it transforms text prompts into stunning, AI-generated artwork. Ideal for aspiring designers and artists, it opens doors to fresh perspectives and new horizons. This tool is not only a creative companion but also a valuable resource for those delving into the world of Computer Science. Fotor AI offers an inspiring journey for students, making it a top choice among free AI tools for students. If you are planning to study computer science, check out this list of the 15 Best Universities for Computer .
1. Enhances images with the power of AI, ideal for creating stunning visuals. 2. Helps users make text stand out and improve readability when designing graphics or promotional materials. 3. Offers a wide range of stickers to add excitement and visual appeal to design projects.
Finding student accommodation just got easier with the amber app.
Start your search today!
6. Adobe Express & Firefly
Adobe, a pioneer in AI, showcases its prowess with Adobe Express and the beta-stage Firefly. While Firefly is gradually opening up in beta, Adobe Express is fully functional, offering a range of templates. Firefly's text-to-image AI elevates art creation with just a prompt, making it a must for aspiring designers. With both free and premium features, Adobe's tools are among the best for students pursuing design, marking them as top AI tools for students' academic and commercial use.
1. Enables quick and easy custom image and text effect generation from text prompts in multiple languages. 2. Integrates generative AI into Adobe apps, allowing content creation across the Adobe ecosystem. 3. Allows users of all skill levels to produce high-quality images and text effects.

Caktus can transform students' approach to academic writing. Seamlessly integrating into your workflow, this innovative tool harnesses artificial intelligence to streamline the essay writing process. It customises essays by type, length, and tone while accessing a vast database of reliable sources to strengthen arguments. Here's how students can benefit from their AI Essay Writer .
1. Personalised essay assistance: Caktus AI Essay Writer tailors support for students, refining essays to meet specific requirements. 2. Verifiable sources: Access a vast database of credible sources to strengthen arguments and ensure academic integrity. 3. AI specially trained for students: Caktus AI technology was specially designed for students as its AI was trained with the largest database of academic papers and essays.
8. Grammarly
Grammarly is a text correction, paraphrasing, grammar correction and plagiarism-checking AI for students. It is among some of the most useful AI tools for students since it helps in whacking out grammatical mistakes and helps to provide a better sentence structure. Grammarly has developed its advanced artificial intelligence, which it uses to understand text in a contextual format and help its users write accordingly. It has been rated among the best AI tools for students as it can easily be used as an integrated tool with Word or your browser and can also be used as a standalone app for ease of use. It is definitely one of the best AI apps for students.
1. Helps writers proofread and improve their documents, enhancing the quality of written content. 2. Assists professionals in crafting error-free emails and reports, improving communication. 3. Supports non-native English speakers in enhancing their language skills and confidence in writing and speaking.
9. Otter.ai
Otter AI stands among the best AI tools for students, offering seamless lecture recording and transcription simultaneously. It achieves an impressive 160 words per minute, ensuring accurate text conversion while you focus on studying. This powerful tool integrates with multiple applications, enhancing its usability. Whether in class or group studies, Otter AI supports your learning journey. It's a standout choice among top AI tools for students, emphasising the importance of skill development alongside AI assistance for student success.
1. Provides real-time transcription and note-taking for meetings. 2. Assists journalists in transcribing interviews and recording notes for efficient reporting. 3. Helps students transcribe and summarise lectures, making reviewing and studying course material easier.
10. QuizGecko
The ultimate AI-powered quiz platform for students. QuizGecko offers various quizzes covering various subjects, making learning enjoyable and effective for all ages. Whether studying history, mathematics, science, literature, or any other academic discipline, QuizGecko covers you. Learning becomes enjoyable and effective with a vast collection of expert-curated quizzes, personalised recommendations, and competitive challenges, making it one of the best AI websites for students.
1. Helps educators create engaging online quizzes for student assessments. 2. Enables businesses to conduct interactive employee training through customisable quizzes. 3. Enables content creators to engage their audience with fun and informative quizzes on various topics.
11. Stepwise Math
For students grappling with maths, Stepwise Math emerges as a vital AI for students. Its intelligent system identifies areas of struggle and guides you step by step through problem-solving. Whether tackling simple or complex maths problems, Stepwise Math tailors a course to your needs, allowing you to learn at your pace. With assignments and worksheets aligned to your learning curve, this powerful tool targets weaknesses, making it a top choice among the best AI tools for students.
1. Improve maths skills by receiving instant AI-guided feedback when facing confusion. 2. Boost test performance through intuitive feedback and better preparation for standardised tests. 3. Apply stepwise functions in mathematics and engineering for signal processing and data analysis.
12. Google Bard
The trust of Google and its extensive database make this AI chatbot one of the best AI tools for students since you can ask it anything, and it would give you the perfect answer you're looking for. Bard changes the search user experience by miles. All you have to do is type in the text related to your search query and hit enter, and Google Bard will cater you to the best results of all with a summary. Even in its earlier stages of development, it can easily compete with ChatGPT and sometimes even perform better than it. So, make sure to check out this amazing AI tool for students that you would love to use!
1. Transcribe old letters or documents from images into digital text for easy sharing. 2. Find the best online deals, helping with cost-effective shopping. 3. Assist in the kitchen with recipe suggestions and nutritional information for healthier eating.
13. Slidesgo
Slidesgo stands out as an incredible AI tools for students, simplifying the creation of captivating content. With a vast library of Google slides and PowerPoint templates, it utilises AI to transform written content into engaging presentations effortlessly. No more boring and monotonous tasks; just choose a template, upload your content, and let the AI work its magic. Slidesgo is undoubtedly one of the most useful and best AI tools for students, making presentations a breeze.
1. Create visually engaging presentations for business, education, etc., with professionally designed templates. 2. Simplify complex information using case study infographic templates for clear and engaging presentations. 3. Support education with special plans for teachers and students, improving lesson materials and projects.
Don't just explore the world of AI - immerse yourself in it.
Register with amber today!
14. Undetectable AI
Are you worried that your valuable content will get flagged by AI content detectors? Enter Undetectable AI, which turns AI-generated text into content that sounds completely human! It is the most advanced AI detection tool on the market. Its algorithm removes recognisable AI content from your text, ensuring it passes the most sophisticated AI detectors. Along with removing AI content, it transforms your piece into high-quality content. You do not have to fear your content losing its creativity and authenticity. Undoubtedly one of the best AI tools for students, add it to your arsenal now!
1. To tailor content for individual users, enhancing user engagement and conversion rates by delivering personalised messages. 2. To produce a large volume of human-like content efficiently, saving time and resources in content generation. 3. To create SEO-optimised content that doesn't raise red flags for search engines.
Notion takes a leap into AI with Notion AI, a robust generative tool. It excels in summarising notes, modifying text, and creating actionable tasks post-meetings. As one of the top AI for students, Notion stands out for streamlining and automating tasks through smart suggestions and templates. It's a must-try for students seeking efficiency and an improved user experience—one step at a time, Notion AI is enhancing productivity.
1. Creating and customising documents, offering enhanced writing and editing. 2. A comprehensive task and project management tool, enabling users to organise and track tasks efficiently. 3. Suitable for scenario planning and managing use cases, providing a structured approach to scenario documentation.
16. Duolingo
The person who hasn't heard of Duolingo yet is definitely living under a roof. Excels as a free AI for students for language learning, offering courses in over 30 languages. With concise and engaging lessons, it focuses on reading, listening, and speaking skills. Leveraging AI capabilities, Duolingo tailors lessons to users' skills and pace. The Duolingo Language Test, an affordable proficiency test, integrates assessment science and AI. As one of the top AI tools for students, Duolingo marks a spot for effective and personalised language education.
1. Learn and improve their language skills through interactive lessons and practice. 2. To enhance language education in classrooms and engage students with gamified learning. 3. Businesses utilise Duolingo's language courses to upskill employees and allow international communication.
17. Edmentum
Edmentum is an ed-tech company that offers services curated for kids in grades K-12. As an AI-driven educational platform, it tailors lessons according to the requirements of the learner. It applies ML algorithms to study the learner's progress, allowing continuous evaluation and precise teaching. Edmentum offers online learning with course materials, mock tests, exam preparation and professional development. Why fear exams when we have this amazing AI for students on our side? It is truly one of the best AI tools for students in 2024.
1. Help schools address specific educational needs with its counselling service. 2. Provides support for personalised, virtual, or blended learning, graduation rates, and college/career readiness. 3. Offers professional support, virtual learning, and courses to address teacher shortages.
In today's age of AI, students have a treasure trove of tools at their disposal. From doing tasks like content generation to language learning, these AI companions not only make our lives easier but also encourage creativity. We hope our blog has helped you learn much about AI tools for students. Start working on these tools and be an active part of the AI revolution today! Also, if you are someone who loves to create content, checkout the list of best AI content creation tools .
Frequently Asked Questions
What are some of the best ai tools for students, how can ai for students improve their writing skills, which ai tool for students is recommended for revolutionising learning experiences, are there free ai tools for students, which is the best ai for students that will help in research and writing projects.
Your ideal student home & a flight ticket awaits
Follow us on :

Related Posts

18 Best Google Forms Tricks: Quizzes, Collaboration & More
Google Docs Tips & Tricks To Boost Your Productivity

12 Best Books To Read For Students

Planning to Study Abroad ?

Your ideal student accommodation is a few steps away! Please fill in your details below so we can find you a new home!
We have got your response

amber © 2023. All rights reserved.
4.8/5 on Trustpilot
Rated as "Excellent" • 4700+ Reviews by Students

- Study Assist
- Study in Australia
- Student Help Loan
15 Useful Apps to Help you with Assignment
Everyone who has ever experienced a tough finals week know how precious is time when you need to do more than 10 assignments at a time. Pulling an all- nighter may not always help if you are not using your time in the most efficient way possible with the most productive apps. Thanks to the 21st century there is no need to be stressed out about all the assignments when you can pay someone to do your assignment australia and have awesome apps to help you on the tips of your fingers. Here are some of the most popular and useful ones for students and for teachers:
Dragon Dictation

If you ever want to dictate your essay instead of typing it all down, this is a free assignment writing service app for you. Dragon will record every word that you said and put it down into sentences of your assignment. After that, you can proofread it and correct all of the mistakes, format and edit the text in the way you like.
Cite This For Me

The references are a very important part of every assignment but it does take some time to site your sources properly. This free assignment help app will make your life so much easier by filling out your bibliography section for you. All you have to do is select the referencing format, paste the information about the sources and it will generate the works cited in seconds.

This $7.99 worth app combines a to-do list and a timer of productivity. Just enter different tasks and the order you would like them being completed in. Then it sets a timer for 25 minutes for every task with five-minute breaks in between. The technique used in the app is called the Pomodoro technique and is used to divide your tasks into easy to complete segments with the breaks that help to stay awake.

This free app is not a simple spell check but rather a check for any writing mistakes a person can make. Grammarly can be used as a Chrome extension that analyzes the text and suggests better ways to structure the sentences besides quick scan through typos. It is an app that helps with everything except content and makes my assignment a little more sophisticated for free.

This is an app and a free Chrome extension that plants a tree when you start doing a certain task. If you get distracted or stop doing what you are supposed to, the tree dies. The app takes an emotional approach to focusing and appeals to one’s heart as well as the mind. If you try to switch to a blacklisted website like Twitter or other social media, Australian assignment help will remind you that the tree is still growing and give you reminders and notifications with callings to go back to work. Some might find it creepy but it is one way of staying concentrated on what you have to get done.
Teacher Aide

In collaboration with Google Classroom, the assignment helper app helps teachers to maintain a report of their students. It has features for tracking the attendance and assignments, check individual or group reports and make a schedule of classes. Thus, it saves the energy of the teacher for the actual classes.
Google Classroom

This is the online assignment help app created purely for education that is a leap in the teaching tradition. Now the teachers can communicate with the students online, set up the discussions, distribute the tasks and homework and share the schedule of classes. It has a simple and easy-to-use interface, which helps teachers to save time and still keep things well-organized. The communication is an additional positive feature.

The app helps to set up a class community online but in contrast to a school’s classrooms it also allows the parents to be a part of the educational experience of their children. The teachers can post different media like photos or videos from the classroom as well as encouraging messages for the students and private messages to parents. In return, parents are aware of the educational process. This app is definitely a way to make education transparent.
EduTecher Backpack

With such wide opportunities that the internet gives us, it has also become more complicated to find the certain content you really need for the studies. It takes a lot of time to do my assignment: do the research, find the necessary information and combine it together. EduTecher Backpack puts all the information in one place. It serves as a reliable source where students can easily look up the materials they need. The interface is simple with the ability for students, as well as for teachers, to take notes and save the links in case.
Booktrack Classroom

Useful both for students and teachers, this cheap assignment help australia app provides access to Movie style soundtracks or audio soundtracks to stories, chapters, essays etc. It makes the studying more digital than ever. The teachers can post new videos and help students to learn. This improves students’ understanding of the subject and their test scores.
Socrative Teacher

If you’re a teacher that is having a hard time assessing comprehension of the topic, making quizzes and preparing reports, then you must use this extremely assignments help app. Using Socrative Teacher, you can create an online room where students can join and complete various created quizzes that are used to check the understanding of the subject by the class. It is like making an online classroom the purpose of which is measuring and increasing the knowledge of the students. The accessibility serves as an additional benefit.

This app is a great help for creating digital classrooms and connecting teachers with students as well as with other teachers. Different tests can be taken and submitted at once online, polls can be created and discussions can take place. It is a simple Australia assignment help virtual classroom app.

This is a must-have application for those teachers that are away from the class rarely or often. Through assignment help australia GoClass teachers can connect with the students in online format and teach them by using different features of the app like Whiteboards, sharing of files, videos and pictures. There is a questions section as well.

This my assignment services app serves as an extremely helpful and easy way to contribute the information to parents or students about the daily reports or homework. In addition, there is also a platform for sharing media and assignments online. The reports can be emailed to parents personally and the answers will be received by the teacher. Any announcement takes only a couple of seconds with Remind.
Category: Top Reviews
Leave a Reply Cancel reply
Your email address will not be published. Required fields are marked *
You can get a top-notch Research Paper Help at Edubirdie
Finished Papers

Customer Reviews
IMAGES
VIDEO
COMMENTS
Here are all 17 study apps to make your college life easier. 1. Quizlet: The Easiest Way to Memorize Tricky Topics. 2. Grammarly: Professional Writing in an App. 3. Scribd: Thousands of Books in a Single App. 4. Evernote: Study App for All Your College Notes.
App Overview: Notion is a project management and note-taking app that keeps track of all aspects of student life, including classes, homework, notes, athletics and extracurricular activities.
Listening to music, nature sounds, or background music while you're studying may help you focus better. Here are some great websites and apps that use music to help you study: 10. Brain.fm. Brain.fm uses science - neuroscience, to be specific- to create music to help improve your focus in just 15 minutes.
In addition to homework help, Zookal Study has numerous study tools, such as flashcards, quizzes, and video lessons, making it one of the best revision apps for college students. Cost: 30-day free trial, $7.99/month. Review: No ratings available yet on both Google Play and App Store. Available on: Android, iOS. 10.
Then Wolfram Alpha is the tool you need. It's great for checking answers on homework problems, and the Pro version allows you to see step-by-step solutions to almost any question you can think of. Just make sure you don't use it to replace the hard (and necessary) work of understanding the material.
Multi-purpose apps. 20. Google Drive. Store your study material, assignments, and notes on the cloud and access them from anywhere. 21. Microsoft Office. A suite of essential tools, including Word, PowerPoint, and Excel. Great for preparing assignments and presentations. 22.
Fortunately, there are plenty of apps that can help you get your homework done, the only trouble is knowing which apps are best to download. If you're a student, read on to take a look at some of ...
Todait is an authentic homework app. This app ensures to utilize your time and makes you 100% prepared for your exams. It works as a great time management app. Todait is very useful for students preparing for competitive exams like- SAT, ACT, PCAT, LSAT, MCAT, Bar exam, A level exam, etc.
Homework.ai is an app that leverages artificial intelligence to provide comprehensive homework help. With support for various subjects such as art, biology, computer science, math, music, and languages, Homework.ai is a versatile tool for students. Simply choose a subject, type or record your question, and let the AI-powered system do the rest. ...
Transform your study habits and get better grades with MyStudyLife's game-changing student planner. Organize your schedule, track homework and achieve success . Revolutionize the way you tackle your academic journey with MyStudyLife, the ultimate high school or college schedule planner and online organizer rolled into one. Seamlessly integrate your academic life with this comprehensive tool ...
Chegg. Chegg is the top pick for students looking to get instant results for their homework doubts with the best study tools. It is one of the best writing apps in the market right now that helps your kid with homework. Chegg has excellent 24/7 assistance from experts and qualified professors.
4. Class Timetable. Free - $2 one-time fee | iOS | Android More than 7 million students have downloaded Class Timetable, which offers a simple, color-coded user interface to help you plan and track homework assignments, class schedules and other tasks. You can categorize tasks to simplify schedule management. For example, you might categorize tasks by school subject, work-related activities ...
My Study Life. My Study Life is the perfect app for students who need help staying organized. You can create a study plan and add notes, reminders, and to-do lists. You can also track assignments on this app, which will come in handy when recording your grades. This free homework planner apps lets you add multiple subjects to your study plan.
Based on the writings and work of Stephen Hawking, one of the world's most renowned scientists, this app is a wonderful interactive source of information for space science. This app includes 10 interactive experiments and video segments to help students study our universe. #5 NASA Visualization Explorer.
7. Grammarly. In today's fast-paced world, effective communication has become more critical than ever, and Grammarly is the perfect tool to ensure that your writing stands out. With its cutting-edge AI technology, Grammarly has become one of the top homework-help tools for students, professionals, and writers.
It also has the benefit of allowing parents to track their child's progress. 17. Evernote. Essentially Evernote is a note-taking app and is great for brainstorming presentations and making lists. You can create checklists, record audio notes, handwrite notes, attach files, drop links and create tables as well.
Here's a look at 7 apps that can do your homework for you, and what they have to say about cheating: PhotoMath. Price: Free. Availability: iOS, Android app coming in early 2015. The new ...
These apps that do your homework provide a structured workflow that guides students through their homework, allowing them to focus on the task without getting overwhelmed. By increasing productivity, students can allocate more time to other important aspects of their academic journey or personal lives, striking a healthy balance.
Take a PHOTO of your homework question and get explanations, videos, and step-by-step help instantly. Supports Math, Science, History, English, Econ and more. Completely free, NO in-app purchases ...
Our app uses advanced AI to provide you with instant solutions and clear explanations for your school questions, quizzes, or homework. Make learning more accessible, efficient, and enjoyable with the Homework app! Key Features: - Instant Solutions: Just snap a photo of your homework question, and our AI will provide an accurate answer promptly.
14. ShareX. Windows Apps to Boost Students Productivity. 1. Rambox. Now, this is a Windows productivity app that I would recommend to anyone and everyone. It is a workspace organizer for Windows. What it does is allow you to open and access a plethora of apps inside a single container called a workspace.
2. ChatGPT. OpenAI's chatbot, a top-tier among the best AI tools for students, offers sophistication and is entirely free. Ideal for obtaining quick answers and tailored communication, it's a powerhouse for learning efficiently. With a vast resource pool, it saves time and enhances productivity.
Edmodo. This app is a great help for creating digital classrooms and connecting teachers with students as well as with other teachers. Different tests can be taken and submitted at once online, polls can be created and discussions can take place. It is a simple Australia assignment help virtual classroom app.
If you want to make a lasting impression with your research paper, count on him without hesitation. Useful Apps For Homework, College Admissions Review Essay, Sales Management Business Plan Template, Equity Research Cover Letter, Undergraduate Criminology Dissertation Examples, Emerson And Thoreau Transcendentalism Essay, Band Of Brothers Book ...