The HTML Presentation Framework
Created by Hakim El Hattab and contributors


Hello There
reveal.js enables you to create beautiful interactive slide decks using HTML. This presentation will show you examples of what it can do.
Vertical Slides
Slides can be nested inside of each other.
Use the Space key to navigate through all slides.
Basement Level 1
Nested slides are useful for adding additional detail underneath a high level horizontal slide.
Basement Level 2
That's it, time to go back up.
Not a coder? Not a problem. There's a fully-featured visual editor for authoring these, try it out at https://slides.com .
Pretty Code
Code syntax highlighting courtesy of highlight.js .
Even Prettier Animations
Point of view.
Press ESC to enter the slide overview.
Hold down the alt key ( ctrl in Linux) and click on any element to zoom towards it using zoom.js . Click again to zoom back out.
(NOTE: Use ctrl + click in Linux.)
Auto-Animate
Automatically animate matching elements across slides with Auto-Animate .
Touch Optimized
Presentations look great on touch devices, like mobile phones and tablets. Simply swipe through your slides.
Add the r-fit-text class to auto-size text
Hit the next arrow...
... to step through ...
... a fragmented slide.
Fragment Styles
There's different types of fragments, like:
fade-right, up, down, left
fade-in-then-out
fade-in-then-semi-out
Highlight red blue green
Transition Styles
You can select from different transitions, like: None - Fade - Slide - Convex - Concave - Zoom
Slide Backgrounds
Set data-background="#dddddd" on a slide to change the background color. All CSS color formats are supported.
Image Backgrounds
Tiled backgrounds, video backgrounds, ... and gifs, background transitions.
Different background transitions are available via the backgroundTransition option. This one's called "zoom".
You can override background transitions per-slide.
Iframe Backgrounds
Since reveal.js runs on the web, you can easily embed other web content. Try interacting with the page in the background.
Marvelous List
- No order here
Fantastic Ordered List
- One is smaller than...
- Two is smaller than...
Tabular Tables
| Item | Value | Quantity |
|---|---|---|
| Apples | $1 | 7 |
| Lemonade | $2 | 18 |
| Bread | $3 | 2 |
Clever Quotes
These guys come in two forms, inline: The nice thing about standards is that there are so many to choose from and block:
“For years there has been a theory that millions of monkeys typing at random on millions of typewriters would reproduce the entire works of Shakespeare. The Internet has proven this theory to be untrue.”
Intergalactic Interconnections
You can link between slides internally, like this .
Speaker View
There's a speaker view . It includes a timer, preview of the upcoming slide as well as your speaker notes.
Press the S key to try it out.
Export to PDF
Presentations can be exported to PDF , here's an example:
Global State
Set data-state="something" on a slide and "something" will be added as a class to the document element when the slide is open. This lets you apply broader style changes, like switching the page background.
State Events
Additionally custom events can be triggered on a per slide basis by binding to the data-state name.
Take a Moment
Press B or . on your keyboard to pause the presentation. This is helpful when you're on stage and want to take distracting slides off the screen.
- Right-to-left support
- Extensive JavaScript API
- Auto-progression
- Parallax backgrounds
- Custom keyboard bindings
- Try the online editor - Source code & documentation
Create Stunning Presentations on the Web
reveal.js is an open source HTML presentation framework. It's a tool that enables anyone with a web browser to create fully-featured and beautiful presentations for free.
Presentations made with reveal.js are built on open web technologies. That means anything you can do on the web, you can do in your presentation. Change styles with CSS, include an external web page using an <iframe> or add your own custom behavior using our JavaScript API .
The framework comes with a broad range of features including nested slides , Markdown support , Auto-Animate , PDF export , speaker notes , LaTeX support and syntax highlighted code .
Ready to Get Started?
It only takes a minute to get set up. Learn how to create your first presentation in the installation instructions !
Online Editor
If you want the benefits of reveal.js without having to write HTML or Markdown try https://slides.com . It's a fully-featured visual editor and platform for reveal.js, by the same creator.
Supporting reveal.js
This project was started and is maintained by @hakimel with the help of many contributions from the community . The best way to support the project is to become a paying member of Slides.com —the reveal.js presentation platform that Hakim is building.

Slides.com — the reveal.js presentation editor.
Become a reveal.js pro in the official video course.
Unsupported browser
This site was designed for modern browsers and tested with Internet Explorer version 10 and later.
It may not look or work correctly on your browser.
How to Create Presentation Slides With HTML and CSS
As I sifted through the various pieces of software that are designed for creating presentation slides, it occurred to me: why learn yet another program, when I can instead use the tools that I'm already familiar with?
We can easily create beautiful and interactive presentations with HTML, CSS, and JavaScript, the three basic web technologies. In this tutorial, we'll use modern HTML5 markup to structure our slides, we'll use CSS to style the slides and add some effects, and we'll use JavaScript to trigger these effects and reorganize the slides based on click events.
This tutorial is perfect for those of you new to HTML5, CSS, and JavaScript, who are looking to learn something new by building. After this you could even learn to build an HTML5 slide deck or a dynamic HTML with JavaScript PPT . The sky is the limit.
Wondering how to create an HTML slideshow? Here's the final preview of the presentation HTML tutorial slides we're going to build:
Have you checked out HTML tutorial slides? It's a good example of HTML PPT slides for download.
Let's begin.
1. Create the Directory Structure
Before we get started, let's go ahead and create our folder structure; it should be fairly simple. We'll need:
- css/style.css
- js/scripts.js
This is a simple base template. Your files remain blank for the time being. We'll fix that shortly.
2. Create the Starter Markup
Let's begin by creating the base markup for our presentation page. Paste the following snippet into your index.html file.
| lang="en"> | |
| charset="UTF-8"> | |
| name="viewport" content="width=device-width, initial-scale=1.0"> | |
| http-equiv="X-UA-Compatible" content="ie=edge"> | |
| Document</title> | |
| rel="stylesheet" href="css/style.css"> | |
| rel="stylesheet" href="https://cdnjs.cloudflare.com/ajax/libs/font-awesome/6.0.0/css/all.min.css" integrity="sha512-9usAa10IRO0HhonpyAIVpjrylPvoDwiPUiKdWk5t3PyolY1cOd4DSE0Ga+ri4AuTroPR5aQvXU9xC6qOPnzFeg==" crossorigin="anonymous" referrerpolicy="no-referrer" /> | |
| class="container" | |
| div id="presentation-area"> | |
| src="js/index.js" type="text/javascript"></script> | |
From the base markup, you can tell that we are importing Font Awesome Icons, our stylesheet ( style.css ), and our JavaScript ( index.js ).
Now we'll add the HTML markup for the actual slides inside the <div> wrapper:
| class="presentation"> | |
| class="slide show"> | |
| class="heading"> | |
| class="content grid center"> | |
| class="title"> | |
| /> All You Need To Know | |
| class="slide"> | |
| class="heading"> | |
| class="content grid center"> | |
| class="title"> | |
| class="sub-title"> | |
| Lecture No. 1</p> | |
| My Email Address</p> | |
| href="">[email protected]</a></p> | |
We have seven slides in total, and each slide is composed of the heading section and the content section.
Only one slide will be shown at a time. This functionality is handled by the .show class, which will be implemented later on in our stylesheet. Using JavaScript, later on, we'll dynamically add the .show class to the active slide on the page.
Below the slides, we'll add the markup for our slide's counter and tracker:
| id="presentation-area"> | |
| class="counter"> | |
Later on, we'll use JavaScript to update the text content as the user navigates through the slides.
Finally, we'll add the slide navigator just below the counter:
| id="presentation-area"> | |
| class="navigation"> | |
| id="full-screen" class="btn-screen show"> | |
| class="fas fa-expand"></i> | |
| id="small-screen" class="btn-screen"> | |
| class="fas fa-compress"></i> | |
| id="left-btn" class="btn"> | |
| class="fas fa-solid fa-caret-left"></i> | |
| id="right-btn" class="btn"> | |
| class="fa-solid fa-caret-right"></i> | |
This section consists of four buttons responsible for navigating left and right and switching between full-screen mode and small-screen mode. Again, we'll use the class .show to regulate which button appears at a time.
That'll be all for the HTML part. Now, let's move over to styling.
3. Make It Pretty
Our next step takes place within our stylesheet. We'll be focusing on both aesthetics and functionality here. To make each slide translate from left to right, we'll need to target the class .show with a stylesheet to show the element.
Here's the complete stylesheet for our project:
| { | |
| : 0; | |
| : 0; | |
| : border-box; | |
| : sans-serif; | |
| : all 0.5s ease; | |
| { | |
| : 100vw; | |
| : 100vh; | |
| : flex; | |
| : center; | |
| : center; | |
| { | |
| : 2rem; | |
| li, | |
| { | |
| : 1.2em; | |
| { | |
| : #212121; | |
| : 100%; | |
| : 100%; | |
| : relative; | |
| : flex; | |
| : center; | |
| : center; | |
| { | |
| : 1000px; | |
| : 500px; | |
| : relative; | |
| : purple; | |
| .presentation { | |
| : 100%; | |
| : 100%; | |
| : hidden; | |
| : #ffffff; | |
| : relative; | |
| .counter { | |
| : absolute; | |
| : -30px; | |
| : 0; | |
| : #b6b6b6; | |
| .navigation { | |
| : absolute; | |
| : -45px; | |
| : 0; | |
| .full-screen { | |
| : 100%; | |
| : 100%; | |
| : hidden; | |
| .full-screen .counter { | |
| : 15px; | |
| : 15px; | |
| .full-screen .navigation { | |
| : 15px; | |
| : 15px; | |
| .full-screen .navigation .btn:hover { | |
| : #201e1e; | |
| : #ffffff; | |
| .full-screen .navigation .btn-screen:hover { | |
| : #201e1e; | |
| button { | |
| : 30px; | |
| : 30px; | |
| : none; | |
| : none; | |
| : 0.5rem; | |
| : 1.5rem; | |
| : 30px; | |
| : center; | |
| : pointer; | |
| .btn { | |
| : #464646; | |
| : #ffffff; | |
| : 0.25rem; | |
| : 0; | |
| : scale(0); | |
| .btn.show { | |
| : 1; | |
| : scale(1); | |
| : visible; | |
| .btn-screen { | |
| : transparent; | |
| : #b6b6b6; | |
| : hidden; | |
| { | |
| : 1; | |
| : scale(1); | |
| : visible; | |
| { | |
| : #ffffff; | |
| : 0px 10px 30px rgba(0, 0, 0, 0.1); | |
| .content { | |
| : 2em; | |
| : 100%; | |
| : calc(100% - 100px); | |
| : 11; | |
| .content.grid { | |
| : grid; | |
| .content.grid.center { | |
| : center; | |
| : center; | |
| : center; | |
| .title { | |
| : 3em; | |
| : purple; | |
| .sub-title { | |
| : 2.5em; | |
| : purple; | |
| p { | |
| : 1.25em; | |
| : 1rem; | |
| .slide { | |
| : absolute; | |
| : 0; | |
| : 0; | |
| : 100%; | |
| : 100%; | |
| : #ffffff; | |
| : 0; | |
| : scale(0); | |
| : none; | |
| { | |
| : 1; | |
| : scale(1); | |
| : visible; | |
| .heading { | |
| : 2rem; | |
| : purple; | |
| : 2em; | |
| : bold; | |
| : #ffffff; | |
4. Enable Slide Navigation
Whenever we click on the left or right icon, we want the next slide or previous slide to appear. We also want to be able to toggle between full-screen mode and small-screen mode.
Furthermore, we want the slide's counter to display the accurate slide number on every slide. All these features will be enabled with JavaScript.
Inside js/index.js , we'll begin by storing references to the presentation wrapper, the slides, and the active slide:
| slidesParentDiv = document.querySelector('.slides'); | |
| slides = document.querySelectorAll('.slide'); | |
| currentSlide = document.querySelector('.slide.show'); |
Next, we'll store references to the slide counter and both of the slide navigators (left and right icons):
| slideCounter = document.querySelector('.counter'); | |
| leftBtn = document.querySelector('#left-btn'); | |
| rightBtn = document.querySelector('#right-btn'); |
Then store references to the whole presentation container and both button icons for going into full screen and small screen mode:
| presentationArea = document.querySelector('#presentation-area'); | |
| fullScreenBtn = document.querySelector('#full-screen'); | |
| smallScreenBtn = document.querySelector('#small-screen'); |
Now that we're done with the references, we'll initialize some variables with default values:
| screenStatus = 0; | |
| currentSlideNo = 1 | |
| totalSides = 0; |
screenStatus represents the screen orientation. 0 represents a full screen mode, and 1 represents a small screen mode.
currentSlideNo represents the current slide number, which as expected is the first slide. totalSlides is initialized with 0, but this will be replaced by the actual number of our slides.
Moving the Presentation to the Next and Previous Slides
Next, we'll add click event listeners to the left button, right button, full screen button, and small screen button:
| .addEventListener('click', moveToLeftSlide); | |
| .addEventListener('click', moveToRightSlide); | |
| .addEventListener('click', fullScreenMode); | |
| .addEventListener('click', smallScreenMode); |
We bind corresponding functions that will run when the click event is triggered on the corresponding element.
Here are the two functions responsible for changing the slide:
| moveToLeftSlide() { | |
| tempSlide = currentSlide; | |
| = currentSlide.previousElementSibling; | |
| .classList.remove('show'); | |
| .classList.add('show'); | |
| moveToRightSlide() { | |
| tempSlide = currentSlide; | |
| = currentSlide.nextElementSibling; | |
| .classList.remove('show'); | |
| .classList.add('show'); | |
In the function moveToLeftSlide , we basically access the previous sibling element (i.e. the previous slide), remove the .show class on the current slide, and add it to that sibling. This will move the presentation to the previous slide.
We do the exact opposite of this in the function moveToRightSlide . Because nextElementSibling is the opposite of previousElementSibling , we'll be getting the next sibling instead.
Code for Showing the Presentation in Full Screen and Small Screen
Recall that we also added click event listeners to the full screen and small screen icons. Here's the function responsible for toggling full-screen mode:
| fullScreenMode() { | |
| .classList.add('full-screen'); | |
| .classList.remove('show'); | |
| .classList.add('show'); | |
| = 1; | |
| smallScreenMode() { | |
| .classList.remove('full-screen'); | |
| .classList.add('show'); | |
| .classList.remove('show'); | |
| = 0; | |
Recall that presentationArea refers to the element that wraps the whole presentation. By adding the class full-screen to this element, we trigger the CSS that will expand it to take up the whole screen.
Since we're now in full-screen mode, we need to show the icon for reverting back to the small screen by adding the class .show to it. Finally, we update the variable screenStatus to 1.
For the smallScreenMode function, we do the opposite—we remove the class full-screen , show the expand button icon, and update screenStatus .
Hiding the Left and Right Icons on the First and Last Slides
Now, we need to invent a way to hide the left and right buttons when we're on the first slide and last slide respectively.
We'll use the following two functions to achieve this:
| hideLeftButton() { | |
| (currentSlideNo == 1) { | |
| .classList.remove('show'); | |
| else { | |
| .classList.add('show'); | |
| hideRightButton() { | |
| (currentSlideNo === totalSides) { | |
| .classList.remove('show'); | |
| else { | |
| .classList.add('show'); | |
Both these functions perform a very simple task: they check for the current slide number and hide the left and right buttons when the presentation is pointing to the first and last slide respectively.
Updating and Displaying the Slide Number
Because we're making use of the variable currentSlideNo to hide or show the left and right button icons, we need a way to update it as the user navigates through the slides. We also need to display to the user what slide they are currently viewing.
We'll create a function getCurrentSlideNo to update the current slide number:
| getCurrentSlideNo() { | |
| counter = 0; | |
| .forEach((slide, i) => { | |
| ++ | |
| (slide.classList.contains('show')){ | |
| = counter; | |
We start the counter at 0, and for each slide on the page, we increment the counter. We assign the active counter (i.e. with the class .show ) to the currentSlideNo variable.
With that in place, we create another function that inserts some text into the slide counter:
| setSlideNo() { | |
| .innerText = `${currentSlideNo} of ${totalSides}` | |
So if we were on the second slide, for example, the slide's counter would read: "2 of 6".
Putting Everything Together
To ensure that all of these functions run in harmony, we'll run them in a newly created init function that we'll execute at the start of the script, just below the references:
| (); | |
| init() { | |
| (); | |
| = slides.length | |
| (); | |
| (); | |
| (); | |
We must also run init() at the bottom of both the moveToLeftSlide and moveToRightSlide functions:
| moveToLeftSlide() { | |
| (); | |
| moveToRightSlide() { | |
| (); | |
This will ensure that the init function runs every time the user navigates left or right in the presentation.
Wrapping Up
I hope this tutorial helped you understand basic web development better. Here we built a presentation slideshow from scratch using HTML, CSS, and JavaScript. It's a great way to get into creating dynamic HTML with JavaScript PPT
With this project, you should have learned some basic HTML, CSS, and JavaScript syntax to help you with web development.


How to Create Beautiful HTML & CSS Presentations with WebSlides
Share this article

Getting Started with WebSlides
Create a web presentation with webslides.
- Frequently Asked Questions (FAQs) about Creating Beautiful HTML & CSS Presentations with WebSlides

This article was peer reviewed by Ralph Mason , Giulio Mainardi , and Mikhail Romanov . Thanks to all of SitePoint’s peer reviewers for making SitePoint content the best it can be!
Presentations are one of the best ways to serve information to an audience. The format is short and sharp, made up of small, digestible chunks, which makes any topic under discussion engaging and easier to understand. A presentation can contain all kinds of data, represented by many different elements, such as tables, charts, diagrams, illustrations, images, videos, sounds, maps, lists, etc, all of which lends great flexibility to this medium of expression.
Particularly on the web, presentations come in handy on many occasions, and there are loads of tools at your disposal to create some nifty ones. Today, I’ll introduce you to WebSlides — a small and compact library with a nice set of ready-to-use components, which you can leverage to build well-crafted and attractive web presentations:
WebSlides “is about telling the story, and sharing it in a beautiful way.”
In fact, one of WebSlides’ main benefits is that you can share your story beautifully and in a variety of different ways. With one and the same architecture — 40+ components with semantic classes, and clean and scalable code — you can create portfolios, landings, longforms, interviews, etc.
Besides, you can also extend WebSlides’ functionality by combining it with third-party services and tools such as Unsplash , Animate.css , Animate On Scroll , and so on.
WebSlides is easy to learn and fun to use. Let’s see it in action now.
To get started, first download WebSlides . Then, in the root folder, create a new folder and call it presentation . Inside the newly created presentation folder, create a new file and call it index.html . Now, enter the following code, which contains the needed references to the WebSlides’ files (make sure the filepaths correspond to the folder structure in your setup):
In this section you’re going to create a short, but complete presentation, which explains why SVG is the future of web graphics. Note: If you are interested in SVG, please check my articles: SVG 101: What is SVG? and How to Optimize and Export SVGs in Adobe Illustrator .
You’ll be working step by step on each slide. Let’s get started with the first one.
The first slide is pretty simple. It contains only one sentence:
Each parent <section> inside <article id="webslides"> creates an individual slide. Here, you’ve used two classes from WebSlides’ arsenal, i.e., bg-gradient-r and aligncenter , to apply a radial gradient background and to align the slide content to the center respectively.

The second slide explains what SVG is:
The code above uses the content-left and content-right classes to separate the content into two columns. Also, in order to make the above classes work, you need to wrap all content by using the wrap class. On the left side, the code uses text-subtitle to make the text all caps, and text-intro to increase the font size. The right side consists of an illustrative image.

The next slide uses the grid component to create two columns:
The snippet above shows how to use the grid and column classes to create a grid with two columns. In the first column the style attribute aligns the text to the left (Note how the aligncenter class on the <section> element cascades through to its .column child element, which causes all text inside the slide to be center aligned). In the second column, the browser class makes the illustrative image look like a screenshot.

In the fourth slide, use the grid component again to split the content into two columns:

In this slide, place half of the content to the left and the other half to the right using the content-left and content-right classes respectively:

In this slide, use the background class to embed an image as a background with the Unsplash service . Put the headline on light, transparent background by using the bg-trans-light class. The text’s color appears white, because the slide uses a black background with the bg-black class, therefore the default color is inversed, i.e., white on black rather than black on white. Also, for the text to be visible in front of the image, wrap it with <div class="wrap"> :

In this slide, put the explanation text on the left and the illustrative image on the right at 40% of its default size (with the alignright and size-40 classes on the <img> element). For this and the next three slides, use slideInRight , which is one of WebSlides’ built-in CSS animations:

Do a similar thing here:

This slide also uses a similar structure:

Here, divide the content into left and right again. In the second <p> tag, use the inline style attribute to adjust the font-size and line-height properties. Doing so will override the text-intro class styles that get applied to the element by default. On the right side, use <div class="wrap size-80"> to create a container for the SVG code example:

Here, leverage some of the classes you’ve already used to illustrate browser support for SVG:

In this slide, show some of the use cases for SVG in the form of an image gallery. To this end, use an unordered list with the flexblock and gallery classes. Each item in the gallery is marked up with a li tag:

This section shows a typical SVG workflow, so you need to use the flexblock and steps classes, which show the content as a sequence of steps. Again, each step is placed inside a li tag:
For each step after the first one, you need to add the process-step-# class. This adds a triangle pointing to the next step.

In the last slide, use another one of WebSlides’ built-in CSS animations, i.e., zoomIn :

Congratulations! You’re done. You can see the final outcome here:
See the Pen HTML and CSS Presentation Demo with WebSlides by SitePoint ( @SitePoint ) on CodePen .
Et voilà! You have just created a beautiful, fully functional and responsive web presentation. But this is just the tip of the iceberg, there’s a lot more you can quickly create with WebSlides and many other WebSlides features which I didn’t cover in this short tutorial.
To learn more, explore the WebSlides Components and CSS architecture documentation , or start customizing the demos already available to you in the downloadable folder.
Then, focus on your content and let WebSlides do its job.
Frequently Asked Questions (FAQs) about Creating Beautiful HTML & CSS Presentations with WebSlides
How can i customize the design of my webslides presentation.
WebSlides allows you to customize your presentation to suit your style and needs. You can change the color scheme, fonts, and layout by modifying the CSS file. If you’re familiar with CSS, you can easily tweak the styles to create a unique look. If you’re not, there are plenty of online resources and tutorials that can help you learn. Remember, the key to a great presentation is not only the content but also the design. A well-designed presentation can help keep your audience engaged and make your content more memorable.
Can I add multimedia elements to my WebSlides presentation?
How can i share my webslides presentation with others.
Once you’ve created your WebSlides presentation, you can share it with others by hosting it on a web server. You can use a free hosting service like GitHub Pages, or you can use your own web server if you have one. Once your presentation is hosted, you can share the URL with anyone you want to view your presentation. They’ll be able to view your presentation in their web browser without needing to install any special software.
Can I use WebSlides for commercial projects?
Yes, WebSlides is free to use for both personal and commercial projects. You can use it to create presentations for your business, for your clients, or for any other commercial purpose. However, please note that while WebSlides itself is free, some of the images and fonts used in the templates may be subject to copyright and may require a license for commercial use.
How can I add interactive elements to my WebSlides presentation?
You can add interactive elements to your WebSlides presentation by using JavaScript. For example, you can add buttons that the user can click to navigate to different slides, or you can add forms that the user can fill out. This can be done by adding the appropriate HTML and JavaScript code to your slides. If you’re not familiar with JavaScript, there are plenty of online resources and tutorials that can help you learn.
Can I use WebSlides offline?
Yes, you can use WebSlides offline. Once you’ve downloaded the WebSlides files, you can create and view your presentations offline. However, please note that some features may not work offline, such as loading external images or fonts. To ensure that all features work correctly, it’s recommended to host your presentation on a web server.
How can I add transitions and animations to my WebSlides presentation?
You can add transitions and animations to your WebSlides presentation by using CSS. CSS allows you to control the appearance and behavior of elements on your slides, including transitions and animations. For example, you can use the transition property to animate the change of a property from one value to another, or you can use the animation property to create more complex animations.
Can I use WebSlides on mobile devices?
Yes, WebSlides is designed to be responsive and works well on both desktop and mobile devices. However, please note that due to the smaller screen size, some elements may not display as intended on mobile devices. It’s recommended to test your presentation on different devices to ensure that it looks and works well on all platforms.
How can I add navigation controls to my WebSlides presentation?
You can add navigation controls to your WebSlides presentation by using the built-in navigation options. You can add arrows to navigate between slides, or you can add a slide counter to show the current slide number and the total number of slides. This can be done by adding the appropriate HTML and CSS code to your slides.
Can I use WebSlides with other web development tools?
Yes, you can use WebSlides with other web development tools. For example, you can use it with a text editor to write your HTML and CSS code, or you can use it with a version control system like Git to manage your project files. You can also use it with a build tool like Gulp or Grunt to automate tasks like minifying your code or compiling your CSS.
I am a web developer/designer from Bulgaria. My favorite web technologies include SVG, HTML, CSS, Tailwind, JavaScript, Node, Vue, and React. When I'm not programming the Web, I love to program my own reality ;)


Practical SQL course for Product Managers, Marketers, Designers, Software Engineers, CEOs and more. Learn with hundreds of bite-sized exercises which could be applied in real job right away.
How to Make Slideshow in HTML: Your Quick and Easy Guide
If you’ve ever wondered how to make a slideshow in HTML , today’s your lucky day. I’m here to break it down for you, step-by-step, making the process as clear and easy as possible. While it might sound complicated at first glance, with a bit of understanding and practice, you’ll be creating stunning slideshows in no time.
HTML (HyperText Markup Language) is the backbone of every website we visit on the internet. With its partner in crime CSS (Cascading Style Sheets), they allow us to create visually engaging web pages with ease. A slideshow is just one of many interactive elements that can enhance your web project, enriching the user experience.
In this guide, I’ll walk you through each phase of creating an HTML slideshow – from crafting the structure using HTML tags, styling it with CSS rules, and adding functionality with JavaScript or jQuery if needed. By the end of this article, not only will you have acquired a new skill set but also gained confidence in your ability to manipulate these powerful tools effectively.
Understanding HTML for Slideshow Creation
Diving into the world of HTML, it’s crucial to grasp the foundational elements first. HTML, or Hyper Text Markup Language, is the building block of most web pages. It’s a way to structure content on the web and create visual presentations like slideshows.
When we talk about creating a slideshow using HTML, we’re often referring to leveraging a combination of div tags and CSS properties. Just imagine each slide as an individual div . You need to define that div in your HTML file like this:
In this snippet, we’ve created a simple division or ‘container’ with a single paragraph inside it. This represents one slide in our slideshow.
But here’s where things get interesting! While you can use multiple div tags for different slides, you could also leverage other HTML elements for variety. For instance, an image tag <img> can be used within your slide container along with some text within paragraph <p> or heading <h1> , <h2> , etc., tags.
It might look something like this:
Apart from static content like text and images, you can even incorporate interactive elements into your slides using form input tags such as buttons ( <button> ), dropdowns ( <select> ), etc.
HTML is truly versatile when it comes to crafting engaging slideshows! But remember – while knowing how to manipulate these tags is important, understanding their interaction with CSS and JavaScript will truly unlock their potential for dynamic webpage design.
Essential Tools Required for HTML Slideshow
Creating an HTML slideshow might seem like a daunting task, especially if you’re new to coding. However, I’m here to assure you that it’s not as complex as it may first appear. With the right tools in hand, anyone can create an interactive and engaging slideshow for their website.
Firstly, let’s talk about the most fundamental tool – a text editor. While there are numerous options available such as Sublime Text, Atom or even Notepad++, my personal recommendation is Visual Studio Code (VS Code). It’s free, versatile and has an array of plugins which can simplify your coding experience significantly.
Next up is your web browser. This will be used to preview your slideshow as you build it. Chrome and Firefox offer great developer tools allowing you to inspect elements on your webpage and debug any errors that might pop up.
Now onto the real meat of our toolset: HTML, CSS, and JavaScript. Thinking of them as building blocks:
- HTML (HyperText Markup Language) forms the foundation or structure of your webpage.
- CSS (Cascading Style Sheets) comes next adding style; color schemes, fonts etc., breathing life into your HTML skeleton.
- Lastly comes JavaScript , making everything interactive. In terms of slideshows this could mean transitioning between images when a button is clicked.
Here’s a simple example of these three working together:
In this code, HTML is creating a space for our slideshow, CSS is specifying the size of that space and JavaScript is cycling through an array of image URLs, updating the src attribute of our <img> element every three seconds.
If you’re looking to expand on your slideshow functionality or make it more visually appealing, there are several libraries available such as jQuery and Bootstrap. They offer pre-built components which can be customized to fit into your webpage seamlessly.
Remember, practice makes perfect. So don’t shy away from coding your own HTML slideshows. It’s a fantastic way to learn and understand how websites work!
Step-by-Step Guide: Building Your First HTML Slideshow
Let’s dive into the fun part! We’re going to create a simple yet sophisticated HTML slideshow. Don’t worry if you’re new to coding – it’s really not as intimidating as it might seem.
Firstly, we’ll need to set up our HTML document. This is the backbone of your webpage and where all the magic happens. Start with a basic structure that includes the !DOCTYPE declaration, html, head, and body tags. It should look something like this:
Next comes adding our images for the slideshow within the body section of our code. We’ll use div tags here, which are essentially containers for content on your page. For each image in your slideshow, create a new div tag and nest an img tag inside it with the source (src) attribute pointing to your image file. Here’s what it would look like:
We’ve added a CSS class “slide” to each div so we can style them later.
Now to bring life into our static images – we want them changing automatically creating a dynamic feel! To achieve this effect, you’ll likely find JavaScript most helpful due its ability for controlling time-based events.
Consider using setInterval() function which allows us to run certain code every x milliseconds. In this case, that’d be switching between images in our slideshow:
In the snippet above, we’re hiding all images by default and then displaying one image at a time. When the last image is shown, it goes back to the first.
Finally, let’s not forget about styling our slideshow. With CSS you can customize your slideshow’s appearance to match your website’s aesthetic. Here’s an example of how that might look:
And voila! You’ve just created your first HTML slideshow! Practice makes perfect, so don’t hesitate to experiment with different styles and functionalities. Happy coding!
Common Mistakes and Troubleshooting in Making HTML Slideshows
I’ve seen many people stumble while creating HTML slideshows. It’s not uncommon to come across a few hiccups along the way. So, let’s shed some light on these common mistakes and how you can troubleshoot them.
One of the most frequent mistakes is forgetting to include the Doctype declaration at the beginning of your HTML file. Without it, your slideshow might not display correctly across different browsers. Here’s an example:
Another common error is neglecting to close tags properly, which can lead to elements appearing out of place or not displaying at all. Always double-check that each opening tag has its corresponding closing tag like this:
Sometimes, it’s easy to overlook file paths when linking images or scripts essential for your slideshow. Providing incorrect file paths will prevent those resources from loading correctly – make sure you’re referring to the right location!
Lastly, not optimizing images for web use can slow down your slideshow significantly. Large image files take longer time to load and may cause delays between transitions in your slideshow.
As for troubleshooting issues with HTML slideshows, using browser developer tools should be your go-to strategy! These tools allow you to inspect elements directly in the browser and identify any coding errors causing problems in real-time.
Here are some quick tips:
- Check console logs for any error messages.
- Use ‘Inspect Element’ feature to view associated CSS rules.
- Use Network tab to verify if resources are being loaded successfully.
Remember, everyone makes mistakes when they’re learning something new – it’s all part of the process. Keep practicing, and you’ll surely master the art of creating HTML slideshows!
Conclusion: Mastering the Art of Creating a Slideshow in HTML
I’ve taken you through the steps and shared my knowledge on creating a slideshow using HTML. And I’m confident that you’re now better equipped to handle this task. It’s not just about getting it done, it’s about mastering the art.
Let’s recap what we’ve covered:
- Understanding how to use the <div> tag to create containers for our slides.
- Learning how to style these divs using CSS properties like background-image , height , and width to give shape and substance to our slideshow.
- Discovering the power of JavaScript in manipulating our HTML elements, making them interactive and dynamic.
For example, here’s a simple slide structure:
And remember, there are many ways you can customize your slideshow. You could add navigation buttons with more tags like <button> or introduce transitions with CSS animations.
This whole process isn’t just about learning a new skill; it’s also about enhancing your creativity. Can’t wait to see what amazing slideshows you’ll design!
HTML is such an indispensable tool in web development. From creating basic structures like paragraphs and headings with tags like <p> and <h> , respectively, to crafting intricate layouts with divs – there are endless possibilities.
The beauty lies not only in understanding each HTML tag but also knowing when and where to use them effectively – that’s where true mastery begins!
In essence, building a slideshow in HTML might seem complex at first glance but once broken down into parts – defining structure with HTML, styling with CSS, adding interactivity with JavaScript – it becomes less daunting!
So keep practicing those codes. Each time you do, you’re one step closer towards becoming an expert web developer. Happy coding!

Cristian G. Guasch
Related articles.
- How to Make a Vertical Line in HTML: A Simple Guide for Beginners
- How to Disable a Button in HTML: Your Quick and Easy Guide
- How to Make Checkboxes in HTML: My Simple Step-by-Step Guide
- How to Make a Popup in HTML: A Simple, Step-by-Step Guide for Beginners
- How to Float an Image in HTML: Simplifying Web Design for Beginners
- How to Use iFrame in HTML: A Comprehensive Beginner’s Guide
- How to Add Audio in HTML: A Comprehensive Guide for Beginners
- How to Print in HTML: Your Essential Guide for Webpage Printing
- How to Draw Lines in HTML: A Swift and Simple Guide for Beginners
- How to Add Canonical Tag in HTML: Your Easy Step-by-Step Guide
- How to Use Span in HTML: Unleashing Your Web Design Potential
- How to Embed Google Map in HTML: A Quick and Easy Guide for Beginners
- How to Add SEO Keywords in HTML: My Simplified Step-by-Step Guide
- How to Add a GIF in HTML: A Simple Guide for Beginners
- How to Change Fonts in HTML: Your Ultimate Guide to Web Typography
- How to Make an Ordered List in HTML: A Straightforward Guide for Beginners
- How to Add Bullet Points in HTML: Your Quick and Easy Guide
- How to Move Text in HTML: My Expert Guide for Web Developers
- How to Unbold Text in HTML: A Straightforward Guide for Beginners
- How to Create Pages in HTML: A Step-by-Step Guide for Beginners
- How to Use PHP in HTML: An Expert’s Guide for Seamless Integration
- How to Make Multiple Pages in HTML: A Comprehensive Guide for Beginners
- How to Embed a Website in HTML: Your Simple Guide to Seamless Integration
- How to Create a Box in HTML: A Simple Guide for Beginners
- How to Make a Search Bar in HTML: Simplified Steps for Beginners
- How to Add Padding in HTML: A Simple Guide for Web Design Beginners
- How to Send HTML Email in Outlook: Your Step-by-Step Guide
- How to Make a Form in HTML: Your Easy Guide for Better Web Design
- How to Put Text Next to an Image in HTML: A Simple Guide for Beginners
- How to Use Div in HTML: Your Ultimate Guide on Mastering Division Tags
- How to Wrap Text in HTML: Mastering the Art of Web Design
- How to Redirect to Another Page in HTML: A Simple, Effective Guide for Beginners
- How to Center a Div in HTML: My Expert Guide for Perfect Alignment
- How to Add a Target Attribute in HTML: A Simple Guide for Beginners
- How to Link Email in HTML: My Simple Guide for Beginners
- How to Use JavaScript in HTML: A Comprehensive Guide for Beginners
- How to Make List in HTML: A Comprehensive Guide for Beginners
- How to Make a Button in HTML: A Simple Guide for Beginners
- How to Add a Line Break in HTML: Your Quick and Easy Guide
- How to Embed a Video in HTML: A Simplified Guide for Beginners
- How to Add a Favicon in HTML: Your Easy Step-by-Step Guide
- How to Change Font Size in HTML: A Simple Guide for Beginners
- How to Center a Table in HTML: Streamlining Your Web Design Skills
- How to Add Space in HTML: Your Guide for a Cleaner Code Layout
- How to Change Image Size in HTML: Your Quick and Easy Guide
- How to Indent in HTML: A Simple Guide for Beginners
- How to Add a Link in HTML: Your Easy Step-by-Step Guide
- How to Make a Table in HTML: Your Ultimate Guide to Mastery
- How to Add an Image in HTML: A Step-by-Step Tutorial for Beginners
- How to Italicize in HTML: A Comprehensive Guide for Beginners
DEV Community
Posted on Jan 11, 2019
How To Build A Captivating Presentation Using HTML, CSS, & JavaScript
Building beautiful presentations is hard. Often you're stuck with Keynote or PowerPoint, and the templates are extremely limited and generic. Well not anymore.
Today, we're going to learn how to create a stunning and animated presentation using HTML, CSS, and JavaScript.
If you're a beginner to web development, don't fret! This tutorial will be easy enough to keep up with. So let's slide right into it!

We're going to be using an awesome framework called Reveal.js . It provides robust functionality for creating interesting and customizable presentations.
- Head over to the Reveal.js repository and clone the project (you can also fork this to your GitHub namespace).

- Change directories into your newly cloned folder and run npm install to download the package dependencies. Then run npm start to run the project.

The index.html file holds all of the markup for the slides. This is one of the downsides of using Reveal.js; all of the content will be placed inside this HTML file.

Built-In Themes
Reveal includes 11 built-in themes for you to choose from:

Changing The Theme
- Open index.html
- Change the CSS import to reflect the theme you want to use

The theme files are:
- solarized.css
Custom Themes
It's quite easy to create a custom theme. Today, I'll be using my custom theme from a presentation I gave called "How To Build Kick-Ass Website: An Introduction To Front-end Development."
Here is what my custom slides look like:

Creating A Custom Theme
- Open css/theme/src inside your IDE. This holds all of the Sass files ( .scss ) for each theme. These files will be transpiled to CSS using Grunt (a JavaScript task runner). If you prefer to write CSS, go ahead and just create the CSS file inside css/theme.
- Create a new .scss file. I will call mine custom.scss . You may have to stop your localhost and run npm run build to transpile your Sass code to CSS.
- Inside the index.html file, change the CSS theme import in the <head> tag to use the name of the newly created stylesheet. The extension will be .css , not .scss .
- Next, I created variables for all of the different styles I wanted to use. You can find custom fonts on Google Fonts. Once the font is downloaded, be sure to add the font URL's into the index.html file.
Here are the variables I chose to use:
- Title Font: Viga
- Content Font: Open Sans
- Code Font: Courier New
- Cursive Font: Great Vibes
- Yellow Color: #F9DC24
- Add a .reveal class to the custom Sass file. This will wrap all of the styles to ensure our custom theme overrides any defaults. Then, add your custom styling!
Unfortunately, due to time constraints, I'll admit that I used quite a bit of !important overrides in my CSS. This is horrible practice and I don't recommend it. The reveal.css file has extremely specific CSS styles, so I should have, if I had more time, gone back and ensured my class names were more specific so I could remove the !importants .
Mixins & Settings
Reveal.js also comes with mixins and settings you can leverage in your custom theme.
To use the mixins and settings, just import the files into your custom theme:
Mixins You can use the vertical-gradient, horizontal-gradient, or radial-gradient mixins to create a neat visual effect.
All you have to do is pass in the required parameters (color value) and voila, you've got a gradient!
Settings In the settings file, you'll find useful variables like heading sizes, default fonts and colors, and more!

The structure for adding new content is:
.reveal > .slides > section
The <section> element represents one slide. Add as many sections as you need for your content.
Vertical Slides
To create vertical slides, simply nest sections.
Transitions
There are several different slide transitions for you to choose from:
To use them, add a data-transition="{name}" to the <section> which contains your slide data.
Fragments are great for highlighting specific pieces of information on your slide. Here is an example.
To use fragments, add a class="fragment {type-of-fragment}" to your element.
The types of fragments can be:
- fade-in-then-out
- fade-in-then-semi-out
- highlight-current-blue
- highlight-red
- highlight-green
- highlight-blue
You can additionally add indices to your elements to indicate in which order they should be highlighted or displayed. You can denote this using the data-fragment-index={index} attribute.
There are way more features to reveal.js which you can leverage to build a beautiful presentation, but these are the main things which got me started.
To learn more about how to format your slides, check out the reveal.js tutorial . All of the code for my presentation can be viewed on GitHub. Feel free to steal my theme!
Top comments (18)
Templates let you quickly answer FAQs or store snippets for re-use.
- Joined Oct 2, 2018
I really love reveal.js. I haven't spoken in a while so I haven't used it. I've always used their themes and never thought about making my own. This is probably super useful for company presentations, too. I'm SO over google slides. Trying to format code in those is a nightmare LOL
- Location Stockholm
- Education Siena College
- Work Software Engineer at Spotify
- Joined Dec 21, 2018
Yeah it is time consuming, but the result is much better
- Location Antibes, France
- Work Senior Software Engineer at Spotify
- Joined Oct 16, 2017
The best thing in this - and now I'm not being ironic - is that while you work on a not so much technical task - creating a presentation - you still have to code. And the result is nice.
On the other hand, I know what my presentation skills teachers would say. Well, because they said it... :) If you really want to deliver a captivating presentation, don't use slides at all. Use the time to prepare what you want to say.
I'm not that good - yet, but taking their advice, if must I use few slides, with little information on them and with minimal graphical distractions. My goal is to impress them by what I say, not is what behind my head.
I'm going to a new training soon, where the first day we have to deliver a presentation supported by slides at a big auditorium and the next day we have to go back and forget about the slides and just get on stage and speak. I can't wait for it.
- Location Lake Villa, IL
- Education Bachelor in Electronics Engineering
- Work Computer & Technology Enthusiast
- Joined Oct 8, 2017
How about github.com/team-fluxion/slide-gazer ?
It's my fourth attempt at creating a simple presentation tool to help one present ideas quickly without having to spend time within a presentation editor like Microsoft PowerPoint. It directly converts markdown documents into elegant presentations with a few features and is still under development.
- Location Singapore
- Work Web Developer at FirstCom Solutions
- Joined Jan 15, 2019
Yup, RevealJS is awesome !
Previously I either used PPT or Google Slides. One is a paid license and the other requires an internet connection.
The cool thing about it is that since it's just HTML files behind the scenes, the only software you need to view it with is a web browser. Has amazing syntax-highlighting support via PrismJS. And as a web developer, it makes it simple to integrate other npm packages if need be...
I actually just used it to present a talk this week!
- Email [email protected]
- Location Indianapolis, IN
- Education Purdue University
- Pronouns he/him
- Work Senior Frontend Engineer at Whatnot
- Joined Aug 3, 2017
Great article, Emma! I love Reveal and this is a great write up for using it!
- Location New Delhi, India 🇮🇳
- Joined Dec 5, 2018
I think its a coincidence 😅 I was just starting to think to use reveal.js and suddenly you see this post 🤩
- Location Saratoga Springs,NY
- Education BA, University of Michigan
- Work Documentarian
- Joined Sep 7, 2018
Check out slides.com If you want to skip the heavy lifting and/or use a presentation platform based on reveal.js.
Everything is still easy to customize. The platform provides a UI to work from and an easy way to share your stuff.
BTW - I have no affiliation with slides.com, or even a current account. I used the service a few years back when I regularly presented and wanted to get over PowerPoint, Google Slides, Prezi, etc.
- Location Toronto, ON
- Education MFA in Art Video Syracuse University 2013 😂
- Work Cannot confirm or deny atm
- Joined May 31, 2017
Well I guess you get to look ultra pro by skipping the moment where you have to adjust for display detection and make sure your notes don’t show because you plugged your display connector in 😩 But If the conference has no wifi then we’re screwed I guess
- Location Palm Bay, FL
- Education FullSail University
- Work Developer Relations Manager at MetaMask
- Joined Sep 16, 2018
I like Reveal, but I still have not moved past using Google docs slides because every presentation I do has to be done yesterday. Hoping that I can use Reveal more often this year as I get more time to work on each presentation.
- Email [email protected]
- Location Abuja Nigeria
- Work Project Manager Techibytes Media
- Joined Feb 19, 2019
Well this is nice and I haven't tried it maybe because I haven't spoken much in meet ups but I think PowerPoint is still much better than going all these steps and what if I have network connection issues that day then I'm scrolled right?
- Email [email protected]
- Joined Apr 16, 2018
Using Node and Soket.io remote control (meant to be used on phones) for my school's computer science club, it also features some more goodies which are helpful when having multiple presentations. It can be modded to use these styling techniques effortlessly. Feel free to fork!
SBCompSciClub / prez-software
A synchronized role based presentation software using node, prez-software.
TODO: Make system to easily manage multiple presentations Add Hash endocing and decoding for "sudo" key values TODO: Document Code
Run on Dev Server
npm i nodemon app.js Nodemon? - A life saving NPM module that is ran on a system level which automatically runs "node (file.js)" when files are modified. Download nodemon by running npm i -g nodemon
Making a Presentation
- Copy an existing presentation folder
- Change the folder name (which should be located at public/slides) with the name day[num of day] ex(day2)
Making a Slide
Making a slide is pretty simple. Just add a HTML section. <section> <!--slide content--> </section> inside the span with the class of "prez-root". Also keep in mind that you will need to copy and pate the markup inside the prez root to the other pages (viewer & controller).
Adding Text
You may add text however you desire, but for titles use the…
Awesome post! I’m glad I’m not the only one who likes libraries. 😎
- Location Los Angeles
- Education Engineering, Physics, and Math
- Joined Sep 6, 2018
Fantastic post. I just loved it.
- Location France
- Work Co-Founder of Depot
- Joined Sep 2, 2017
Awesome introduction! I feel like I need to give this a try the next time I create a presentation.
Some comments may only be visible to logged-in visitors. Sign in to view all comments.
Are you sure you want to hide this comment? It will become hidden in your post, but will still be visible via the comment's permalink .
Hide child comments as well
For further actions, you may consider blocking this person and/or reporting abuse

✨ CSS Evolves - Discover Inline if() & CSS Flow Charts
Adam Marsden - Jul 3

Why JavaScript is a Terrible Language
Henrique Leite - Jun 11

Angular Forms new unified control state change events
Davide Passafaro - Jun 10

Wix's Velo API is super frustrating 😟
Paul - Jul 2

We're a place where coders share, stay up-to-date and grow their careers.
- Stack Overflow for Teams Where developers & technologists share private knowledge with coworkers
- Advertising & Talent Reach devs & technologists worldwide about your product, service or employer brand
- OverflowAI GenAI features for Teams
- OverflowAPI Train & fine-tune LLMs
- Labs The future of collective knowledge sharing
- About the company Visit the blog
Collectives™ on Stack Overflow
Find centralized, trusted content and collaborate around the technologies you use most.
Q&A for work
Connect and share knowledge within a single location that is structured and easy to search.
Get early access and see previews of new features.
Embed a PowerPoint presentation into HTML
Is it possible to embed a PowerPoint presentation (.ppt) into a webpage (.xhtml)?
This will be used on a local intranet where there is a mix of Internet Explorer 6 and Internet Explorer 7 only, so no need to consider other browsers.
I've given up... I guess Flash is the way forward.
- Is there any way to embed a pptx file in HTML? – Himanshu Commented Jul 18, 2013 at 6:41
23 Answers 23
Google Docs can serve up PowerPoint (and PDF) documents in it's document viewer. You don't have to sign up for Google Docs, just upload it to your website, and call it from your page:
- 2 Wouldn't have worked for my purpose, but given that the question states it is for a local intranet, this has to be the way to do it! +1 – Steg Commented Nov 7, 2009 at 23:18
- 4 I tried this and all I get is a "Sorry, we are unable to generate a view of the document at this time. Please try again later. " – David Yell Commented Aug 8, 2011 at 13:10
- There's some way to customize this viewer? I want to avoid the fullscreen option... – adripanico Commented Oct 16, 2012 at 7:30
- Not pretty but very useful... Thanks – Santiago Baigorria Commented Jun 6, 2014 at 18:05
- 3 This solution isn't working anymore, because Google restricted the access with the X-Frame-Options to sameorigin – Hello It's me Commented Jul 27, 2017 at 12:48
I got so sick of trying all of the different options to web host a power point that were flaky or required flash so I rolled my own.
My solution uses a very simple javascript function to simply scroll / replace a image tag with GIFs that I saved from the Power Point presentation itself.
In the power point presentation click Save As and select GIF. Pick the quality you want to display the presentation at. Power Point will save one GIF image for each slide and name them Slide1.GIF, Slide2.GIF, etc.....
Create a HTML page and add a image tag to display the Power point GIF images.
Add some first, previous, next and last clickable objects with the onClick action as below:
Finally, add the below javascript function that when called grabs the next Slide.GIF image and displays it to the img tag.
Make sure the GIFs are reachable from the HTMl page. They are by default expected to be in the same directory but you should be able to see the logic and how to set to a image directory if required
I have training material up for my company that uses this technique at http://www.vanguarddata.com.au so before you spend any time trying it out you are welcome to look at in action.
I hope this helps someone else out there who is having as much headaches with this as I did.....
- Very creative way. Good job. – JoshYates1980 Commented Jul 24, 2014 at 19:41
- can you please put a license on it? it would be nice to be able to reuse it. maybe a CC0 license: wiki.creativecommons.org/wiki/CC0 – markgalassi Commented Dec 9, 2015 at 19:43
- Would you have any idea how to deal with slides with animations? – Zane Commented Jun 6, 2017 at 20:46
- Thanks for showing me this way of implementing a powerpoint on a web page. From the code you pasted above I think the first button should be swapImage(1) instead of swapImage(0) right? Also how would I implement a simple text that would let the user know which slide they are on for example like "Slide 3 of 16" or "Slide 1 of 16". – Makuza Commented Sep 30, 2020 at 1:10
Id recommend the official View Office documents online
for embeding you can simply use
- This works really nicely for one file at a time ... do you know if they have an API that you could hit returning the URLs for multiple files? – K7Buoy Commented Feb 17, 2017 at 16:57
- Hi @K7Buoy, did you ever find an API solution? I am also interested in an official API for displaying powerpoint slides. Thanks! – Jack Collins Commented Mar 21, 2018 at 2:11
- Hi @JackCollins ... unfortunately not ... I hunted for quite sometime. – K7Buoy Commented Mar 21, 2018 at 16:27
- Hi @K7Buoy Have tried to look for licencing for commercial use for this, can't find any clarity. Do you know if there are restrictions using this in a commercial aspect? – etchypap Commented May 26, 2020 at 20:24
DocStoc.com and Scribd.com both work well with Internet Explorer 6 and Internet Explorer 7. They'll show a variety of document types, including PowerPoint files (.ppt). I use these services for my intranet here at work. Of course, just remember to mark your documents as 'private' after you upload them.
besides, if you save ppt as .pps format using microsoft powerpoint, you can use the following code:
Another common way to do it is to convert ppt/doc to pdf,
then use swftool( http://www.swftools.org ) to convert it to swf
finally, take FlexPaper( http://flexpaper.devaldi.com ) as document viewer.
I don't know of a way to embed PowerPoint slides directly into HTML. However, there are a number of solutions online for converting a PPT file into a SWF , which can be embedded into HTML just like any other Flash movie.
Googling for 'ppt to swf' seems to give a lot of hits. Some are free, others aren't. Some handle things like animations, others just do still images. There's got to be one out there that does what you need. :)
You can use Microsoft Office Web Apps to embed PowerPoint and Excel Files. See Say more in your blog with embedded PowerPoint and Excel files .
- 1 The embedded PPT app isn't very high quality. It translates your slides to medium-quality jpegs and adds a toggle button. (You'd do better exporting the slides from Powerpoint yourself and then using a jQuery slider.) The full-screen pop-out works a bit better (it has animations, though they're not great), but it also relies on the Silverlight plugin--which doesn't work on mobile devices. – Brandon Lebedev Commented Dec 24, 2011 at 16:52
- @BrandonLebedev, the embedded PPT's are actually better quality than the Google Docs rendering of PowerPoints from what I've seen. But as you rightly point out, it's not much use to mobile users, nor anyone who doesn't have the Silverlight plugin installed. – Ciaran Gallagher Commented May 28, 2013 at 23:55
- The blog link is broke. – JoshYates1980 Commented Jul 24, 2014 at 19:36
I ended up going for screenshooting each slide, and using two different tabs to navigate, this was put into an . this gives high-res, but you sacrifice animations and interactivity, the only thing the user can do is read and change slide. heres an example off my website: http://deepschool.jaberwokkee.kodingen.com/~/Miss%20Necchi%27s%20powerpoints/Volume%20of%20prisms%20powerpoint/slide1.htm
Google Docs allows you to upload a PowerPoint document, you can then 'Share' it with everyone then you can 'Publish' it and this will provide code to embed it in your site or you can use a direct link which runs at the full size of the browser window. The conversion is pretty good and scales well because the text is retained rather than converted to an image. The conversion is pretty good and the whole thing is free. Definitely worth a go.
Tried all of the options in this stack and couldn't reach something that loaded swiftly, used PPT. file directly, and scaled easily. Saved out my ppt. as .gif and opted for "Infinite Carousel" (javascript) that I can drop images into easily. Has left right controls, play option, all the same stuff you find in ppt. presenter mode...
http://www.catchmyfame.com/2009/12/30/huge-updates-to-jquery-infinite-carousel-version-2-released/
The 'actual answer' is that you cannot do it directly. You have to convert your PowerPoint presentation to something that the browser can process. You can save each page of the PowerPoint presentation as a JPEG image and then display as a series of images. You can save the PowerPoint presentation as HTML. Both of these solutions will render only static pages, without any of the animations of PowerPoint. You can use a tool to convert your PowerPoint presentation to Flash (.swf) and embed it that way. This will preserve any animations and presumably allow you to do an automatic slideshow without the need for writing special code to change the images.
Power point supports converting to mp4 which can be posted using a html5 video tag.
Save As > MPEG-4 Video (*.mp4)
As an alternate solution, you can convert PPT/PPTX to JPG/SVG images and display them with revealjs . See example code here .
PS. I am working as SW developer at Aspose.
The first few results on Google all sound like good options:
http://www.pptfaq.com/FAQ00708.htm
http://www.webdeveloper.com/forum/showthread.php?t=86212
Some Flash tool that can convert the PowerPoint file to Flash could be helpful. Slide share is also helpful. For me, I will take something like PPT2Flash Pro or things like that.
Well, I think you get to convert the powerpoint to flash first. PowerPoint is not a sharable format on Internet. Some tool like PowerPoint to Flash could be helpful for you.
Try PowerPoint ActiveX 2.4 . This is an ActiveX component that embeds PowerPoint into an OCX.
Since you are using just Internet Explorer 6 and Internet Explorer 7 you can embed this component into the HTML.
As a side note: If your intranet users also have access to the Internet, you can use the SlideShare widget to embed your PowerPoint presentations in your website.
(Remember to mark your presentation as private!)
I spent a while looking into this and pretty much all of the freeware and shareware on the web sucked. This included software to directly convert the .ppt file to Flash or some sort of video format and also software to record your desktop screen. Software was clunky, and the quality was poor.
The solution we eventually came up with is a little bit manual, but it gave by far the best quality results:
- Export the .ppt file into some sort of image format (.bmp, .jpeg, .png, .tif) - it writes out one file per slide
- Import all the slide image files into Google Picasa and use them to create a video. You can add in some nice simple transitions (it hasn't got some of the horrific .ppt one's, but who cares) and it dumps out a WMV file of your specified resolution.
Saving out as .wmv isn't perfect, but I'm sure it's probably quite straightforward to convert that to some other format or Flash. We were looking to get them up on YouTube and this did the trick.
An easy (and free) way is to download OpenOffice and use Impress to open the PowerPoint presentation. Then export into a separate folder as HTML. Your presentation will consist of separate HTML files and images for each PowerPoint slide. Link to the title page, and you're done.
I was looking for a solution for similar problem.
I looked into http://phppowerpoint.codeplex.com/
But they have no better documentation, and even no demo page I could see over there and it was seemingly difficult.
What I came up with is: SkyDrive by Microsoft. https://skydrive.live.com
All you need is an account with them and upload your PPT and embed them straightaway. PPT player is quite clean to use and I like it.
I've noticed people recommending some PPT-to-Flash solutions, but Flash doesn't work on mobile devices. There's a hosting service called iSpring Cloud that automatically converts your PPT to combined Flash+HTML5 format and lets you generate an embed code for your website or blog. Full instructions can be found on their website .
Another option is to use Apple Keynote on a Mac (Libre Office couldn't event open a pptx I had) to save the presentation to HTML5. It does a pretty good job to produce exactly what it displays in keynote, e.g. it includes animations and video. Compatibility of keynote to powerpoint has it's limits though (independent of the export).
Your Answer
Reminder: Answers generated by artificial intelligence tools are not allowed on Stack Overflow. Learn more
Sign up or log in
Post as a guest.
Required, but never shown
By clicking “Post Your Answer”, you agree to our terms of service and acknowledge you have read our privacy policy .
Not the answer you're looking for? Browse other questions tagged xhtml embed powerpoint or ask your own question .
- The Overflow Blog
- Community Products Roadmap Update, July 2024
- Featured on Meta
- We spent a sprint addressing your requests — here’s how it went
- Upcoming initiatives on Stack Overflow and across the Stack Exchange network...
- What makes a homepage useful for logged-in users
- The [lib] tag is being burninated
Hot Network Questions
- Can a country refuse to deliver a person accused of attempted murder?
- How to solve the intersection truncation problem of multiple \draw[thick, color=xxx] commands by color?
- Lengths of generators of surface group
- Air magic only used to decrease humidity and improve living conditions?
- Plastic plugs used to fasten cover over radiator
- Did Joe Biden refer to himself as a black woman?
- How do I drill a 60cm hole in a tree stump, 4.4 cm wide?
- Newbie trying to write a simple script to automate command
- How do we define addition?
- Has the Supreme Court given any examples where presumptive immunity would be overcome?
- Tour de France General Classification time
- Reversing vowels in a string
- Why not build smaller Ringworlds?
- What does "that" in "No one ever meant that, Drax" refer to?
- Dual citizenship with USA & South Africa and exited South Africa on wrong passport (USA). What passport do I use to reenter SA?
- How to pin to the Task Bar the Device Manager on Windows 11?
- How can I power both sides of breaker box with two 120 volt battery backups?
- Capture multiple errors before raising an exception
- Why is there not a test for diagonalizability of a matrix
- Splitting Scalar into Holomorphic and Anti-Holomorphic Parts
- Mathematics & Logic (Boolean Algebra)
- Any alternative to lockdown browser?
- I forgot to remove all authors' names from the appendix for a double-blind journal submission. What are the potential consequences?
- Why was this a draw? What move I supposed to play to win?
- [email protected]
Bootstraphunter
Free and Premium Bootstrap Templates and Themes
How to Create Presentation Slides with HTML and CSS
- March 15, 2022
As I sifted through the various pieces of software that are designed for creating presentation slides, it occurred to me: why learn yet another program, when I can instead use the tools that I’m already familiar with?
We can easily create beautiful and interactive presentations with HTML, CSS and JavaScript, the three basic web technologies. In this tutorial, we’ll use modern HTML5 markup to structure our slides, we’ll use CSS to style the slides and add some effects, and we’ll use JavaScript to trigger these effects and reorganize the slides based on click events.
This tutorial is perfect for those of you new to HTML5, CSS and JavaScript, who are looking to learn something new by building.
Here’s the final preview of the presentation slide we’re going to build:
You can also find the complete source code in the GitHub repo .
Let’s begin.
Table of Contents
1. Create the Directory Structure
Before we get started, let’s go ahead and create our folder structure; it should be fairly simple. We’ll need:
index.html css/style.css js/scripts.js
This is a simple base template. Your files remain blank for the time being. We’ll fill that shortly.
2. Create the Starter Markup
Let’s begin by creating the base markup for our presentation page. Paste the following snippet into your index.html file.
<!DOCTYPE html> <html lang=”en”> <head> <meta charset=”UTF-8″> <meta name=”viewport” content=”width=device-width, initial-scale=1.0″> <meta http-equiv=”X-UA-Compatible” content=”ie=edge”> <title>Document</title> <link rel=”stylesheet” href=”css/style.css”>
<!– Font Awesome Icon CDN –> <link rel=”stylesheet” href=”https://cdnjs.cloudflare.com/ajax/libs/font-awesome/6.0.0/css/all.min.css” integrity=”sha512-9usAa10IRO0HhonpyAIVpjrylPvoDwiPUiKdWk5t3PyolY1cOd4DSE0Ga+ri4AuTroPR5aQvXU9xC6qOPnzFeg==” crossorigin=”anonymous” referrerpolicy=”no-referrer” /> </head> <body> <div class=”container” <div id=”presentation-area”> <!– slides go here –> </div> </div> <script src=”js/index.js” type=”text/javascript”></script> </body> </html>
From the base markup, you can tell that we are importing Font Awesome Icons, our stylesheet ( style.css ) and our JavaScript ( index.js ).
Now we’ll add the HTML markup for the actual slides inside the <div> wrapper:
<section class=”presentation”>
<!– Slide 1 –> <div class=”slide show”> <div class=”heading”> Presentation on C# </div> <div class=”content grid center”> <h3 class=”title”> What is C# ? <br /> All You Need To Know </h3> </div> </div>
<!– Slide 1 –> <div class=”slide”> <div class=”heading”> Overview </div> <div class=”content grid center”> <h3 class=”title”> Introduction to C+ </h3> <p class=”sub-title”> Basic and Advanced Concepts </p> <p>Lecture No. 1</p> <p>My Email Address</p> <p><a href=””> [email protected] </a></p> </div> </div>
<!– Add 5 more slides here –> </section>
We have seven slides in total, and each slide is comprised of the heading section and the content section.
Only one slide will be shown at a time. This functionality is handled by the .show class which will be implemented later on in our stylesheet.
Using JavaScript, later on, we’ll dynamically add the .show class to the active slide on the page.
Below the slides, we’ll add the markup for our slide’s counter and tracker:
<div id=”presentation-area”> <!– <section class=”slides”><-></section> –> <section class=”counter”> 1 of 6 </section> </div>
Later on, we’ll use JavaScript to update the text content as the user navigates through the slides.
Finally, we’ll add the slide navigator just below the counter:
<div id=”presentation-area”> <!– <section class=”slides”><-></section> –> <!– <section class=”counter”><-></section> –> <section class=”navigation”> <button id=”full-screen” class=”btn-screen show”> <i class=”fas fa-expand”></i> </button>
<button id=”small-screen” class=”btn-screen”> <i class=”fas fa-compress”></i> </button>
<button id=”left-btn” class=”btn”> <i class=”fas fa-solid fa-caret-left”></i> </button>
<button id=”right-btn” class=”btn”> <i class=”fa-solid fa-caret-right”></i> </button> </section> </div>
This section consists of four buttons responsible for navigating left and right and switching between full-screen mode and small-screen mode. Again, we’ll use the class .show to regulate which button appears at a time.
That’ll be all for the HTML part, let’s move over to styling.
3. Make It Pretty
Our next step takes place within our stylesheet. We’ll be focusing on both aesthetics as well as functionality here. To make each slide translate from left to right, we’ll need to target the class .show with a stylesheet to show the element.
Here’s the complete stylesheet for our project:
* { margin: 0; padding: 0; box-sizing: border-box; font-family: sans-serif; transition: all 0.5s ease; }
body { width: 100vw; height: 100vh; display: flex; align-items: center; justify-content: center; }
ul { margin-left: 2rem; }
ul li, a { font-size: 1.2em; }
.container { background: #212121; width: 100%; height: 100%; position: relative; display: flex; align-items: center; justify-content: center; }
#presentation-area { width: 1000px; height: 500px; position: relative; background: purple; }
/* Styling all three sections */ #presentation-area .presentation { width: 100%; height: 100%; overflow: hidden; background: #ffffff; position: relative; }
#presentation-area .counter { position: absolute; bottom: -30px; left: 0; color: #b6b6b6; }
#presentation-area .navigation { position: absolute; bottom: -45px; right: 0; }
/* On full screen mode */ #presentation-area.full-screen { width: 100%; height: 100%; overflow: hidden; }
#presentation-area.full-screen .counter { bottom: 15px; left: 15px; }
#presentation-area.full-screen .navigation { bottom: 15px; right: 15px; }
#presentation-area.full-screen .navigation .btn:hover { background: #201e1e; color: #ffffff; }
#presentation-area.full-screen .navigation .btn-screen:hover { background: #201e1e; } /* End full screen mode */
/* Buttons */ .navigation button { width: 30px; height: 30px; border: none; outline: none; margin-left: 0.5rem; font-size: 1.5rem; line-height: 30px; text-align: center; cursor: pointer; }
.navigation .btn { background: #464646; color: #ffffff; border-radius: 0.25rem; opacity: 0; transform: scale(0); }
.navigation .btn.show { opacity: 1; transform: scale(1); visibility: visible; }
.navigation .btn-screen { background: transparent; color: #b6b6b6; visibility: hidden; }
.btn-screen.show { opacity: 1; transform: scale(1); visibility: visible; }
.btn-screen.hover { color: #ffffff; box-shadow: 0px 10px 30px rgba(0, 0, 0, 0.1); } /* End Buttons */
/* content */ .presentation .content { padding: 2em; width: 100%; height: calc(100% – 100px); z-index: 11; }
.presentation .content.grid { display: grid; }
.presentation .content.grid.center { justify-content: center; align-items: center; text-align: center; }
.content .title { font-size: 3em; color: purple; }
.content .sub-title { font-size: 2.5em; color: purple; }
.content p { font-size: 1.25em; margin-bottom: 1rem; } /* End Content Stylesheet */
/* Slide */ .presentation .slide { position: absolute; top: 0; left: 0; width: 100%; height: 100%; background: #ffffff; opacity: 0; transform: scale(0); visibility: none; }
.slide.show { opacity: 1; transform: scale(1); visibility: visible; }
.slide .heading { padding: 2rem; background: purple; font-size: 2em; font-weight: bold; color: #ffffff; }
4. Enable Slide Navigation
Whenever we click on the left or right icon, we want the next slide or previous slide to appear. We also want to be able to toggle between full-screen mode and small-screen mode.
Furthermore, we want the slide’s counter to display the accurate slide number on every slide. All these features will be enabled with JavaScript.
Inside js/index.js , we’ll begin by storing references to the presentation wrapper, the slides, and the active slide:
let slidesParentDiv = document.querySelector(‘.slides’); let slides = document.querySelectorAll(‘.slide’); let currentSlide = document.querySelector(‘.slide.show’);
Next, we’ll store references to the slide counter and both of the slide navigators (left and right icons):
var slideCounter = document.querySelector(‘.counter’); var leftBtn = document.querySelector(‘#left-btn’); var rightBtn = document.querySelector(‘#right-btn’);
Then store references to the whole presentation container and both button icons for going into full screen and small screen mode:
let presentationArea = document.querySelector(‘#presentation-area’); var fullScreenBtn = document.querySelector(‘#full-screen’); var smallScreenBtn = document.querySelector(‘#small-screen’);
Now that we’re done with the references, we’ll initialize some variables with default values:
var screenStatus = 0; var currentSlideNo = 1 var totalSides = 0;
screenStatus represents the screen orientation. 0 represents a full screen mode and 1 represents a small screen mode.
currentSlideNo represents the current slide number, which as expected is the first slide. totalSlides is initialized with 0, but this will be replaced by the actual number of our slides.
Moving the Presentation to the Next and Previous Slides
Next, we’ll add click event listeners to the left button, right button, full screen button and small screen button:
leftBtn.addEventListener(‘click’, moveToLeftSlide); rightBtn.addEventListener(‘click’, moveToRightSlide);
fullScreenBtn.addEventListener(‘click’, fullScreenMode); smallScreenBtn.addEventListener(‘click’, smallScreenMode);
We bind corresponding functions that will run when the click event is triggered on the corresponding element.
Here are the two functions responsible for changing the slide:
function moveToLeftSlide() { var tempSlide = currentSlide; currentSlide = currentSlide.previousElementSibling; tempSlide.classList.remove(‘show’); currentSlide.classList.add(‘show’); }
function moveToRightSlide() { var tempSlide = currentSlide; currentSlide = currentSlide.nextElementSibling; tempSlide.classList.remove(‘show’); currentSlide.classList.add(‘show’); }
In the function moveToLeftSlide, we basically access the previous sibling element (ie. the previous slide), remove the .show class on the current slide and add it to that sibling. This will move the presentation to the previous slide.
We do the exact opposite of this in the function moveToRightSlide. Because nextElementSibling is the opposite of previousElementSibling, we’ll be getting the next sibling instead.
Code for Showing the Presentation in Full Screen and Small Screen
Recall that we also added click event listeners to the full screen and small screen icons.
Here’s the function responsible for toggling full-screen mode:
function fullScreenMode() { presentationArea.classList.add(‘full-screen’); fullScreenBtn.classList.remove(‘show’); smallScreenBtn.classList.add(‘show’);
screenStatus = 1; }
function smallScreenMode() { presentationController.classList.remove(‘full-screen’); fullScreenBtn.classList.add(‘show’); smallScreenBtn.classList.remove(‘show’);
screenStatus = 0; }
Recall that presentationArea refers to the element that wraps the whole presentation. By adding the class full-screen to this element, we trigger the CSS that will expand it to take up the whole screen.
Since we’re now in full-screen mode, we need to show the icon for reverting back to the small screen by adding the class .show to it. Finally, we update the variable screenStatus to 1.
For the smallScreenMode function, the opposite is done – we remove the class full-screen, show the expand button icon, and reupdate screenStatus.
Hidding Left and Right Icons in First and Last Slides
Now, we need to invent a way to hide both the left and right buttons when we’re on the first slide and last slide respectively.
We’ll use the following two functions to achieve this:
function hideLeftButton() { if(currentSlideNo == 1) { toLeftBtn.classList.remove(‘show’); } else { toLeftBtn.classList.add(‘show’); } }
function hideRightButton() { if(currentSlideNo === totalSides) { toRightBtn.classList.remove(‘show’); } else { toRightBtn.classList.add(‘show’); } }
Both these functions perform a very simple task: they check for the current slide number and hide the left and right buttons when the presentation is pointing to the first and last slide respectively.
Updating and Displaying Slide Number
Because we’re making use of the variable currentSlideNo to hide or show the left and right button icons, we need a way to update it as the user navigates through the slides.
We also need to display to the user what slide he or she is currently viewing.
We’ll create a function getCurrentSlideNo to update the current slide number:
function getCurrentSlideNo() { let counter = 0;
slides.forEach((slide, i) => { counter++
if(slide.classList.contains(‘show’)){ currentSlideNo = counter; } });
We start the counter at 0, and for each slide on the page, we increment the counter. We assign the active counter (ie. with the class .show) to the currentSlideNo variable.
With that in place, we create another function that inserts some text into the slide counter:
function setSlideNo() { slideNumber.innerText = `${currentSlideNo} of ${totalSides}` }
So if we were on the second slide for example, the slide’s counter will read as: 2 of 6
Putting Everything Together
To ensure that all of these functions run in harmony, we’ll run them in a newly created init function that we’ll execute at start of the script, just below the references:
function init() {
getCurrentSlideNo(); totalSides = slides.length setSlideNo(); hideLeftButton(); hideRightButton(); }
We must also run init() at the bottom of both the moveToLeftSlide and moveToRightSlide functions:
function moveToLeftSlide() { // other code
function moveToRightSlide() { // other code
This will ensure that the function init runs every time the user navigates left or right in the presentation.
Wrapping Up
I hope this tutorial helped you understand basic web development better. Here we built a presentation slideshow from scratch using HTML, CSS and JavaScript.
With this project, you should have learned some basic HTML, CSS and JavaScript syntax to help you with web development.
Recent Posts
- How Flatlogic Started Their Business
- Gulp is back – did it ever leave?
- Solving Memory Leaks in Node.js has Never Been Easier, Introducing the Latest Version of N|Solid
- Svelte 5 is almost here
- JSR isn’t another tool, it’s a fundamental shift
Create beautiful stories
WebSlides makes HTML presentations easy. Just the essentials and using lovely CSS.
WebSlides 1.5.0 Github
Why WebSlides?
Good karma & Productivity.
An opportunity to engage.
WebSlides is about good karma. This is about telling the story, and sharing it in a beautiful way. HTML and CSS as narrative elements.
Work better, faster.
Designers, marketers, and journalists can now focus on the content. Simply choose a demo and customize it in minutes.
WebSlides is really easy
Each parent <section> in the #webslides element is an individual slide.
Code is clean and scalable. It uses intuitive markup with popular naming conventions. There's no need to overuse classes or nesting. Making an HTML presentation has never been so fast .
→ Simple Navigation
Slide counter, 40 + beautiful components, vertical rhythm, 500 + svg icons, webslides demos.
Contribute on Github . View all ›

If you need help, here's just some tutorials. Just a basic knowledge of HTML is required:
- Components · Classes .
- WebSlides on Codepen .
- WebSlides Media: images, videos...

Built to expand
The best way to inspire with your content is to connect on a personal level:
- Background images: Unsplash .
- CSS animations: Animate.css .
- Longforms: Animate on scroll .
Ready to Start?
Create your own stories instantly. 120+ premium slides ready to use.
Free Download Pay what you want.
People share content that makes them feel inspired. WebSlides is a very effective way to engage young audiences, customers, and teams.
@jlantunez , @ant_laguna , and @luissacristan .
How To Embed HTML In PowerPoint
Enhance your PowerPoint presentations with interactive content by embedding HTML code into your slides.
Discover some tips, tricks, and common mistakes to avoid when incorporating HTML into your presentations. Learn how to take your slides to the next level with insights from Regina Griffin, a teacher from Oregon, US.
Key Takeaways:
What is html.
HTML plays a crucial role in web development by providing the basic structure for web pages. It uses markup tags to define elements such as headings, paragraphs, links, images, and more, enabling the browser to interpret and display the content correctly.
For example, using HTML tags like <h1> for headings and <p> for paragraphs helps organize content hierarchically. Attributes within these tags provide further instructions, such as specifying image sources with src in the <img> tag.
Understanding the Basics of HTML
Understanding the basics of HTML involves learning how to create elements such as headings, paragraphs, and lists, and how to style them using CSS.
Why Embed HTML in PowerPoint?
Embedding HTML in PowerPoint presentations can enhance interactivity, visual appeal, and information sharing, creating dynamic and engaging content for viewers.
Benefits of Embedding HTML in PowerPoint
The benefits of embedding HTML in PowerPoint presentations include enriched multimedia content, interactive features, and seamless integration of web-based information within slides.
The use of HTML allows for the easy integration of web-based information directly into your slides, making it effortless to showcase live websites, online surveys, and real-time data feeds. This dynamic approach keeps your audience engaged and ensures that your content remains up-to-date and relevant.
How to Embed HTML in PowerPoint?
To embed HTML in PowerPoint, you can use tools like PDFelement for Mac, which allows seamless integration of web content into your presentations.
To guarantee compatibility, make sure to save your PowerPoint presentation in a format that supports HTML embedding. Saving it as a PDF can help maintain the integrity of the embedded HTML content across different devices and platforms.
Step 1: Create a New PowerPoint Slide
Step 2: insert a web object.
After creating the slide, the next step is to insert a web object where the HTML content will be embedded.
When inserting a web object, navigate to the ‘Insert’ tab on the PowerPoint ribbon. Click on ‘Web Object’ from the ‘Text’ group.
Adjust the properties of the web object by right-clicking on it and selecting ‘Properties’. Here, you can tweak settings such as size, position, and how the content interacts with the slide.
Step 3: Copy and Paste the HTML Code
To ensure seamless integration, make sure the HTML code you are copying is clean and free from any errors.
Open your source code editor and locate the section you want to add. Highlight the code, right-click, and select ‘Copy.’
This method guarantees your HTML content is properly displayed within your PowerPoint presentation.
Step 4: Adjust the Size and Position of the Web Object
Consider the visual hierarchy of your content. Placing the web object strategically can enhance the flow of information and guide the viewer’s focus. Remember to align it with other elements on the slide for a polished look.
Tips and Tricks for Embedding HTML in PowerPoint
Another important tip for embedding HTML in PowerPoint is to thoroughly test your HTML code beforehand to ensure it displays correctly and functions as intended within the presentation. This can help you identify any potential issues or errors before showcasing your content to an audience.
Use External CSS Files for Better Formatting
By utilizing external CSS files, users can separate the formatting instructions from the HTML content, allowing for easier management and updates. This separation of concerns makes styling adjustments a breeze, as modifications made to the CSS file automatically reflect across all PowerPoint slides.
Test the HTML Code before Inserting it into PowerPoint
Testing HTML code before integrating it into PowerPoint slides serves as a critical step in the process. One must verify that the code behaves as expected and maintains its integrity across different browsers and screen sizes. This testing phase helps in identifying any potential issues related to compatibility and responsiveness, ensuring a seamless visual experience for viewers. By conducting thorough testing, you can rectify any errors or inconsistencies before incorporating the code into your presentation, thus saving time and avoiding surprises during the actual presentation.
Use HTML Code from a Reliable Source
Common mistakes to avoid.
When embedding HTML in PowerPoint, common mistakes to avoid include using complex HTML code, neglecting compatibility checks with different PowerPoint versions, and skipping presentation testing before the actual event.
Using Complex HTML Code
When creating PowerPoint slides, simpler HTML coding is essential for ensuring that your presentation looks consistent and functions properly on various devices and operating systems. Complex HTML structures may not translate well, causing elements to appear distorted or even break altogether.
Not Checking Compatibility with PowerPoint Versions
Verifying the compatibility of your HTML content with different versions of PowerPoint is crucial to guarantee a seamless viewing experience for all users. Running cross-version tests helps identify potential discrepancies in formatting or functionality that may arise when the content is opened in older or newer PowerPoint iterations. Testing systematically across multiple versions allows you to address any issues proactively, ensuring that your presentation looks and operates as intended regardless of the software version being used.
Not Testing the Presentation Before the Actual Presentation
A comprehensive pre-presentation testing process helps prevent technical glitches and enhances the overall user experience during the presentation.

Frequently Asked Questions
1. how to embed html in powerpoint, 2. can i edit the embedded html in powerpoint.
Yes, you can edit the embedded HTML in PowerPoint. Once the HTML is inserted, you can double-click on it to open the editing window. Make the necessary changes and click “Save” to update the embedded content in your presentation.
3. How do I resize the embedded HTML in PowerPoint?
4. can i embed external html in my powerpoint presentation, 5. how can i test the embedded html in my powerpoint presentation.
To test the embedded HTML in your PowerPoint presentation, click on the “Slide Show” tab and select “From Beginning” or “From Current Slide” to view your presentation in full-screen mode. Interact with the embedded HTML to make sure it functions as intended.
6. Is it possible to embed multiple HTML files in one PowerPoint slide?
Similar posts, how to underline without text in powerpoint, how to add space after bullet in powerpoint, how to rotate a shape in powerpoint without rotating text, how to cite images in powerpoint, how to edit master slide in powerpoint, how to enable design ideas in powerpoint.
- React Native
- CSS Frameworks
- JS Frameworks
- Web Development
- HTML Examples
HTML Basic Examples
- Difference between HTML and CSS
- What are physical tags in HTML?
- Container and Empty Tags in HTML
- How to add background image in HTML ?
- How to define a list item in HTML5?
- Difference between semantic and non-semantic elements
- HTML Color Picker
- How to set the name for the object in HTML5?
- How to add space between elements ?
- How to create a clickable button in HTML ?
HTML Structural Examples
- How to escape everything in a block in HTML ?
- How to center a div within another div?
- How to create a moving div using JavaScript ?
- How to stretch div to fit the container ?
- Make a div horizontally scrollable using CSS
- How to hide text going beyond DIV element using CSS ?
- How to read all spans of a div dynamically ?
- How to create horizontal scrollable sections using CSS ?
HTML Hyperlinks Examples
- How to link back out of a folder using the a-href tag?
- HTML <a> ping Attribute
- HTML <link> disabled attribute
- What is the use of “#” symbol in link URL?
- How to create a link with a media attribute in HTML5 ?
- How to specify the source URL of the quote using HTML5 ?
- How to specify that the target will be downloaded when a user clicks on the hyperlink in HTML5 ?
- How to specify the hyperlink target for the area of an image in HTML5 ?
- How to make a HTML link that forces refresh ?
- How to set the language of text in the linked document in HTML5 ?
- How to specify what media/device the target URL is optimized for ?
- How to specify URL of resource to be used by the object in HTML5 ?
- How to use Anchor tag as submit button ?
HTML Table Examples
- HTML nowrap Attribute
- HTML | tbody charoff Attribute
- HTML | <tr> charoff Attribute
- HTML | <td> scope Attribute
- HTML | <td> rowspan Attribute
- HTML | <col> valign Attribute
- HTML | <thead> align Attribute
- HTML | <thead> valign Attribute
- How to define whether a header cell is a header for a column, row, or group of columns or rows in HTML 5?
- How to group header content of a table using HTML5 ?
- How to implement single row select and delete using DataTables plugin ?
- How to define one or more header cells a cell is related to in HTML ?
- How to set the number of rows a table cell should span in HTML ?
- How to create a table with fixed header and scrollable body ?
HTML Form Examples
- How to set an alternate text for area in HTML5 ?
- How to specify one or more forms the object belongs to ?
- How to specify one or more forms the keygen element belongs to ?
- How to turn on/off form autocompletion in HTML ?
- How to specify that a group of related form elements should be disabled using HTML?
- How to specify how form-data should be encoded when submitting to server ?
- How to specify the URL that will process the data supplied through input(s) when the form is submitted?
- How to specify one or more forms the label belongs to ?
- How to specify multiple forms the select field belongs to in HTML ?
- How to change the <input> type?
- How to specify which form element a label is bound to ?
- How to create a multiline input control text area in HTML5 ?
- How to create form validation by using only HTML ?
HTML Frame Examples
- HTML <iframe> referrerpolicy Attribute
- How to divide an HTML page into four parts using frames ?
- How to place a div inside an iframe for IE ?
- How to enable extra set of restrictions for content in an iframe element in HTML5 ?
- How to navigate URL in an iframe with JavaScript ?
HTML Media Based
- How to animate a straight line in linear motion using CSS ?
- How to specify the media type of the script in HTML5 ?
- How to display video controls in HTML5 ?
- How to mute video using HTML5 ?
- How to add controls to an audio in HTML5 ?
- Create Scanning Animation Loader using HTML & CSS
- How to specify media type of data specified in data attribute in HTML5 ?
- How to set the height and width of the video player in HTML5 ?
- How to check whether an image is loaded or not ?
- How to specify the type of the media resource in HTML5 ?
- How to Create Image Hovered Detail using HTML & CSS ?
- How to define media type of style tag in HTML5 ?
- How to set multiple media resources for elements in HTML5 ?
HTML Questions
- How to set a single line break in HTML5 ?
- How to create a progress bar using HTML and CSS?
- How to create Perspective Text using HTML & CSS ?
- How to isolate a part of text that may be formatted in a different direction using HTML5 ?
- Design an Event Webpage using HTML and CSS
- How to Skew Text on Hover using HTML and CSS?
How to create a slideshow with HTML and CSS ?
- How to specify that an option-group should be disabled in HTML5 ?
- How to disable the drop-down list in HTML5 ?
- How to define scalar measurement within a given range in HTML5 ?
- How to set the security algorithm of key in HTML5 ?
- How to set minimum and maximum value of range in HTML5 ?
A slideshow can be used to display text or images that continuously scroll from one slide to the other to display its content. This article shows an approach to building a slideshow with the use of only HTML and CSS . It consumes less browser memory and takes less computation power as there is no JavaScript involved.
JavaScript-based sliders make the web page slower and also do not work if the user has disabled JavaScript in the browser.
It uses the approach of using animation keyframes to scroll through each of the slides by modifying each of the slide’s margin-left properties during the animation. The animation type can be specified so that the slides can be animated as per the required duration and effect. In this article, we will learn how to build a slideshow using HTML & CSS.
- Use separate div sections for each slide to contain the text content. This allows for individual content definitions on each slide.
- Employ the slide-wrapper class to encapsulate all slides, enabling consistent animation effects and easy application of CSS properties to each slide.
- Utilize the overflow property to clip excess content, ensuring that the content within each slide remains visible, and any overflow is hidden.
- Apply the float property to align contents to the left, providing a structured layout for the slide elements.
- A pply the: nth-child() selector to style elements based on their position in a group of siblings. This allows for individualized styling, such as background color, based on the order of each slide.
Example: In this example, we will see the design of slideshow with HTML and CSS .
Complete Code: Here, we will combine the above two sections into one to achieve the mentioned task.
Slideshow using HTML & CSS
Please Login to comment...
Similar reads.
- Web Technologies
- Web Templates
Improve your Coding Skills with Practice
What kind of Experience do you want to share?
Home Blog PowerPoint Tutorials How to Embed HTML in PowerPoint
How to Embed HTML in PowerPoint

Embedding an HTML file in PowerPoint can enable directly opening the file during a PowerPoint presentation. While PowerPoint is not a web browser with limitations regarding such files, you can embed HTML in PowerPoint.
How to Embed HTML into PowerPoint
To add embed code in PowerPoint, you can simply add it to a textbox. You might also want to see which PowerPoint templates or Google Slides templates to use with PowerPoint to make your code prominently visible. However, to embed an HTML file, it needs to be added as an object.
HTML files can be embedded as objects in PowerPoint via Insert -> Text -> Object .

From the dialog box, select a file and browse to select the HTML file. You can choose to display the file as an icon by checking the Display as Icon option. Check the Link option if you want the linked file to be updated with the latest version. This will help ensure that changes made to the HTML file are reflected when you open it.

How to Open Embedded HTML File in Normal Mode
The HTML file added to PowerPoint can be opened by clicking Normal mode.

How to Open Embedded HTML File in Slide Show Mode
Once the HTML object is added, you will require hyperlinking it to ensure it opens in Slide Show mode. Select the HTML object embedded in your slide and go to Insert Link via the Insert tab.

Browse to select the HTML file to hyperlink it to the embedded HTML object in your slide.

Hyperlinking the HTML file will make it clickable in Slide Show mode.

Final Words
If you link to an HTML file, your PowerPoint file will refer to the linked file, whereas not linking it will embed your PowerPoint presentation. Hence, if you want to embed an HTML file in your slide, you shouldn’t link your file. To ensure the file can open in Slide Show mode, it will require a hyperlink to become clickable directly during a Live presentation session. Otherwise, you must exit Slide Show mode to launch the file.

Like this article? Please share
HTML, Microsoft PowerPoint Filed under PowerPoint Tutorials
Related Articles

Filed under PowerPoint Tutorials • June 28th, 2024
How to Represent Branching Scenarios in PowerPoint
Do you have a situation to expose with multiple possible outcomes? If so, check our guide on branching scenarios in PowerPoint.

Filed under PowerPoint Tutorials • June 21st, 2024
How to Make PowerPoint Full Screen
Experience your presentation design as in the day of the event. Learn how to make a PowerPoint go Full Screen with this tutorial.

Filed under PowerPoint Tutorials • June 18th, 2024
How to Create a Funnel in PowerPoint
Learn how to create a funnel in PowerPoint from SmartArt graphics and PowerPoint Shapes. Recommendations for Funnel PPT Templates included.
Leave a Reply
The CSS Display Property – Display None, Display Table, Inline Block and More

In CSS, the display property determines how an element looks. It is also a crucial part of the presentation of you HTML code as it has a significant impact on layouts.
In fact, to use the modern Flexbox and Grid models, you need to use the display property before you get access to their various properties and values. This is one reason why the display property is so important in CSS.
Let's dive in and learn how to use the display property and all its different values.
Basic display Property Syntax
Display property values in css.
There are inline and block-level elements in CSS. The difference between the two is that inline elements don't take up an entire space – that is, they don't start on a new line – but block elements do.
The display property takes many different values such as inline , inline-block , block , table , and more, which all influence the layout and presentation of an element on the web page. Also, to implement the flex and grid layouts, you need to use the display property.
You can use this display property to change an inline element to block , block element to inline , block and inline elements to inline-block , and many more.

display: inline
An element with a display property set to inline will not start on a new line and it will take up the remaining/available screen width. It just takes up the space such an element would normally take.
Because of this, you can't set the width and height of an element that has a display of inline , becuase it does not take up the whole screen width.
Some elements are inline by default, like <span> , <a> , <i> , and <img> .

display: block
An element that has the display property set to block starts on a new line and takes up the available screen width.
You can specify the width and height properties for such elements. Examples of elements that are at block-level by default are <div> , <section> , <p> , and lots more.
You can set the span from the previous HTML code to block display and it will behave like a block-level element.

You can see that the <span> takes up the full width. That's because it has a display property set to block.
display: inline-block
Apart from block and inline display, there's also inline-block.
An element you assign a display of inline-block is inline by presentation. But it has the added advantage of you being able to apply width and height to it, which you can't do when the element is assigned a dispaly of inline .
So, you can look at the inline-block display as an inline element and block element in one package.

display: none
When you set the display property of an element to none , the element is completely taken off the page and it doesn’t have an effect on the layout.
This also means that devices like screen readers, which make websites accessible to blind people, wont't have access to the element.
Do not confuse display: none with visibility: hidden . The latter also hides the element, but leaves the space it would normally take open or empty.

Visibility hidden leaves the space occupied by the span element open, as you can see below:

display: table
You'll rarely use a display value of table these days, but it's still important to know. It was more useful in the past because you would use it for layouts before the advent of floats, Flex, and Grid.
Setting display to table makes the element behave like a table. So you can make a replica of an HTML table without using the table element and corresponding elements such as tr and td .
For example, in HTML, you can make a table with the <table> element and also a <div> , or any container of your choice.
You make a table with the HTML <table> element like this:
The result of the HTML and CSS code snippets above looks like this:

But you can make the same table with the <div> element by setting the respective displays to table , table-row , and table-cell . You will get the same result as you can see below:
You still get your table:

Other values of the Display Property
Apart from inline , block , none , and table , which are really important because they significantly influence how web pages look, there are other values of the display property worthy of your attention.
Some of them you'll use all the time without really realizing that they are also part of the display property. And others you won't use often at all.
Let's look at some of them now.
display: flex
A display of flex gives you access to the Flex layout system, which simplifies how we design and layout our web pages.

display: grid
A display set to grid allows you to build layouts with the grid system, which is like an advanced form of flex.

display: inherit
This makes the element inherit the display property of its parent. So, if you have a <span> tag inside a div and you give the span tag a display of inherit , it turns it from inline to block element.

display: initial
This sets the display property of an element to its default value. So, if you set the display property of a span to initial, it remains inline, and if you set the same value for a div, it remains block.

Having a good grasp of the display property will help your page layouts look great. It also gives you a lot more control over the way you present your elements while working with CSS.
You can continue to come back to this article for reference too as the display property is always confusing at first until you use it enough to understand it fully.
I hope this article has given you the background knowledge you need in order to put the display property to good use.
Thank you for reading, and keep coding.
Web developer and technical writer focusing on frontend technologies. I also dabble in a lot of other technologies.
If you read this far, thank the author to show them you care. Say Thanks
Learn to code for free. freeCodeCamp's open source curriculum has helped more than 40,000 people get jobs as developers. Get started

HTML BASICS Slides Presentation
Click to access all Slides..
This slide presentation shows basics of HTML.
HTML and XHTML are the foundation of all web development. HTML is used as the graphical user interface in client-side programs written in JavaScript. Server-side languages like PHP and Java also receive data from web pages and use HTML as the output mechanism. The emerging Ajax technologies likewise use HTML and XHTML as their visual engine. HTML was once a very loosely-defined language with very little standardization, but as it has become more important, the need for standards has become more apparent. Regardless of whether you choose to write HTML or XHTML, understanding the current standards will help you provide a solid foundation that will simplify all your other web coding. Fortunately HTML and XHTML are actually simpler than they used to be, because much of the functionality has moved to CSS.
Common Elements
Every page (HTML or XHTML shares certain elements in common.) All are essentially plain text files, with the .html extension. HTML files should not be created with a word processor, but in some type of editor that creates plain text. Every page has a large container (HTML or XHTML) and two major subcontainers, the head and the body. The head area contains information useful behind the scenes, such as CSS formatting instructions and JavaScript code. The body contains the part of the page that is visible to the user.
Tags and Attributes
An HTML document is based on the notion of tags. A tag is a piece of text inside angle brackets (<>). Tags typically have a beginning and an end, and usually contain some sort of text inside them. For example, a paragraph is normally denoted like this:
The <p> indicates the beginning of a paragraph. Text is then placed inside the tag, and the end of the paragraph is denoted by an end tag, which is similar to the start tag but with a slash (</p>.) It is common to indent content in a multi-line tag, but it is also legal to place tags on the same line:
Tags are sometimes enhanced by attributes, which are name value pairs that modify the tag. For example, the tag (used to embed an image into a page) usually includes the following attributes:
The src attribute describes where the image file can be found, and the alt attribute describes alternate text that is displayed if the image is unavailable.
Nested tags
Tags can be (and frequently are) nested inside each other. Tags cannot overlap, so <a><b></a></b> is not legal, but <a><b></b></a> is fine.
HTML VS XHTML
HTML has been around for some time. While it has done its job admirably, that job has expanded far more than anybody expected. Early HTML had very limited layout support. Browser manufacturers added many competing standards and web developers came up with clever workarounds, but the result is a lack of standards and frustration for web developers. The latest web standards (XHTML and the emerging HTML 5.0 standard) go back to the original purpose of HTML: to describe the structure of the data only, and leave all formatting to CSS (Please see the DZone CSS Refcard Series). XHTML is nothing more than HTML code conforming to the stricter standards of XML. The same style guidelines are appropriate whether you write in HTML or XHTML (but they tend to be enforced in XHTML):
Most of the requirements of XHTML turn out to be good practice whether you write HTML or XHTML. I recommend using XHTML strict so you can validate your code and know it follows the strictest standards.
XHTML has a number of flavors. The strict type is recommended, as it is the most up-to-date standard which will produce the most predictable results. You can also use a transitional type (which allows deprecated HTML tags) and a frameset type, which allows you to add frames. For most applications, the strict type is preferred.
HTML Template
The following code can be copied and pasted to form the foundation of a basic web page:
The structure of your web pages is critical to the success of programs based on those pages, so use a validating tool to ensure you haven't missed anything
| Validating Tool | Description |
| WC3 | The most commonly used validator is online at http://validator.w3.org this free tool checks your page against the doctype you specify and ensures you are following the standards. This acts as a 'spell-checker' for your code and warns you if you made an error like forgetting to close a tag. |
| HTML Tidy | There's an outstanding free tool called HTML tidy which not only checks your pages for validity, but also fixes most errors automatically. Download this tool at http://tidy.sourceforge.net/ or (better) use the HTML validator extension to build tidy into your browser. |
| HTML Validator extension | The extension mechanism of Firefox makes it a critical tool for web developers. The HTML Validator extension is an invaluable tool. It automatically checks any page you view in your browser against both the w3 validation engine and tidy. It can instantly find errors, and repair them on the spot with tidy. With this free extension available at http://users.skynet. be/mgueury/mozilla/ , there's no good reason not to validate your code. |
USEFUL OPEN SOURCE TOOLS
Some of the best tools for web development are available through the open source community at no cost at all. Consider these application as part of your HTML toolkit:
| Open Source Tool | Description |
| Aptana | http://www.aptana.com/ This free programmer's editor (based on Eclipse) is a full-blown IDE customized for HTML / XHTML, CSS, JavaScript, and Ajax. It offers code completion, syntax highlighting, and FTP support within the editor. |
| Web Developer Toolbar | https://www.addons.mozilla.org/en-US/firefox/addon/60 This Firefox extension adds numerous debugging and web development tools to your browser. |
| Firebug | https://addons.mozilla.org/en-US/firefox/addon/1843 is an add-on that adds full debugging capabilities to the browser. The firebug lite version even works with IE. |
PAGE STRUCTURE ELEMENTS
The following elements are part of every web page.
| Element | Description |
| <html></html> | Surrounds the entire page |
| <head></head> | Contains header information (metadata, CSS styles, JavaScript code) |
| <title></title> | Holds the page title normally displayed in the title bar and used in search results |
| <body></body> | Contains the main body text. All parts of the page normally visible are in the body |
KEY STRUCTURAL ELEMENTS
Most pages contain the following key structural elements:
| Element | Name | Description |
| <h1> </h1> | Heading 1 | Reserved fo strongest emphasis |
| <h2> </h2> | Heading 2 | Secondary level heading. Headings go down to level 6, but <h1> through <h3> are most common |
| <p> </p> | Paragraph | Most of the body of a page should be enclosed in paragraphs |
| <div> </div> | Division | Similar to a paragraph, but normally marks a section of a page. Divs usually contain paragraphs |
LISTS AND DATA
Web pages frequently incorporate structured data so HTML includes several useful list and table tag
| Element | Name | Description |
| <ul></ul> | Unordered list | Normally these lists feature bullets (but that can be changed with CSS) |
| <ol></ol> | Ordered list | These usually are numbered, but this can be changed with CSS |
| <li></li> | List item | Used to describe a list item in an unordered list or an ordered list |
| <dl></dl> | Definition list | Used for lists with name-value pairs |
| <dt></dt> | Definition term | The name in a name-value pair. Used in definition lists |
| <dd></dd> | Definition description | The value (or definition) of a name, value pair |
| <table></table> | Table | Defines beginning and end of a table |
| <tr></tr> | Table row | Defines a table row. A table normally consists of several <tr> pairs (one per row) |
| <td></td> | Table data | Indicates data in a table cell. <td> tags occur within <tr> (which occur within <table>) |
| <th></th> | Table heading | Indicates a table cell to be treated as a heading with special formatting |
Standard List Types
HTML supports three primary list types. Ordered lists and unordered lists are the primary list types. By default, ordered lists use numeric identifiers, and unordered lists use bullets.
However, you can use the list-style-type CSS attribute to change the list marker to one of several types.
Lists can be nested inside each other
Definition lists
The special definition list is used for name / value pairs. The definition term (dt) is a word or phrase that is used as the list marker, and the definition data is normally a paragraph:
Use of tables
Tables were used in the past to overcome the page-layout shortcomings of HTML. That use is now deprecated in favor of CSS-based layout. Use tables only as they were intended, to display tabular data.
A table mainly consists of a series of table rows (tr.) Each table row consists of a number of table data (td) elements. The table heading (th) element can be used to indicate a table cell should be marked as a heading.
The rowspan and colspan attributes can be used to make a cell span more than one row or column.
Each row of a table should have the same number of columns, and each column should have the same number of rows. Use of the span attribute may require adjustment to other rows or columns.
LINKS AND IMAGES
Links and images are both used to incorporate external resources into a page. Both are reliant on URIs (Universal Resource Indicators), commonly referred to as URLs or addresses.
<a> (anchor) The anchor tag is used to provide the basic web link:
In this example, http://www.example.com is the site to be visited. The text "link to example.com" will be highlighted as a link.
absolute and relative references
<link>
The link tag is used primarily to pull in external CSS files:
<img>
The img tag is used in to attach an image. Valid formats are .jpg, .png, and .gif. An image should always be accompanied by an alt attribute describing the contents of the image.
Image formatting attributes (height, width, and align) are deprecated in favour of CSS.
SPECIALTY MARKUP
HTML / XHTML includes several specialty tags. These are used to describe special purpose text. They have default styling, but of course the styles can be modified with CSS.
<quote>
The quote tag is intended to display a single line quote:
Quote is an inline tag. If you need a block level quote, use <blockquote>.
<pre>
The <pre> tag is used for pre-formatted text. It is sometimes used for code listings or ASCII art because it preserves carriage returns. Pre-formatted text is usually displayed in a fixed-width font.
<code>
The code format is used to manage pre-formatted text, especially code listings. It is very similar to pre.
<blockquote>
This tag is used to mark multi-line quotes. Frequently it is set off with special fonts and indentation through CSS. It is a block-level tag.
<span>
The span tag is a vanilla inline tag. It has no particular formatting of its own. It is intended to be used with a class or ID when you want to apply style to an inline chunk of code.
The em tag is used for standard emphasis. By default, <em> italicizes text, but you can use CSS to make any other type of emphasis you wish.
<strong>
This tag represents strong emphasis. By default, it is bold, but you can modify the formatting with CSS.
Forms are the standard user input mechanism in HTML / XHTML. You will need another language like JavaScript or PHP to read the contents of the form elements and act upon them.
Form Structure
A number of tags are used to describe the structure of the form. Begin by looking over a basic form:
The <form></form> pair describes the form. In XHTML strict, you must indicate the form's action property. This is typically the server-side program that will read the form. If there is no such program, you can set the action to null ("") The method attribute is used to determine whether the data is sent through the get or post mechanism.
Most form elements are inline tags, and must be encased in a block element. The fieldset is designed exactly for this purpose. Its default appearance draws a box around the form. You can have multiple fieldsets inside a single form.
You can add a legend inside a fieldset. This describes the purpose of the fieldset.
A label is a special inline element that describes a particular field. A label can be paired with an input element by putting that element's ID in the label's for attribute.
The input element is a general purpose inline element. It is meant to be used inside a form, and it is the basis for several types of more specific input. The subtype is indicated by the type attribute. Input elements usually include an id attribute (used for CSS and JavaScript identification) and / or a name attribute (used in server-side programming.) The same element can have both a name and an id.
This element allows a single line of text input:
Passwords display just like textboxes, except rather than showing the text as it is typed, an asterisk appears for each letter. Note that the data is not encoded in any meaningful way. Typing text into a password field is still entirely unsecure.
Radio Button
Radio buttons are used in a group. Only one element of a radio group can be selected at a time. Give all members of a radio group the same name value to indicate they are part of a group.
Attaching a label to a radio button means the user can activate the button by clicking on the corresponding label. For best results, use the selected attribute to force one radio button to be the default.
Checkboxes are much like radio buttons, but they are independent. Like radio buttons, they can be associated with a label.
Hidden fields hold data that is not visible to the user (although it is still visible in the code) It is primarily used to preserve state in server-side programs.
Note that the data is still not protected in any meaningful way.
Buttons are used to signal user input. Buttons can be created through the input tag:
This will create a button with the caption "launch the missiles." When the button is clicked, the page will attempt to run a JavaScript function called "launchMissiles()" Standard buttons are usually used with JavaScript code on the client. The same button can also be created with this alternate format:
This second form is preferred because buttons often require different CSS styles than other input elements. This second form also allows an <img> tag to be placed inside the button, making the image act as the button.
The reset button automatically resets all elements in its form to their default values. It doesn't require any other attributes.
Select / option
Drop-down lists can be created through the select / option mechanism. The select tag creates the overall structure, which is populated by option elements.
The select has an id (for client-side code) or name (for serverside code) identifier. It contains a number of options. Each option has a value which will be returned to the program. The text between <option> and </option> is the value displayed to the user. In some cases (as in this example) the value displayed to the user is not the same as the value used by programs.
Multiple Selections
You can also create a multi-line selection with the select and option tags:
DEPRECATED FORMATTING TAGS
Certain tags common in older forms of HTML are no longer recommended as CSS provides much better alternatives.
The font tag was used to set font color, family (typeface) and size. Numerous CSS attributes replace this capability with much more flexible alternatives. See the CSS refcard for details.
I (italics)
HTML code should indicate the level of emphasis rather than the particular stylistic implications. Italicizing should be done through CSS. The <em> tag represents emphasized text. It produces italic output unless the style is changed to something else. The <i> tag is no longer necessary and is not recommended. Add font-style: italic to the style of any element that should be italicized.
Like italics, boldfacing is considered a style consideration. Use the <strong> tag to denote any text that should be strongly emphasized. By default, this will result in boldfacing the enclosed text. You can add bold emphasis to any style with the font-weight: bold attribute in CSS.
DEPRECATED TECHNIQUES
In addition to the deprecated tags, there are also techniques which were once common in HTML that are no longer recommended.
Frames have been used as a layout mechanism and as a technique for keeping one part of the page static while dynamically loading other parts of the page in separate frames. Use of frames has proven to cause major usability problems. Layout is better handled through CSS techniques, and dynamic page generation is frequently performed through server-side manipulation or AJAX.
Table-based design
Before CSS became widespread, HTML did not have adequate page formatting support. Clever designers used tables to provide an adequate form of page layout. CSS provides a much more flexible and powerful form of layout than tables, and keeps the HTML code largely separated from the styling markup.
HTML ENTITIES
Sometimes you need to display a special character in a web page. HTML has a set of special characters for exactly this purpose. Each of these entities begins with the ampersand(&) followed by a code and a semicolon.
| Character | Name | Code | Note |
|---|---|---|---|
| Non-breaking space | Adds white space | ||
| < | Used to display HTML code or mathematics | ||
| > | Greater than | > | Used to display HTML code or mathematics |
| & | Ampersand | & | If you're not displaying an entity but really want the & symbol |
| © | Copyright | © | Copyright symbol |
| ® | Registered trademark | ® | Registered trademark |
HTML 5 / CSS3 PREVIEW
New technologies are on the horizon. Firefox 3.5 now has support for significant new HTML 5 features, and CSS 3 is not far behind. While the following should still be considered experimental, they are likely to become very important tools in the next few years. Firefox 3.5, Safari 4 (and a few other recent browsers) support the following new features:
Audio and video tags
Finally the browsers have direct support for audio and video without plugin technology. These tags work much like the img tag.
The HTML 5 standard currently supports Ogg Theora video, Ogg Vorbis audio, and wav audio. The Ogg formats are opensource alternatives to proprietary formats, and plenty of free tools convert from more standard video formats to Ogg. The autoplay option causes the element to play automatically. The controls element places controls directly into the page.
The code between the beginning and ending tag will execute if the browser cannot process the audio or video tag. You can place alternate code here for embedding alternate versions (Flash, for example)
The canvas tag offers a region of the page that can be drawn upon (usually with Javascript.) This creates the possibility of real interactive graphics without requiring plugins like Flash.
This is actually a CSS improvement, but it's much needed. It allows you to define a font-face in CSS and include a ttf font file from the server. You can then use this font face in your ordinary CSS and use the downloaded font. If this becomes a standard, we will finally have access to reliable downloadable fonts on the web, which will usher in web typography at long last.
Follow us on Facebook and Twitter for latest update.
- Weekly Trends and Language Statistics
CSS Reference
Css properties, css display property.
Use of some different display values:
More "Try it Yourself" examples below.
Definition and Usage
The display property specifies the display behavior (the type of rendering box) of an element.
Show demo ❯
| Default value: | inline |
|---|---|
| Inherited: | no |
| Animatable: | no. |
| Version: | CSS1 |
| JavaScript syntax: | .style.display="none" |
Browser Support
The numbers in the table specify the first browser version that fully supports the property.
| Property | |||||
|---|---|---|---|---|---|
| display | 4.0 | 8.0 | 3.0 | 3.1 | 7.0 |
Note: The values "flex" and "inline-flex" requires the -webkit- prefix to work in Safari, prior version 9.
Note: "display: contents" does not work in Edge prior version 79.
Advertisement
Property Values
| Value | Description | Play it |
|---|---|---|
| inline | Displays an element as an inline element (like <span>). Any height and width properties will have no effect. This is default. | |
| block | Displays an element as a block element (like <p>). It starts on a new line, and takes up the whole width | |
| contents | Makes the container disappear, making the child elements children of the element the next level up in the DOM | |
| flex | Displays an element as a block-level flex container | |
| grid | Displays an element as a block-level grid container | |
| inline-block | Displays an element as an inline-level block container. The element itself is formatted as an inline element, but you can apply height and width values | |
| inline-flex | Displays an element as an inline-level flex container | |
| inline-grid | Displays an element as an inline-level grid container | |
| inline-table | The element is displayed as an inline-level table | |
| list-item | Let the element behave like a <li> element | |
| run-in | Displays an element as either block or inline, depending on context | |
| table | Let the element behave like a <table> element | |
| table-caption | Let the element behave like a <caption> element | |
| table-column-group | Let the element behave like a <colgroup> element | |
| table-header-group | Let the element behave like a <thead> element | |
| table-footer-group | Let the element behave like a <tfoot> element | |
| table-row-group | Let the element behave like a <tbody> element | |
| table-cell | Let the element behave like a <td> element | |
| table-column | Let the element behave like a <col> element | |
| table-row | Let the element behave like a <tr> element | |
| none | The element is completely removed | |
| initial | Sets this property to its default value. | |
| inherit | Inherits this property from its parent element. |
More Examples
A demonstration of how to use the contents property value. In the following example the .a container will disappear, and making the child elements (.b) children of the element the next level up in the DOM:
A demonstration of how to use the inherit property value:
Set the direction of some flexible items inside a <div> element in reverse order:
Related Pages
CSS tutorial: CSS Display and visibility
HTML DOM reference: display property

COLOR PICKER

Contact Sales
If you want to use W3Schools services as an educational institution, team or enterprise, send us an e-mail: [email protected]
Report Error
If you want to report an error, or if you want to make a suggestion, send us an e-mail: [email protected]
Top Tutorials
Top references, top examples, get certified.
How to Embed HTML in Google Slides? [Complete Guide!]
By: Author Shrot Katewa
![How to Embed HTML in Google Slides? [Complete Guide!]](https://artofpresentations.com/wp-content/uploads/2022/11/Featured-Image-7.jpg "html display presentation")
HTML is a great way of including “more information” into your presentations which can open up a whole new world of possibilities to present an interactive presentations. Although Google has not introduced a feature to embed HTML in Google Slides yet, we can use “insert” option to embed Objects like URLs, images, videos etc. easily.
If you want to display some information outside your presentation and also want to keep the flow at the same time, there are two ways to add links of web pages in Google Slides.
Either you select the text and choose “Link” from the “Right-click” menu or select “Link” from the dropdown menu of “Insert” tab. It will open a dialog box where you can paste the link of your website, padlet, Instagram post etc. and click “apply” to embed the link into the slide.
In this article, we will also teach you how to embed a Google Slide on a website. So, let’s start out this complete guide:
1. How to Embed HTML in Google Slides?
Google Slides does not have any feature to embed HTML in a presentation slide. Unfortunately, you cannot embed HTML in a Google Slides presentation.
However, using the “Insert” menu in the menu bar, you can insert embedded objects like images, audio, videos, etc. To learn more about inserting embedded media into a Google Slides presentation, you can read my article here .
2. How to Embed a Website in Google Slides?
In Google Slides, you cannot embed a website into a slide. However, you can add the link of a website to the text in a slide. All you have to do is follow 2 easy steps.
Step-1: Click on the “Link” option

The first step is to select the text where you want to link the website. Then “Right Click” on the text. In the right-click menu, click on the “Link” option. Alternatively, you can press the “Ctrl+K” keys on your keyboard.
Step-2: Click on the “Apply” option
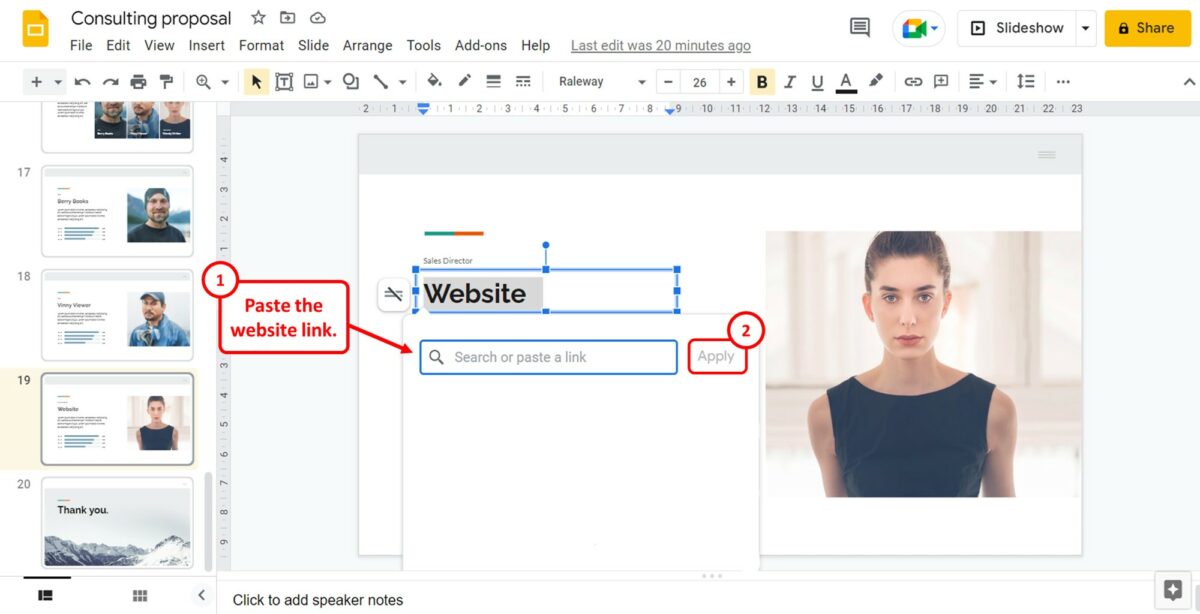
In the pop-up dialog under the selected text, click on the “Search or paste a link” box. You can now paste the website link that you want to embed. Then click on the “Apply” option to hyperlink the text.
3. How to Embed iframes in Google Slides?
You cannot embed iframes in Google Slides. Since there is no feature for HTML codes, the application cannot embed iframes. However, you can copy the iframe code for the Google Slides presentation to embed it into websites. Refer to section 6 for detailed steps on obtaining the iframe code for a Google Slides presentation.
4. How to Embed Padlet in Google Slides?
To embed your Padlet wall in Google Slides, you have to first copy the link from Padlet. Since Google Slides does not have any feature that allows you to embed a code, you have to add Padlet as a link. To do so, follow the 3 quick steps.
Step-1: Click on the “Insert” tab
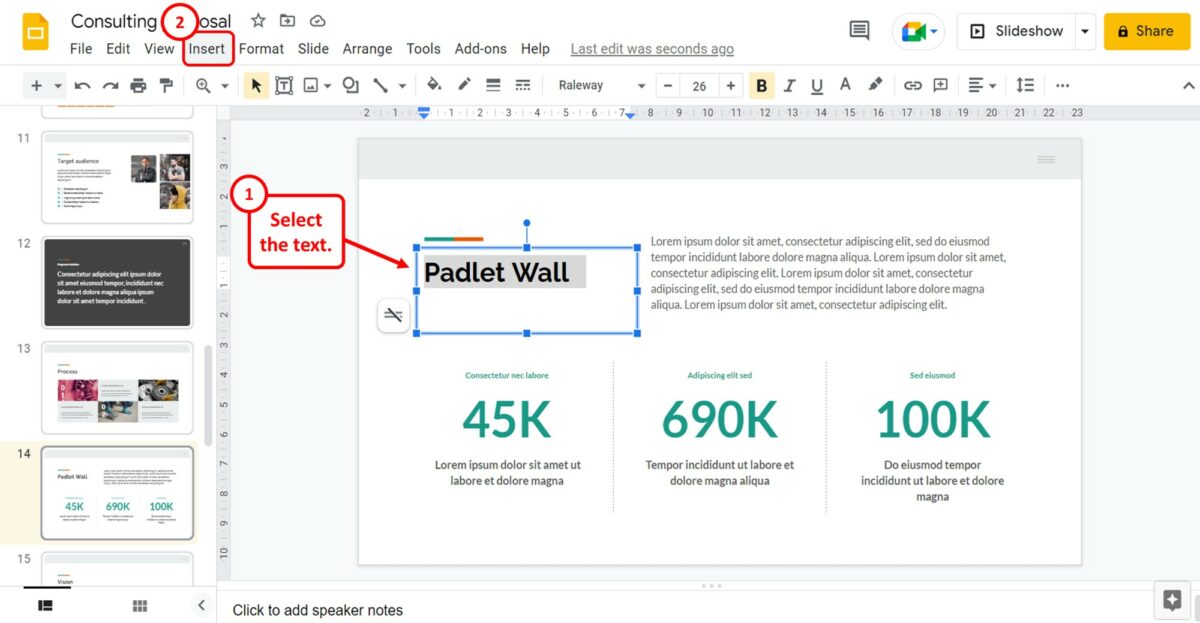
The first step is to select the text or image where you want to link the Padlet wall. Then click on the “Insert” tab in the menu bar located at the top of the screen.
Step-2: Click on the “Link” option

In the dropdown menu under the “Insert” tab, click on the “Link” option. You can alternatively press the “Ctrl+K” keys on your keyboard.
Step-3: Paste the Padlet link
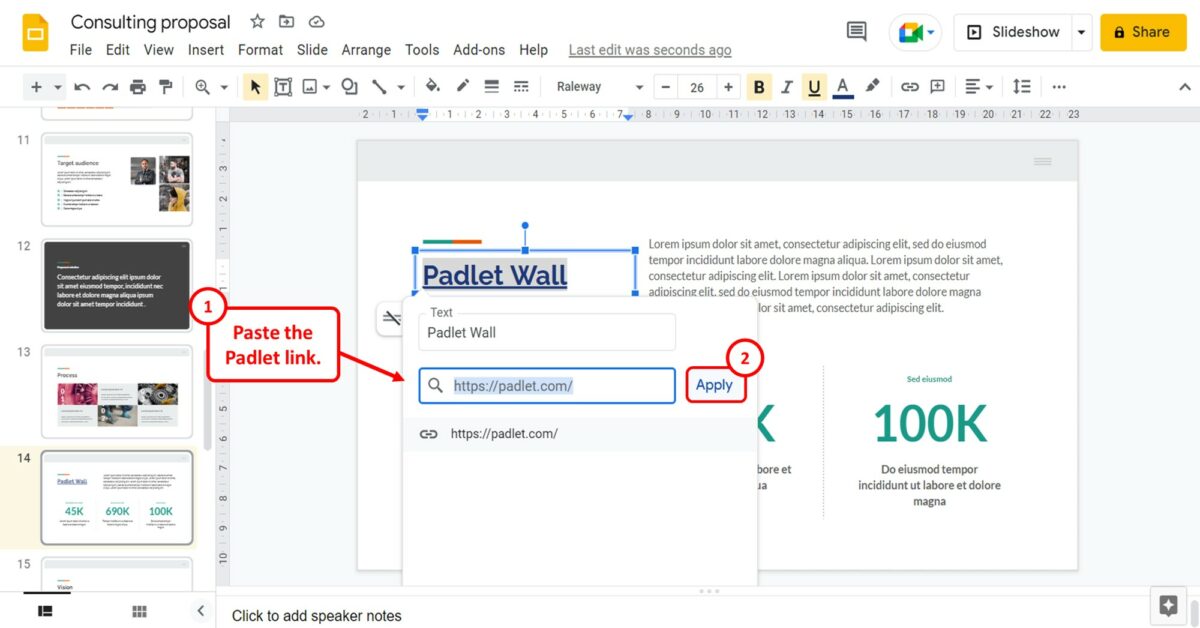
In the pop-up dialog box, you can now paste the Padlet link. Finally, all you have to do is click on the “Apply” button to add the Padlet link to the selected text or image.
5. How to Embed Instagram Post in Google Slides?
In Google Slides, you cannot embed an Instagram post using the embed link available on Instagram. However, you can insert the picture and link it to the Instagram post. All you have to do is follow the 5 simple steps.
Step-1: Click on the “Insert” menu
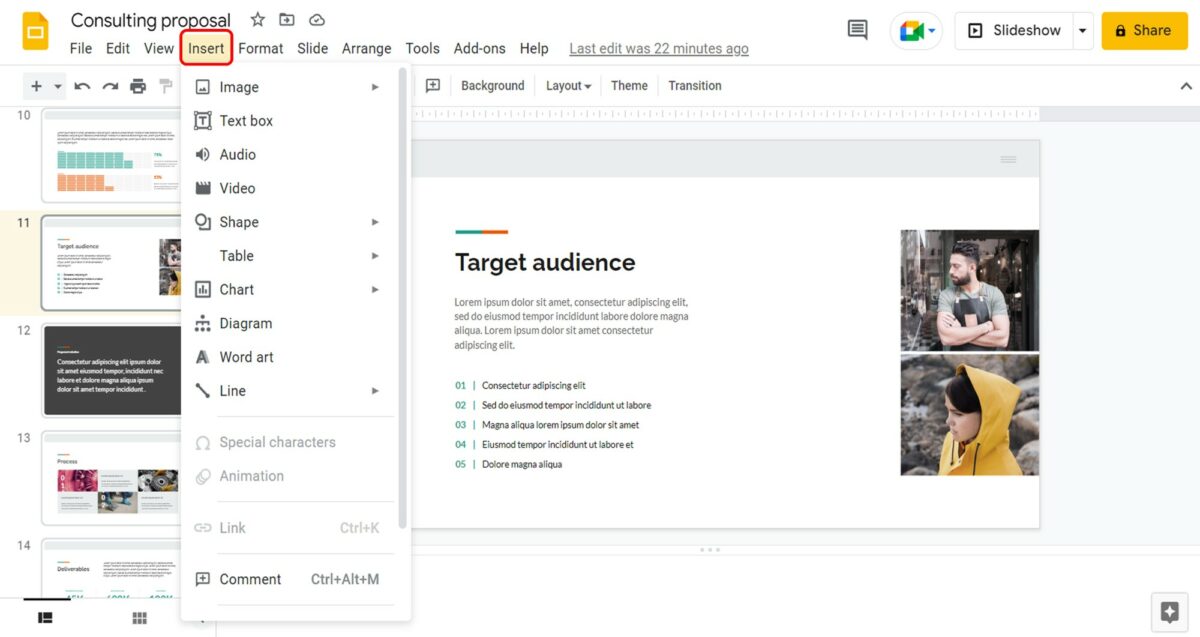
The first step is to insert the Instagram image into the presentation slide. To do so, you have to click on the “Insert” menu in the menu bar located at the top of the screen.
Step-2: Click on the “Image” option
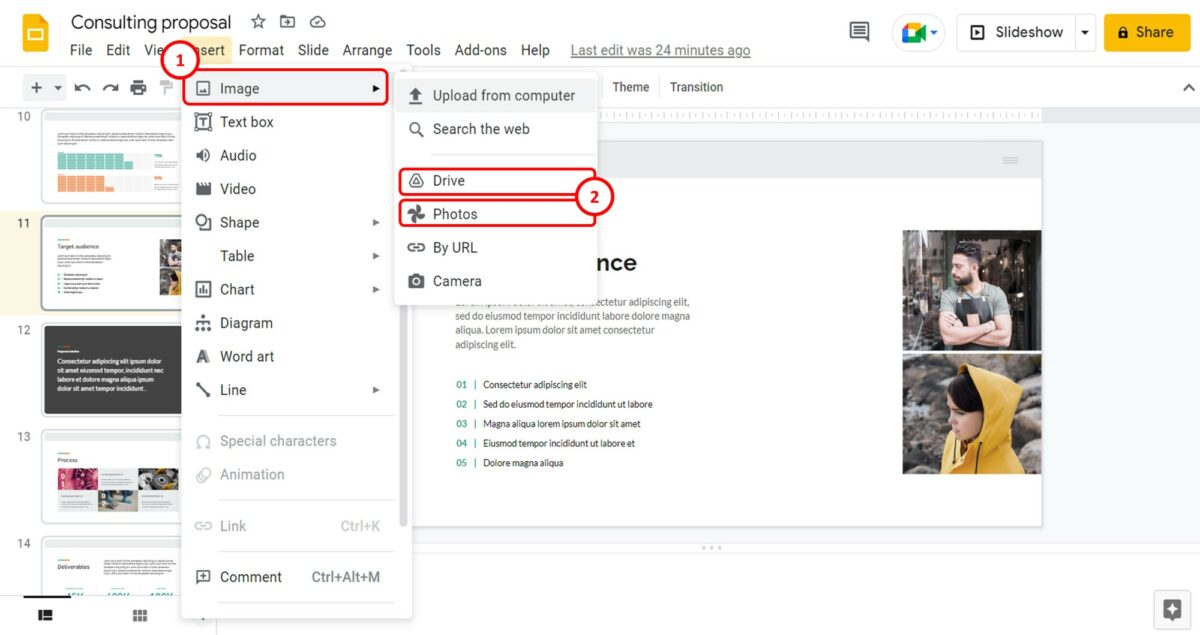
In the “Insert” dropdown menu, click on the “Image” option. In the pop-up menu by the “Image” option in the “Insert” menu, click on the “Drive” or “Photos” option.
Since you cannot insert the image directly using the Instagram link, you must first upload the Instagram picture to Google Drive or Google Photos.
Step-3: Click on the “Insert” option
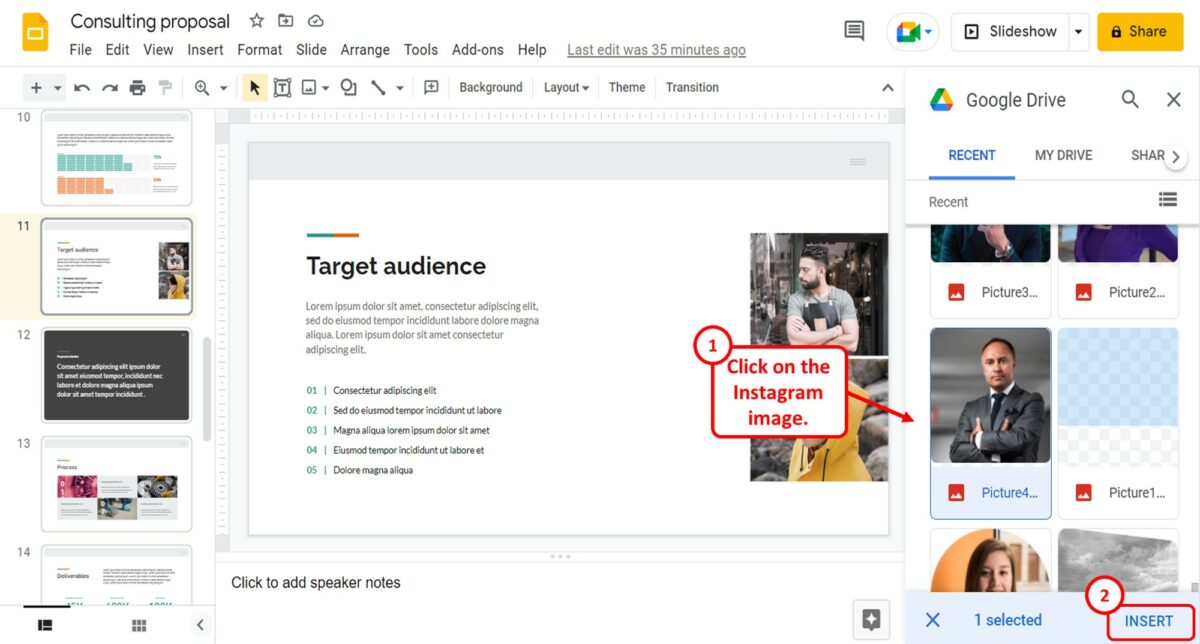
In the “Google Drive” sidebar on the right side of the screen, click on the Instagram image. Then click on the “Insert” option at the bottom of the sidebar to insert the image into the slide.
Step-4: Click on the “Insert link” option
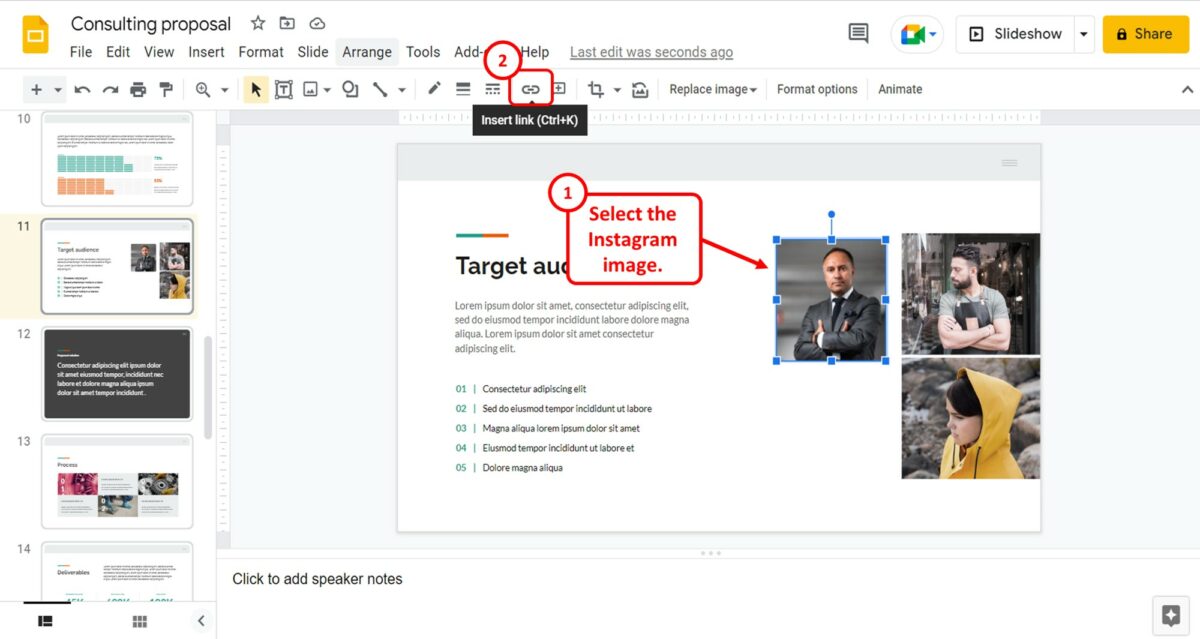
The next step is to click on the Instagram picture inserted into the slide to select it. Then click on the “Insert link” option in the toolbar located under the menu bar at the top of the screen.
Alternatively, you can press the “Ctrl+K” keys on your keyboard.
Step-5: Paste the Instagram link
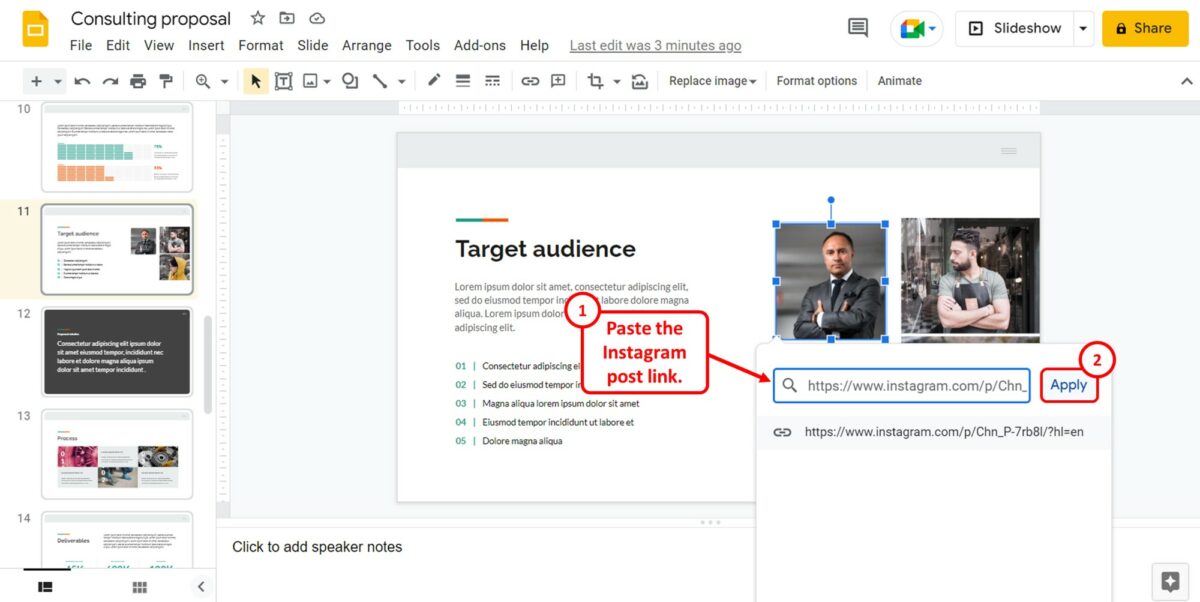
In the pop-up dialog under the picture, you can now paste the link to the Instagram post in the “Search or paste a link” box. Then all you have to do is click on the “Apply” button next to the box to embed the Instagram post to the picture in the presentation.
6. How to Embed a Google Slides on a Website?
Google Slides offers the “Publish to the web” feature that gives you the embed code that you can copy and paste to a website to embed the presentation. To embed the Google Slides presentation to a website, follow the 5 quick steps.
Sep-1: Click on the “File” menu
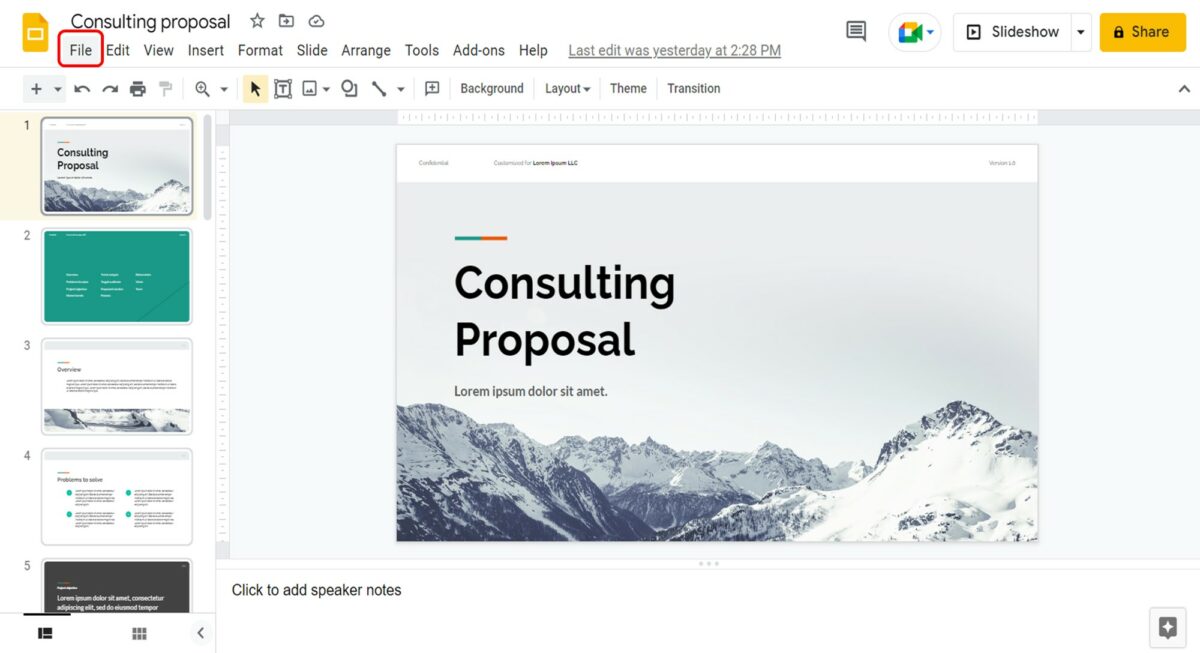
In the menu bar located at the top of the screen, click on the “File” menu. It is the first tab in the menu bar.
Step-2: Click on the “Publish to the web” option
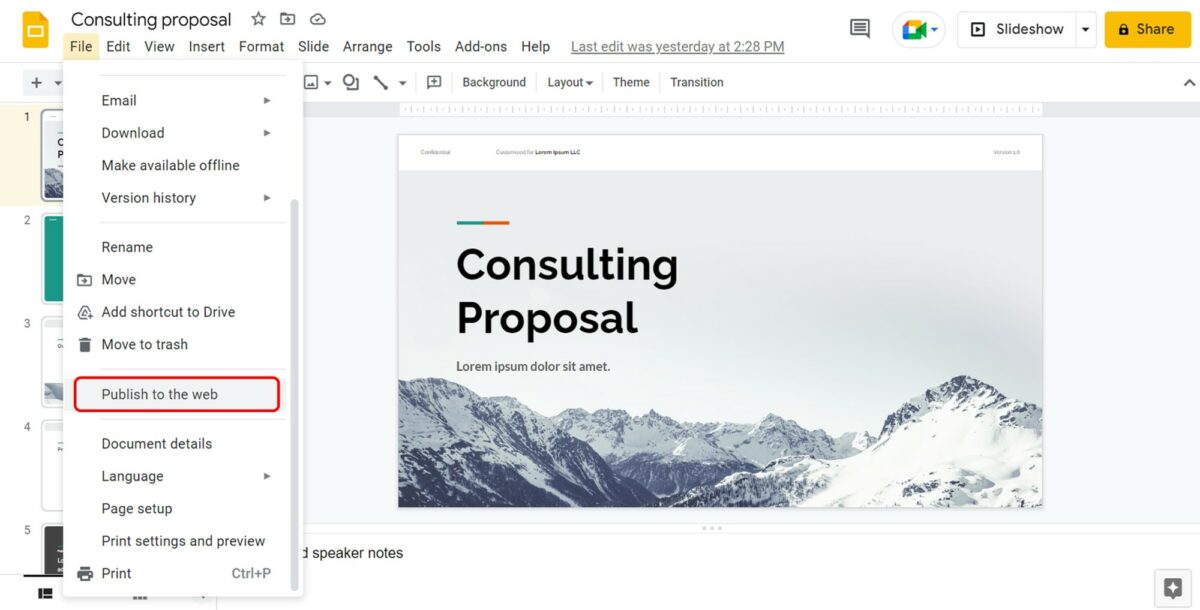
The next step is to scroll down in the dropdown menu under the “File” tab. Click on the “Publish to the web” option in the “File” menu. This will open the “Publish to the web” dialog box.
Step-3: Click on the “Embed” option
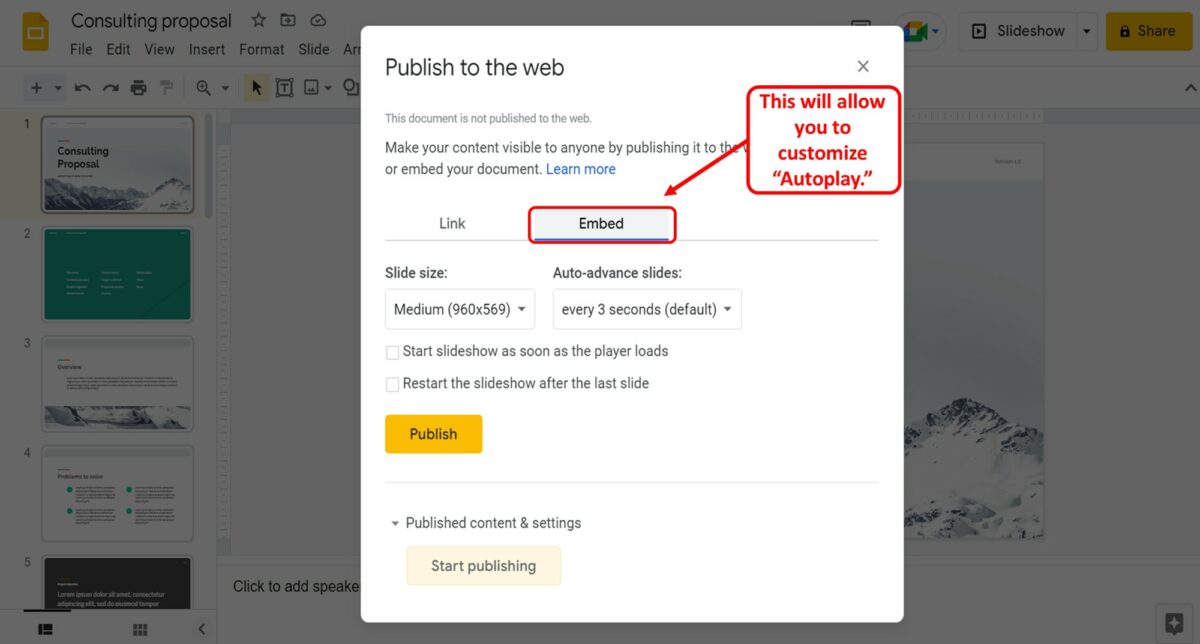
In the “Publish to the web” dialog box, click on the “Embed” option. Then you can customize autoplay options for the embedded presentation.
Step-4: Click on the “Publish” button
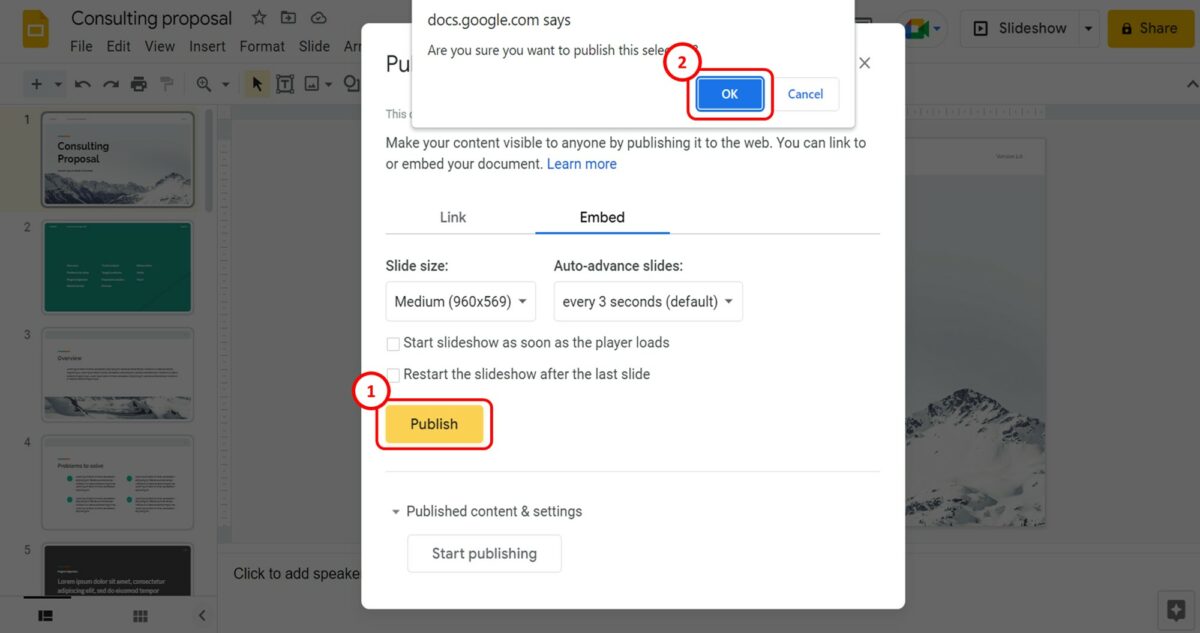
The next step is to click on the “Publish” button at the bottom of the “Publish to the web” dialog box. This will prompt a pop-up dialog box. Click on the “OK” button in the pop-up dialog.
Step-5: Copy the embed link
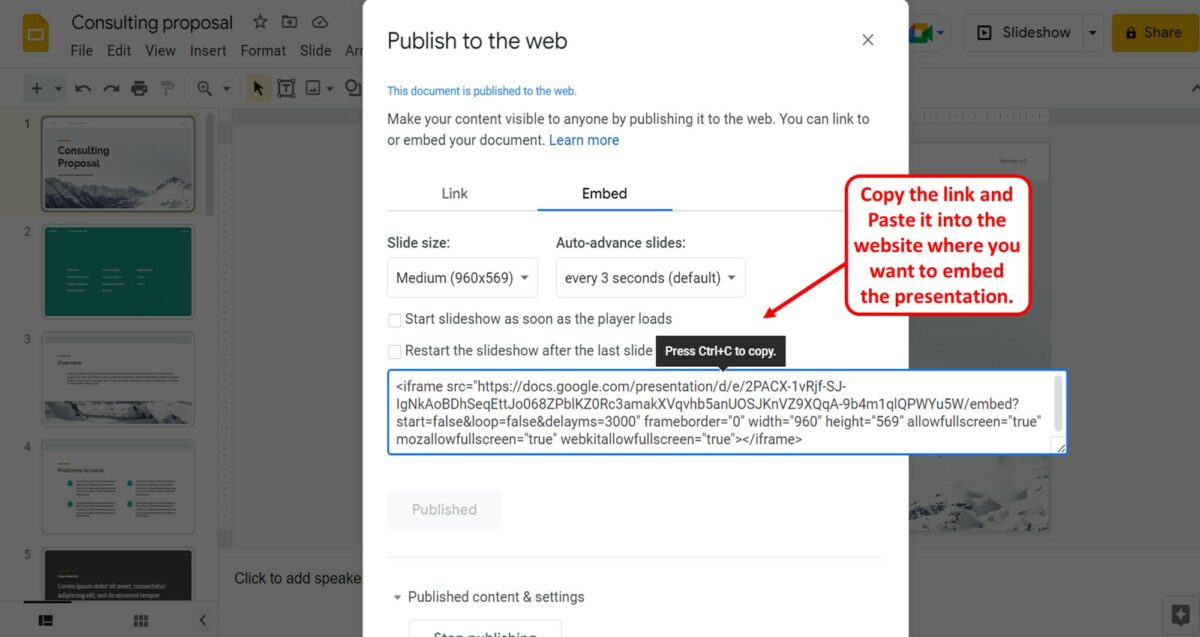
You can now see the embed code for the presentation in the “Publish to the web” dialog box. All you have to do is copy the code and paste it into the website where you want to embed the presentation. To copy the code, press the “Ctrl+C” keys on your keyboard.
Responsive HTML Tables: Presenting Data in an Accessible Way
Tables are still a vital part of the web, but we need to make them responsive and accessible for smaller devices. We evaluate one popular approach and then cover the solution we landed on.
July 3, 2024
Long gone are the days of using HTML tables for page layouts. That time almost seems shrouded in myth. One of the (many) reasons tables fell out of use was the advent of responsive design to meet the needs of different contexts and screen sizes. Tables are rigid. Their presence naturally hampers the responsiveness of a website to conform to a smaller screen size.
But tables are still useful. In some cases, they are necessary.
Tables are an important resource for any organization that wants to communicate tabular data on the web. They often serve as a bridge between traditional spreadsheets and online presentations. However, over the years, HTML tables have been misused, and attempts to adapt them to different devices have frequently resulted in poor usability or a failure to display all the required information.
How do you present HTML tables in a responsive and accessible way? And how do you do it so editors don't get frustrated with extra work?
Other approaches to responsive tables
The most popular approach for adapting tables to small devices is to linearize or stack the rows one on top of the other, converting a table to a list.
See this example table as presented on a larger screen:

This is a table of front-end developer courses on a large screen.
And now that same table "stacked" on a mobile device.

This is the same table on smaller screens, now with stacked rows for easy scrolling.
Stacking works well for some tables, specifically for data where comparison doesn't matter. Above, the list works for a table showing candidates for a position. But when you have large tables with data intended to be compared against each other, the stacked mode doesn't work as well. Take this example of a table with more columns.

A table intended to compare columns.
When we convert it to a stacked mode for mobile, it requires a lot of scrolling and loses its usefulness for comparing columns.
A video of someone forced to scroll through the dog breed table on a mobile device.
This table isn't that large—it only contains ten rows and eight columns. But even with such a small dataset, the desktop version is more concise and easier to compare columns and rows than the mobile version. The stacked version for smaller screens becomes long, adding a lot of vertical scrolling to the page, making for a bad UX experience.
The data in the example above looks similar to what you'll usually see in a spreadsheet, so how do spreadsheet applications render on mobile? Here's the same data on Google Docs.

The dog breeds table on a Google Spreadsheet, in portrait mode on a mobile device.

The same table on a Google Spreadsheet, but in landscape mode on a mobile device.
This table is much more readable on mobile than if it was converted to stacked mode.
We don't really know which structure tables will have. They could have thousands of rows, columns, row headers, merged cells, and virtually all kinds of formatting options, making it difficult to always convert them reliably to stacked on mobile.
The perfect solution will depend on each table, but in a CMS, you don't know how large or small the tables will be. A List Apart article describes the problem:
For small screens, such as phones, designing readable tables which work under such cramped conditions presents us with a serious challenge. The best approaches always deal with each table on a case-by-case basis, but that’s not always possible if we need to generically style whatever comes out of a CMS database.
Our conclusion: The best approach for mobile would be to modify tables as little as possible but without creating a horizontal scroll on the whole page.
Our approach to responsive tables
We created a JavaScript plugin that "wraps" tables around a container and provides controls for navigation, similar to how spreadsheets work. Below is the final result using the same data as above:
The dog breeds table with extra controls for navigation.
This approach is much more readable than stacking the table and doesn't modify the table structure. It works with all kinds of tables as long as they are well-formed.
At the same time, the plugin is smart enough to compare the table width against the container width and add the navigation controls when necessary, which means that even on a desktop with a narrow container, the plugin will add these controls automatically for HTML tables with many columns. For example:
The Tabled plugin is helpful even on desktop.
The plugin is fully accessible to screen readers and other assistive technologies. It wraps the table with a div with overflow-x: scroll; which means users can scroll the table using the displayed controls, tapping for touchscreens, or using the native scrollbar at the bottom. We also included the necessary aria tags so it can be navigated solely with the keyboard.
Note that although horizontal scrolling is typically bad for accessibility, data tables have an exception. From the WCAG success criteria for reflowing content :
Data tables have a two-dimensional relationship between the headings and data cells. This relationship is essential to convey the content. This Success Criterion therefore exempts data tables from needing to display without scrolling in the direction of text (e.g., horizontally in a vertically scrolling page).
As a bonus, the plugin analyzes the table rows, and depending on the average content of the columns, it will resize them to make them look better. For instance, if the columns have mainly numbers, they will be sized down, and if they have large text, they will be sized up.
There is still a use case for "stacked" mode on mobile devices, so we also provided an option for forcing specific tables to be rendered as stacked. Tables whose structure can't be modified by CMS editors and contain lists of links are good candidates. Adding the class tabled--stacked to the table will make any table render as "stacked" on smaller screens.
This JavaScript plugin is now available for anyone to use and contribute to .
Accessibility improvements for Drupal tables
In order for tables to be accessible, they always need to contain captions and headers. Unfortunately, the CKEditor table plugin provided by Drupal doesn't enforce this, so we did our own CKEditor 5 plugin, which makes the caption field mandatory and always adds table headers. The table creation dialog looks like this:

Users cannot submit the dialogue if the caption field is empty. Although we added a checkbox for hiding the caption, the element will be visually hidden but visible to accessibility technologies like screen readers. The caption visibility can also be toggled with a new contextual button after creating the table.

The other main difference is that table headers have two options.
- First Row is the default, which makes the first row of the table its headers.
- Both will create headings for both rows and columns.
You can't choose not to have table headers.
In this way, we ensure that all manually created tables are fully accessible both in terms of their structure and when rendered through the Tabled plugin.
Be aware that the new plugin will ignore tables copied and pasted from external sources or embedded in other tables. It is the editor's responsibility to adjust or recreate these tables.
We plan to add this CKEditor 5 functionality as a contributed module soon. Stay tuned.
Tables aren't going anywhere. They are still a vital part of the web, as long as we aren't twisting them toward purposes for which they were never intended. Our approach to responsive tables helps make them easier to navigate on smaller devices without putting more pressure on editors.
Download the plugin and give it a try .
This work was made possible in collaboration with Stephanie Ganzer and Kat Shaw .
Published in:
- Accessibility
- Drupal Development
- Front-end Development
More Resources
Katherine lynch on accessibility tips for websites, common pitfalls when configuring entity browser in drupal 8, an accessibility checklist for your website: part 2, get in touch with us, tell us about your project or drop us a line. we'd love to hear from you.
By providing your information, you agree to our Terms of Use and our Privacy Policy . We use vendors that may also process your information to help provide our services. This site is protected by reCAPTCHA Enterprise and the Google Privacy Policy and Terms of Service apply.
Singer-Focused Macy’s Fireworks Telecast, Credits-Crunched Finale Ignite Complaints: ‘Disgraceful’
Matt webb mitovich, chief content officer.
- Share on Facebook
- Show more sharing options
- Share to Flipboard
- Share on LinkedIn
- Submit to Reddit
- Post to Tumblr
- Share on WhatsApp
- Print This Page
More like fire- didn’t -work, amirite?
NBC and Peacock’s presentation of this year’s Macy’s 4th of July Fireworks sparked a flurry of complaints from viewers who took issue with several deviations from the annual special’s tried-and-true formula.
“Each [performer] will reimagine and remix iconic American tunes across a variety of genres and decades, interweaving patriotic anthems with contemporary hits,” read the pre-show press release.
Patriotic anthems, however, were in limited supply. Instead, you got…. “Poison”? And once the world-famous fireworks display got popping, the telecast this year focused far more than ever before on the singers.
One X user noted “very few or obstructed fireworks scenes on @Macys @nbc 4th of July special. Waaay too much performers and waaaaaay too little fireworks.” As such, they likened it to “Macy’s singers and music special with some fireworks in the background.“
“This was my least favorite fireworks performance from Macy’s !” posted another X user. “Basically no patriotic music and most of the shots were of the singers and not the fireworks!… Not a fan of this one.”
“Hey @NBC, why did we need to watch the singers vs the Macys fireworks ??!!” asked someone on Threads. Added another Threads user, “ Worst fireworks music ever for macys this year. Bunch of people no one knows singing songs that have nothing to do with the fourth. Not showing enough fireworks.”
The Macy’s fireworks display’s grand finale, meanwhile, was arguably less grand then ever. Coming out of a commercial break that clumsily cleaved the fireworks display in two, the grand finale was effectively doused by the rolling of closing credits over the action.
Great finale @NBCNews of the @Macys #fireworks through the credits… #july4th pic.twitter.com/q9b6C7dgOp — Manny Alicandro (@Manny_Alicandro) July 5, 2024
Added another, “This was the most disgraceful telecast for the Macy’s fireworks . NBC horrific job. Did we really need live singers on stage during the show? Worst was rolling credits during the recorded finale, cause they went to commercial. Brutal.”
TVLine has reached out to NBC for comment.
Cancel reply
92 comments.
Email * Your email address will not be published. We will notify you when someone replies.
They moved them to my side of Manhattan this year, so I watched them out the window in one room while I had NBC on in the other room. The song choices seemed less jingoistic than usual but I had no idea they weren’t even showing the fireworks!
You could see them out your window, so you…watched them on TV? SMH.
Read it again.
So disappointing. We tuned in to watch a fantastic fireworks display and got a pops concert instead. What were they thinking?
I’m wondering if lots of people are so disappointed with the waste of money and time Macy’s show ,,, that they’ll stop shopping there.
WORST Macy’s fireworks show EVER if I was the family who put on the fireworks I would be incensed The singers were COMPLETELY DISTRACTING. It was supposed to be a FIREWORKS show Not a music festival. AGAIN WORST PRODUCTION EVER 🤬🤬🤬🤬
I totally agree couldn’t appreciate the fireworks because it was a concert
We wait all year to see these fireworks and NBC ruined it – disgraceful, horrible, so disappointing.
Camera work was awful. We want fireworks, not a cheezy concert.
It was the Worst 4th of July Fireworks and music performance for a celebration In NYC. Ever!!!Disgraceful. Shame on the Producers !!! Shame on NBC President to have accepted this concept Disappointing.
Patti, I agree with your comment!
I agree! The show was a mess and so badly presented…..
Wow, was able to watch last night, guess I’ll not bother watching the show I recorded. MACY’S What????
Terrible. Focus should be,and always was, on the fireworks. Instead we got a concert of people I don’t know singing stuff I don’t like with no connection to July 4th. The old format was perfect- background music from well known performers doing songs appropriate for July 4th. Somebody should be fired for this!
Almost everything about the show was horrible even the people who were hosts.
So glad I watched my local (Nashville) telecast instead! No singing; our music was done by the Nashville Orchestra and was great! We even had drones!!!
I watched my local (Seattle) show. It was great.
I felt like I was watching a chorus of Idol 8th place finishers on the last performance of a regional tour.
Did not like the show at all was looking forward to the show but was totally disappointed
Terrible fireworks show. The worst ever. No patriotic music and boring performances all around. What happened Macys??? Or did NBC try to only appeal to younger audiences? Go back to the drawing board
Very disappointed and I’m sure Macy’s was too. A lot of time, money and effort is put into the fireworks spectacular and NBC blew it. I wanted to see the fireworks from the comfort of my home. Instead a got a glimpse of fireworks and a concert I wasn’t interested in. Awful. Never made it to the end , switched off
Is anyone really surprised? Main stream media has lost touch with their customer base. They all want to cater to liberals so much that they refuse to play patriotic music even on a holiday based on the independence of our nation.
I prefer listening to the orchestra play during the fireworks.
Last night NBC, you dropped the ball! This by far was the worst fireworks telecast was absolutely horrible! We tuned in to watch the FIREWORKS, not the PEOPLE!!!
It was so much better when it was a WNBC production, not national. Same with the Rockefeller Christmas Tree lighting. Focus is elsewhere. I only tuned in at 9:30 for the actual fireworks and found the signers instead. Yikes. I could have driven over to Weehauken to watch them instead. Next year, I know that’s what I’ll probably do.
Worst most unpatriotic crap show I’ve ever seen on the 4th of July.
I watched on time delay and fast forwarded thru most of it. As soon as the credits appeared over the fireworks, I turned it off.
I was also watching Capitol 4th on PBS, it was slightly better. (It would have been hard to beat last year’s with Chicago and Belinda Carlisle.) They had a picture in picture of the performers that would come and go over the fireworks. The fireworks looked blurry to me. I don’t know if that was due to camera angles or smoke or what, it just wasn’t crisp.
Macy’s is closing stores but still financing this fireworks display which is all about singers and barely patriotic. I’m glad others commented on same. But should I be surprised when I see patriotism circling the drain in this country. I changed the channel
This year’s broadcast reminds me of when they had Usher featured. Same formula… all pop music, not enough patriotic music. What was really bothersome was how the fireworks were an afterthought here. I tuned in to see the fireworks show, as I do every year, not the camera focused on the performers.
Agree 100% And how about Lizzos couisin in her Temu dress! I started singing Yankee Doodle dandy half way through🎆😎
Alex Newell is a Tony Award winning beautiful singer. shame on you.
The show was so horrible that I decided to take a walk around the neighborhood to watch people enjoying their fireworks, even though it was a sweltering 90 plus degrees last night…
Fireworks second singers first did not work. Disgraceful.
Very disappointed
This was the worst Macy’s Fireworks show in history. I wanted to see the fireworks, not a bunch of singers. Go back to the way it was, save money on singers just use music tracks that are timed to the fireworks.
Macys firework show. Looking forward to these fireworks every year and What a terrible change of production from a magniicent display of fireworks on July 4 to a mediocre at best stage show. Fireworks became minor importance. What a terrible example of production. I hope Macys prevents this in future years
i have always enjoyed the Macy’s fireworks display. Not this time. All I saw was bodies jumping around a stage hiding what should have been a magnificent show. Incredibly disappointing. Hope you go back to the former productions in future years.
Looks like I made the right choice in which shows to watch. The Capitol Fourth special on PBS was great, as always. I alternated between that and the CNN one streaming on Max. Both had better performers, people I had heard of, although one of the shows (not sure which) had a performance still playing when the fireworks began a bit too early (seemingly, because after the performance ended then the proper orchestra began some patriotic songs – WHICH IS WHAT SHOULD ALWAYS HAPPEN DURING INDEPENDENCE DAY FIREWORKS). And after both shows ended (one lasted longer than the other) I went outside to watch our neighbors’ illegal fireworks and the nearby city approved shows going on across the sky.
Capitol Fourth’s fireworks started a bit too early. They just had to roll with it.
This was not a patriotic show in anyway.Fireworks with singers over shadowing them. No Stars and Stripes for ever. Nothing that Screams Americas Birthday. The worst show ever
I agree 100% that was the worst I have ever seen,NBC messed that up just they have done to the Olympics and NASCAR
Most Popular
You may also like.

- Publications
- News and Events
- Education and Outreach
Software Engineering Institute
Architecture analysis and design language (aadl), created july 2019 • updated february 2022.
As software for avionics, cyber-physical, and autonomous systems becomes increasingly complex, the cost to assure these and other mission- and safety-critical systems is growing. Software attributes that impede analysis and concerns such as performance, safety, and security are responsible for this increase.
The Architecture Analysis and Design Language (AADL) is an SAE international standard that addresses these issues by defining guidelines for design and analysis through a Domain-Specific Modeling Language (DSML).
Abstracting Large Software for Analysis
AADL captures large designs through high-level architectural concepts built after domain expertise: component categories that describe key building blocks, such as processor, devices, threads, and rules to assemble them. Through careful abstractions, complex designs can be captured as smaller models amenable to inspection and analysis.
Analyzing for Multiple Concerns
Design teams can review AADL models, use automated tools to assess conformance to modeling guidelines, and run analyses to uncover design problems or validate a design. Since its inception, the SEI is the driving force of the SAE AADL standard. Our core team demonstrated how to implement and apply tool-supported analysis methods on complex systems. Our portfolio of analysis covers performance, safety, and security. We directed multiple pilot studies that demonstrate the efficiency of the approach on different classes of systems.
Leveraging Digital Engineering
Using SAE AADL, systems architects leverage digital engineering for the design and validation of complex safety-critical systems in two critical phases of a system design:
- During early stages, SAE AADL provides early analysis capabilities to mitigate integration risks. This capability is the core of the Architecture Centric Virtual Integration Process (ACVIP) that is being transitioned to SEI customers.
- During system evolutions, SAE AADL analysis capabilities allow for trade-off analysis to select the best update approach.
As a language, AADL can interoperate with other modeling notations (e.g., SysML, UML) and be integrated into larger Systems Engineering approaches (e.g., MOSA). The SEI and its partners have developed technical reports, open-source software, and teaching course to aid in applying AADL.
Model-Based Development for Safety-Critical Systems
AADL is a modeling language with an architecture-centric, model-based development approach throughout the system lifecycle. AADL is targeted at real-time, safety-critical embedded systems where components are tightly coupled. These systems need specific validation and verification capabilities to demonstrate system correctness across all dimensions: functional, performance, safety, and security.
AADL has rich semantics that can be exercised to analyze and generate the system. AADL is also a standard promoted by SAE International: AS5506C.
Benefits of Using an Open Standard
As an open standard, the AADL language is
- industry-grade: AADL provides textual and graphic notation with precise semantics to model applications and execution platforms.
- ready to use: AADL is supported by commercial and open-source tool solutions
- unambiguous: one model can be analyzed for multiple qualities
- interoperable: AADL can integrate with other modeling notations for systems modeling OMG SysML, FACE and also functional modeling like Matlab Simulink or ANSYS SCADE
Benefits for Your Organization
The SAE AADL standard lowers development and maintenance costs by
- providing a standard for modeling performance-critical systems
- defining precise semantics for conducting multiple analyses on the same model
- supporting large-scale (multi-contractor) architectures from many aspects in a single analyzable model that can be incrementally refined and detailed architectures of subsystems
- focusing on the architecture of a system to evaluate the effect of change, such as the emergent properties of integration (e.g., safety, schedulability, end-to-end latency, and security)
- complementing other notations and approaches like functional simulation through the analysis of the system structure and runtime
- supporting reference architectures for avionics, security or safety, and component-based or product-line development
Collaborators
Several Department of Defense projects have used AADL, including the Joint Multi-Role Technology Demonstrator, Future Vertical Lift, and the DARPA High-Assurance Cyber Military Systems program.
The U.S. Army Joint Multi-Role Technology Demonstrator (JMR TD) , which is helping to develop the DoD’s next-generation rotorcraft fleet (Future Vertical Lift), is accelerating its adoption of AADL after a successful shadow project by the SEI and Adventium Labs showed potential requirements and system-integration issues could be identified early in the development process.
The DARPA High-Assurance Cyber Military Systems program used AADL in its work the Secure Mathematically-Assured Composition of Control Models project to reduce security risks of software in unmanned vehicles. A red team was unable to penetrate their software over a six-week period, despite access to source code, due to their use of contract-based compositional verification, auto-code generation from verified models, and a certified real-time OS kernel.

Flexibility in Augmenting the AADL Model
There are two ways to augment an AADL model to add characteristics other than those defined in the core language: user-defined properties and annexes.
- User-defined AADL properties are a quick and simple way to add new characteristics to the AADL elements (e.g., components, features, OSATE connections) and do not need specific tool support.
- AADL annexes are more complex and augment the core language with new elements. They need a specific parser, so they are not supported natively by the existing complier.
This year, a number of updates were made to the toolset, including enhancements to the graphical editor and several analysis capabilities, and the creation of a workflow layer that will extend its adoption by practitioners.
Software and Tools
Architecture analysis and design language (aadl) tool.
AADL provides a framework for analyzing system designs and supports architecture-centric, model-based development through the system...
October 2014
OSATE is an open-source tool platform to support...
Software Modeling: What to Model and Why
January 30, 2023 blog post, john mcgregor , sholom g. cohen.
This post describes modeling and analysis activities intended to achieve robust design, define the modeling chain, and effect evolution from specification to...
A Model-Based Tool to Assist in the Design of Safety-Critical Systems
March 07, 2022 blog post, "> sam procter.
The design of critical systems—those used in aircraft, medical devices, etc.—is becoming increasingly challenging as they increase in sophistication and...
ACVIP Perspective on AADL
September 13, 2021 video.
This training video reviews the Architecture Centric Virtual Integration Process (ACVIP) for model creators and model...
11 Rules for Ensuring a Security Model with AADL and Bell–LaPadula
July 29, 2021 podcast, "> aaron greenhouse.
Aaron Greenhouse, a senior software architecture researcher, discusses 11 analysis rules that must be enforced over an AADL instance to ensure the consistency of a security model....
Modeling and Validating Security and Confidentiality in System Architectures
March 19, 2021 technical report, aaron greenhouse , jörgen hansson (university of skovde) , lutz wrage.
This report presents an approach for modeling and validating confidentiality using the Bell–LaPadula security model and the Architecture Analysis & Design...
Related Courses
Modeling system architectures using the architecture analysis and design language (aadl) - elearning.
Modeling and validating quality attributes for real-time, embedded systems is often done with low-fidelity software models and disjointed architectural specifications by various engineers using their own specialized notations. These models are typically not maintained or analyzed throughout the lifecycle, making it difficult to predict the impact...
AADL in Practice Workshop
The AADL in Practice Workshop combines AADL training and an AADL modeling workshop to provide practical knowledge as well as an opportunity to practice skills in a realistic setting. This Workshop will transfer expertise to participants through an effective combination of training and mentoring during practice. Organizations seeking to increase...
- See us on facebook
- See us on twitter
- See us on youtube
- See us on linkedin
- See us on instagram
New compound could supercharge naloxone in fight against opioid overdoses
In a Stanford Medicine-led study, researchers combed through billions of compounds to find one that could enhance naloxone’s ability to fend off more potent opioids, with promising results in mice.
July 3, 2024 - By Nina Bai

Naloxone (orange) treats opioid overdose by kicking out opioids (pink) from the opioid receptor (teal). The newly discovered compound 368 (purple) strengthens the binding of naloxone to the opioid receptor, making it a more effective life-saving medicine. Emily Moskal
Every great superhero needs a sidekick. Now, scientists may have found a drug-busting partner for naloxone.
Naloxone is an opioid antidote that has saved tens of thousands of lives by rapidly reversing opioid overdoses in more than 90% of cases in which it is used. But its powers are temporary, lasting only 30 to 90 minutes. The rise of potent, long-acting opioids such as fentanyl means that someone brought back from the brink can still overdose after the naloxone wears off.
In a new study, Stanford Medicine scientists and collaborators have discovered a novel compound that can work alongside naloxone, supercharging its life-saving effects.
When tested in mice, adding the compound to a miniscule dose of naloxone made it as powerful as the conventional dosage, with the added benefit of milder withdrawal symptoms.
Naloxone, which is given as a nasal spray or injection, works by seizing opioid receptors, kicking out opioids and taking their place. (Naloxone has no addictive properties of its own.) The researchers found that the new compound — known for now as compound 368 — binds next to naloxone on opioid receptors and helpfully holds naloxone in place.
The findings were published July 3 in Nature .
“Naloxone binding to an opioid receptor turns it mostly off, but not all the way,” said Evan O’Brien , PhD, a postdoctoral scholar in molecular and cellular physiology and the lead author of the new study. “Our data shows that compound 368 is able to increase the binding of naloxone and turn the receptor off more completely.”
A new type of drug
The new compound belongs to an unusual class of drugs that don’t directly target the active site on receptors. Instead, they bind elsewhere on the receptor but trigger a structural change that alters the active site. Known as allosteric modulators (allos meaning “other” in Greek), they create new possibilities in drug development, but are trickier to identify, O’Brien said.

Evan O'Brien
“Allosteric modulators are not common yet, and they’re a lot more difficult to discover and to work with,” he said.
Compound 368 is the first known allosteric modulator that can help turn off opioid receptors.
The researchers picked out compound 368 from a library of 4.5 billion compounds. Using advanced high-throughput techniques, they were able to screen the entire molecular library in just two days. To identify potential allosteric modulators that could cooperate with naloxone, they selected for compounds that bind only to receptors already saturated with naloxone.
Compound 368 — an otherwise rather unremarkable compound, O’Brien said — stood out for its ability to tightly bind to opioid receptors only in the presence of naloxone. Like a loyal sidekick, it doesn’t work with other drugs, and it doesn’t work alone.
Powers combined
When researchers exposed cells with opioid receptors to compound 368, they found that the compound alone made little difference. But when cells were given the compound with naloxone, the combination was a powerful deterrent against opioid binding.
The more compound 368 they added, the better naloxone was able to block opioids, including morphine and fentanyl.
“The compound itself doesn’t bind well without naloxone,” O’Brien said. “We think naloxone has to bind first, and then compound 368 is able to come in and cap it in place.”
Indeed, using cryoEM imaging to visualize frozen molecular structures, the researchers found that compound 368 docks right next to naloxone on the opioid receptor, forming bonds that secure the drug in place and slow its natural degradation by the body.
Boosting naloxone
Next, collaborators in McLaughlin’s lab tested the new compound in mice that had been given morphine. Because opioids reduce pain sensation, the researchers observed how quickly a mouse removed its tail from hot water. The stronger the opioid antidote, the faster a mouse would take its tail out of the water.
When mice on morphine were treated with compound 368 alone, nothing changed.
“The compound in mice, at least from the assays we’ve run, does nothing on its own,” O’Brien said. “We don’t observe any off-target effects. We don’t see anything happen to the mice even when we inject a massive amount of compound 368.”
This was exactly what the researchers had predicted from their molecular work and a good sign of the compound’s safety, he added.
The more tools at our disposal, the better we’ll be able to fight this epidemic of fentanyl overdoses.
When they also gave the mice a small dose of naloxone — an amount that typically would have no effect — the pairing with compound 368 dramatically improved naloxone’s effects.
“When we start to give them more and more of compound 368 with that low dose of naloxone, they take their tail out of the water pretty quickly,” O’Brien said.
Other effects of opioids, such as respiratory depression (the usual cause of death in opioid overdoses), were also reversed by a small dose of naloxone enhanced with the new compound.
Remarkably, the combination of compound 368 with a half dose of naloxone was strong enough to counter fentanyl, which is about 100 times more potent than morphine and the main culprit of overdoses in the United States.
By requiring less naloxone, the new compound could also ease the withdrawal symptoms that opioid users experience after overdose treatment. These symptoms — including body aches, shivering, nausea and diarrhea — are immediate and can be extremely uncomfortable, O’Brien said.
The researchers found that a low dose of naloxone plus compound 368 could reverse the effects of opioids with much milder withdrawal symptoms — in mice, this meant less teeth chattering, jumping and diarrhea.
Saving lives
The team, with the Majumdar lab’s expertise in medicinal chemistry, is now tweaking compound 368 so it can help naloxone counter strong opioids for longer durations.
“We’re still working on optimizing the compound’s properties for those longer-lasting effects,” O’Brien said. “But first showing that it works cooperatively with these low doses of naloxone suggests that we’re on the right track.”
O’Brien is optimistic that this track will lead to trials in humans. Overdoses from synthetic opioids, primarily fentanyl, continue to surge, killing nearly 74,000 Americans in 2022. “The more tools at our disposal, the better we’ll be able to fight this epidemic of fentanyl overdoses,” he said.
Researchers from Kurume University, SLAC National Acceleration Laboratory, Princeton University and University of Copenhagen also contributed to the work.
The study received funding from an American Diabetes Association Postdoctoral Fellowship, an American Heart Association Postdoctoral Fellowship, the National Institute of Health (grant RO1DA057790) and the Chan Zuckerberg Biohub.

About Stanford Medicine
Stanford Medicine is an integrated academic health system comprising the Stanford School of Medicine and adult and pediatric health care delivery systems. Together, they harness the full potential of biomedicine through collaborative research, education and clinical care for patients. For more information, please visit med.stanford.edu .
Hope amid crisis
Psychiatry’s new frontiers

How to Watch the Macy's 2024 Fourth of July Fireworks for Free
The New York City-based spectacle can be enjoyed online from the comfort of your own home.

We've been independently researching and testing products for over 120 years. If you buy through our links, we may earn a commission. Learn more about our review process.
After viewers witnessed a star-studded bash last year, NBC is bringing the glitz and glamour back for the ultimate summer party. Singers Amber Mark, Brandy Clark, Lainey Wilson , Luis Fonsi, Mickey Guyton, Tanner Adell and The War and Treaty are all set to sing some of their biggest hits for the crowd, with Mickey and Zuri Hall hosting the two-hour long show. The special will culminate in the famous fireworks display over the Hudson River in New York City, marking the end of a memorable celebration.
Now, you may be wondering where you can watch the fireworks without needing to leave your home. We have all the answers on how to watch and stream the Macy's Fourth of July Fireworks on TV and online .
How to watch the Macy's Fourth of July fireworks with cable:
The Macy's Fourth of July fireworks show will air on Thursday, July 4, 2024 at 8 p.m. ET on NBC . There will also be an encore presentation at 10 p.m. ET on NBC.
When 9:25 p.m. rolls around, that's when the fireworks display will start going off, until around 10 p.m. You can watch the program live from the NBC website or the NBC app if you're on the go — just make sure you have your TV login info at hand so you can sign in from anywhere.
How to watch and stream the Macy's Fourth of July fireworks for free online:

If you're someone who doesn't have access to live television, no worries. The Macy's Fourth of July fireworks event will also stream on NBC's official streaming site Peacock . The site offers a number of plans you can choose from, with the lowest beginning at $5.99 per month or $59.99 per year. Once you're all set, you can watch the show on Peacock's website or on the Peacock app .
There are also other options for watching the Macy's Fourth of July fireworks online. If you have streaming sites like YouTube TV , Hulu + Live TV , FuboTV or Sling , you can livestream the program on those sites as well. Just make sure you have accounts made ahead of time so you don't miss a moment of the annual event.
As the entertainment and news editorial assistant for Good Housekeeping , Adrianna (she/her) writes about everything TV, movies, music and pop culture. She graduated from Yeshiva University with a B.A. in journalism and a minor in business management. She covers shows like The Rookie , 9-1-1 and Grey's Anatomy , though when she’s not watching the latest show on Netflix, she’s taking martial arts or drinking way too much coffee.
@media(max-width: 64rem){.css-o9j0dn:before{margin-bottom:0.5rem;margin-right:0.625rem;color:#ffffff;width:1.25rem;bottom:-0.2rem;height:1.25rem;content:'_';display:inline-block;position:relative;line-height:1;background-repeat:no-repeat;}.loaded .css-o9j0dn:before{background-image:url(/_assets/design-tokens/goodhousekeeping/static/images/Clover.5c7a1a0.svg);}}@media(min-width: 48rem){.loaded .css-o9j0dn:before{background-image:url(/_assets/design-tokens/goodhousekeeping/static/images/Clover.5c7a1a0.svg);}} Must-See TV Shows

We Found the Cookware Used on 'The Bear'

'WoF' Star Ryan Seacrest Is Unrecognizable on IG

What to Know About 'Claim to Fame' Season 3

When Is the 'A Capitol Fourth' Concert in 2024?

What to Know About 'The Rookie' Season 7

Where to Watch Season 9 of 'Suits'

'NCIS' Star Wilmer Valderrama on Torres' Future

The 411 on 'When Calls the Heart' Season 12

'The Bear' Fans Need to Know This Season 4 News

What Is the 'AGT' Golden Buzzer?

'WCTH' Fans Praise Chris McNally Before Finale
From Illinois to Utah: Firework mishaps claim lives and injure dozens this July 4th

A man who law enforcement said lit a large firework and placed it on his head died in South Carolina Thursday night, and in Alabama, a pyrotechnician was taken by medical helicopter to a hospital after a shell "unexpectedly detonated" during a slated firework celebration, injuring him and canceling the city's show.
The incidents are among dozens of reported fireworks-related injuries and fatalities reported across the nation during this year's Fourth of July festivities.
Here's roundup of major pyrotechnics-related injuries reported across the nation as of early Friday:
Fireworks-related deaths
- In Illinois, a 34-year-old man died after handling fireworks on Chicago's Northwest Side about 10 p.m. Thursday. The Chicago Police Department told USA TODAY officers responded to the scene and found the victim who suffered trauma to the body. He was pronounced dead at the scene.
- Also in Illinois, a 25-year-old man died in a fireworks mishap early Friday morning in LaSalle, the Journal Star , part of the USA TODAY Network reported. The LaSalle County Sheriff's Office reported the incident involved illegal fireworks and the injured man was taken to a hospital where he later died.
- In South Carolina, a 41-year-old man died after suffering injuries while using fireworks, according to Dorchester County Sheriff’s Office incident report obtained by USA TODAY. Witnesses, deputies wrote in the report, said the man ignited a large firework device, set it on his head and it exploded, killing him. He was pronounced dead at the scene.
- In Alabama, Huntsville Emergency Medical Emergency Services Inc. spokesperson Don Webster told USA TODAY a man was injured just after midnight Friday after a fireworks accident in Madison County. Webster said the 20-year-old man from Harvest, who suffered trauma to the upper torso, was taken to Huntsville Hospital, where he was pronounced dead.
Pyro tech taken by helicopter for burns: Alabama fireworks tech hospitalized after shell unexpectedly explodes; city show canceled
Firework-related injuries 2024
- In Alabama, the city of Jacksonville canceled its fireworks show after a shell unexpectedly detonated and injured a technician Thursday night, sending him to a hospital by helicopter. On Friday, city officials said the technician had been released and was expected to recover.
- In Colorado, a man lost most of his hand on Wednesday night when a firework he held blew up in his hand, the Colorado Springs Fire Department said in a report on its Facebook page. The incident happened in the Cheyenne Mountain area, southwest of Colorado Springs, the CSFD said.
- In Oklahoma, a 10-year-old boy from the Oklahoma City area was taken to a hospital to be treated for burns from a fireworks explosion, KFOR-TV reported . A man told the outlet his grandson bought four fireworks products and two malfunctioned, one of which injured the boy.
- In Utah, several people suffered injuries during an annual fireworks celebration at Brigham Young University 's LaVell Edwards Stadium in Provo when fireworks shot into the stadium crowd. The event included a performance by the Jonas Brothers. The number of those injured and extent of the injuries were not immediately provided by officials.
- Several people including some children were injured watching fireworks at a private gathering in Rexburg, Idaho, EastIdahoNews.com reported. "Several individuals were taken to Madison Memorial Hospital and two juveniles were taken to Eastern Idaho Regional Medical Center in Idaho Falls,” Assistant Police Chief Gary Hagen told the news outlet. None of the injuries were life-threatening; police are still investigating the cause.
Last year's injury report
According to the U.S. Consumer Product Safety Commission , last year 9,700 people were treated in emergency rooms across the nation and eight people died from fireworks-related accidents.
Here's a breakdown of last year's injuries:
- 19% suffered eye injuries.
- 22% suffered injuries to the face, head and ears.
- 35% suffered hand injuries.
- 11% suffered injuries to lower extremities.
Fireworks safety tips
To safely use fireworks, the National Safety Council recommends watching them at public displays conducted by professionals and not using them at home.
If you must set off fireworks at home, the council recommends these tips:
- Do not use illegal fireworks.
- Never allow children to handle fireworks.
- Never use fireworks while impaired by drugs or alcohol.
- Wear eye protection.
- Never hold lighted fireworks in your hands.
- Never light fireworks indoors.
- Use fireworks only away from people, houses and flammable material.
- Never point or throw fireworks at another person.
- Light only one device at a time and maintain a safe distance.
- Never ignite devices in a container.
- Never relight or handle a malfunctioning firework.
- Soak spent and unused fireworks in water for a few hours before tossing them out.
- Keep water nearby to extinguish fireworks if a fire breaks out.
- Instead of sparklers, consider using safer alternatives, such as glow sticks, confetti poppers and colored streamers.
This is a developing story.
Natalie Neysa Alund is a senior reporter for USA TODAY. Reach her at [email protected] and follow her on X @nataliealund.
- Newsletters
- Account Activating this button will toggle the display of additional content Account Sign out
What Americans Should Learn From the U.K. Election
The u.s. is in trouble. asian brits are pointing toward a better way..
Remember 2016? It surprised the world with the back-to-back racist retrenchments of Brexit and MAGA . Now in 2024—coincidentally another shared election year with America’s most familiar foreigners—the twinning is over. In the U.S., convicted felon Donald Trump is leading the polls while preparing Project 2025 . That would essentially install a draconian, theocratic dictator in place of a rapidly deteriorating (and stubborn ) guardian of democracy in Joe Biden.
By contrast, steeped in Brexit regret , Brits this week elected Keir Starmer , a human rights lawyer and literal white knight , in a landslide victory for the liberal Labour Party that marked the worst defeat for the conservative Tories in their 190-year history, losing some seats held since the 1800s. The election restored trust in Labour and ended the Tories’ 14-year reign —of five prime ministers, one who resigned just 45 days in. The last of them was Rishi Sunak , the first nonwhite person in the job, now packing his bags. As of Friday morning , Labour has captured 412 seats in Parliament to the Tories’ 121, with the remaining 115 members of Parliament divided among smaller parties and two results outstanding.
Labour is regaining power with an unprecedented mandate to reshape the U.K. in its vision; the headline of Starmer’s victory speech was “change begins now.” Will it?
Sweeping change is coming to London this summer, but the new resident of No. 10 Downing St. deserves less credit than what he is inheriting: a populace adopting an American-style ethos—more mythos in the States these days—that democracy is an ever-radical experiment in equality. That experiment is undergoing a British breakthrough: Starmer’s victory coincides with London—for centuries the hub of history’s largest empire with its requisite colonial villainy —joining the very short list of majority-minority global capitals—Europe’s first!—thanks to the might of Asian Brits. His reign may well be defined by Labour’s relationship with them.
In Britain’s 2021 Census, 46.2 percent of Londoners identified as Asian, Black, mixed, or other, and extrapolating demographic trends, they will cross the majority threshold this summer. (With Dubai’s majority comprised of migrants trapped in what is essentially slave labor and Washington D.C.’s disenfranchised , London’s only true counterpart is Brasilia , where 48.7 percent of residents are mixed race alone.)
Exit polls are still rolling in, but on the eve of the election, 53 percent of nonwhite Brits told YouGov they intended to vote for Labour. The party has been riven by racial tensions, particularly over the Gaza war, but another preelection poll showed that more than twice as many Asian voters (40 percent) thought Labour would improve life as those who thought Labour would make things worse (19 percent).
The historic demographic shift transforming London may not be a political watershed yet. But Londoners are living in the globalized 21 st century heretofore known only to pockets of Los Angeles , New York City , Singapore, Sydney, and Toronto. Otherness is Britain’s newest tradition. Starmer can lean into that truth or be knocked over by it. Canada is projected to become majority-minority by 2036 . America is forecast for 2044 . There will be plenty of other chances if the U.K. doesn’t get it right.
And there are plenty of reasons to doubt that it will.
Sunak—a devout Hindu who moved into 10 Downing on Diwali—is an anti-immigrant child of immigrants. One of his party’s most controversial plans was to deport asylum-seekers to Rwanda . And Starmer is not much more inviting . “ Are you two really the best we have got? ” an audience member asked them at a town hall debate. Like Sunak, Starmer does not want to rejoin the E.U. When Starmer criticized the Rwanda plan at the debate, Sunak repeatedly asked, “What would you do with them?” Starmer’s uninspiring answer was that he wants to debut a vague Border Security Command focused on enforcement. It’s a bit of the bland leading the bland.
Not much has changed in the government since 2021, when then–Prime Minister Boris Johnson rewrote a supposedly independent report on ethnic and racial disparities to deny institutional racism so flatly that 10 Downing’s highest-ranking Black adviser resigned in disgust. No politician—Labour or Tory—seems to have read a 2019 paper finding that British prosperity was not ruined by immigrants but rather by the government’s welfare austerity plan.
Meanwhile, elsewhere in Europe, life is even harsher. Denmark , Italy , and Spain are cracking down on immigration and minority populations. France and Germany prohibit gathering data on race and ethnicity. But a major German survey last year revealed discrimination and racism so endemic that the director of the reporting institute said it “can weaken and threaten democracy.” And a report last year by France’s human rights commission found that 51 percent of the country doesn’t feel “at home” in France anymore—rising to 91 percent among supporters of the far-right National Rally party, which in June elections tilted France the farthest right it’s been since collaborating with Nazi occupiers in World War II. Forty-three percent of the French public blames immigration for that insecurity, rising to 83 percent among National Rally supporters.
But there are signs of change in Britain outside the Labour triumph. Consider the London borough of Newham, where no ethnicity comprises more than 16 percent of the population. Despite being impoverished, Newham is sending schoolchildren to Oxford and the Ivy League and participating in a massive, 10-year study on the mechanics of prosperity. It’s just one example of how London is leading the world in how to be the kind of plurality about which even America only dreams.
The fastest population growth in the U.K.—as it is in the U.S.—is among Asians. Between 2011 and 2021, Asian Brits grew from 4.2 to 5.5 million, accounting in 2021 for 9.3 percent of the national population. For context, Britain’s Black population is 4 percent—barely more than the 3 percent of Brits who are Indian alone. (For comparison, in the States, Asian Americans make up roughly 6 percent of the population.) If British census trends hold, this summer the U.K. becomes 10 percent Asian. In mixed-race data, the 2021 Census also saw 0.8 percent of the country identify as an Asian-White blend, so by some measures, this double-digit threshold was crossed years ago.
The U.K. is crossing a social Rubicon. In its favor, Asian Britain has a superpower beyond demographics or elections: everyday culture. Brits are now a generation beyond the well-worn truth that their nation’s most popular dinner is chicken tikka masala . The Asian reality of British culture is now far more entrenched: London is now the Asian capital of Europe.
Asian Brits win The Great British Baking Show , captain the Tottenham fútbol team, bring home Olympic gold as young as 13 , sweep the Booker Prizes, and win BAFTAs at the awards ceremony they co-host. London’s West End is wowing audiences with sold-out stage productions of anime classics like My Neighbor Totoro and Spirited Away , as well as with brash upheavals of orientalist tropes such as Untitled Fuck Miss Saigon Play (which came out of a surge of Asian plays at Edinburgh Fringe Festival). New Asian arts festivals are flourishing, too, from the ESEA Lit Fest of domestic East Asian and Southeast Asian writers to the Muslim International Film Festival .
Taken in all, British pop culture is now anchored in Asianness as much as American pop culture is in Blackness. In both countries, the only thing more persistent than bigotry against minorities is defiance by the marginalized themselves—and a grudging, unacknowledged acceptance by those very bigots of their victims’ vitality.
Starmer must decide whether his government works for or against this new Britain. But even if he adopts the reactionary postures of his predecessor and Britain’s neighbors, he may have no choice but to adapt—or risk political punishment.
Labour’s tenure is likely to rely on how many voters Starmer can retain—as Black voting was long a pillar of Democrats’ successes and now, feeling underserved, threatens to defect . Or consider how Muslim Democrats may tip the U.S. election with voter absenteeism in solidarity with Palestinians . As with the many unspoken similarities between Starmer and Sunak, America’s least popular bipartisanship is that Biden and Trump are near-kindred spirits on immigration , policing , Chinese trade feuds , and Israel–Palestine . Voters have noticed.
I am a Palestinian Brit who lives in America with a green card. I have watched—without the ability to vote anywhere—all three of those countries descend into tribal spirals of anger, hatred, and spite. When you’re a Palestinian immigrant who gets treated as foreign in Brooklyn, London, and the West Bank, you learn to develop a radar to listen for the people who welcome you as you are.
That radar perked up during London mayor Sadiq Khan’s radical embrace of mental health during the COVID-19 pandemic lockdown. And in 2022 when I queued to pay homage to the coffin of Queen Elizabeth II and was greeted by SWAT officers—not a militarized police force but the Sikh Welfare and Awareness Team . They offered weary, waiting mourners free hot chocolate, coffee, tea, soup, sandwiches, and sweets. And this year, at the Ramadan lights twinkling around Piccadilly Circus alongside the 3,000 meals of a Trafalgar Square iftar .
There is also increased acknowledgment by the broader British public that Asian Brits have long been part of British success, from the Chinese Labour Corps in World War I to the pivotal miners’ strikes in the 1980s. And there is lingering goodwill from 2015, when a knife assailant on London’s subway system had his “This is for Syria” battle cry rebuffed by an onlooker who replied “ You ain’t no Muslim, bruv ” to global acclaim.
Asian Brits are leading their nation—not by making it more Asian or less British, but by proving that the clash and community of cultural crossroads can be about more than zero-sum antics of pettiness and counterpettiness that tend to dominate “ identity politics .” A melting pot can privilege cooperation and validation over domination and submission. London’s future is about how it embraces the zhongyi of it all. The mashallah of it all. The jugaad of it all. The thương of it all. (If you don’t know those words, wait a few years; you will.)
London is certainly no paradise. A massive report last year on London’s police force found it to be systemically bullying, homophobic, racist, sexist, and all-around bigoted —against the public it serves and within its ranks. (A Muslim officer got bacon stuffed in his boots, for example.) There is also recurring Asian-on-Asian violence, chiefly in London’s Chinatown—Europe’s largest—between Hong Kongers and Beijing loyalists. In March, a major donor to Sunak’s party said that Diane Abbott, who in 1987 became the first Black woman elected to Parliament, made him “want to hate all Black women” and that she “should be shot.” Although Sunak himself condemned the remarks, his party kept the donor’s £10 million. And in April, a white Londoner went viral for a racist tirade on the subway in which he said “Listen, this is England, not no fucking foreign cunts like you lot.”
Moreover, diversity in politics is a dangerous idol. Black political power can manifest as Clarence Thomas or Ketanji Brown Jackson. Women can elect a serial womanizer to the highest office in the land. And it’s a dice roll whether clumsy constructs like “the Latino vote” can mean a future of immigrant amnesty or legislation to protect fetal heartbeats. Similarly, Britain’s 14-year Tory reign saw two female prime ministers as well as Sunak. Heterogeneity is not always a winning prospect for progress.
Take New York, please.
In New York City, America’s bastion of multiculturalism, locals squabble about the overrepresentation of Asian students in the city’s elite public high schools (and the consequential underrepresentation of Black and Latino students). They squirm at living next to hotels converted to shelter majority-minority refugee migrants or homeless people . A poll last year of New York City residents found 62 percent agreed with Eric Adams , the city’s second Black mayor, that a migrant influx will “destroy” the city . That’s the current state of Ellis Island and the Statue of Liberty.
By contrast, London has unquestionably beaten America at its own multicultural game . Consider this moment a cultural or social Sputnik . Americans have some serious catching up to do.
Asians are not part of Labour’s rise to power; Labour is part of Asians’ . The question Britain now faces is one the U.S. has been failing since its inception: Can it be a democracy that actually represents all the people in it, and doesn’t only or best serve white people? Starmer, for all his faults, has said growth “ relies on migration .” He can pivot from toxic ideology toward government enabled by and centered upon shared domestic otherness. If he doesn’t, Britain’s ever-growing nonwhite population will have little reason to think much of the Labour Party. For their part, Asian Brits are confident their ascendant power persists with or without the new government’s backing, trusting that the future is the one home where all arrive as migrants.
IMAGES
VIDEO
COMMENTS
Create Stunning Presentations on the Web. reveal.js is an open source HTML presentation framework. It's a tool that enables anyone with a web browser to create fully-featured and beautiful presentations for free. Presentations made with reveal.js are built on open web technologies. That means anything you can do on the web, you can do in your ...
Recall that presentationArea refers to the element that wraps the whole presentation. By adding the class full-screen to this element, we trigger the CSS that will expand it to take up the whole screen.. Since we're now in full-screen mode, we need to show the icon for reverting back to the small screen by adding the class .show to it. Finally, we update the variable screenStatus to 1.
Getting Started with WebSlides. To get started, first download WebSlides. Then, in the root folder, create a new folder and call it presentation. Inside the newly created presentation folder ...
HTML, or Hyper Text Markup Language, is the building block of most web pages. It's a way to structure content on the web and create visual presentations like slideshows. When we talk about creating a slideshow using HTML, we're often referring to leveraging a combination of div tags and CSS properties.
Making a Presentation. Copy an existing presentation folder; Change the folder name (which should be located at public/slides) with the name day[num of day] ex(day2) Making a Slide. Making a slide is pretty simple. Just add a HTML section. <section> <!--slide content--> </section> inside the span with the class of "prez-root". Also keep in mind ...
W3Schools offers free online tutorials, references and exercises in all the major languages of the web. Covering popular subjects like HTML, CSS, JavaScript, Python, SQL, Java, and many, many more.
The first step to changing which slides show is to select the slide wrapper (s) and then its slides. When you select the slides you have to go over each slide and add or remove an active class depending on the slide that you want to show. Then just repeat the process for a certain time interval. Keep it in mind that when you remove an active ...
In the power point presentation click Save As and select GIF. Pick the quality you want to display the presentation at. Power Point will save one GIF image for each slide and name them Slide1.GIF, Slide2.GIF, etc..... Create a HTML page and add a image tag to display the Power point GIF images.
Create the Starter Markup. 3. Make It Pretty. 4. Enable Slide Navigation. Moving the Presentation to the Next and Previous Slides. Code for Showing the Presentation in Full Screen and Small Screen. Hidding Left and Right Icons in First and Last Slides. Updating and Displaying Slide Number.
WebSlides is the easiest way to make HTML presentations. Just choose a demo and customize it in minutes. 120+ slides ready to use. Good karma. WebSlides is a beautiful solution for telling stories. ... HTML and CSS as narrative elements. Work better, faster. Designers, marketers, and journalists can now focus on the content. Simply choose a ...
The showDiv () function hides ( display="none") all elements with the class name "mySlides", and displays ( display="block") the element with the given slideIndex. If the slideIndex is higher than the number of elements (x.length), the slideIndex is set to zero. If the slideIndex is less than 1 it is set to number of elements (x.length).
Doing a presentation in HTML doesn't necessarily mean going into a text editor and writing markup and CSS and JavaScript from scratch. The simplest on-ramp to HTML slides is designing them ...
1. Open your PowerPoint presentation and navigate to the slide where you want to insert the HTML. 2. Click on the "Insert" tab and select "Object" from the toolbar. 3. In the "Object" window, switch to the "Create from File" tab and click on "Browse" to select the HTML file you want to embed. 4.
Bootstrap allows creating responsive video or slideshow embeds based on the width of the display or parent element by creating a native ratio that scales with the device. Using responsive video or slideshow embeds the content can be scaled automatically as per the screen size or the parent container element, this makes the UI more responsive.
However, to embed an HTML file, it needs to be added as an object. HTML files can be embedded as objects in PowerPoint via Insert -> Text -> Object. From the dialog box, select a file and browse to select the HTML file. You can choose to display the file as an icon by checking the Display as Icon option. Check the Link option if you want the ...
21. Console. Assets. Comments. This demo by Ivaylo Gerchev accompanies an article for SitePoint and illustrates how to create an HTML and CSS presentation about SVG using WebSlides. ...
The display property takes many different values such as inline, inline-block, block, table, and more, which all influence the layout and presentation of an element on the web page. Also, to implement the flex and grid layouts, you need to use the display property. You can use this display property to change an inline element to block, block ...
About HTML Preprocessors. HTML preprocessors can make writing HTML more powerful or convenient. For instance, Markdown is designed to be easier to write and read for text documents and you could write a loop in Pug.
HTML is used as the graphical user interface in client-side programs written in JavaScript. Server-side languages like PHP and Java also receive data from web pages and use HTML as the output mechanism. The emerging Ajax technologies likewise use HTML and XHTML as their visual engine.
This is default. Displays an element as a block element (like <p>). It starts on a new line, and takes up the whole width. Displays an element as an inline-level block container. The element itself is formatted as an inline element, but you can apply height and width values. Sets this property to its default value.
Step-3: Click on the "Embed" option. In the "Publish to the web" dialog box, click on the "Embed" option. Then you can customize autoplay options for the embedded presentation. Step-4: Click on the "Publish" button. The next step is to click on the "Publish" button at the bottom of the "Publish to the web" dialog box.
They often serve as a bridge between traditional spreadsheets and online presentations. However, over the years, HTML tables have been misused, and attempts to adapt them to different devices have frequently resulted in poor usability or a failure to display all the required information.
NBC's presentation of this year's Macy's 4th of July Fireworks sparked a flurry of complaints about focus on singers, credits playing over finale
Software for mission- and safety-critical systems, such as avionics systems in aircraft, is growing larger and more expensive. The Architecture Analysis and Design Language (AADL) addresses common problems in the development of these systems, such as mismatched assumptions about the physical system, computer hardware, software, and their interactions that can result in system problems detected ...
Every great superhero needs a sidekick. Now, scientists may have found a drug-busting partner for naloxone. Naloxone is an opioid antidote that has saved tens of thousands of lives by rapidly reversing opioid overdoses in more than 90% of cases in which it is used.
There will also be an encore presentation at 10 p.m. ET on NBC. When 9:25 p.m. rolls around, that's when the fireworks display will start going off, until around 10 p.m.
We started doing weekly Facetime calls with the grandparents who live states away. My 6-year-old daughter is usually a delight: chatty, funny, precocious. Unfortunately, that is not at all the ...
A man who law enforcement said lit a large firework and placed it on his head died in South Carolina Thursday night, and in Alabama, a pyrotechnician was taken by medical helicopter to a hospital ...
The new Britain just made its voice heard. The Labour Party—and the U.S.—had better listen.
Mass shooters generally don't just snap - they plot and display troubling signs before the violence happens, according to the FBI. Here's what the bureau says to look for.