
3 Ways to Share a PowerPoint on Google Drive

Google Drive is a popular cloud storage platform that makes it easy to store, access, and collaborate on files. One of the most common files people may want to share on Google Drive is PowerPoint presentations. There are a few simple ways to upload and share PowerPoint files on Google Drive.
1. Upload the PowerPoint File to Google Drive
2. share the uploaded powerpoint file, 3. convert the powerpoint to google slides, benefits of sharing presentations on google drive.
There are many benefits of storing your PowerPoint presentations on Google Drive and sharing them from there:
Adjust Share Settings and Permissions
When sharing a presentation file on Google Drive, you can adjust the permissions to control what recipients can do with the file.
Share PowerPoints Securely with Specific People
Collaborate on powerpoints in real-time.
A key benefit of using Google Drive for presentations is the ability for multiple people to collaborate easily:
Generate Shareable Links for Presentations
When people click on the link, they will be able to view the presentation without needing to log in or have access to your Google Drive.
This makes it easy to share presentations with clients, partners, or anyone outside of your organization.
Google Drive takes the friction out of collaborating on and presenting PowerPoints. So next time you need to share a presentation, look no further than your Google Drive account.
About The Author
Vegaslide staff, related posts, how to export excel to powerpoint, how to remove footer from powerpoint ppt, powerpoint 2000: inserting hyperlinks, powerpoint crashes frequently after upgrading windows.
Genuine software, legally FREE - no cracking required!
Edit Word, Excel, and PPT effortlessly
Read, edit, and convert PDFs with the powerful PDF toolkit.
Microsoft-like interface, easy to use.
Windows • MacOS • Linux • iOS • Android

- Articles of Office solution
3 Easy Ways to Share a PowerPoint on Google Drive
One of the most used tools to convey information clearly and concisely in all these settings is PowerPoint.
Some users find it hard to store large PowerPoint files on Drive, even with its popularity. What's the best way to upload PowerPoint without converting it? Read on till the end to see how to share a PowerPoint on Google Drive.
What is Google Drive?
You'll have many questions, like why choose Google Drive? And What is even Google Drive? Google is a popular cloud-based storage and collaboration service that allows users to store and share files. Google Drive lets you share files online and syncs with many platforms.
You can upload your PowerPoint presentation to Google Drive to obtain a shareable link you can send to people. You can also adjust the access permissions you give users on the file to either view or edit it.
Sharing and collaborating with others becomes easy once you upload your presentations on Google Drive. If you lost a device, you can simply recover any file thanks to Google's file backup feature.
When you upload to the service, your data is encrypted and secured on Google Drive's servers. Using the Desktop Google Drive app or a web browser to visit www.google.com/drive/download/ gets you started. Syncing your data across several devices will ensure that you always have the most recent version is another option.
You automatically qualify for its free version, which lets you store files up to 15GB in size if you have a Google account. Yet, you can switch to a premium plan for more storage space.
Upload PowerPoint Presentation to Google Drive
Before you learn how to share a PowerPoint on google drive, you must first upload the file to the platform. You can do this either by uploading the file with Google Drive or moving the file to Google file.
Drag and Drop the PowerPoint File Into Google Drive
Although this method may not suit uploading on mobile devices, it works perfectly on computers. So follow us as we show you how to upload PowerPoint to Google Drive by dragging and dropping the file.
Step 1 : Open Google Drive on your web browser via drive.google.com.
Step 2 : On your computer windows, go to the folder where you'll find the PowerPoint file.
Step 3 : Click and hold on to the file, then drag it to the Google Drive page you opened on your web browser.
Step 4 : Drop the dragged file where you get a popup message saying, "Drop files to upload them to My Drive."
Step 5 : You'll see a notification in the lower right corner saying, "Uploading file." Wait till the upload is complete, and you're all set.
Upload the PowerPoint File From Within Google Drive
This is another effective way to upload your PowerPoint file in Google Drive using mobile devices or computers. You can even decide to use the Google Drive app or website for this method. Below are the steps to take if you want to upload your PowerPoint file from Google Drive:
Step 1 : Open the Google Drive app or use the website and ensure you're logged in.
Step 2 : Click on "New" at the top left.
Step 3 : Click "File upload," and your file explorer will pop up.
Step 4 : Locate and click on the "Presentation" you want to upload.
Step 5 : Finally, click Open, and the file will start uploading.
Share PowerPoint Presentation with a Link from Google Drive
The file has now been uploaded to your Google Drive; sharing it is the next step. Though it should take a little effort, some people still need help sharing the PowerPoint. Below are steps on how to share a PowerPoint on Google Drive to obtain a link that can be sent to others:
Step 1 : Goto Google Drive
Step 2 : Locate and right-click on the "Presentation" you want to share.
Step 3 : Select and click on Share.
Step 4 : Change the visibility open from "Restricted" to "Anyone with the link." You can also modify the access role as a Viewer, Commenter, or Editor.
Step 5 : Click on Copy Link and then Done. The link you copied can be shared by email or social media platforms.
How to Convert PowerPoint Presentation to Google Slides
This is another simple trick some users do not know is possible with steps similar to how to share a PowerPoint on Google Drive. Some users even go as far as searching for converters on Google. But you can convert PowerPoint presentations to Google Slides in two different ways. Keep reading as we walk you through both methods.
Converting PowerPoint Presentation to Google Slides
Step 1 : Open Google Drive.
Step 2 : Search for the desired PowerPoint file.
Step 3 : Once you see the file, double-click to open it. Once the Presentation opens, click on "File."
Step 4 : Then click on "Save as Google Slides."
Importing PowerPoint to Google Slide Without Converting
This method is not too common as most users barely use it. But it is the way to go if you need to know how to upload PowerPoint to Google Slides. Check through the steps below to get answers on uploading PowerPoint to convert them to Google Slides.
Step 1 : Open your Google Drive.
Step 2 : Click on "New" and select "Google Slides."
Step 3 : Once a blank page opens, click "File." Then click "Import Slides" and select the Presentation file you want to convert.
Step 4 : Click "Select all slides" and then "Import Slides." You now have the slide after successfully importing the presentation.
Best Alternative to Microsoft PowerPoint - WPS Office
Since you now know how to share a PowerPoint on Google Drive, viewing and presenting the shared file is the next vital check. WPS Office is the best office suite for making and editing documents, presentations, and more. You can choose WPS Office if you need an alternative to Microsoft PowerPoint that keeps you from breaking the bank.
The following are some of the features that set WPS Office distinct from its rivals:
Compatibility : WPS Office is compatible with all PowerPoint files like PPT, PPTX, PPS, and PPSX. You can open, edit, and save any PowerPoint file without changing its format or reducing the quality. WPS lets you easily export your presentation to PDF format with just a click as well as convert pictures to xls and vice versa.
Cloud Storage : WPS Office customers get access to 1 GB of free cloud storage. Files stored on the cloud can be viewed and synced simultaneously on multiple devices. This is possible regardless of the device type, even if you're using Windows, macOS, Linux, Android, or iOS. In addition to providing direct links, you can also share your files via QR codes.
Template Library : WPS Office gives users access to thousands of free and professional templates. You can use these free templates for several applications, like design, education, and business. You can search the template collection and download the one that meets your needs. You can edit the templates to suit your preferences since they are modifiable.
Collaboration Tools : WPS Office makes it possible to have real-time collaboration on your presentation. You can provide feedback and suggestions, see other people's edits in real-time, and restrict users that can change sensitive information. It has an Airpage feature to create interactive web pages from your presentations and share them online.
Use Word, Excel, and PPT for FREE, No Ads.
Edit PDF files with the powerful PDF toolkit.
Microsoft-like interface. Easy to learn. 100% Compatibility.
Boost your productivity with WPS's abundant free Word, Excel, PPT, and CV templates.
How To Convert a PowerPoint Presentation to Google Slides Without Losing Formatting?
The best bet you have to convert a presentation to Google Slide while retaining its format is to upload the file to Google Drive. After uploading the file, you can open it by double-clicking it. Then you can click on "File" and select "Save as Google Slide."
How Do I Make PowerPoint Editable Online?
Sometimes the access you get in a shared PowerPoint link is to be a viewer only. In this scenario, you can use PowerPoint for the web if the file is on OneDrive, SharePoint, or Dropbox. To edit such a file, open Onedrive on the web, locate the file and click on the name. Click on Edit Presentation and select Edits in PowerPoint Online. But if the file is on Google Drive, you can use Google Slide.
Why won't my PowerPoint Upload to Google Drive?
Most times, PowerPoint files aren't uploaded to Google Drive because the internet link is slow or unstable. If you're using an old browser or one that isn't suitable, your file might fail. Your upload can stop because of the size or type of the file or security measures like a firewall or virus scanner. To fix the issue, you can try some troubleshooting steps.
How Do I Save PowerPoint as PDF?
There are many ways to accomplish this task, but the easiest method is utilizing WPS Presentation. To do this, open the presentation file on WPS Presentation and click Menu, then select "Export to PDF." That's it; you're all set to view your presentations in PDF.
PowerPoint sharing is a fundamental tool to facilitate collaboration and the presentation of ideas. With PowerPoint sharing, presentations can be displayed and edited in real-time. This allows participants to contribute and make changes to the content.
Google Drive is software that helps perfect the execution of this idea. It does this by serving as a storage facility that helps keep the file and a base to execute all actions on the project.
We have discussed how you can share your PowerPoint file and how to keep the format and quality of a shared file intact. A tool we recommend for this is the WPS Office .
Particularly, the WPS Office helps you execute this process at no charge. WPS Office seamlessly enables you to save on Google Drive to get a shareable link. WPS uploads your file to Google Drive, making it easier to convert it to slides.
Also, WPS Office makes creating a platform for your team easier and lets you design and edit your presentation. You can't get enough of this powerful tool!
- 1. How to Share PowerPoint on Webex (Easy ways)
- 2. 3 Effective Ways to Share a Large PowerPoint File
- 3. How to Share A PowerPoint to Edit (In Easy Methods)
- 4. A Complete Guide for Editing PDFs with Google PDF Editor - Google Drive
- 5. How to Share PowerPoint on Zoom Without Showing Notes (In Easy Methods)
- 6. 5 Easy Ways to Share Your Presentation so Others Can View It

15 years of office industry experience, tech lover and copywriter. Follow me for product reviews, comparisons, and recommendations for new apps and software.
- Tips & Tricks
- Website & Apps
- ChatGPT Blogs
- ChatGPT News
- ChatGPT Tutorial
How To Share a PPT In Google Docs
How To Share a PowerPoint in Google Docs – Quick Steps Open Google Drive Upload Presentation Open with Google Slides Click Share Button Enter Email Address >> Click Share
Google Docs is known as an online word processor used to create and edit documents, files, drawings, and many other things. It is a part of Google Docs Office Suite which is offered by Google, in Google Docs there are so many other things such as Google Sheets, Google Slides, Google Drawings, and so on. Google Slides is also a part of Google Docs so sharing a presentation in Google Slides means you are sharing the ppt in Google Docs. So, in this article, we will explore how we can share a ppt in Google Docs using Google Slides and Drive.
How To Share a PPT in Google Docs on a Desktop
Step 1: open google drive and upload presentation.
Open the Google Drive on your Desktop and upload your desired ppt on the Drive by clicking on the “New” button present on the top-left side of the interface.

Click on the “New” button
Step 2: Select “File Upload” button
Now select the “File Upload” button from the drop-down menu appeared so that you can upload your ppt on your Google Drive.

Select “File Upload”
Step 3: Select the File and Click “Open”
Now select your desired file by clicking on it and clicking on the “Open” button. It will start uploading your file to the Google Docs.

Select the File >> Click “Open”
Step 4: Click on Three Dots
When your file uploaded to the Drive it will appear among all the files available, just click on the Three Dots present next to your file name.

Click on Three Dots
Step 5: Click on “Open With” and Select “Google Slides”
After clicking on the Three Dots a drop-down menu will appear, select “Open With” >> “Google Slides” to continue sharing the ppt.

Select “Open with” >> Google Slides
Step 6: Click on “Share” Button
After opening your file in Google Slides click on the “Share” button present on the top-left corner of the interface.

Click on Share button
Step 7: Enter Email address, Click on Manage Permission and Click “Send”
In this step you have to enter the email address of the person whom you want to share the ppt and you can also set the permissions to edit it, view it, or comment it. After managing the permissions and entering the email address click on the “Share” button to share the ppt.

Enter Email address >> Manage Permission >> Click “Send”
How To Share a PPT in Google Docs by Link
Upload File
Step 2: Click on Three Dots
Step 3: select “open with” and choose “google slides”.
Select “Open with”
Step 4: Click on “Share” Button
Click Share Button
Step 5: Click on Copy Link
Click on the “Copy Link” button to copy the link and then you can share or paste the link anywhere you want.

How To Share a PPT in Google Docs on Mobile
Step 1: open google drive and upload ppt.
First you have to upload your presentation to the Google Drive to do so open Google Drive in your Mobile and click on the “+” Icon present at the bottom-right corner of the interface.

Click on “+” Icon
Step 3: Click on Upload Button
Click on the Upload button which will appear after when you will click on “+” icon.

Click on “Upload” Button
When your file is uploaded on Google Drive locate your file and click on the Three Dots present next to your file name.

Step 5: Select “Open With”
After clicking on the Three Dots select “Open With” option from the drop-down menu.

Select “Open With”
Step 6: Select Slides
Now select Google Slides to open the selected presentation because Google Slide is part of Google Docs.

Select “Slides”
Step 7: Click on Share Icon
After opening the presentation in Google Slide click on the Share icon present at the top-right side of the interface.

Click on Share Icon
Step 8: Enter Email Address, Manage Permissions and Click Share
Now enter the email address of the person whom you want to share the ppt and also manage the permission of the ppt to view, to edit or to comment it. After entering the email address and managing the permissions click on Share button to share the presentation.

Enter Email Address >> Manage Permissions >> Click Share
Google Docs is an online word processor used to create and edit spreadsheets, documents and so many things. Google Slides is also a part of Google Docs which is used to view and edit presentations, so we have taken help of Google Slides to share the ppt. Sharing a presentation in Google Docs can be done in some easy and simple steps. All you have to do is open your Google Drive and upload the presentation, then open your presentation with the Google Slides. After opening your presentation click on the Share Icon to share the ppt and enter the email address, manage the permissions then click on Share button to share it.
Can I directly open and edit a PowerPoint presentation in Google Docs?
No, Google Docs doesn’t give you the feature of directly opening the presentation in it. However, you can open it in Google Slide.
How do I convert a PowerPoint presentation to Google Slides?
Go to your Google Drive and upload the presentation to the drive and open then open it with Google Slides, your ppt will be converted.
Can I share a PowerPoint presentation without converting it to Google Slides?
Yes, you can directly share the presentation from the Google Drive by clicking on the Three Dots >> Share button.
Please Login to comment...
Similar reads.
- Geeks Premier League
- Google Workspace
- Geeks Premier League 2023
- Google Docs
- Google Docs Tips
- How to Get a Free SSL Certificate
- Best SSL Certificates Provider in India
- Elon Musk's xAI releases Grok-2 AI assistant
- What is OpenAI SearchGPT? How it works and How to Get it?
- Content Improvement League 2024: From Good To A Great Article
Improve your Coding Skills with Practice
What kind of Experience do you want to share?
Login with confidence. Protect your passwords and accounts with LogMeOnce rich features.
- Top Features
- Free Mobile Security
- PasswordLess QR Login
- PasswordLess Photo Login
- Two-Factor Authentication
- Scheduled Login ©

Scan Dark Web for stolen passwords. Stop hackers from attacking your online activity. Collect hacker’s metadata!
- Anti-Hacker Protecter
- Mugshot (patented)
- Password SHOCK ©

Encrypt files, images, and documents stored on your favorite cloud storage sites with your own password!

Our award-winning software helps to effectively protect and manage passwords for teams of 50 or less.
- Cloud Encrypter
- Identity Theft Protection
- Pricing & Comparison

Secure employees, contractors, and partners’ access with Single Sign-On, MFA and more rich security features.
- Passwordless MFA
Protecting your government agency requires threats awareness of external and internal elements.

As an MSP, you need to manage your company’s internal passwords and your customers' passwords too.
- Become a Partner
- MSP Password Manager
- How LogmeOnce Works
- How Secure is Logmeonce ?
- Dangers of Weak Password
- Teams / Business / Enterprise
- Personal / Family
- Students – 50% off on total bundle
- Student – 50% off everything
Nicole’s, journey in the tech industry is marked by a passion for learning and an unwavering commitment to excellence. Whether it’s delving into the latest software developments or exploring innovative computing solutions, Nicole’s expertise is evident in her insightful and informative writing style. Her ability to connect with readers through her words makes her a valuable asset in any technical communication endeavor.
- Applications
- Cloud Security
- Password Manager
- Single Sign On
- Social Media
- Two Factor Authentication
Protect your passwords, for FREE
How convenient can passwords be? Download LogMeOnce Password Manager for FREE now and be more secure than ever.

- LogMeOnce, HQ, USA, Washington DC
- 1 (800) 935-4619
- Corporate: [email protected]
- Sales: [email protected] Media Contact: [email protected] Careers: [email protected]
Personal & Family
- Pricing and Comparison
Business / Enterprise
More Security
- Anti-Hacker
- Cloud Storage Encryption
- Password Shock ©
- Schedule Login ©
- Dark Web Monitoring
- How LogMeOnce Works
- Why Use LogMeOnce
- How Secure is LogMeOnce ?
- NIST 800 Information Security Policies
- Your LogMeOnce Password Management Benefits
- Support Center
- Password Generator
- Partner Login
- Company Overview
- Executive Team
- Patents & Licensing
- Media Coverage
- Online Media Kit
LogMeOnce is a US based company, operating globally with offices in Washington DC, USA,. All other company, product , service names and trademarks used in this website are for identification purposes only, and are property of their respective owners . Use of these names, trademarks and brands does not imply endorsement.
This content is intended to provide general information. While we strive for accuracy and reliability, it may contain errors or outdated information. It should not be considered professional or personalized advice. Please use this content as a starting point for further research and consult relevant experts when needed. We do not assume any responsibility or liability for the use or interpretation of this content.

- Get started with computers
- Learn Microsoft Office
- Apply for a job
- Improve my work skills
- Design nice-looking docs
- Getting Started
- Smartphones & Tablets
- Typing Tutorial
- Online Learning
- Basic Internet Skills
- Online Safety
- Social Media
- Zoom Basics
- Google Docs
- Google Sheets
- Career Planning
- Resume Writing
- Cover Letters
- Job Search and Networking
- Business Communication
- Entrepreneurship 101
- Careers without College
- Job Hunt for Today
- 3D Printing
- Freelancing 101
- Personal Finance
- Sharing Economy
- Decision-Making
- Graphic Design
- Photography
- Image Editing
- Learning WordPress
- Language Learning
- Critical Thinking
- For Educators
- Translations
- Staff Picks
- English expand_more expand_less
Google Slides - Sharing and Collaborating
Google slides -, sharing and collaborating, google slides sharing and collaborating.

Google Slides: Sharing and Collaborating
Lesson 6: sharing and collaborating.
/en/googleslides/managing-your-files/content/
Sharing and collaborating on files
Google Drive makes sharing your files simple. It also allows multiple people to edit the same file, allowing for real-time collaboration . Watch the video below to learn more about these features.
Sharing files
Whenever you share a file from your Google Drive, you can let others view and even edit that same file. While you can share any file stored on your Google Drive, it's important to note that you can only use the collaboration features for files created within your Drive.
Let's look at the example of Olenna, an art teacher who uses her Google Drive to organize letters, lesson plans, and more. Olenna's files include:
- Files she keeps private , like her spreadsheet with classroom expenses
- Files she lets others edit , like the lesson-planning documents she creates with her co-teacher
- Files she shares publicly and doesn't let others edit , like the newsletters and announcements she shares with her students and their parents
- Files others share with her , including ones she can edit, like her co-teacher's supply inventory; and ones she can't, like a schedule sent to her by the principal
As you can tell, no single sharing setting would be right for all of Olenna's files. The settings you choose for each of your shared files will probably depend on why you're sharing it in the first place.
When you share a file with a limited group of people, your collaborators must sign in with a Google account to view or edit the file. However, when you share with a larger group or make the file public , your collaborators will not need a Google account to access the file.
To share a file with a limited group of people:

- A dialog box will appear. In the People box, type the email addresses of the people you'd like to share the file with. If you want, you can add a message that will be emailed to the people you share the file with.

For more control over your files, you can click the drop-down arrow to decide whether people can edit, comment on, or simply view the file.

Sharing with a link
You can easily share a file with a larger group of people by providing a link to any file in your Google Drive. A link is basically a URL or web address for any file you want to share. This can be especially helpful for files that would be too large to send as an email attachment, like music or video files. You can also share a file by posting the link to a public webpage. Anyone who clicks the link will be redirected to the file.
To share a link:

Files shared with you
People can also choose to share files with you. These files will appear in your Shared with Me folder. However, if you'd prefer to access a file from your Google Drive without switching to this view, you can move it. To do this, navigate to your Shared with Me folder, hover the mouse over the desired file, then select Add to My Drive .

Collaboration tools
Whenever you share a file in a Google Drive format, you'll have the option to allow your co-editors to change and edit the file. Google Drive offers several tools that enhance collaboration by making it easier to communicate with your co-editors and to see which changes have been made and by whom.
Click the buttons in the interactive below to learn about the collaboration features in Google Drive.

Additional Sharing Options
Click File to view additional sharing options. Download as downloads your file in a different format like a Word document, PDF file, or HTML text. Publish to Web creates a simple webpage of your document. Email collaborators allows you to send an email that includes a link to your file. Email as attachment allows you to send your file as an email attachment.
Revision History
Click File and then select See revision history to view older versions of the file. You can see changes that have been made over time and revert to an older version if you want.
Comments Button
Click the Comments button to view a thread containing all comments related to the file, sorted chronologically. You can also add new comments and reply to old ones.
Share Button
Hover over the Share button to see a description on the file's current visibility settings . Click the Share button to edit the file's sharing settings . You can share your file with others, modify visibility, or create a link to the file.
Currently Viewing and Chat
Click here to chat with others who are currently viewing the file. Note that chats are not saved in Comments.
When a collaborator is modifying the file, a cursor will appear in a bright color at whatever point he or she is editing. Any changes the person makes will appear in real time.
Adding Comments
Comments allow you to attach a brief note to a certain section of a file. Your collaborators can see and reply to any comment you create. To add a comment , select the text you want to comment on, then right-click and select Comment from the drop-down menu. Your collaborators can choose to either Reply or Resolve the comment.
Suggesting mode
Google Drive also has a feature called Suggesting mode , which is similar to the Track Changes feature in Microsoft Office. This allows each collaborator to make changes, while giving the other collaborators a chance to review the changes before making them permanent. This page has more information about how to make suggested edits and accept or reject other people's changes.
- Open our example file . Make sure you're signed in to Google, then click File > Make a copy .
- Change to suggesting mode .
- Select the first three lines of the letter and center align them.
- Select the name Melissa Vaughn and add a comment that says Double check the spelling .

- Optional: Try sharing your document with someone.
/en/googleslides/converting-and-printing-docs/content/
Home Blog PowerPoint Tutorials How to Share a PowerPoint Presentation
How to Share a PowerPoint Presentation

Sharing a PowerPoint file is easy, but depending on how you choose to share the file, you can also use third-party services for sharing presentations and PowerPoint templates .
Share a PowerPoint for Editing and Viewing via OneDrive
You can use the default sharing options, including OneDrive, to share a PowerPoint. The Share button in the top right corner enables instantly sharing your file online. To generate a link for a file not yet uploaded to OneDrive, go to Share -> Share .

You will be asked to log in with your Microsoft account to share the file via OneDrive if you are not signed in.

How to Share PowerPoint So Everyone can Edit
When generating the direct link, you can choose to enable editing for the file for online collaboration. This will enable someone to collaborate and edit the file.

How to Share PowerPoint with View-Only Privileges
Select the option via the dropdown menu to limit the file to View Only . Files limited with this privilege cannot be edited online, but the recipient can still download them.

How to Share PowerPoint with Specific People Only
There is also an option to ensure you share the file only with specific users by entering their email addresses. Otherwise, you can generate a direct link for sharing with anyone based on either editing or view-only privileges.

How to Copy PowerPoint Link for Sharing
Once you set the privileges for your file, you are instantly provided with a link based on the selected user privileges once you select Copy .

You can also instantly copy a link via the Share button to generate a direct link for the PowerPoint presentation or the current slide.

This will create a link that you can share with anyone. The link has settings based on your selected user privileges.

How to Share PowerPoint via Email
To share PowerPoint via email, you can either attach the file as an attachment or share it directly via Attach a copy option available from the PowerPoint Share button.

The service provider usually limits attachments to a certain size, such as 25 MB. In contrast, files larger than that are sometimes uploaded to a cloud-sharing service like OneDrive or Google Drive by email service. The default attachment option in PowerPoint opens the file as an attachment via a mail client like Outlook.

How to Share a PowerPoint as PDF
You can share PowerPoint files as PDFs by instantly converting them via the Share button in PowerPoint. This will create a PDF attachment for instant sharing via an email client.

You can also create a PDF file via File -> Save As , select PDF, and share it via email, instant messenger, or a cloud storage service.

How to Share a PowerPoint via Microsoft Teams
You can share your PowerPoint presentation as an attachment, present it via teams during a meeting, or use the PowerPoint Live option. You can learn about sharing your presentations using Teams from our tutorial about How to Share a PowerPoint Presentation on Microsoft Teams .

Other Methods for Sharing a PowerPoint
You can also use various third-party services or methods to share PowerPoint files.
Share a PowerPoint via SlideShare
SlideShare is a popular service for sharing presentations online. PowerPoint presentations uploaded to SlideShare can also be shared via direct link or embedded on a website.

Share a PowerPoint via Google Drive
Among the various third-party services, Google Drive is famous for supporting PowerPoint files. Making it easy to upload, edit, and share PowerPoint files online. What makes Google Drive a viable free alternative to PowerPoint and Microsoft services like OneDrive is its support for PowerPoint files.

Share a PowerPoint via USB or External Drive
Sometimes, transferring your PowerPoint file via a USB or external drive for instant sharing is best. This is commonly done when sharing files with colleagues or when you need to quickly provide the file to someone at an event to cue your presentation before your session.

Share a PowerPoint via Bluetooth
You can quickly share your PowerPoint file with a Bluetooth-connected device, such as a nearby smartphone. This, among other methods, can be particularly useful when you are short of connectivity options for file sharing and are pressed for time.

To share a PowerPoint presentation via OneDrive: – Click the Share button in the top right corner. – Sign in with your Microsoft account if prompted. – Choose whether you want to share for editing or view-only. – Generate the link and copy it for sharing.
Yes, you can allow others to edit your PowerPoint presentation: – Click the Share button. – Select Anyone with the link can edit from the permissions menu. – Generate the link and share it with collaborators.
To share with view-only privileges: – Click the Share button. – Select Anyone with the link can view from the permissions menu. – Generate the link and share it.
To share with specific people: – Click the Share button. – Enter the email addresses of the people you want to share the presentation with. – Choose the permission level (edit or view). – Send the invitation.
To copy a PowerPoint link: – Click the Share button. – Set the permissions as needed. – Click the Copy Link to generate and copy the sharing link.
To share via email: – Click the Share button. – Select Attach a copy and choose Email as an attachment. – This will open your default email client with the presentation attached.
Yes, to share as a PDF: – Click the Share button. – Select Send as PDF. – This will create a PDF version of your presentation for sharing.
To share on Microsoft Teams: – Click the Share button. – Select Present in Teams if you are in a meeting. – Alternatively, attach the file in a Teams chat or channel.
To share via Google Drive: – Upload the PowerPoint file to Google Drive. – Right-click the file and select Share. – Choose the permission settings and generate a sharing link.
Yes, you can share a presentation using a USB or external drive: – Copy the PowerPoint file to the USB or external drive. – Hand over the drive to the recipient or connect it to the target device.
To share via Bluetooth: – Review if both devices have Bluetooth enabled and are paired. – Select the PowerPoint file on your device. – Choose Send via Bluetooth and select the target device.
Final Words
There are various methods for sharing a PowerPoint file. Each method has its own merits. Files smaller than 25 MB are frequently shared via email. However, larger files are often shared via cloud storage services. The most commonly used cloud-based services for sharing PowerPoint files include OneDrive, Google Drive, Box, and Dropbox. Even at the enterprise level, different organizations have a preference for one or the other. For very heavy files, you can always use services like WeTransfer or opt for more conventional methods such as sharing the file via a USB, external drive, or Bluetooth.
Like this article? Please share
Microsoft PowerPoint, PowerPoint Tips Filed under PowerPoint Tutorials
Related Articles

Filed under PowerPoint Tutorials • July 30th, 2024
How to Add a Timer to PowerPoint
Generate expectations for your presentation introductions by mastering how to add a timer to PowerPoint. Step-by-step instructions + templates.

Filed under PowerPoint Tutorials • July 24th, 2024
How to Find Quick Access Toolbar in PowerPoint
Easily customize PowerPoint’s UI by locating and editing the Quick Access Toolbar in PowerPoint

How to Translate in PowerPoint
Unlock the experience of PowerPoint translation! Learn methods, tools, and expert tips for smooth Spanish conversions. Make your presentations global.
Leave a Reply
How to share your Google Slides presentation
- Written by: Emma Trantham
- Categories: Google Slides
- Comments: 4

Wondering how to share a Google Slides presentation? Good news! It’s a pretty simple process. There are multiple ways of sharing a Google Slides deck. The right method for you will depend on how you’re going to deliver the slides, the required file type, and your audience. Do you want to share so that a colleague can proof-read and edit, or so that an online audience has the virtual equivalent of a handout?
As Google Slides exists completely online, sharing your presentation with others isn’t limited to an email attachment. This post will show you how to share Google Slides presentations in five ways, there’s definitely something here to meet your needs!
Share with people and groups
Publish to the web
Download as different file type
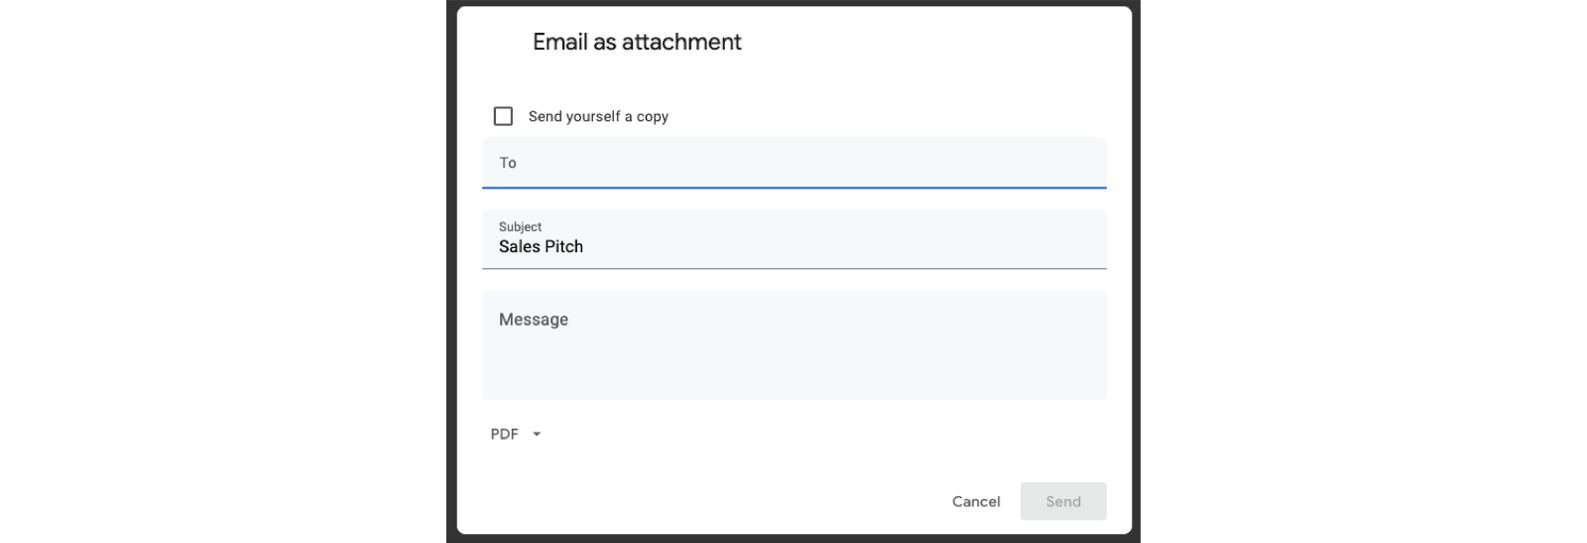
Email as attachment
Before we get to that, you need to know where to find the Share function in Google Slides.
- Open Google Slides and click File , in the top bar
- Click Share at the top of the drop-down menu
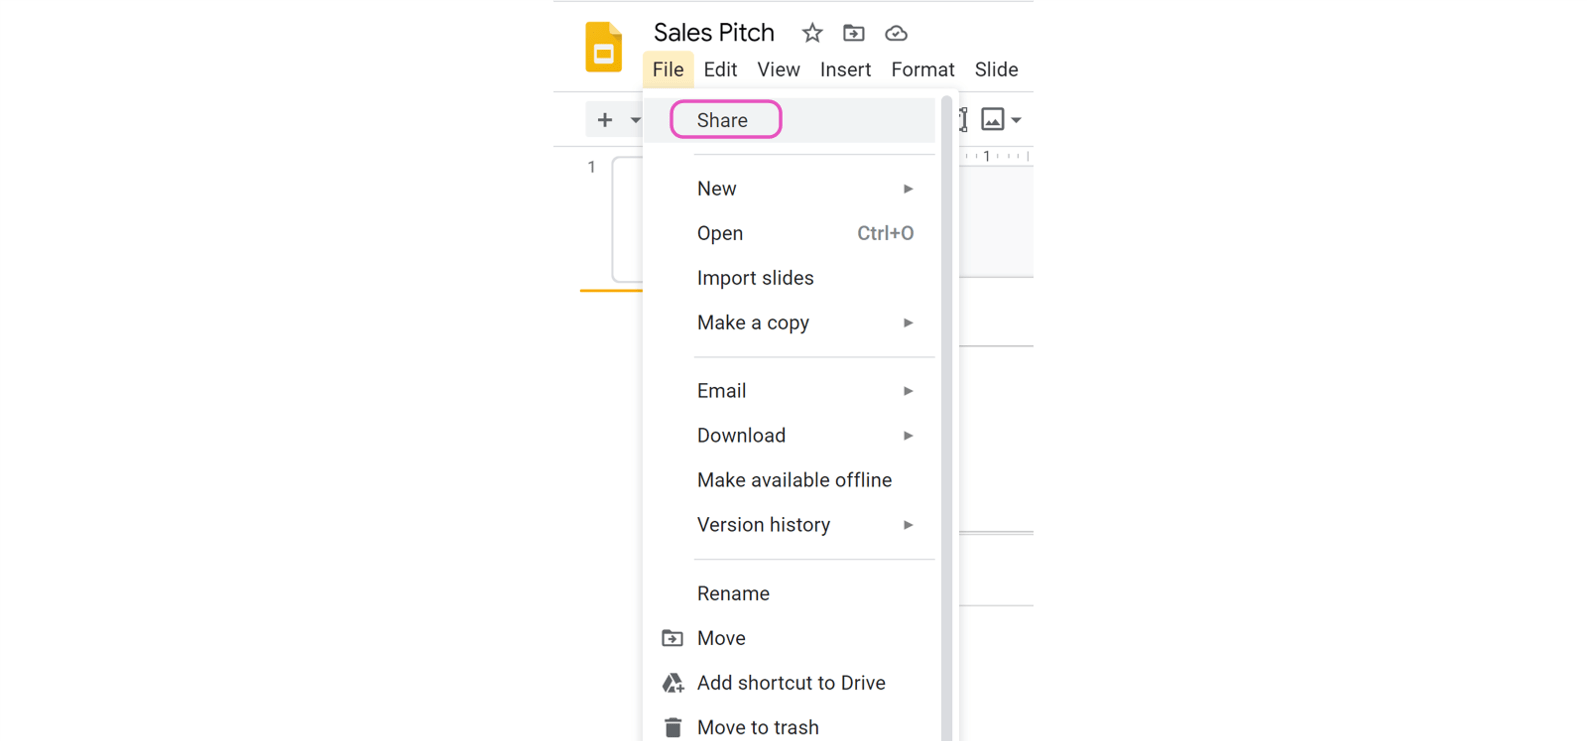
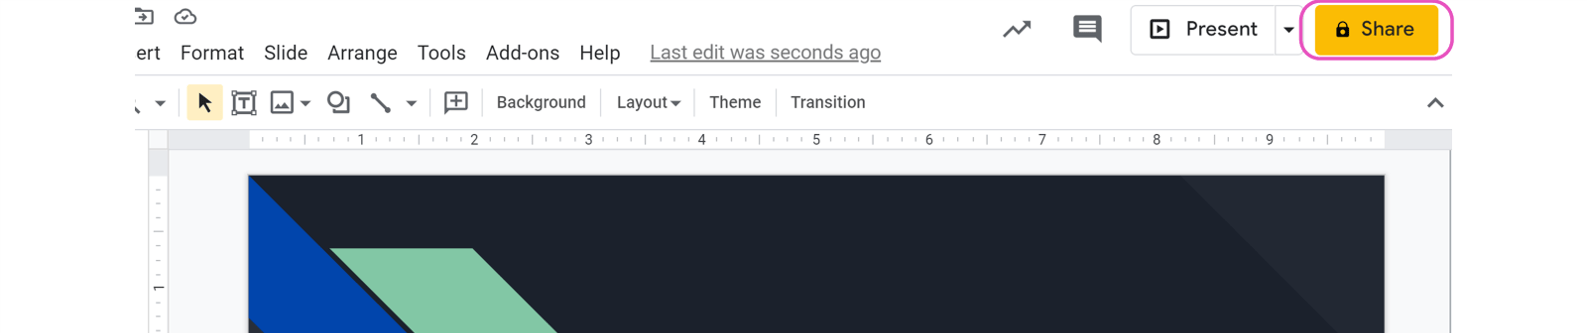
- Or, click Share at the top right-hand side of your window.
1. How to share Google Slides presentations with people and groups
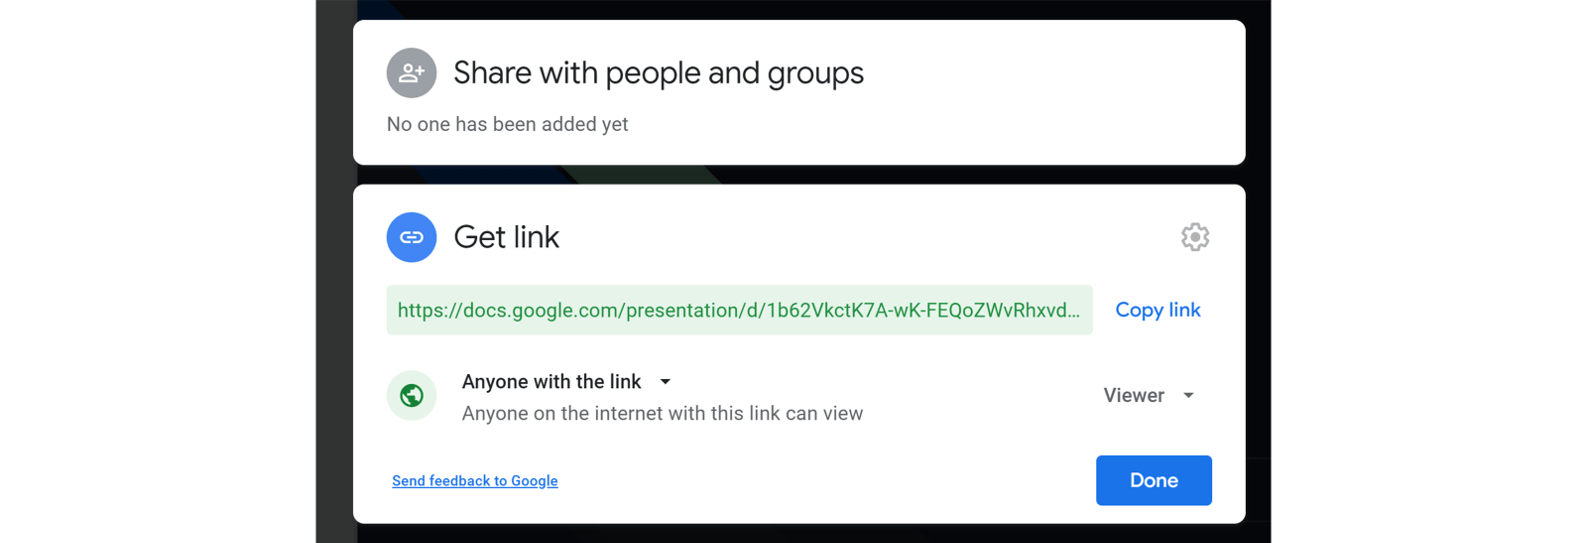
Using Share with people and groups , you can share your Google Slides presentation with multiple people at once. This is helpful if your teammates need to collaborate in the same deck or if you require feedback from a colleague or client. Share with people and groups allows you to change the editing permissions per contact. You can allow each contact to simply view the document, or add comments, or edit it themselves. The level of permission you choose can be different for each contact you share with, giving you a lot of flexibility.
- Click Share to bring up the Share with people and groups pane.
- Next to Add people and groups , start typing the name or email address of the contact you want to share the deck with. A list of recommendations will appear as you type. Once you’ve selected the right contact, their name will appear at the top of the pane. If the person you want to share with is not already in your contact list, you need to type in their full email address.
- Click the small cross next to a contact name to deselect the contact.
When you share using Share with people and groups , Google will ask the user to log in to their Google account to access your shared file. If the user does not have a Google account, they will be unable to access your deck. Just head to the next section to find out how to grant access to non-Google users.
Now you’ve chosen your contact, you can alter their permissions to change how they are able to interact with the deck. There are three options – Viewer , Commenter , and Editor . Simply click on the option currently visible and a drop-down menu will appear allowing you to choose whether your contact can… well… view, comment on or edit the deck. Pretty self-explanatory, right?
But which permission should you give to who and when?
- Viewer: This will prevent contacts from editing slides. If your deck is completely finished and approved, set the permissions to Viewer to stop contacts accidentally editing – or even deleting – slides from your finished presentation!
- Commenter: The best option for gathering feedback. If your contact has limited knowledge of Google Slides, direct them towards our handy Ultimate Guide to Google Slides post so that they can brush up! In the meantime, share your deck using the Commenter function. This way, contacts can comment without being able to rearrange slides, or change text or animations.
- Editor: Perfect for collaborative projects. Editor allows you to share an editable version of your deck. Everyone with this permission can work on the same slides at the same time. This means you don’t end up with multiple versions of the same deck.
For more tips on how to improve collaboration in Google Slides, check out these 6 ways to get the most out of online collaboration with Google Slides .
Once you’ve selected one of these permission options, you’re free to hit Send . If you tick Notify people , your contact will receive an email letting them know that they have permission to access or interact with your deck.

In the Share with people and groups pane, the owner of the Google Slides presentation appears at the top. Beneath that, you can see who has access to the deck and the status of their permissions. If you want to change someone’s permissions, press the yellow Share button at any time and edit permissions using the same drop-down menu.
To stop sharing with a specific person:
- Click Share and scroll to the contact you want to remove
- Click the drop-down arrow next to their name
- Select Remove
- Click Save .
Notice the Give temporary access and Make owner options. If you choose to Give temporary access , you can edit the number of days that your contact has access to your deck. All you have to do is click the number of days next to Access expires to change the expiration date. This can be a great option if you’re working with people outside of your organization, such as clients or agencies. For example, you can schedule the expiration date for the end of a project, once the feedback has been received and the work completed.
Make owner allows you to pass ownership of the deck to another user. After you’ve created a presentation you might need to hand it over, to the presenter for example. You can use this option to give someone else complete control. Use it with caution, however. Once you’ve handed over ownership, you cannot retrieve it – unless the new owner hands it back or chooses to grant you access permissions.
Top tip: If you’re the owner of the deck (if you have created it yourself or have been given ownership by the original creator), there are further sharing options. When you click Share , you’ll notice a cog appears in the top right-hand corner pop up. This allows you to choose whether your Editors can change permissions and share or if Viewers and commenters can see the option to download, print, and copy. All you have to do is tick or untick the box. Easy!
2. How to share a Google Slides presentation via a link
In this window you can also get a link.
- Click the blue Copy link button.
- Paste the link anywhere, from an email draft to a Microsoft Teams chat
This link will only work for people who have been given permission to view, edit or comment on the deck. To change this:
- Click Share
- In the Get link section, press Change .
- Choose whether your deck is Restricted or if Anyone with the link can view. Note: when you change a link’s setting to Restricted , the only people who can still see the deck are those you have directly shared with in the Share with people and groups section.
Though the Anyone with link function can be useful, it’s not the most secure option. Remember: the users that you originally shared the link with can continue to share the link with their friends, colleagues, and contacts too, meaning your presentation can be shared endlessly and with anyone! If your deck contains confidential content, you should not use this method.
3. How to publish a Google Slides presentation to the web
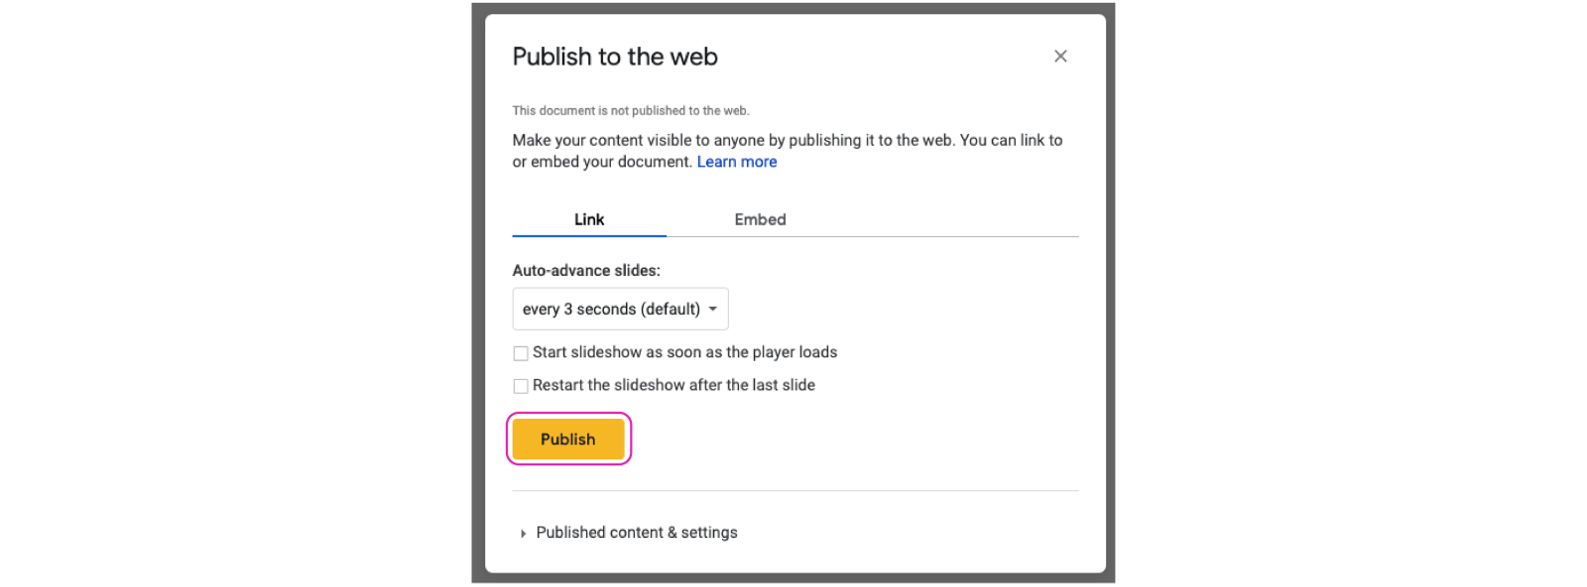
If you don’t want your viewers to edit your deck, then Share with groups and people may not be the option for you. Instead, choose to Publish to the web . With this option, your deck becomes non-editable, it will simply play as if your deck was a video; auto-advancing through the slides. This means that the viewer won’t have control over which slides they view or the order they view them in. The content of your slides will be visible to anyone and everyone when publishing to the web, so be careful about choosing this option if your slides contain confidential information.
- Click File
- Select Publish to the web
- Choose Link or Embed. You can share the URL with your contacts, or you can embed the link on a website or blog
- Choose how your slides playback using the drop-down menu beneath Auto-advance slides
- Click Publish
- Copy the URL or HTML and share your deck
4. How to download a Google Slides deck as different file type
Another method of sharing (or saving) your slides involves downloading the deck as a different type of file.
- Under File select Download .
- Select the format you need (Microsoft PowerPoint (.pptx), PDF Document (.pdf), or JPEG Image (.jpeg)), and the download will begin.
- Open your file
While there are many formats available, we don’t recommend all of them. For example, when downloading as an Image, whether PNG or JPEG, the quality of your slides can be lost, the presentation will be static, and you can only download one slide at a time. If you’re printing or emailing your deck, downloading as a PDF is the best option to get a static version of your slides.
Since PowerPoint is the closest option to Slides, this format retains the presentability of the deck. However, there’s a chance that your content will corrupt or break as not all features are transferable between file formats. Check for any changes and make tweaks – like removing animations – before sending your presentation to your contacts. To find out more about the differences between PowerPoint and Slides, check out 9 Google Slides features we wish PowerPoint had or if you want to try different platforms to PowerPoint, we recommend The ULTIMATE Guide to PowerPoint Alternatives .
5. How to email your Google Slides presentations as an attachment
If all these sharing options still aren’t quite cutting it, there’s one more! To share your slides via email:
- Select Email as attachment
- Type the name or email address of your contact
- Pick the file type your deck
- Add a message, then hit Send
That’s the last of our five tips on how to share a Google Slides presentation. Now you know pretty much everything there is to know about sharing your slides and, if you want to make those slides even more awesome and effective, you have got to check out these 5 Google Slides video tutorials to level up your skills .

Emma Trantham
Principal consultant, related articles, how to present in google slides with present mode toolbar.
- Google Slides / Presentation skills
It takes time to create engaging, visual slides, so why undermine all your effort at the crunch point? Delivering a presentation properly really isn’t that tricky! With Google Slides’ Present mode toolbar, it’s super easy to present in Google Slides navigating your presentation effortlessly.

How to use Presenter view in Google Slides
- Comments: 5
For seasoned presenters and newbies alike, the move to online presenting comes with the joint complications of an online audience and unfamiliar tech. Talk about spinning plates! This blog post covers how to use Presenter view in Google Slides, so that you can be more professional and feel more confident.
Linking Google Slides and Google Keep
- Google Slides
If you're using Google Slides regularly then it's worth getting to know how you can integrate it with your other favorite Google Workspace programs - this time, Google Keep!

What is the name of piece that I attach to my chromebook that allows me to present Google slides
Hi Milton. I’m not sure what you mean – could you please clarify?
Hello, My PowerPoint contains an audio file. I uploaded it to Google Sites (new) and there’s no audio. So I uploaded my PowerPoint to Google Slides and inserted that into my Google portfolio Site hoping that would fix the problem. It didn’t. Can you tell me how to get the audio file to upload to my portfolio site, along with my slides? Thank you! Pam
Hi, I am looking for a way to have Google slides running on a laptop or tablet and instead of the presentation going to a screen, to go live i.e. as it would on a projecter in a URL that I can tell people about, so they can use it with their mobile phones, tablets etc. The sort of application would be for Carol singing, each slide would have no more than two lines to allow for large type and as it goes through the verses it shows on singers devices, one slide at a time. This of course would be outside, i.e. people would at best use mobile data, or if it would work for a larger number by wifi tethering (wifi provided by 1phone/tablet. Thank you, Sam
Join the BrightCarbon mailing list for monthly invites and resources
I wanted to make sure I send you both a HUGE thank you for making this story come to life and creating amazing graphics to help. We really appreciate BrightCarbon for stepping up our presentation game massively! Sarah Walker Softchoice


[Solved] How to Upload PowerPoint to Google Drive

3 Reasons to Upload Your PowerPoint to Google Drive
How to upload powerpoint to google drive, drag & drop a powerpoint into google drive, upload a powerpoint presentation from within google drive, how to convert your powerpoint to google slides, upload your powerpoint with google drive or onedrive, final words: how to upload powerpoint to google drive, related posts, how to add music to powerpoint slideshow and find free music, how to record audio in powerpoint for narration or voice-over | step-by-step, 10s method: how to add bullet points in powerpoint.
- All Templates
- Infographics
How to Upload a PowerPoint to Google Drive? (Step-by-Step Guide Line)
- October 4, 2023
We are getting more dependent on cloud storage every day. Be it storing our work safely or collaborating with others, Google Drive is probably the most popular platform right now. You may need to upload your presentations made in Microsoft PowerPoint to Google Drive.
So, how to upload a PowerPoint to Google Drive? Open the target folder and click the New button. Then, select File Upload and browse for your PowerPoint file. Select the desired file and click Open. Your PowerPoint will be uploaded to Google Drive.
Let me show you the detailed steps of the uploading process and how you can collaborate with others.
Why Do You Need to Upload a PowerPoint to Google Drive?
Uploading a PowerPoint to Google Drive has several benefits. Here are a few of them.
- After uploading the PowerPoint file, you can access it from anywhere. For example, you can make a presentation at home and open it on the office PC after uploading it to Google Drive.
- You can share your presentations with others through Google Drive. So others can collaborate on the presentation in real-time. You can even edit the presentation on other devices.
- The risk of losing your important presentations gets reduced. Even if your physical storage devices get corrupted or damaged, your presentation will be secure on the cloud storage.
How to Upload a PowerPoint to Google Drive?
Here are the detailed steps that will take you through the uploading process. Follow these steps carefully.
Step 1: Go to Google Drive
Type drive.google.com in your browser and hit Enter . It will take you to your Google Drive homepage. You can directly upload the PowerPoint to the homepage or choose a folder to upload the file. In this case, I have chosen the Test Folder to upload my presentation.

Step 2: Click New Button
At the top left corner of the screen and under the Drive logo, you will see the New button with a ‘+’ icon. Click this button.

Step 3: Select Upload Type
You have the option to upload a file or folder to the target folder. If you want to upload only one PowerPoint file, choose the File upload option. But if you have multiple .pptx files in one folder and you want to upload them all, choose Folder Upload . I am choosing File Upload because I want to upload just one file.

Step 4: Select the Desired PowerPoint File
Now, browse your storage and choose the PowerPoint File you want to upload. I have selected the Test Slide.pptx file. Then, click the Open button to start uploading the file.

It will take a few seconds to upload the file. Once the file upload is complete, you will see the file inside the target folder. That’s it. You have successfully uploaded a PowerPoint to Google Drive.

How to Open a PowerPoint on Google Drive?
Once you have uploaded the PowerPoint to Google Drive, you can open and edit it from there. Check the steps below.
Step 1: Open with Google Slides
Go to the folder where you uploaded the file. Click the menu icon beside the file name. It looks like three vertical dots . Hover your mouse over the Open with option. From the sub-menu, select Google Slides to open the file.

Alternatively, you can double-click on the file to open it. The file will now open in Google Slides. You can make any edits here, and all changes will be saved to the Drive.

How to Share a PowerPoint on Google Drive?
As you have uploaded the PowerPoint file to your personal drive, only you can access the file. If you want others to view or edit the file, you need to follow the steps below.
Step 1: Change the Access Settings
To do this, you need to go to your Drive and open the target folder. As you can see, I have opened the Test Folder, and the Test Slide is present inside the folder. Click on the file to select it. Then, click the Manage Access button in the right column.
Step 2: Permit Access
A new dialog box will show up. You will see your name as the owner of this file. Under General Access , you will see Restricted , which means no one else can access the file.
Click the drop-down arrow and choose Anyone with the link from the list. This will make the file accessible to anyone who has the shared link.

Step 3: Select the Role
Once you have changed the access option, you will see the role drop-down menu at the right. It has three options: Viewer, Commenter, and Editor . If you choose the Viewer role, other users will only be able to see the file.
The Commenter role allows them to comment on the file. The Editor role gives other users full access to the file with editing permission. If you want someone to collaborate with you, choose the Editor role.
Step 4: Copy the Sharing Link
After giving access and choosing the role, click the Copy link button at the bottom left corner. Finally, click Done to complete the process. Now, you can share the link with users who you want to access the file. They can open and edit the file by clicking the link you shared.

Alternative Sharing Method for the Uploaded PowerPoint
Instead of mass sharing, you can allow specific users to access the PowerPoint you uploaded to Google Drive. Here is how you do it.
Step 1: Add User Email
Like the previous method, you need to select the file and click on Manage access to open the Share dialog box. At the top, you will see a text box. Write the email address of the user you want to share the file with.

Step 2: Send a Sharing Notification
Beside the user email, you will see the role drop-down menu . Choose the role if you want. Tick the Notify People checkbox so that they get an email notification. You can also add a custom message to the email notification by writing something in the Message box. Finally, click the Send button to share the file.

Sharing your PowerPoint files with others is essential, especially in the current corporate environment around the globe. If you know how to upload a PowerPoint to Google Drive, you can instantly upload your Microsoft PowerPoint presentations. Then, you can collaborate with others on that file.
I showed the simplest steps of uploading your .pptx files to Google Drive and sharing those files with other users. This guide should help you a lot in real-time collaboration.
Leave a Reply Cancel reply
Your email address will not be published. Required fields are marked *
Save my name, email, and website in this browser for the next time I comment.

- Login / Register
Username or email address *
Password *
Lost your password? Remember me
No account yet?
- Help Center
- Google Docs Editors
- Privacy Policy
- Terms of Service
- Submit feedback
Switch from Microsoft PowerPoint to Google Slides
Learn the differences between Microsoft PowerPoint and Google Slides and get best practices for collaboration at work or school.
On this page
Comparison at a glance, related topics, what you'll need.
Get Slides: slides.google.com | Android app | iOS app Note : The instructions in this guide are primarily web only. Get switching information for mobile devices .
Expand all | Collapse all
| In PowerPoint... | In Slides...* |
|---|---|
| Share your presentation using SharePoint or OneDrive | , , , , or . . . . . |
| Collaborate in real-time in SharePoint or OneDrive | . |
| Access version history in SharePoint or OneDrive | , open your file. . . . |
| Open a PowerPoint presentation | , double-click a PowerPoint file. A preview of your file opens. .Any changes you make are saved to the original Microsoft Office file. . |
| Access a presentation offline in OneDrive | . , click Settings . section, check the box. . . To learn how to access files offline from your desktop or mobile, see . |
| Save a presentation automatically in SharePoint or OneDrive or turn on AutoRecover | . |
| Add images to your presentation | and choose an image from Google Drive, Google Photos, the web, and more. For more details, see . |
| Add an Excel chart to your presentation | or . . . . . |
* Note : The instructions in this guide are primarily web only. Get switching information for mobile devices .
To set up Slides, or get troubleshooting help, try these guides instead:
- Get started with Slides
- Get help with Slides
Want advanced Google Workspace features for your business?
Try Google Workspace today!
Google, Google Workspace, and related marks and logos are trademarks of Google LLC. All other company and product names are trademarks of the companies with which they are associated.
Need more help?
Try these next steps:.
Using Google products, like Google Docs, at work or school? Try powerful tips, tutorials, and templates. Learn to work on Office files without installing Office, create dynamic project plans and team calendars, auto-organize your inbox, and more.
How-To Geek
How to collaborate on a microsoft powerpoint presentation.

Your changes have been saved
Email is sent
Email has already been sent
Please verify your email address.
You’ve reached your account maximum for followed topics.
Microsoft Office vs. Google Docs, Sheets, Slides: Which Is Best?
Verizon goes after t-mobile customers with $15/month unlimited data, 8 useful pcie cards to put in your secondary pcie slot, quick links, sharing a presentation, collaborating on a presentation.
PowerPoint has some useful features that allow others to make edits or leave feedback on your presentations. You can even coauthor a presentation in real time if you have a Microsoft 365 (formerly Office 365) subscription. Here’s how to collaborate with others in PowerPoint.
Before others can work on a presentation with you, you have to share it with them . To do so, open the presentation you want to share, and then click "Share" in the top-right corner.

Related: How to Share Things from OneDrive
A banner will appear in front of your presentation. The first thing to note is the "Share" section. Here, you’ll see the two methods for sharing the presentation, and anyone with whom you've already shared it.

With the "Invite People" method of sharing, you can do the following:
- Type the email addresses of those with whom you’d like to collaborate.
- Leave a note for the recipients.
- Assign Read and Write or Read-Only permissions.
- As an extra layer of security, select whether you want recipients to have a Microsoft account .
- Share your presentation.

If you choose the "Get a Link" option instead, assign Read/Write or Read-Only permissions to whoever receives the link, and then click "Create Link."

Your link will appear.

Once your link has been created, you can share it with whoever you want to collaborate with on your presentation. Keep in mind that anyone who has this link can access your presentation with the privileges you’ve assigned, so be careful who you share it with.
Once you’ve shared your presentation, it’s time to start collaborating. There are several useful tools that make collaboration more efficient. We'll go over them below, so be sure to take full advantage of them.
Who’s Working Where?
PowerPoint shows you who is currently viewing or editing a presentation, as well as which part of it they're working on. When someone's working on a presentation with you, you'll see a thumbnail with that person's name in the top-right corner.
Click the thumbnail to see who it is and which slide he or she is editing. If you want to go to that slide, click "Go to Location."

You'll see the section of the slide on which the other person is working.

You can also see where the other person is at any time in the slide thumbnail view on the left.

Related: How to Collaborate on Documents in Real-Time in Office 2016
Leave Comments for Others
You can also leave comments for the other people you're collaborating with to read at their convenience. To leave a comment, highlight text or an object, and then click "New Comment" in the menu that appears.

Type your comment in the text box, and then click the Arrow icon to leave it.

The next time this person is working on the presentation, she'll see a Message Bubble icon on the slide that contains the comment.

To read a comment, click "Comments" in the top-right corner.

To reply to a comment, just type your response in the text box, and then click the Arrow icon.

Premium Features
PowerPoint also has a few premium features available for collaborators. One of these is real-time chat. Just click the thumbnail of the person you want to chat with, and then select "Chat" from the menu that appears.
This isn't a good replacement for comments, though. No one else can see your chat, and it's deleted as soon as you close the file.
Related: How to Get Microsoft Office for Free
Another neat premium feature is version history. PowerPoint 365 stores every version of your slideshow. This means you can go back and view, restore, and/or download older versions it.
To access this feature, click "File," click "Info" in the pane that appears, and then choose "Previous Versions." This option will be grayed out if you aren't a premium subscriber, though.

Overall, good collaboration on any project boils down to communication. PowerPoint makes this easy for both normal and premium subscribers, although some methods are more streamlined than others.
- Microsoft Office
- Microsoft PowerPoint
- Add, change, hide, or delete comments in a presentation Article
- Share your PowerPoint presentation with others Article
- Save a presentation as a video Article
- Inspect a presentation Article
- Save PowerPoint presentations as PDF files Article

Share your PowerPoint presentation with others

Select Share .
If your presentation isn't already stored on OneDrive, select where to save your presentation to the cloud.
Choose a permission level, like Anyone with a link , or maybe just people in your company. You can also control if people can edit or just view the doc.
Select Apply .
Enter names and a message.
Select Send .
You can also copy the link and then paste it in an email, social media post, or even a text message.
For info on collaborating with others on a document, see Work together on PowerPoint presentations .
To stop sharing, see Stop sharing OneDrive files or folders or change permissions.
Share by using a traditional email attachment:
If you don't want to share a document with others to collaborate on, simply use a traditional email attachment to send the presentation to others.
From OneDrive for Business or SharePoint, share a PDF or copy of a presentation by email
This feature is only available if you have a Microsoft 365 subscription . If you are a Microsoft 365 subscriber, make sure you have the latest version of Office .
To send your presentation as a copy or a PDF, select Share .

Select Attach a Copy Instead in the Share dialog box.

Select either PowerPoint Presentation or PDF .

PowerPoint will open the email application and attach the file to a new message. Enter the recipients details and a short message, and click Send .
From OneDrive, share a PDF or copy of your presentation by email

Select Send as attachment in the Share pane.

Select either Send a copy or Send a PDF .

PowerPoint will open the email application and attach the file to a new message. Enter the recipients details and a short message, and click Send .
You can share or co-author a presentation in PowerPoint for macOS. If you allow others to edit your presentation, changes they make will be merged into the original presentation. If you want to share your presentation, you can:
Invite people to view or edit the file located in the cloud, like your OneDrive.
Send a link to your file saved to the cloud.
Send a copy of the file as an email attachment.
Note: If you're looking for information about saving a presentation in JPEG or PDF format, see File formats supported in PowerPoint .
Invite people to view or edit your presentation
Save your file to the cloud and then invite people to view or edit it. That way, whenever you update your file, everyone you share with will have the latest version.
In the upper right corner, click the Share icon and then click Invite People .

If the file is on your device, you'll be asked to upload the file to the cloud first.

Invite users by adding their email addresses to the invite field. When adding names for the first time, PowerPoint will prompt to access your Contacts.
To allow your users to edit the file, click the Can Edit check box. Add any comments in the comments field and click Share .

The recipients receive an email with a link to the shared file.
Share a link to your presentation
You can copy the link to your presentation and paste it in another shared file or email to the recipients.
In the upper right corner, click the Share icon and then click Copy Link .

Paste the link wherever you need.
Send your presentation as an email attachment
If you don't want to save your file to the cloud, you can share it as an email attachment.
In the upper right corner, click the Share icon and then click Send Attachment .

Click Presentation or PDF .

PowerPoint will open your email application and attach your file to a new message. Just fill in the details, like email addresses and a short message, and click Send .
Share and co-author a presentation in PowerPoint for Mac
File formats supported in PowerPoint

Need more help?
Want more options.
Explore subscription benefits, browse training courses, learn how to secure your device, and more.

Microsoft 365 subscription benefits

Microsoft 365 training

Microsoft security

Accessibility center
Communities help you ask and answer questions, give feedback, and hear from experts with rich knowledge.

Ask the Microsoft Community

Microsoft Tech Community

Windows Insiders
Microsoft 365 Insiders
Was this information helpful?
Thank you for your feedback.
COMMENTS
There are a few simple ways to upload and share PowerPoint files on Google Drive. 1. Upload the PowerPoint File to Google Drive. The first step is to upload your PowerPoint presentation to your Google Drive account: Go to drive.google.com and log into your Google account. Click on the New button and select File Upload.
Below are steps on how to share a PowerPoint on Google Drive to obtain a link that can be sent to others: Step 1: Goto Google Drive. Google drive page. Step 2: Locate and right-click on the "Presentation" you want to share. find presentation. Step 3: Select and click on Share. file share selection.
How To Share a PowerPoint in Google Docs - Quick Steps. Open Google Drive. Upload Presentation. Open with Google Slides. Click Share Button. Enter Email Address >> Click Share. Google Docs is known as an online word processor used to create and edit documents, files, drawings, and many other things. It is a part of Google Docs Office Suite ...
Video teaches how to share a ppt. file - Power Point presentation on Google drive and then to others. ... Power Point presentation on Google drive and then to others.
1. "Share Your Powerpoint on Google Drive in 4 Easy Steps". Step 1: Add Google Drive to Your PowerPoint. Go to the 'Insert' tab within PowerPoint and click the 'Store' button. In the Office Add-ins window, type in 'Google Drive' and click the 'Add' button. Step 2: Sign In to Your Account.
On a computer, go to Google Drive, Docs, Sheets, Slides, or Vids. Click the file you want to share. Click Share . Share multiple files. On a computer, go to drive.google.com. On your keyboard, hold Shift and select two or more files. At the top right, click Share . Learn how to add files to a folder and share the entire folder.
This video will take you through the steps to learn how to share a PPT using Google Drive
Step 2: Edit and format a presentation. You can add, edit or format text, images or videos in a presentation. Insert and arrange text, shapes and lines; Add, delete and organise slides; Add animations to a slide; Step 3: Share and work with others. You can share files and folders with people and choose whether they can view, edit or comment on ...
To share a link: Locate and select the file you want to share, then click the Share button. A dialog box will appear. Click Get shareable link. A link to the file will be copied to your web clipboard. You can then paste the link in an email message or on the Web to share the file. When you're finished, click Done.
Remove a link to a presentation you own. Find the file or folder in Google Drive, Google Docs, Google Sheets, or Google Slides. Open or select the file or folder. Click Share or Share Copy link . Under "General access", click the Down arrow . Select Restricted.
Learn how to share a Google Slide presentation with others.
To share a PowerPoint presentation via OneDrive: - Click the Share button in the top right corner. - Sign in with your Microsoft account if prompted. - Choose whether you want to share for editing or view-only. - Generate the link and copy it for sharing.
Email as attachment. Before we get to that, you need to know where to find the Share function in Google Slides. Open Google Slides and click File, in the top bar. Click Share at the top of the drop-down menu. Or, click Share at the top right-hand side of your window. 1.
To view a PowerPoint presentation on Google Slides, you must first upload the file to your Google Drive. Open Google Drive, click "New," and then click "File Upload" to get started. Related: How to Insert Symbols into Google Docs and Slides. Navigate to your file (s) and then click "Open.". Alternatively, you can drag and drop a ...
Open Google Drive and sign in to your Google Drive account. Navigate to the folder where you want to store your PowerPoint presentation. Locate your PowerPoint file on your computer and drag and drop the file to the surface of Google Drive, where it says, "Drop files here". You will now see a message in the lower right where it says ...
First, open the PowerPoint presentation that you'd like to share. At the top-right corner of the window, you'll see a "Share" button. Go ahead and select it. Once selected, the "Share" window will appear. You have a few different options here. In the "Attach a copy instead" group, you can choose to send your presentation as a ...
Locate and select your PowerPoint file, then click "Open." After the file uploads to Google Drive, right-click it and choose Open With > Google Slides. The presentation will open in Google Slides but remain a PowerPoint file as you can see next to the name on the top left. Click File > Save as Google Slides from the menu to convert it.
Step 1: Open with Google Slides. Go to the folder where you uploaded the file. Click the menu icon beside the file name. It looks like three vertical dots. Hover your mouse over the Open with option. From the sub-menu, select Google Slides to open the file. Alternatively, you can double-click on the file to open it.
On your computer, open a document or presentation in Google Docs or Google Slides. Click Insert Chart From Sheets. Click the spreadsheet with the chart you want to add, then click Select. Click the chart you want to add. If you don't want the chart linked to the spreadsheet, uncheck "Link to spreadsheet."
Try it! Share your PowerPoint presentation by saving it to the cloud and sending it to others. Select Share. Select where to save your presentation to the cloud. Choose a permission level. Select Apply. Enter names and a message.
Share and collaborate with PowerPoint. Share your presentation. Select Share on the ribbon. Enter the names or email addresses of the people you want to share with. Or select the drop-down to change permissions. Allow editing is checked by default. To change permission to view only, uncheck this box and select Apply.
The first thing to note is the "Share" section. Here, you'll see the two methods for sharing the presentation, and anyone with whom you've already shared it. With the "Invite People" method of sharing, you can do the following: Type the email addresses of those with whom you'd like to collaborate. Leave a note for the recipients.
Share your PowerPoint presentation with others. Windows macOS. Select Share. If your presentation isn't already stored on OneDrive, select where to save your presentation to the cloud. Choose a permission level, like Anyone with a link, or maybe just people in your company. You can also control if people can edit or just view the doc.